Set up a distribution path between OCI GoldenGate deployments in different regions with VCN peering
Learn to set up and configure Oracle Cloud Infrastructure GoldenGate and Virtual Cloud Network (VCN) peering to create a distribution path between two OCI GoldenGate deployments located in two different regions.
Overview
You can create a distributed heterogeneous and multicloud data fabric using interconnected Oracle Cloud Infrastructure (OCI) GoldenGate deployments. This example demonstrates how to create a distribution path between OCI GoldenGate deployments located in Phoenix (Region A) and Frankfurt (Region B).
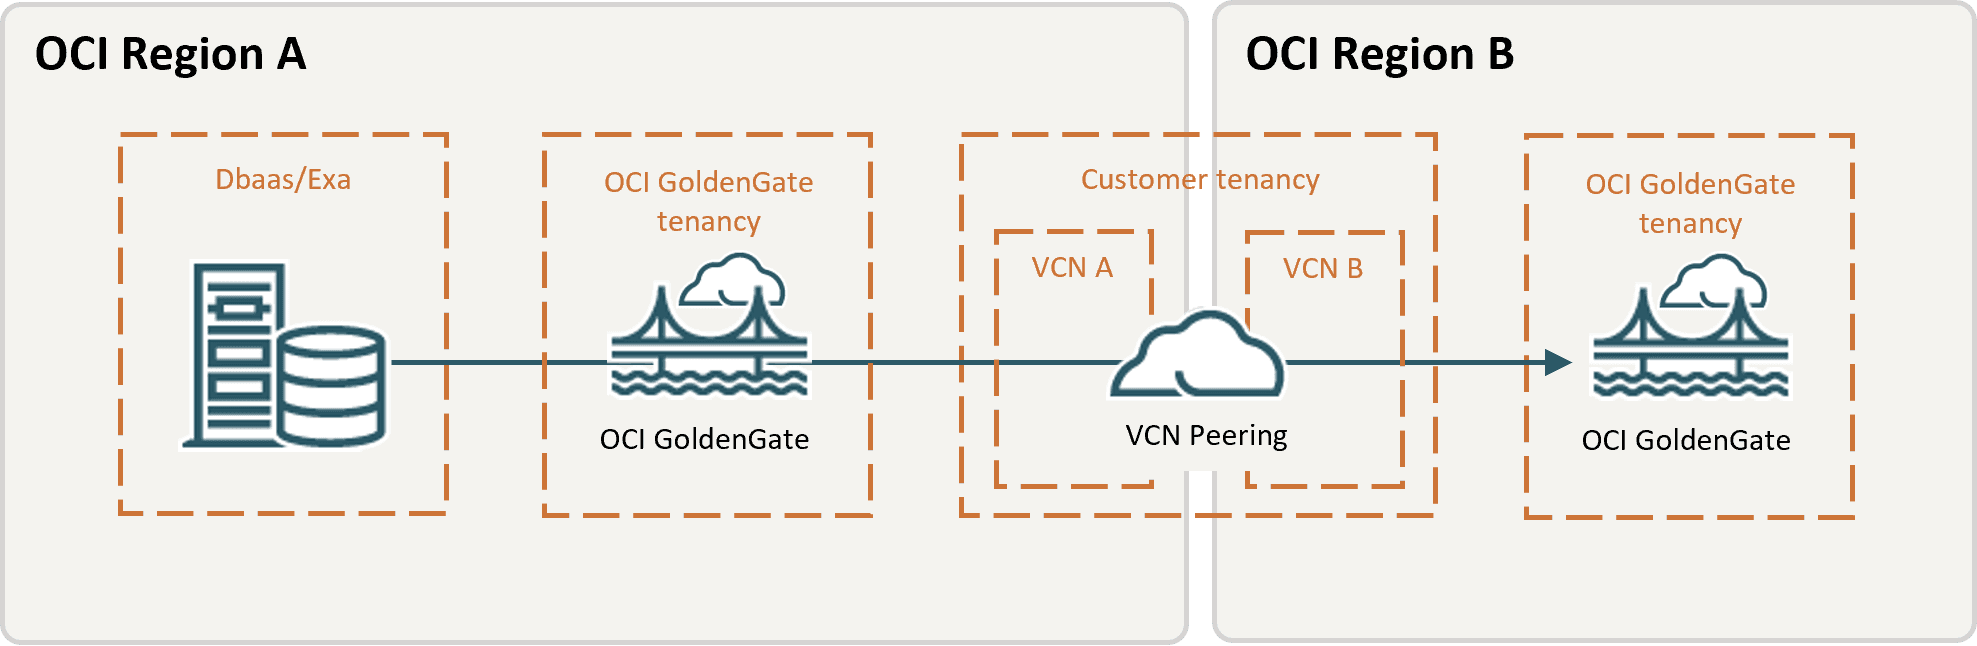
Description of the illustration vcn-peering-diff-regions.png
Before you begin
To successfully complete this quickstart, you must have:
-
An existing OCI GoldenGate deployment in one region (Region A) with an Extract defined
-
An existing OCI GoldenGate deployment in a different region (Region B)
-
Both should only allow private network connectivity
-
An existing Dynamic Routing Gateway (DRG)
Task 1: Configure networking
-
In Region A, follow the steps to create a VCN:
-
From the Oracle Cloud console navigation menu, select Networking, and then select Virtual cloud networks.
-
Confirm the compartment selection, or change compartments.
-
Select Create VCN.
-
In the Create VCN panel, complete the following fields, and then select Create VCN:
-
Name: Enter a name
-
Create in Compartment: Leave as is
-
IPv4 CIDR Blocks:
-
Public (
10.0.0.0/24) -
Private (
10.0.1.0/24)
-
-
-
On the VCN A Details page, select Gateways, and then select Create DRG Attachment.
-
on the Create DRG Attachment page, enter a Name for the DRG, select a DRG Location, and then select Create DRG Attachment.
-
In the Dynamic Routing Gateway Attachments list, select the DRG you created.
-
On the DRG Details page, select Attachments.
-
Under Remote peering connection attachments, and then select Create remote peering connection.
-
In the Create Remote Peering Connection panel, enter a name, leave the default settings as is, and then select Create remote peering connection. An RPC attachment is automatically added to the DRG and its peering status set to New (not peered).
-
In the Remote peering connections attachments list, select the RPC you created.
-
On the RPC Details page, for OCID, select Copy.
Note: You can temporarily paste the OCID to a text editor for later use.
-
-
Repeat the previous step in Region B to create a VCN (VCN B) with two regional subnets and DRG:
-
Public (
192.168.0.0/24) -
Private (
192.168.1.0/24)
-
-
On Region B's RPC Details page, select the RPC name, and then select Establish Connection.
-
On VCN A's Details page, select Security, and then select security list for private subnet-<VCN Name>.
-
Select Add Ingress Rules.
-
In the Add Ingress Rules dialog, complete the following fields, and then select Add Ingress Rules:
-
Source Type: CIDR
-
Source CIDR:
192.168.1.0/24 -
IP Protocol: TCP
-
Source Port Range: All
-
Destination Port Range:
443Note:
443is the default port to access OCI GoldenGate deployments.
-
-
Similarly add Ingress Rules to allow the DNS Resolver in both regions to communicate with each other:
-
192.168.0.0/16 UDP All 53 -
192.168.0.0/16 TCP All 53
-
-
On VCN A's Details page, select Routing, and then select route table for private subnet-<VCN Name>.
-
Select Add Route Rules.
-
In the Add Route Rules panel, complete the following fields, and then select Add Route Rules:
-
Target Type: Dynamic Routing Gateway
-
Destination CIDR Block:
192.168.1.0/24
-
-
On VCN B's Details page, select Security, and then select security list for private subnet-<VCN Name>.
-
Select Add Ingress Rules.
-
In the Add Ingress Rules dialog, complete the following fields and then select Add Ingress Rules:
-
Source Type: CIDR
-
Source CIDR:
10.0.1.0/24 -
IP Protocol: TCP
-
Source Port Range: All
-
Destination Port Range:
443Note:
443is the default port to access OCI GoldenGate deployments.
-
-
Similarly, add Ingress Rules to allow the DNS Resolver in both regions to communicate with each other:
-
10.0.0.0/16 UDP All 53 -
10.0.0.0/16 TCP All 53
-
-
On VCN B's Details page, under Resources, select Route Tables, and then select route table for private subnet-<VCN Name>.
-
Select Add Route Rules.
-
In the Add Route Rules panel, complete the following fields, and then select Add Route Rules:
-
Target Type: Dynamic Routing Gateway
-
Destination CIDR Block:
10.0.1.0/24
-
Task 2: Configure DNS Peering
-
Create a Listening and a Forwarding endpoint in VCN A:
-
From the Oracle Cloud console navigation menu, select Networking, and then select Virtual Cloud Networks.
-
From the list of Virtual Cloud Networks, select VCN A.
-
In VCN A, under VCN Information, select the DNS Resolver.
-
Under Resources, select Endpoints then select Create endpoint to create a Listening and a Forwarding endpoint.
-
In the Create endpoint panel, enter a Name.
-
For Choose a subnet, select VCN A Private subnet from the dropdown.
-
For Endpoint type, select Listening.
-
Select Create endpoint.
-
Repeat the steps above to create the Forwarding endpoint.
Note: See Creating a Resolver Endpoint for more information.
-
-
-
Repeat step 1 to create a Listening and a Forwarding endpoint in VCN B.
-
Manage Rules for VCN A:
-
Go back to VCN A, select on DNS Resolver.
-
Under Resources, select Rules and then select Manage rules:
-
In the Manage rules panel, for Rule condition, select Domains from the dropdown.
-
For Domains, enter the DNS Domain Name for VCN B.
For example, if your target region (Region B) is Germany Central (Frankfurt), then your OCI GoldenGate domain name would be:
deployment.goldengate.eu-frankfurt-1.oci.oraclecloud.com -
For Source endpoint, select the DNS Resolver Forwarding Endpoint for VCN A from the dropdown.
-
For Destination IP address, enter the IP address of the DNS Resolver Listening Endpoint for VCN B.
-
Select Save changes.
Note: See Resolver Rules for more information about creating a resolver rule.
-
-
-
Manage Rules for VCN B:
-
Go back to VCN B, select on DNS Resolver.
-
Under Resources, select Rules and then select Manage rules:
-
In the Manage rules panel, for Rule condition, select Domains from the dropdown.
-
For Domains, enter the OCI GoldenGate Domain Name for VCN A.
For example, if your target region (Region A) is US West (Phoenix), then your OCI GoldenGate domain name would be:
deployment.goldengate.us-phoenix-1.oci.oraclecloud.com -
For Source endpoint, select the DNS Resolver Forwarding Endpoint for VCN B from the dropdown.
-
For Destination IP address, enter the IP address of the DNS Resolver Listening Endpoint for VCN A.
-
Select Save changes.
Note: See Resolver Rules for more information about creating a resolver rule.
-
-
Task 3: Create and assign connections
-
In Region A, create a GoldenGate Connection for the remote deployment in Region B.
Note:
Ensure that:
-
You select Dedicated endpoint for Traffic routing method.
-
The domain used by the FQDN provided in the connection string or wallet is being correctly forwarded to the appropriate DNS Resolver using its Rules. See Resolver Rules for more information.
-
-
Assign the connection to the deployment in Region A.
Task 4: Create a distribution path
-
In Region A, log into the OCI GoldenGate deployment console.
-
Add a Distribution Path using the Extract and Trail defined in this deployment.
-
Once the distribution path is active, log into the target deployment in Region B and verify the distribution path appears in Receiver Service.