Domo
Before You Begin
Introduction
This document describes how to configure Oracle Identity Cloud Service to provide Single Sign-On (SSO) and user provisioning for Domo.
About Domo
Domo specializes in business intelligence tools and data visualization such as BI, Finance, IT, Marketing, Operations, and Sales Services. Domo offers a Programmatic Revenue Solution that brings complex data from AD servers and sell-side platforms into a set of cards and dashboards built on practices in the AD tech industry.
After integrating Domo with Oracle Identity Cloud Service:
- Users can access Domo using their Oracle Identity Cloud Service login credentials.
- Users can launch Domo using the Oracle Identity Cloud Service My Apps console.
- Admins can assign and revoke user access to the Domo app using the Oracle Identity Cloud Service administration console.
What Do You Need?
- An Oracle Identity Cloud Service account with authorization rights to manage apps and users (Identity Domain Administrator or Application Administrator).
- A Domo account with authorization rights to configure federated authentication and user provisioning.
- Identity Provider metadata. You can use the following URL to access the metadata:
https://<IDCS-Service-Instance>.identity.oraclecloud.com/fed/v1/metadataand save the metadata in a text file. Use this file later to obtain the identity provider certificate in the "Obtaining the Identity Provider Certificate" section.
Prerequisite Step
A dedicated domain name is required before you can register and activate the Domo app. You obtain that domain name from Domo.
The Domo domain name appears in the login URL: https://<Domain_Name>.domo.com that you received in an email from Domo.
Obtaining the Identity Provider Certificate
Use this section to obtain the Identity Provider Certificate in a format that is suitable for Domo.
Use the following URL to access the identity provider metadata:
https://<IDCS-Service-Instance>.identity.oraclecloud.com/fed/v1/metadata.In the metadata file, locate the dsig:X509Certificate tags.
Copy the content between the dsig:X509Certificate tags into a text file. This content is the Oracle Identity Cloud Service signing certificate.
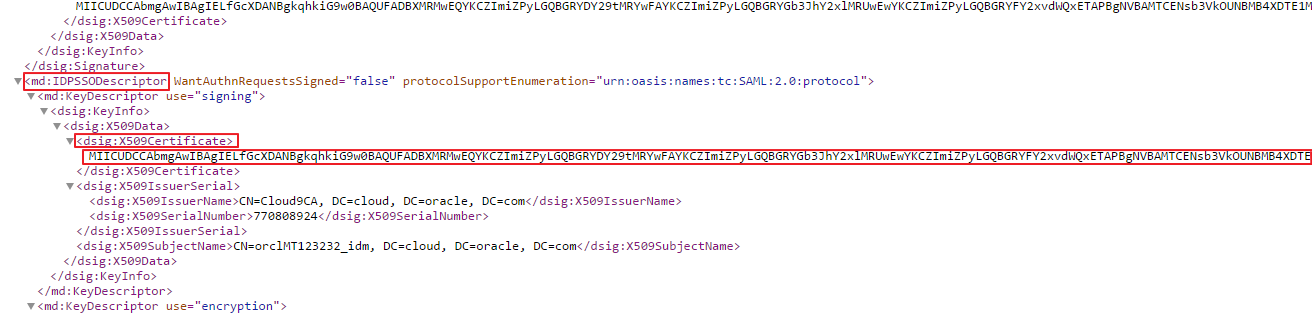
Add
-----BEGIN CERTIFICATE-----at the beginning of the content.Add
-----END CERTIFICATE-----at the end of the content.
Save the text file in .pem format. This is the identity provider certificate.
Tip: Use this certificate later during Domo configuration in the "Configuring SSO for Domo" section.
Configuring SSO for Domo
Access Domo as an administrator using the URL:
https://<Domain_Name>.domo.com/. The pop-up window appears on the Developer Home page.On the pop-up window, the user can either fill in the required details, and then click FINISH or ignore providing information by closing the pop-up window. The Developer Home page appears.
Click the grid icon in the upper-right corner, and then select ADMIN. The Admin Settings page appears.
In the left navigation menu, select Security, and then select Single Sign-On (SSO). The Single Sign‑On (SSO) page appears.
Click START SETUP. The Choose a setup process pop-up window appears.
Click Manual setup. The MANUAL SETUP tab appears on the Single Sign‑On (SSO) page.
Under the Information from your IdP section, use the table to update the federated authentication attributes.
Attribute Value Identity provider endpoint URL Enter the Sign-in URL/SSO Endpoint: https://<IDCS-Service-Instance>.identity.oraclecloud.com/fed/v1/idp/sso.Entity ID Enter https://<Domain_Name>.domo.com.Upload x.509 certificate to authenticate request Click the upload icon and upload the certificate that you obtained earlier in the "Obtaining the Identity Provider Certificate" section. In the upper-right corner of the Single Sign‑On (SSO) page, click SAVE CONFIG. The Save SSO Configuration? pop-up window appears.
Click SAVE ANYWAY. The SSO is enabled in the application.
Under the MANUAL SETUP tab, locate the Advanced settings section, and then clear the Mixed mode login check box. The Disable mixed mode login? pop-up window appears.
Click DISABLE.
Note: Disabling the Mixed mode login check box allows users to perform service provider initiated SSO and deactivates the ability to log in using email and password.
Obtaining the Client ID and Secret
In another tab, access the Domo developer account using the following URL:
https://developer.domo.com/. The DOMO HELP CENTER Developers sign in page appears.In the upper-right corner, click LOG IN.
Enter your Domo domain name in the text box, and then click Continue. The DOMO HELP CENTER Developers page appears.
Note: This is the domain name value that you obtained while performing the steps in the "Prerequisite Step" section.
In the upper-right corner, hover over My Account, and then select New Client. The Create new client section appears.
Enter your application Name and Description in the respective text boxes.
Under the Application Scope section, select the Data and User check boxes to provide access for user provisioning from the application, and then click CREATE. The Manage Clients page appears.
Make note of the Client ID and Secret values.
Tip: Use this Client ID and Secret value while enabling user provisioning for the Domo app in Oracle Identity Cloud Service. See the "Enabling Provisioning" section.
Configuring Domo in Oracle Identity Cloud Service
Use this section to register and activate Domo, and to enable provisioning and synchronization for Domo.
Registering and Activating the Domo App
Access the Oracle Identity Cloud Service administration console, select Applications, and then click Add.
Click App Catalog.
Search for
Domo, and then click Add.In the App Details section, enter your Domo Domain Name, and then click Next.
Note: This is the domain name value that you obtained while performing the steps in the "Prerequisite Step" section.
Click Next to enable provisioning and synchronization for Domo. Oracle Identity Cloud Service displays the Provisioning page.
Enabling Provisioning and Synchronization for Domo
Use this section to enable provisioning and synchronization for managing user accounts in Domo through Oracle Identity Cloud Service.
Enabling Provisioning
On the Provisioning page, select Enable Provisioning.
Under the Configure Connectivity section, enter the Client ID and Client Secret.
Note: These are the Client ID and Secret values that you obtained while performing the steps in the "Obtaining the Client ID and Secret" section.
Click Test Connectivity. A success message is displayed stating that the connection is successful.
To view predefined attribute mappings between the user account fields defined in Domo and the corresponding fields defined in Oracle Identity Cloud Service, click Attribute Mapping, and then click OK.
Note: To add a new attribute for provisioning, click Add Row, specify the attributes in the User and Domo Account columns, and then click OK. For example, if you want to add the External ID field, enter
$(user.externalId)in the User column, and then select the corresponding field from the drop-down list in the Domo Account column.Specify the provisioning operations that you want to enable for Domo:
Note: By default, the Create Account, Update Account, and Delete Account check boxes are selected.
Create Account: Automatically creates a Domo account when Domo access is granted to the corresponding user in Oracle Identity Cloud Service.
Update Account: Automatically updates a Domo account when the corresponding user account is edited in Oracle Identity Cloud Service.
Delete Account: Automatically removes an account from Domo when Domo access is revoked from the corresponding user in Oracle Identity Cloud Service.
Note: Users can be provisioned to Domo only if they have the same domain as one of the authorized domains. To check the authorized domains, in the upper right corner of the Developer Home page in Domo, click the grid icon and then select ADMIN. The Admin Settings page appears. In the left navigation menu, click Security, and then click Authorized domains.
Enabling Synchronization
On the Provisioning page, select Enable Synchronization.
From the User Identifier drop-down list, select the Oracle Identity Cloud Service user attribute that you want to match with the corresponding record fetched from Domo:
Note: By default, the Primary Email Address option is selected from the drop-down list. It is recommended to leave this default attribute for accurate synchronization of user records.
Primary Email Address: Primary email address of the Oracle Identity Cloud Service user.
User Name: User name of the Oracle Identity Cloud Service user.
To match a Domo account attribute with the existing Oracle Identity Cloud Service user, select an attribute from the Application Identifier drop-down list.
Note: By default, the Email option is selected that represents the Email attribute of the Domo account. It is recommended not to change this default option.
From the When exact match is found drop-down list, select one of the following actions to be performed when a matching Oracle Identity Cloud Service user is found for an account:
Link and confirm: Automatically links and confirms the matched account to the corresponding Oracle Identity Cloud Service users based on the defined User Identifier and Application Identifier fields.
Link but do not confirm: Automatically links all the matched accounts to the corresponding Oracle Identity Cloud Service users based on the defined User Identifier and Application Identifier fields. You need to manually confirm the linked accounts.
In the Max. number of creates field, enter a number that is greater than or equal to 10. This value limits the number of accounts to be created during the synchronization run.
In the Max. number of deletes field, enter a number that is greater than or equal to 10. This value limits the number of accounts to be deleted during the synchronization run.
After enabling provisioning and synchronization for Domo, you can synchronize the existing account details from Domo and link them to the corresponding Oracle Identity Cloud Service users. For more information on performing synchronization tasks, see the Importing User Accounts from a Software as a Service Application section in Administering Oracle Identity Cloud Service.
You can also manage Domo accounts through Oracle Identity Cloud Service. For more information on performing provisioning tasks, see the Managing Oracle Identity Cloud Service Users and Managing Oracle Identity Cloud Service Groups sections in Administering Oracle Identity Cloud Service.
Click Finish, and Activate, and then click Activate Application. Oracle Identity Cloud Service displays a confirmation message.
Verifying the Integration
Use this section to verify that SSO works when initiated from Oracle Identity Cloud Service (IdP initiated SSO) and Domo (SP initiated SSO).
Verifying Identity Provider Initiated SSO from Oracle Identity Cloud Service
Access the Oracle Identity Cloud Service My Profile console using the URL:
https://<IDCS-Service-Instance>.identity.oraclecloud.com/ui/v1/myconsole.Log in using credentials for a user that is assigned to the Domo app. Oracle Identity Cloud Service displays a shortcut to Domo under My Apps.
Click Domo. The Developer Home page appears.
Note: When the user accesses Domo for the first time, the Welcome to Domo! pop-up window appears. Click Continue on the pop-up window, and then either click Skip Tour or close the pop-up window. The Developer Home page appears.
In the upper-right corner of the header menu, click the user icon and then confirm that the user that is logged in is the same for both Domo and Oracle Identity Cloud Service.
This confirms that SSO that is initiated from Oracle Identity Cloud Service works.
Verifying Service Provider Initiated SSO from Domo
Access Domo using the URL:
https://<Domain_Name>.domo.com/. The Domo sign in page appears.Click SIGN IN. You are redirected to the Oracle Identity Cloud Service login page.
Log in using credentials for a user that is assigned to the Domo app. The pop-up window appears on the Developer Home page.
On the pop-up window, the user can either fill in the required details, and then click FINISH or ignore providing information by closing the pop-up window.
Note: When the user accesses Domo for the first time, the Welcome to Domo! pop-up window appears. Click Continue on the pop-up window, and then either click Skip Tour or close the pop-up window. The Developer Home page appears.
In the upper-right corner of the header menu, click the user icon and then confirm that the user that is logged in is the same for both Domo and Oracle Identity Cloud Service.
This confirms that SSO that is initiated from Domo works.
Troubleshooting
Use this section to locate solutions to common integration issues.
Known Issues
Unknown Issues
For unknown issues, contact Oracle Support:
Go to https://support.oracle.com.
Select Cloud Support, and then sign in with your support credentials.
In the Cloud Dashboard, confirm that there are no planned outages in Oracle Identity Cloud Service, and then click Create Service Request.
Select Oracle Identity Cloud Service as the service type.
Complete your service request.