Identity Cloud Service Generic Scripting Connector
Before You Begin
Introduction
This document describes how to configure Oracle Identity Cloud Service to provide user provisioning and other connector operations using Identity Cloud Service Generic Scripting Connector.
About the Generic Scripting Connector
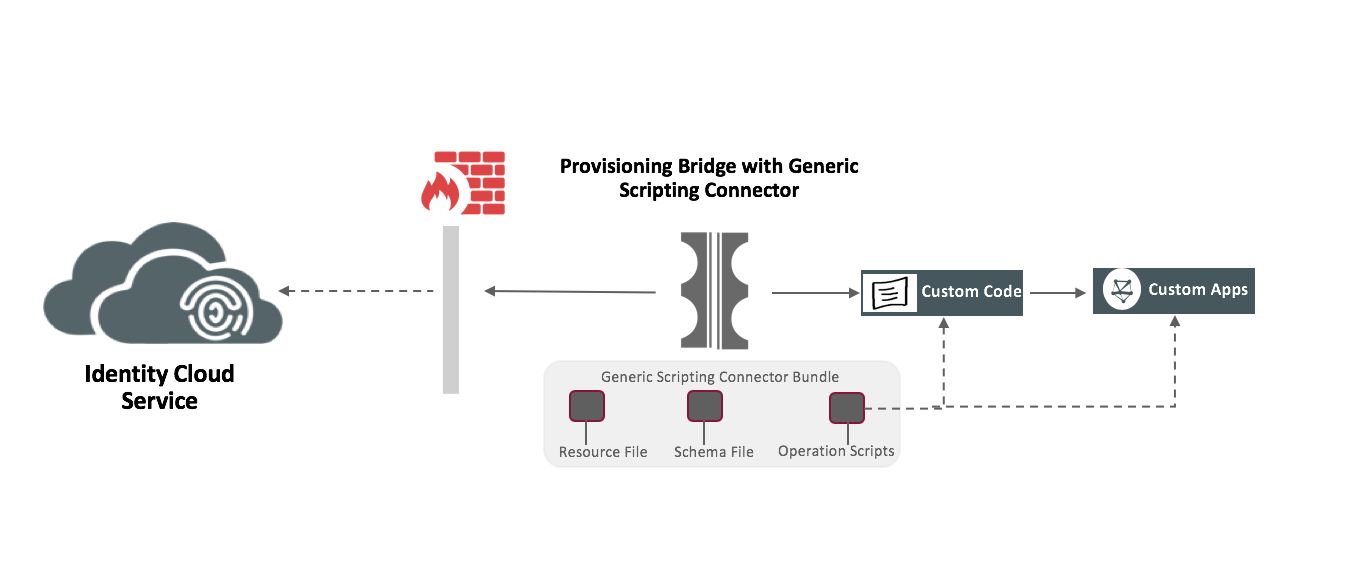
Use Generic Scripting Connector to integrate Oracle Identity Cloud Service with target systems. This connector enables you to perform connector operations between Oracle Identity Cloud Service and your target system by providing your own scripts. The connector generates a custom connector and the required metadata based on the target system schema you initially define. Subsequently, the generated connector will invoke your custom scripts to perform the actual connector operations.
You can develop your custom scripts using scripting languages like Groovy. This connector guide includes a few sample scripts that you can modify to suit your requirements and perform connector operations.
Use Case Scenario
Generic Scripting Connector integration can connect to multiple targets. The following are some of the advantages of using Generic Scripting Connector:
- Enables you to easily integrate numerous target systems with Oracle Identity Cloud Service that do not have predefined connectors.
- Provides platform independence for the target system. This integration can be used with target systems that belong to enterprise, mobile, cloud, or social environments.
- Provides flexibility to define custom rules and business logic that can be dynamically modified at run time for complex applications.
- Reduces time and effort required to develop, deploy, and test custom ICF connectors for multiple target systems in your environment to connect with Oracle Identity Cloud Service with the help of the Provisioning bridge.
Architecture Diagram
Prerequisites
- An Oracle Identity Cloud Service account as an Identity Domain Administrator, Security Administrator, or Application Administrator so that you can manage users and applications.
Install and configure a Provisioning Bridge in Oracle Identity Cloud Service.
This bridge provides a link between Oracle Identity Cloud Service and the target application. Oracle Identity Cloud Service can synchronize with the target system so that any new, updated, or deleted user or group records (to be removed) are transferred into Oracle Identity Cloud Service. Each minute, the bridge polls the target system for any changes to these records and brings these changes into Oracle Identity Cloud Service.
So, if a user is deleted in the target system, then this change is propagated to Oracle Identity Cloud Service. Because of this synchronization, the state of each record is synchronized between the target system and Oracle Identity Cloud Service.
After users are synchronized from the target system to Oracle Identity Cloud Service, if you use Oracle Identity Cloud Service to:- update a user's attribute,
- provision the user with additional groups,
- revoke the user, or
- revoke the access that the user has with the target system,
then these changes are propagated to the target system through the Provisioning Bridge. See Manage Provisioning Bridges for Oracle Identity Cloud Service.
Use the App Catalog to add Generic Scripting Connector Application to Oracle Identity Cloud Service. The Provisioning Bridge uses this app to synchronize, import, and provision users between the target system and Oracle Identity Cloud Service. See Add an App Catalog Application in Administering Oracle Identity Cloud Service.
The target System Details. For example, a database with below schema. Tables: USERINFO, USERGROUPS, GROUPS.
Include the third-party libraries required for connecting to target applications. Follow these steps to include third party libraries in Generic Script Connector.
- Stop the Bridge and make a backup of
org.identityconnectors.genericscript-1.0.jarfromBRIDGE_HOME/bundle_home. - Create a folder
genericscript/libunderthirdparty-lib(underBRIDGE_HOME). - Copy the required libraries to the directory created in Step 2.
Run below command from
BRIDGE_HOME.On a Linux Machine:
sh updateJar.sh org.identityconnectors.genericscript-1.0.jar ./thirdparty-lib/genericscriptOn a Windows Machine:
updateBundleJarWithThirdPartyLib.bat org.identityconnectors.genericscript-1.0.jar D:\devBridge\thirdparty-lib\genericscriptStart the Bridge.
- Stop the Bridge and make a backup of
Create an Application in Oracle Identity Cloud Service
Create an application in Oracle Identity Cloud Service that the Provisioning Bridge can use to synchronize, import, and provision users between the target system and Oracle Identity Cloud Service.
- Access the Oracle Identity Cloud Service administration console, select Applications, and then click Add.
- Click App Catalog.
- Search for Generic Script Connector, and then click Add.
- In the App Details section, enter a Name and Description, and then click Next.
- On the Provisioning page, select Enable Provisioning and then click OK.
- In the Associate with Provisioning Bridge drop-down, select Active and Start Provisioning Bridge.
Under the Configure Connectivity section, enter the following details:
Parameter Mandatory? Description Host Yes Host name or IP address of the computer hosting the target system. Port Yes Port number at which the target system is listening. User Yes User ID or user name of the account in the target system that Oracle Identity Cloud Service must use to connect to and access the target system during search and provisioning operations. This target system user account must have the necessary permissions to perform all connector operations. User Password Yes Password of the target system user account that Oracle Identity Cloud Service uses to connect to the target system. Change Log Column No Name of the column where the last update-related, non-decreasing, value is stored. Can be a number or a timestamp.
The values in this column are used during sync operation to determine the newest record to bring from the target system.
Note: You must specify a value for this property if you want to perform sync operation.Create Script No Specify a value for this property if you want the application to perform Create operation.
Enter the file URL of the script containing the implementation to create objects in your target system. For example, enter the script containing the implementation to perform a create user account provisioning operation.
You must enter the file URL in the following format:
file:///URL
Sample value: file:///home/scripts/create_user.groovyUpdate Script No Specify a value for this property if you want the application to perform Update operation.
Enter the file URL of the script containing the implementation to update objects in your target system. For example, enter the script containing the implementation to perform an update user account provisioning operation. This script is called when you update the user account detail or enable or disable the user account or when user memberships like groups are cleared from user.
You must enter the file URL in the following format:
file:///URL
Sample value: file:///home/scripts/update_user.groovyDelete Script No Specify a value for this property if you want the application to perform Delete operation.
Enter the file URL of the script containing the implementation to delete objects in your target system. For example, enter the script containing the implementation to perform a delete user account provisioning operation. This script is called when you remove or delete an account.
You must enter the file URL in the following format:
file:///URL
Sample value: file:///home/scripts/delete_user.groovySearch Script No Specify a value for this property if you want to configure the application to perform search operation.
Enter the file URL of the script containing the implementation to fetch users from your target system. This script is called while performing an account search.
You must enter the file URL in the following format:
file:///URL
Sample value: file:///home/scripts/search.groovySync Script No Specify a value for this property if you want the application to perform sync operation to incrementally bring user accounts.
Enter the file URL of the script containing the implementation to fetch incremental changes for users from your target system.
You must enter the file URL in the following format:
file:///URL
Sample value: file:///home/scripts/sync.groovyApplication Data Script No Specify a value for this property if you want the application to search application data like group details.
Enter the file URL of the script containing the implementation to fetch values of application data like group details from your target system.
You must enter the file URL in the following format:
file:///URL
Sample value: file:///home/scripts/application_data.groovyAdd Multivalued Attribute Script No Specify a value for this property if you want the application to assign groups to users.
Enter the file URL of the script containing the implementation to groups for users in your target system. This script is called when you assign group to user.
You must enter the file URL in the following format:
file:///URL
Sample value: file:///home/scripts/assign _groups.groovyRemove Multivalued Attribute Script No Specify a value for this property if you want the application to remove user group memberships.
Enter the file URL of the script containing the implementation to remove group from user in your target system. This script is called while group memberships are removed.
You must enter the file URL in the following format:
file:///URL
Sample value: file:///home/scripts/unassign_groups.groovyTest Connectivity Script No Specify a value for this property if you want the application to perform test connectivity.
Enter the file URL of the script containing the implementation to verify the connectivity between identity cloud service and target application.
You must enter the file URL in the following format:
file:///URL
Sample value: file:///home/scripts/test.groovyConnection Script Yes Enter the file URL of the script containing the implementation to connect to the target system.
The connection object returned by this script will be available in all other scripts for performing provisioning and search operations.
You must enter the file URL in the following format:
file:///URL
Sample value: file:///home/scripts/connection.groovyCheck Alive Script No Enter the file URL of the script containing the implementation to check whether the connector's physical connection to the target system is alive. This script must do only the minimum that is necessary to check that the connection is still alive.
You must enter the file URL in the following format:
file:///URL
Sample value: file:///home/scripts/checkalive.groovyConnection Dispose Script No Enter the file URL of the script containing the implementation to dispose any configuration objects.
You must enter the file URL in the following format:
file:///URL
Sample value: file:///home/scripts/dispose.groovySchema File Yes Enter the file URL of the schema file that you want to use.
You must enter the file URL in the following format:
file:///URL
Sample value: file:///home/scripts/schema.properties
Please refer “Create the Schema File” section for schema definition for your target application.Resource Properties No Enter the file URL of the properties file containing application-specific information related to your target system.
You must enter the file URL in the following format:
file:///URL
Sample value: file:///home/scripts/resource.properties
Please refer “Prepare the Resource Properties File” section for more details above this property.- Click Test Connectivity. A success message is displayed stating that the connection is successful.
To view predefined attribute mappings between the user account fields defined in Generic Scripting Connector and the corresponding fields defined in Oracle Identity Cloud Service, click Attribute Mapping, and then click OK.
Note:To add a new attribute for provisioning, first complete the application creation, do the Setup the Dynamic Schema Discovery (refer to instructions below) and then click Add Row, specify the attributes in the User and Generic Script Connector Account columns, and then click OK. For example, if you want to add the
Email_Addressfield, enter$(user.emails[primary=true].value)in the User column, and then select the corresponding field from the drop-down list in Generic Script Connector Account column. Similarly,$(user.name.givenName)for FIRSTNAME and$(user.name.familyName)for LASTNAME.Specify the provisioning operations that you want to enable for Generic Scripting Connector. By default, the Create Account, Update Account, De-activate Account and Delete Account check boxes are selected.
- Create Account: Automatically creates a Generic Scripting Connector account when Generic Scripting Connector access is granted to the corresponding user in Oracle Identity Cloud Service.
- Update Account: Automatically updates a Generic Scripting Connector account when the corresponding user account is edited in Oracle Identity Cloud Service.
- De-activate Account: Automatically deactivates or activates a Generic Scripting Connector account when the Generic Scripting Connector access is deactivated or activated for the corresponding user in Oracle Identity Cloud Service.
- Delete Account: Automatically deletes a Generic Scripting Connector account when Generic Scripting Connector access is revoked for the corresponding user in Oracle Identity Cloud Service.
- On the Provisioning page, select Enable Synchronization.
From the User Identifier drop-down list, select the Oracle Identity Cloud Service user attribute that you want to match with the corresponding record fetched from the Generic Scripting Connector. By default, the User Name option is selected from the drop-down list. It is recommended to leave this default attribute for accurate synchronization of user records. User Name is the user name of the Oracle Identity Cloud Service user.
To match a Generic Scripting Connector account attribute with the existing Oracle Identity Cloud Service user, select an attribute from the Application Identifier drop-down list. By default, the name option is selected that represents the User Name attribute of the Generic Scripting Connector account. It is recommended not to change this default option.
From the When exact match is found drop-down list, select one of the following actions to be performed when a matching Oracle Identity Cloud Service user is found for an account:
- Link and confirm: Automatically links and confirms the matched account to the corresponding Oracle Identity Cloud Service users based on the defined User Identifier and Application Identifier fields.
- Link but do not confirm: Automatically links all the matched accounts to the corresponding Oracle Identity Cloud Service users based on the defined User Identifier and Application Identifier fields. You need to manually confirm the linked accounts.
In the Max. number of creates field, enter a number that is greater than or equal to 10. This value limits the number of accounts that will be created during the synchronization run.
In the Max. number of deletes field, enter a number that is greater than or equal to 10. This value limits the number of accounts that will be deleted during the synchronization run.
- From the Synchronization schedule drop-down list, select an option to schedule the synchronization between Generic Scripting Connector and Oracle Identity Cloud Service. Based on the selection, the synchronization will be scheduled during the specified intervals in Oracle Identity Cloud Service. By default, the Never option is selected.
Click Finish, Activate, and then click Activate Application. Oracle Identity Cloud Service displays a confirmation message.
Create the Schema File
The schema file is used as an input to the metadata generation utility. It is necessary to create a schema.properties file to help the connector understand the target system schema. Before running the metadata generation utility, you must populate the schema file in the specified format. The schema file is a properties file and consists of name-value pairs.
To create a schema file describing the structure of your target system, complete the following steps:
- Create a
.propertiesfile. Add entries in the schema file according to requirements of your environment. The following are the mandatory qualifiers that should be defined in the schema file:
FieldNamesUidAttributeNameAttribute
- Provide values for each of the entries that you added.
Save the
.propertiesfile.
The following is a sample of the Schema properties file:
FieldNames=__UID__, __NAME__,FIRSTNAME,LASTNAME,EMAIL_ADDRESS,SALARY,status
UidAttribute=__UID__
NameAttribute=__NAME__
FIRSTNAME.DataType=String
LASTNAME.DataType=String
SALARY.DataType=Integer
StatusAttribute=status
status.True=Enabled
status.False=Disabled
Note: Do not remove __UID__,__NAME__ attributes from FieldNames. Also, don’t delete the UidAttribute or the NameAttribute entries.
Prepare the Resource Properties File
By default, the connector provides the following connection properties to store connection-related information about your target system:
- Host
- Port
- User
- Password
The connector uses this information to establish a connection from Oracle Identity Cloud Service to your target system to perform connector operations.
If there are any additional parameters that the connector requires in the scripts being used for connector operations, then you must create a .properties file with these additional parameters. Ensure that the .properties file contains only parameters that are not already available in the default configuration parameters.
Including any of the default configuration parameters in the .properties file results in the creation of duplicate entries and the custom script that you have written for connecting to your target system might fail. For example, host is a parameter that is already available as a connection property. If you include a host parameter in the .properties file, then your custom connection script fails.
The following is a sample of the resource properties file:
portNumber=1521
databaseName=XE
Note: These properties will be available to the scripts as a script argument.
Setup the Schema Discovery
The target system schema must be defined to let the connector discover the underlying schema of the target system database.
The schema file is a properties file that is used to represent the structure of your target system. It contains details such as datatypes, mandatory attributes, and the uid attribute that are specific to your target system. In order to map Oracle Identity Cloud Service user attributes to the target application attributes for provisioning operations, execute the below steps to discover the schema attributes and add them to the application.
Use this endpoint to discover the schema and then get the Account Object Class ID of the
__ACCOUNT__from the response.Method: GET
Path: /admin/v1/Apps/
Use this endpoint to Get the
AccountObjectClassesID of an application.Method: PUT
Path: /admin/v1/ManagedAppSchemaDiscovery/
Request Body:
{
"schemas": [
"urn:ietf:params:scim:schemas:oracle:idcs:ManagedAppSchemaDiscovery"
]
}
Use this endpoint to Patch on
AccountObjectClassesfor the attribute’s user wish to manage fromAccountForm.Method: PATCH
Path: /admin/v1/AccountObjectClasses/
Note: ( AccountObjectClassesIdfrom step #2)Request Body:
{
"schemas": [
"urn:ietf:params:scim:api:messages:2.0:PatchOp"
],
"Operations":[
{
"op":"replace",
"path": "schema[name eq \"LASTNAME\"].idcsManaged",
"value": true
},
{
"op":"replace",
"path": "schema[name eq \"FIRSTNAME\"].idcsManaged",
"value": true
}, {
"op":"replace",
"path": "schema[name eq \"EMAIL_ADDRESS\"].idcsManaged",
"value": true
Synchronize Data from the Target System to Oracle Identity Cloud Service
Synchronize user accounts from the target system and link them to the corresponding Oracle Identity Cloud Service user accounts. You also synchronize groups for the accounts from the target system to Oracle Identity Cloud Service.
In the Generic Connector Application, click the Import tab.
Click the Import button.
Note:If this button is grayed out, then click the Provisioning tab and verify that both the Enable Provisioning and Enable Synchronization options are turned on, and that the Generic Scripting Connector Application is activated.
Verify that you see a status of Running for the job that Oracle Identity Cloud Service uses to synchronize users and groups from target system.
After all users and groups are synchronized, the Import tab lists the target system user accounts and the job status changes to Success.
If you don't see the status change after a few minutes, then click Refresh. Also, if the status of the job is Failed, then an error occurred while the Provisioning Bridge was transferring users and groups from target system to Oracle Identity Cloud Service.
Ensure all user records are matched. Oracle Identity Cloud Service tries to match each target system user account with an existing user account in Oracle Identity Cloud Service. If a user exists, then the user is assigned to the Generic Scripting Connector Application. If the user doesn't exist, then from the Actions column of the Import tab, choose from one of the following options.
Assign Existing User: Assign the target system user account to any user in Oracle Identity Cloud Service.
Create New User and Link: Add a new user to Oracle Identity Cloud Service, and then assign the target system user account to this newly created user.
- To create a new group in target system and get it synced with Oracle Identity Cloud Service, complete the following steps.
- Create a new group in target system.
- Assign the group to an existing user in target system.
- Click Import in Oracle Identity Cloud Service.
- Verify the user is added with new group privileged in Oracle Identity Cloud Service.
Setup for LCM Changes for Dynamic Attribute
Get the AccountObjectClasses ID of an application.
Method: GET Path: .../admin/v1/Apps/
Get the MappedAttributes ID of an application.
Method: GET Path: .../admin/v1/AccountObjectClasses/
PUT MappedAttributes to add custom attributes for which you want LCM support from Oracle Identity Cloud Service.
Method: PUT Path: .../admin/v1/MappedAttributes/
Request Body:
{
"schemas": [
"urn:ietf:params:scim:schemas:oracle:idcs:MappedAttribute"
],
"idcsResourceType": "User",
"direction": "outbound",
"attributeMappings" : [
    {
        "managedObjectAttributeName": "FIRSTNAME",
    "idcsAttributeName": $(user.name.givenName)",
    "appliesToActions": [ "create", "update" ]
        },
    {
         "managedObjectAttributeName": "LASTNAME",
    "idcsAttributeName": $(user.name.familyName)",
    "appliesToActions": [ "create", "update" ]
        },
    { "managedObjectAttributeName": "EMAIL_ADDRESS",
    "idcsAttributeName": $(user.emails[primary=true].value)",
    "appliesToActions": [ "create", update" ]
        },
    {
        "managedObjectAttributeName": "active",
    "idcsAttributeName": $(user.active)",
    "appliesToActions": [ "create" ]
        },
    {
        "managedObjectAttributeName": "name",
    "idcsAttributeName": $(user.userName)",
    "appliesToActions": [ "create" ]
        }
]
}
Provision a User in the Target System
Provision users from Oracle Identity Cloud Service to the target system.
- Go to the Users tab in the Generic Scripting Connector Application.
- Click Assign.
- Select the User whom you want to provision and click Assign. A User form will open.
- (Optional) To add a user to a group, click Add Group and select the group you want to add.
- Click Save and then OK.
- Verify the user is provisioned successfully in the target system.
Modify a User in the Target System
In this section, you'll modify the user in the target system using Oracle Identity Cloud Service.
- Go to the Users tab in the Generic Scripting Connector Application.
- Select the User you want to modify and click Edit.
- Modify the required attributes and click Save.
- Verify the changes in the target system.
Revoke a User
In this section, you'll revoke the users from the target system using Oracle Identity Cloud Service.
- Go to the Users tab in the Generic Scripting Connector Application.
- Select the User you want to delete from the target system and click Revoke.
- Save the changes in the Application.
- Verify changes in the target system.
Modify a User in Oracle Identity Cloud Service
- Go to Users tab in Oracle Identity Cloud Service.
- Select the user assigned the Generic Connector Application.
- Modify any field (First Name/Last Name/Email Address) on User Details screen.
- Click Save on User details screen.
- Once done, in the target system, verify whether the changes are reflected or not.
Deactivate a User in Oracle Identity Cloud Service
- Go to the Users tab in Oracle Identity Cloud Service.
- Select the user assigned the Generic Connector Application.
- Select the User you want to deactivate from the Target system and click the Deactivate button.
- Once done, in the target system, verify whether the changes are reflected or not.
Script Examples
The following is a sample of the Create Account Script:
import java.sql.PreparedStatement;
import org.identityconnectors.framework.common.objects.*;
System.out.println("[Create-Groovy] Attributes::" + attributes);
//Get all the attributes from script argument
String uid = attributes.get("__NAME__") != null ? attributes.get("__NAME__").getValue().get(0) : null;
String firstName = attributes.get("FIRSTNAME") != null ? attributes.get("FIRSTNAME").getValue().get(0) : null;
String lastName = attributes.get("LASTNAME") != null ? attributes.get("LASTNAME").getValue().get(0) : null;
String email = attributes.get("EMAIL_ADDRESS") != null ? attributes.get("EMAIL_ADDRESS").getValue().get(0) : null;
enableValue = attributes.get("__ENABLE__") != null ? attributes.get("__ENABLE__").getValue().get(0) : true;
println attributes.get("SALARY");
PreparedStatement createStmt = null;
try {
    //Initialize the prepare statement to insert the data into database table
    createStmt = conn.prepareStatement("INSERT INTO USERINFO(USERID,FIRSTNAME,LASTNAME,EMAIL,STATUS) VALUES(?,?,?,?,?)");
    //Set the input parameters
    createStmt.setString(1, uid);
    createStmt.setString(2, firstName);
    createStmt.setString(3, lastName);
    createStmt.setString(4, email);
    if (enableValue)
        createStmt.setString(5, "Enabled");
    else
        createStmt.setString(5, "Disabled");
    //Execute sql statement
    createStmt.executeUpdate();
} finally {
    //close the sql statements
    if (createStmt != null)
        createStmt.close();
}
The following is a sample of the Update Account Script:
import java.sql.PreparedStatement;
import java.sql.ResultSet;
import java.util.Date.*
import org.identityconnectors.framework.common.exceptions.*;
import org.identityconnectors.framework.common.objects.*;


trace.info("[Update-Groovy] Atrributes::" + attributes);
//During an Update operation,OIM  sends the UID attribute along with updated attributes.
//Get all the values of attributes

String uid = attributes.get("__UID__") != null ? attributes.get("__UID__").getValue().get(0) : null;
String name = attributes.get("__NAME__") != null ? attributes.get("__NAME__").getValue().get(0) : null;
enableValue = attributes.get("__ENABLE__") != null ? attributes.get("__ENABLE__").getValue().get(0) : null;
String email = attributes.get("EMAIL_ADDRESS") != null ? attributes.get("EMAIL_ADDRESS").getValue().get(0) : null;
String firstName = attributes.get("FIRSTNAME") != null ? attributes.get("FIRSTNAME").getValue().get(0) : null;
String lastName = attributes.get("LASTNAME") != null ? attributes.get("LASTNAME").getValue().get(0) : null;

//Throw exception if uid is null
if (uid == null) throw new ConnectorException("UID Cannot be Null");
PreparedStatement upstmt = null;
try {

//Call Target APIS to update the record
//stmt =   conn.prepareStatement(....); or stmt =   conn.createStatement(....);
upstmt = conn.prepareStatement("UPDATE USERINFO SET USERID=COALESCE(?,USERID),FIRSTNAME=COALESCE(?,FIRSTNAME),LASTNAME =COALESCE(?, LASTNAME), EMAIL= COALESCE(?, EMAIL), STATUS=COALESCE(?, STATUS) WHERE USERID =?");
//Set the input parameters
upstmt.setString(1, uid);
upstmt.setString(2, firstName);
upstmt.setString(3, lastName);
upstmt.setString(4, email);
if(enableValue != null){
    if(enableValue)
    upstmt.setString(5,"Enabled");
    else
    upstmt.setString(5,"Disabled");}
else
    upstmt.setString(5,null);
upstmt.setString(6, uid);
upstmt.executeUpdate();
} //end try
finally {
if (upstmt != null)
upstmt.close();
};


//Nullifying Group
// Here "__GROUPS__" is object class of simple multi-valued attribute
if (attributes.get('__GROUPS__') != null && attributes.get('__GROUPS__').getValue().isEmpty()) {
delSt = conn.prepareStatement("DELETE FROM USERGROUPS WHERE USERID=?");
delSt.setString(1, uid);
delSt.executeUpdate();
}

trace.info("[Update] Updated user::" + uid);
//Must return Uid
return new Uid(uid);
The following is a sample of the Delete Account Script:
import org.identityconnectors.framework.common.objects.*;
import java.sql.PreparedStatement;
//Get the UID from the input map 'attributes'
String uid = attributes.get("__UID__").getValue().get(0);
trace.info("[Delete-Groovy] Deleting user:: " + uid);
try {
    //Delete user account
    st1 = conn.prepareStatement("DELETE FROM USERINFO WHERE USERID=?");
    st1.setString(1, uid);
    //executing sql query for user deletion
    st1.executeUpdate();
    st2 = conn.prepareStatement("DELETE FROM USERGROUPS WHERE USERID=?");
    st2.setString(1, uid);
    //executing sql query for user groups deletion(if any)
    st2.executeUpdate();
}
finally {
    if (st1 != null || st2 != null)
        st1.close();
    st2.close();
};
trace.info("Deleted user:: " + uid);