Office 365
Before You Begin
Introduction
This document describes how to configure Oracle Identity Cloud Service to provide Single Sign-On (SSO) using SAML and provisioning for Office 365.
About Office 365
Office 365 is the brand name that Microsoft uses for a group of software and services subscriptions, which together provide productivity software and related services to subscribers. For consumers, the service allows the use of Microsoft Office apps and provides cloud storage service. For business users, it offers plans providing email and social networking services.
After integrating Office 365 with Oracle Identity Cloud Service:
- Users can access Office 365 using their Oracle Identity Cloud Service login credentials.
- Users can start Office 365 using the Oracle Identity Cloud Service My Apps console.
- Admins can assign and revoke user access to Office 365 using the Oracle Identity Cloud Service administration console.
- Admins can manage users, user licenses, user roles, and user group memberships.
What Do You Need?
- An Oracle Identity Cloud Service account with authorization rights to manage apps and users (Identity Domain Administrator or Application Administrator).
- An Office 365 administrator account with authorization rights to configure federated authentication.
For Active Profile Authentication to work as expected, users must have access to the resource in Office 365.
Note: If you are using Active Profile Authentication with Oracle Identity Cloud Service, ensure that the Oracle Identity Cloud Service user name type being used is email address.
Configuring Office 365 in Oracle Identity Cloud Service
Use this section to register and activate Office 365, and to enable provisioning and synchronization for Office 365. You can then assign users or groups to Office 365 and start the user provisioning process.
Registering and Activating Office 365
Note: Before registering the Office 365 application, make sure that an instance of it does not already exist.
Access the Oracle Identity Cloud Service administration console, select Applications, and then click Add.
Click App Catalog.
Search for
MS Office 365, click Add, and then click Next.Click Next to enable provisioning and synchronization for Office 365. For details, see the "Enabling Provisioning and Synchronization for Office 365" section.
Click Finish. Oracle Identity Cloud Service displays a confirmation message.
Click Activate, and then click Activate Application. Oracle Identity Cloud Service displays a confirmation message.
Enabling Provisioning and Synchronization for Office 365
Use this section to enable provisioning and synchronization for managing user accounts in Office 365 through Oracle Identity Cloud Service.
Enabling Provisioning
On the Provisioning page, select Enable Provisioning.
To establish a connection with Office 365 through Oracle Identity Cloud Service, click Authorize. The Office 365 login page appears.
Enter the Office 365 administrator account credentials, click Sign in, and then click Allow at the prompt requesting offline access to Office 365.
From the Actions drop-down list, select Test to verify the connection with Office 365. Oracle Identity Cloud Service displays a confirmation message.
To view the predefined attribute mappings between the user account fields defined in Office 365 and the corresponding fields defined in Oracle Identity Cloud Service, click Attribute Mapping, and then click OK.
Note: To add a new attribute for provisioning, click Add Attribute, specify the attributes in the User and Office 365 Account columns, and then click OK. For example, if you want to add the External ID field, enter
$(user.externalId)in the User column, and then select the corresponding field from the drop-down list in the Office 365 Account column.Specify the provisioning operations that you want to enable for Office 365:
Authoritative Sync: Configures Office 365 as an authoritative source of Oracle Identity Cloud Service. In authoritative sync, you can synchronize the users, groups, and user group memberships from Office 365 to Oracle Identity Cloud Service.
Note: By default, authoritative sync is not enabled and the Create Account, De-activate Account, Update Account, and Delete Account check boxes are selected for performing provisioning operations. If you enable authoritative sync, these check boxes are disabled for this app and you cannot perform the provisioning operations using Oracle Identity Cloud Service.
Create Account: Automatically creates an Office 365 account when Office 365 access is granted to the corresponding user in Oracle Identity Cloud Service.
De-activate Account: Automatically activates or deactivates an account in Office 365 when the corresponding user is activated or deactivated in Oracle Identity Cloud Service.
Update Account: Automatically updates an user account in Office 365 when the user account is updated in Oracle Identity Cloud Service.
Delete Account: Automatically removes an user account from Office 365 when Office 365 access is revoked from the corresponding user in Oracle Identity Cloud Service.
Enabling Synchronization
On the Provisioning page, select Enable Synchronization.
From the User Identifier drop-down list, define a matching rule that links a record fetched from Office 365 with an existing record in Oracle Identity Cloud Service:
Note: By default, the Primary Email Address check box is selected. It is recommended to leave this default attribute for an accurate synchronization of user records.
Primary Email Address: Primary email address of the Oracle Identity Cloud Service user.
User Name: User name of the Oracle Identity Cloud Service user.
From the When exact match is found drop-down list, select one of the following actions to be performed when a matching Oracle Identity Cloud Service user is found for an account:
Link and confirm: Automatically links and confirms the matched account to the corresponding Oracle Identity Cloud Service users based on the defined user identifier.
Link but do not confirm: Automatically links all the matched accounts to the corresponding Oracle Identity Cloud Service users based on the defined user identifier. You need to manually confirm the linked accounts.
In the Max. number of creates field, enter a number that is greater than or equal to 10. This value limits the number of accounts to be created during the synchronization run.
In the Max. number of deletes field, enter a number that is greater than or equal to 10. This value limits the number of accounts to be removed during the synchronization run.
After enabling provisioning and synchronization for Office 365, you can synchronize the existing account details from Office 365 and link them to the corresponding Oracle Identity Cloud Service users. For more information on performing synchronization tasks, see the Importing User Accounts from a Software as a Service Application section in Administering Oracle Identity Cloud Services.
You can also manage Office 365 accounts through Oracle Identity Cloud Service. For more information on performing provisioning tasks, see the Managing Oracle Identity Cloud Services Users and Managing Oracle Identity Cloud Services Groups sections in Administering Oracle Identity Cloud Services.
Configuring SSO for Office 365 and Oracle Identity Cloud Service
Use this section to set up an Office 365 domain, and configure SSO for both Office 365 and Oracle Identity Cloud Service.
Setting Up the Domain in Office 365
Access Office 365 as an administrator, and then click Admin.
Expand the left navigation menu, select Settings, and then Domains.
In the Domains window, click Add domain. The Add a domain window appears.
Enter your domain name, and then click Next. The Verify domain window appears.
Click the Select your DNS Host link, choose your DNS host from the drop-down list, and then click Verify.
Configuring SSO for Office 365
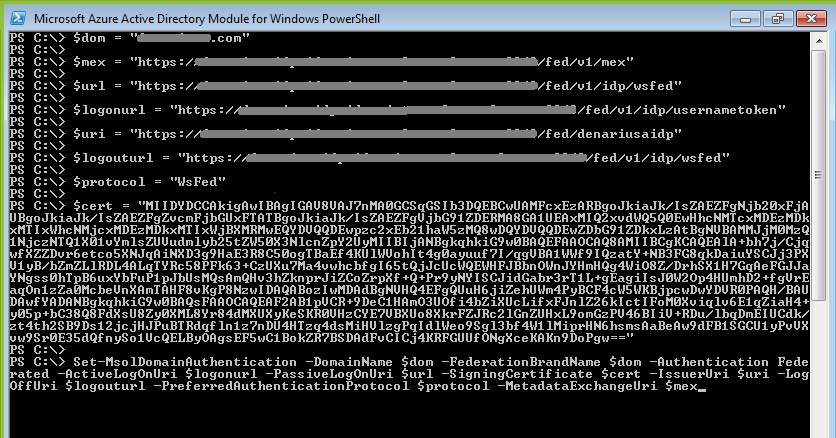
Install Microsoft Azure Active Directory Module for Windows PowerShell to set up SSO access.
Connect to the Office 365 tenant as a tenant administrator using the Connect-MsolService command.
Enter the Set-MsolDomainAuthentication command and use the table to update the authentication attributes for the Office 365 domain that you want to configure.
This table lists the mandatory federated authentication attributes that you must set to complete the SSO configuration.
Attribute Value DomainName($dom) Enter the Domain Name. MetadataExchangeUri Enter the MEX uri. For example, https://<IDCS-Service-Instance>/fed/v1/mexActiveLogOnUri Enter active logon uri. For example, https://<IDCS-Service-Instance>/fed/v1/idp/usernametokenFederationBrandName($brandname) Enter the Company Name. Authentication Enter Federatedas the value for Authentication. Note: This disables normal user name/password log in. Changing this value toManagedenables the user to log in with normal user name/password.PassiveLogOnUri($url) Enter https://<IDCS-Service-Instance>/fed/v1/idp/ssoas the value for Login URL. Enterhttps://<IDCS-Service-Instance>/fed/v1/idp/wsfedas the value for SSO endpoint.IssuerUri($uri) Enter the Entity ID. Use the metadata file that you downloaded earlier to obtain the Entity ID. The Entity ID information is located in the first line of the metadata. See section "Registering and Activating Office 365" for more details. LogOffUri($logouturl) Enter https://<IDCS-Service-Instance>/fed/v1/idp/sloas the value for Logoff URL. Enterhttps://<IDCS-Service-Instance>/fed/v1/idp/wsfedas the value for SLO endpoint.SigningCertificate($cert) Paste the certificate that you downloaded during Office 365 registration in Oracle Identity Cloud Service. See section "Registering and Activating Office 365" for more details. PreferredAuthenticationProtocol Enter WsFedas the value for PreferredAuthenticationProtocol.Note: Use Get-MsolDomain to view the details of an already registered domain.
Configuring SSO for Oracle Identity Cloud Service
By default, in Oracle Identity Cloud Service, the Office 365 ImmutableID attribute maps to the Oracle Identity Cloud Service User Name attribute and the Office 365 UPN attribute maps to the Oracle Identity Cloud Service Primary Email Address attribute.
You can map the Office 365 ImmutableID attribute and UPN attributes to any Oracle Identity Cloud Service user attributes, even if the attribute isn't offered in a drop-down menu, by writing an expression using the policy path expression syntax.
- For the
ImmutableIDmapping, select Expression from the NameID Value drop-down menu. In the text input field that appears, enter your expression. - For the
UPNmapping, select Expression/Literal from the Type drop-down menu. The Value drop-down menu changes to a text input field where you can enter your expression.
Examples of valid expressions include:
$(user.user.externalID)$(user.emails[type eq "recovery"].value)$(user.urn:ietf:params:scim:schemas:extension:enterprise:2.0:User:employeeNumber)#concat($(user.name.givenName), $(user.name.familyName))
See Adding a SAML Application in Administering Oracle Identity Cloud Service for more information about this functionality.
Verifying the Integration
Use this section to verify that SSO and single log-out (SLO) work when initiated from Oracle Identity Cloud Service (IdP Initiated SSO and IdP Initiated SLO) and Office 365 (SP Initiated SSO and SP Initiated SLO).
Verifying Identity Provider Initiated SSO from Oracle Identity Cloud Service
Access the Oracle Identity Cloud Service My Profile console:
https://<IDCS-Service-Instance>.identity.oraclecloud.com/ui/v1/myconsole.Log in using credentials for a user that is assigned to Office 365. Oracle Identity Cloud Service displays a shortcut to Office 365 under My Apps.
Click MS Office 365. The Office 365 home page appears.
On the Office 365 home page, confirm that the user that is logged in is the same for both Office 365 and Oracle Identity Cloud Service.
This confirms that SSO initiated from Oracle Identity Cloud Service works.
Verifying Identity Provider Initiated SLO
On the Oracle Identity Cloud Service dashboard, click the user name in the upper-right corner, and then select Sign Out from the drop-down list.
Access the user profile in Office 365, and then confirm that the login page appears.
This confirms that SLO works and that the user is no longer logged in to Office 365 and Oracle Identity Cloud Service.
Verifying Service Provider Initiated SSO from Office 365
Access Office 365 at:
https://www.office.com/Click Sign in with SSO or another account. You are prompted to sign in using your company credentials.
Enter the company name and click Sign In. The Oracle Identity Cloud Service Sign In page appears.
Note: When there are multiple identity providers, select the appropriate identity provider, and then click Sign In.
Log in using credentials for a user that is assigned to the Office 365 app. The Office 365 home page appears.
On the Office 365 home page, confirm that the user that is logged in is the same for both Office 365 and Oracle Identity Cloud Service.
This confirms that SSO that is initiated from Office 365 works.
Verifying Service Provider Initiated SLO
On the Office 365 home page, click the user icon in the upper-right corner, and then select Logout from the drop-down list.
Click OK at the confirmation message that appears.
Access the Oracle Identity Cloud Service My Console, and then confirm that the login page appears.
This confirms that SLO works and that the user is no longer logged in to Office 365 and Oracle Identity Cloud Service.
Performing Active Profile Authentication Using MS-Desktop Clients
Use this section to perform Active Profile Authentication using MS-Desktop clients.
Testing Active Client Authentication against Oracle Identity Cloud Service to Office 365 applications.
Use this section to test Active Client Authentication against Oracle Identity Cloud Service to Office 365 applications such as Skype for Business.
Note:
Lync IM is a desktop client used as an example to test the Active Profile Authentication flow. You can use any other MS-Desktop client to perform this operation.
To configure the client, open Lync IM, select Tools, Options, Personal, Advanced. Select Manual Configuration and enter
sipdir.online.lync.com:443in the Internal and External Server textbox, and then click OK.The sign-in user has to have the
Skype for Businessapplication assigned to their respective account in Office 365.
After configuring Lync IM and assigning Skype for Business application, perform the following:
Open the Lync IM client.
In the Sign-In Address field, specify the address of a synchronized user and select Sign-In.
When prompted, enter the user's credentials and click Submit. You should be able to sign-in to Lync IM (Skype for Business).
Troubleshooting
Use this section to locate solutions to common integration issues.
Known Issues
Office 365 displays the message “Hmm... we’re having trouble signing you out. You may still be signed in to some applications. Close your browser to finish signing out"
Cause: User performs Identity Provider initiated SSO from Oracle Identity Cloud Service followed by Service Provider initiated SLO from Office 365.
Solution: Office 365 displays this message after all sessions are ended from Oracle Identity Cloud Service and from Office 365. Please contact Office 365 for further details.
Office 365 displays the message “We don't recognize this user ID or password"
Cause: The email attribute sent by Oracle Identity Cloud Service during SSO doesn't match any existing user in Office 365.
Solution: Ensure that the user that you assign to Office 365 has an account in both Oracle Identity Cloud Service and Office 365 with the same email address.
Office 365 displays the message “Your request can't be executed. Please try again. If the problem persists, then contact your system administrator.”
Cause: After performing a revoke operation, re-granting the Office 365 account to the revoked user in Office 365 fails as the revoked user account is present in the Office 365 recycle bin and not permanently deleted.
Solution: Ensure that you log in to Azure PowerShell and run the following command:
Command: ‘Remove-MsolUser -UserPrincipalName "user.idcs@fed-domain.com" –RemoveFromRecycleBin’
Unknown Issues
For unknown issues, contact Oracle Support:
Go to https://support.oracle.com.
Select Cloud Support, and then sign in with your support credentials.
In the Cloud Dashboard, confirm that there are no planned outages in Oracle Identity Cloud Services, and then click Create Service Request.
Select Oracle Identity Cloud Services as the service type.
Complete your service request.