Oracle Content Marketing
Before You Begin
Introduction
This document describes how to configure Oracle Identity Cloud Service to provide Single Sign-On (SSO) using SAML and provisioning for Oracle Content Marketing.
About Oracle Content Marketing
Oracle Content Marketing simplifies the complex process of creating, distributing, and promoting new content to drive strategic conversations for every stage of the sales cycle. It helps to plan, craft, and communicate messages to prospects and customers to spark relevant conversations that lead to conversions.
What Do You Need?
- An Oracle Identity Cloud Service account with authorization rights to manage apps and users (Identity Domain Administrator or Application Administrator).
- A downloaded Identity Provider metadata file. Use the following URL to access the metadata:
https://<IDCS-Service-Instance>.identity.oraclecloud.com/fed/v1/metadata - The Oracle Content Marketing site URL and the company name.
- An Oracle Content Marketing administrator account to manage user accounts in Oracle Content Marketing through Oracle Identity Cloud Service.
- The host name and the port number of Oracle Content Marketing instance.
Configuring SSO for Oracle Content Marketing
Use this section to configure an Identity Provider for Oracle Content Marketing.
Configuring an Identity Provider
Use the support URL to log a support request to configure an Identity Provider in Oracle Content Marketing.
Configuring the Oracle Content Marketing Application in Oracle Identity Cloud Service
Use this section to register and activate Oracle Content Marketing, and to enable provisioning and synchronization. You can then assign users or groups to Oracle Content Marketing and start the user provisioning process.
Obtaining the Service Provider Details
Use this section to obtain the SP details such as the Server Name and the Entity ID.
Obtain the SP Metadata file and the SP X509 Certificate file in PEM format. Contact Oracle support to download the SP Metadata and the SP X509 Certificate files.
Open the Service Provider metadata file.
Locate the entityID URL in the metadata file.
entityID =<https://app.compendium.com/api/saml/sp/dd8cde15-61c8-4d8f-971d-5230b8d4a3ff>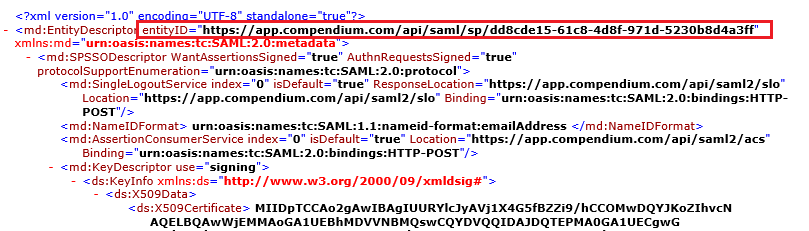
- Make a note of the Server Name and the entityID information. In the above entityID URL:
- Server Name: app.compendium.com
- Entity ID: dd8cde15-61c8-4d8f-971d-5230b8d4a3ff
Registering and Activating the Oracle Content Marketing Application
Access the Oracle Identity Cloud Service administration console, select Applications, and then click Add.
Click App Catalog.
Search for Oracle Content Marketing, and then click Add.
In the App Details section, enter the Name and Description.
Enter the Server Name. See the “Obtaining the Service Provider Details” section.
Click Next.
On the SSO Configuration tab, enter the Entity ID. See the “Obtaining the Service Provider details” section.
Upload X509 Certificate that you previously downloaded. See the “Obtaining the Service Provider Details” section.
Click Next to enable provisioning and synchronization for Oracle Content Marketing. For details, see the "Enabling Provisioning and Synchronization for Oracle Content Marketing" section.
Click Finish. Oracle Identity Cloud Service displays a confirmation message.
Click Activate, and then click Activate Application. Oracle Identity Cloud Service displays a confirmation message.
Enabling Provisioning and Synchronization for Oracle Content Marketing
Use this section to enable provisioning and synchronization for managing user accounts in Oracle Content Marketing through Oracle Identity Cloud Service.
Enabling Provisioning
On the Provisioning page, select Enable Provisioning.
Use the following table to configure connectivity between Oracle Content Marketing and Oracle Identity Cloud Service:
This table lists the parameters that Oracle Identity Cloud Service requires to connect to Oracle Content Marketing. Parameter Value Host Name Enter the host name of the server that hosts Oracle Content Marketing. For example, host name value: app.cpdmqa01.comNote: The host name value is dynamic and changes for each instance of Oracle Content Marketing.Port Number Enter the port number at which Oracle Content Marketing is listening. For example, port number value: 443Administrator Username Enter the Oracle Content Marketing service account user name. Administrator Password Enter the Oracle Content Marketing service account password. Click Test Connectivity to verify the connection with Oracle Content Marketing. Oracle Identity Cloud Service displays a confirmation message.
To view predefined attribute mappings between the user account fields defined in Oracle Content Marketing and the corresponding fields defined in Oracle Identity Cloud Service, click Attribute Mapping, and then click OK.
Note: To add a new attribute for provisioning, click Add Attribute, specify the attributes in the User and Oracle Content Marketing Account columns, and then click OK. For example, if you want to add the User Name field, enter
$(user.userName)in the User column, and then select the corresponding field from the drop-down list in the Oracle Content Marketing Account column.Specify the provisioning operations that you want to enable for Oracle Content Marketing:
Note: By default, the Create Account and the Delete Account check boxes are selected.- Create Account: Automatically creates an account in Oracle Content Marketing when Oracle Content Marketing access is granted to the corresponding user in Oracle Identity Cloud Service.
- Delete Account: Automatically deletes an account from Oracle Content Marketing when Oracle Content Marketing access is revoked from the corresponding user in Oracle Identity Cloud Service.
Enabling Synchronization
On the Provisioning page, select Enable Synchronization.
From the User Identifier drop-down list, select User Name to define a matching rule that links a record from Oracle Content Marketing with a record in Oracle Identity Cloud Service.
From the When exact match is found drop-down list, select one of the following actions to be performed when a matching Oracle Identity Cloud Service user is found for an account:
Link and confirm: Automatically links and confirms the matched account to the corresponding Oracle Identity Cloud Service users based on the defined user identifier.
Link but do not confirm: Automatically links all the matched accounts to the corresponding Oracle Identity Cloud Service users based on the defined user identifier. You need to then manually confirm the linked accounts.
In the Max. number of creates field, enter a number that is greater than or equal to 10. This value limits the number of accounts that are created during synchronization.
In the Max. number of deletes field, enter a number that is greater than or equal to 10. This value limits the number of accounts that are deleted during synchronization.
After enabling provisioning and synchronization for Oracle Content Marketing, you can synchronize the existing account details from Oracle Content Marketing and link them to the corresponding Oracle Identity Cloud Service users. For more information on performing synchronization tasks, see the Importing User Accounts from a Software as a Service Application section in Administering Oracle Identity Cloud Service.
You can also manage Oracle Content Marketing accounts through Oracle Identity Cloud Service. For more information on performing provisioning tasks, see the Managing Oracle Identity Cloud Service Users and Managing Oracle Identity Cloud Service Groups sections in Administering Oracle Identity Cloud Service.
Assigning Users to the Oracle Content Marketing Application
On the Oracle Content Marketing app page in Oracle Identity Cloud Service, select the Users tab, and then click Assign. The Assign Users window appears.
Select users that you want to assign to Oracle Content Marketing, and then click OK. Oracle Identity Cloud Service displays a confirmation message stating that the Oracle Content Marketing app is assigned to the users that you selected.
Verifying the Integration
Use this section to verify that SSO and single log-out (SLO) work when initiated from Oracle Identity Cloud Service (IdP initiated SSO and IdP initiated SLO) and when initiated from Oracle Content Marketing (SP initiated SSO and SP initiated SLO).
Verifying Identity Provider Initiated SSO from Oracle Identity Cloud Service
Access the Oracle Identity Cloud Service My Apps page using the URL:
https://<IDCS-Service-Instance>.identity.oraclecloud.com/ui/v1/myconsole/Log in using credentials for a user that is assigned to the Oracle Content Marketing app. Oracle Identity Cloud Service displays a shortcut to the Oracle Content Marketing app under My Apps.
Click Oracle Content Marketing. The Oracle Content Marketing home page appears.
On the Oracle Content Marketing home page, confirm that the user that is logged in is the same for both Oracle Content Marketing and Oracle Identity Cloud Service. This confirms that SSO that is initiated from Oracle Identity Cloud Service works.
Verifying Service Provider Initiated SSO from Oracle Content Marketing
Access the Oracle Content Marketing URL.
Select Sign in with SSO. A page appears for you to enter your company credentials.
Enter the Company Name, and then click Submit.
When there is more than one Identity Provider configured, you are prompted to select one. Select the Identity Provider that is associated with your account, and then click Submit. The Oracle Identity Cloud Service login page appears.
Enter the credentials for a user that is assigned to the Oracle Content Marketing App, and then click Sign In. The Oracle Content Marketing home page appears.
Confirm that the user that is logged in is the same for both Oracle Content Marketing and Oracle Identity Cloud Service. This confirms that SSO that is initiated from Oracle Content Marketing works.
Verifying Identity Provider Initiated SLO
On the Oracle Identity Cloud Service home page, click the user name in the upper-right corner, and then select Sign Out from the drop-down list.
On the Oracle Content Marketing home page, perform any operation. The Login Page appears.
This confirms that SLO works and that the user is no longer logged in to Oracle Content Marketing and Oracle Identity Cloud Service.
Verifying Service Provider Initiated SLO
On the Oracle Content Marketing home page, click the user icon in the upper-right corner of the page.
Select Logout.
Access the Oracle Identity Cloud Service console and confirm that the login page appears.
This confirms that SLO works and that the user is no longer logged in to Oracle Content Marketing and Oracle Identity Cloud Service.
Troubleshooting
Use this section to locate solutions to common integration issues.
Known Issues
Oracle Identity Cloud Service displays the message, " You are not authorized to access the app. Contact your system administrator."
Cause1: The administrator revokes access for the user at the same time that the user tries to access the Oracle Content Marketing app using Oracle Identity Cloud Service.
Solution1: Access the Oracle Identity Cloud Service administration console, select Applications, Oracle Content Marketing app, Users, and then click Assign to re-assign the user.
Oracle Identity Cloud Service displays the message, "There is a problem with your account. Please contact Support."
Cause2: The SAML 2.0 integration between the Oracle Identity Cloud Service and Oracle Content Marketing is deactivated.
Solution1:
- Access the Oracle Identity Cloud Service administration console, select Applications, and then Oracle Content Marketing.
- Click Activate, and then click Activate Application. Oracle Identity Cloud Service displays a confirmation message.
Unknown Issues
For unknown issues, contact Oracle Support:
Go to https://support.oracle.com.
Select Cloud Support, and then sign in with your support credentials.
In the Cloud Dashboard, confirm that there are no planned outages in Oracle Identity Cloud Service, and then click Create Service Request.
Select Oracle Identity Cloud Service as the service type.
Complete your service request.