Oracle Field Service Cloud
Before You Begin
Introduction
This document describes how to configure Oracle Identity Cloud Service to provide Single Sign-On (SSO) using SAML and provisioning for Oracle Field Service Cloud.
About Oracle Field Service Cloud
Oracle Field Service Cloud is built on time-based, self-learning, and predictive technology, empowering customers to solve business problems while evolving their field service organization.
What Do You Need?
- The Oracle Field Service Cloud application with a minimum supported version of 17.2 Service Update 8 or later.
- An Oracle Identity Cloud Service account with authorization rights to manage apps and users (Identity Domain Administrator or Application Administrator).
- An Oracle Field Service Cloud account with administrative rights to configure federated authentication and Oracle Field Service Cloud Login URL.
- An Oracle Field Service Cloud resource (pending-assignment) to provision user accounts in Oracle Field Service Cloud through Oracle Identity Cloud Service.
- Identity Provider metadata. Use the following URL to access the metadata:
https://<IDCS-Service Instance>.identity.oraclecloud.com/fed/v1/metadata
Configuring SSO for Oracle Field Service Cloud
Use this section to configure an Identity Provider for Oracle Field Service Cloud.
Configuring an Identity Provider
Creating the SSO Login Policy
Log in as an administrator using the login URL format:
<https://login.etadirect.com/your.tenant.id>.In the main page, click Configuration. The Configuration tab displays the Users, Security, Integrations section.
From the Users, Security, Integrations section, click Login Policies. The Login Polices page appears.
On right side of the page, click Add New. The Add Policy page appears.
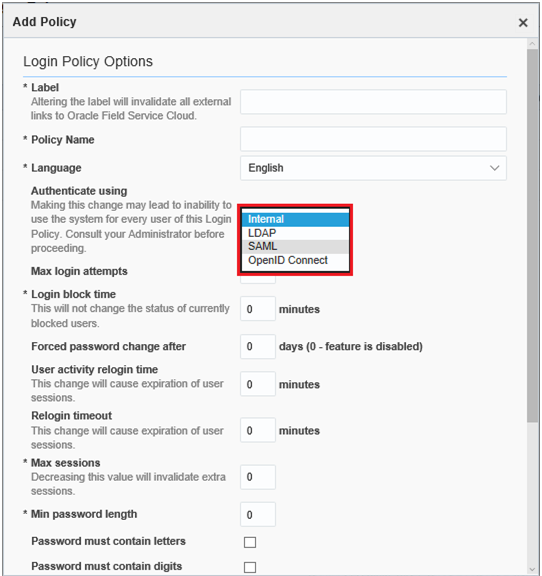
Enter a Label and a Policy Name.
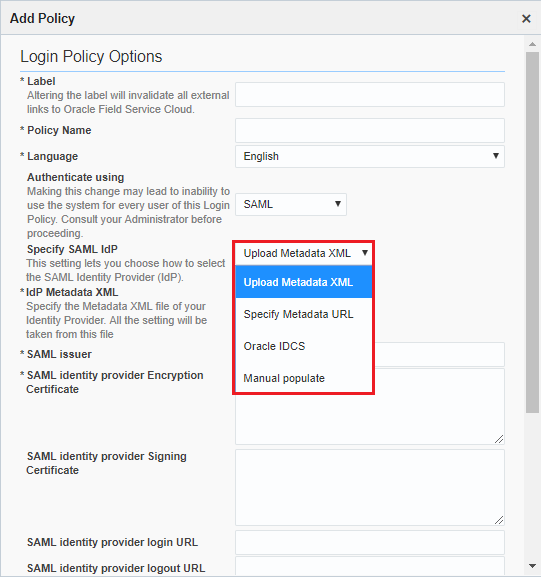
Select SAML from the Authenticate using drop-down list. The SAML specific fields get updated in the Add Policy page.
Select Upload Metadata XML from the Specify SAML IdP drop-down list. The specific fields for Oracle Identity Cloud Service get updated on the Add Policy page.
Click Upload, and then locate the Oracle Identity Cloud Service metadata that you previously downloaded. See the "What Do You Need" section.
Click Open, and then click Download to download the SP metadata.
Do not enter any value for the SAML attribute containing username text box.
Enter a value for Max sessions. Max sessions are the maximum number of simultaneous sessions allowed for a user.
Click Add. The new policy appears in the list of login policies.
Note: Based on requirements, you need to create separate policies for manage applications and for mobility applications. As an alternative, you can use a common policy for both applications.
Updating User Types to Use the New Login Policy Created for SSO Profile
Log in as an administrator using the login URL format:
<https://login.etadirect.com/your.tenant.id>.In the main page, click Configuration. The Configuration tab displays the Users, Security, Integrations section.
From the Users, Security, Integrations section, click User Types. The Users Types page appears.
On the left side of the page, select the User Type that you want to use for the newly created SSO policy. The selected user type appears.
From the Login Policy drop-down list, select the SSO policy that you created in the "Create SSO Login Policy" section.
Click Save.
Note:- Alternatively, to save configuration time, create a new user type, and then modify settings as per your requirement.
- For SSO to work for a user, ensure that the user is mapped to the correct user type and the user type is assigned to the SSO login policy.
Saving the X509 Certificate in PEM Format
Use this section to convert the X509 Certificate value into a format that is suitable for Oracle Identity Cloud Service.
In the SP metadata file, locate
<ds:X509Certificate>under<samlmd:KeyDescriptor use="signing">.Copy value between
<ds:X509Certificate>and</ds:X509Certificate>to a text file.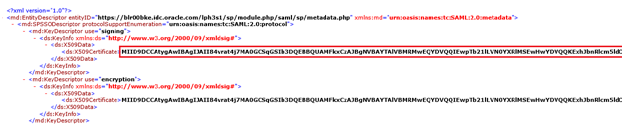
Add
-----BEGIN CERTIFICATE-----at the beginning of the file.Add
-----END CERTIFICATE-----at the end of the file.
Save and change the file extension to .cer.
Obtaining Oracle Field Service Cloud Details
The tenant ID is required before you can register and activate Oracle Field Service Cloud. You obtain this information from the Oracle Field Service Cloud URL: https://login.etadirect.com/your.tenant.id.
The Oracle Field Service Cloud server name is the login.etadirect.com portion of the URL, and the tenant ID is the your.tenant.id portion of the URL.
Configuring Oracle Field Service Cloud in Oracle Identity Cloud Service
Use this section to register and activate Oracle Field Service Cloud and to enable provisioning for Oracle Field Service Cloud. You can then assign users or groups to Oracle Field Service Cloud and start the user provisioning process.
Note: The Synchronization feature is currently not supported.
Prerequisite Steps
To enable provisioning, client credentials (client ID and client secret) and API access permissions are required to authenticate with Oracle Field Service Cloud REST APIs. You obtain these values while registering Oracle Identity Cloud Service tenant with Oracle Field Service Cloud using the Oracle Field Service Cloud admin console.
For details, see the "Configuring Authentication using Oracle Field Service Cloud Token Service" and "Authorization" sections in the REST API for Oracle Field Service Cloud Service document.
Registering and Activating Oracle Field Service Cloud
Access the Oracle Identity Cloud Service administration console, select Applications, and then click Add.
Click App Catalog.
Search for
Oracle Field Service Cloud, and then click Add.In the App Details section, enter the Name and Description.
By default, both of the Oracle Field Service Cloud apps are selected. Clear the sub app that is not required.
Enter the OFSC Tenant Id that you previously obtained. See the "Obtain the Oracle Field Service Cloud Details" section.
Enter the OFSC Manage Login Policy and OFSC Mobility Login Policy that you previously created, and then click Next. See the "Create SSO Login Policy" section.
Note: The OFSC Manage Login Policy and the OFSC Mobility Login Policy are similar when you use the same policy for both applications.
Click Upload to upload the signing certificate that you previously saved in PEM format. See the "Saving the X509 Certificate in PEM Format" section.
Click Next to enable provisioning for Oracle Field Service Cloud. See the "Enabling Provisioning for Oracle Field Service Cloud" section.
After you enable provisioning, click Finish. Oracle Identity Cloud Service displays a confirmation message.
Click Activate, and then click Activate Application. Oracle Identity Cloud Service displays a confirmation message.
Enabling Provisioning for Oracle Field Service Cloud
Use this section to enable provisioning for managing user accounts in Oracle Field Service Cloud through Oracle Identity Cloud Service.
On the Provisioning page, select Enable Provisioning.
Use the table to enter values for establishing a connection with Oracle Field Service Cloud through Oracle Identity Cloud Service:
This table lists the parameters that Oracle Identity Cloud Service requires to connect to Oracle Field Service Cloud. Parameter Value Client ID @ Instance Name Enter the value in the Client ID@Instance Nameformat. In this format, replaceClient IDwith the Client ID that you obtained in the "Prerequisite Steps" section. ReplaceInstance Namewith the Oracle Field Service Cloud instance name that appears on the About tab of the Oracle Field Service Cloud admin console. For example: “idcsApp@acmeinstance“Client Secret Enter the client secret value that you obtained in the “Prerequisite Steps” section. Click Test Connectivity to verify the connection with Oracle Field Service Cloud. Oracle Identity Cloud Service displays a confirmation message.
To view predefined attribute mappings between the user account fields defined in Oracle Field Service Cloud and the corresponding fields defined in Oracle Identity Cloud Service, click Attribute Mapping, and then click OK.
To add a new attribute for provisioning, click Add Attribute, specify the attributes in the User and Oracle Field Service Cloud Account columns, and then click OK. For example, if you want to add the User Name field, enter
$(user.userName)in the User column, and then select the corresponding field from the drop-down list in the Oracle Field Service Cloud Account column.Note: For SSO to work for provisioned users, ensure that the user type that you specify (in the User column for the userType attribute) is assigned to the login policy that you created for SSO profile in the "Creating the SSO Login Policy" section.
Specify the provisioning operations that you want to enable for Oracle Field Service Cloud:
Note: By default, the Create Account and Delete Account check boxes are selected.
Create Account: Automatically creates an account in Oracle Field Service Cloud when access is granted to the corresponding user in Oracle Identity Cloud Service.
Delete Account: Automatically deletes an account from Oracle Field Service Cloud when access is revoked from the corresponding user in Oracle Identity Cloud Service.
You can now manage Oracle Field Service Cloud accounts through Oracle Identity Cloud Service. For more information on performing provisioning tasks, see the Managing Oracle Identity Cloud Service Users and Managing Oracle Identity Cloud Service Groups sections in Administering Oracle Identity Cloud Service.
Note: Before assigning the Oracle Field Service Cloud app to a user account, ensure that the Time Zone and Preferred Language attributes are specified for the account otherwise the app grant process fails.
Verifying the Integration
Use this section to verify that SSO and single log-out (SLO) work when initiated from Oracle Identity Cloud Service (IdP Initiated SSO and IdP Initiated SLO) and when initiated from Oracle Field Service Cloud (SP Initiated SSO and SP Initiated SLO).
Verifying Identity Provider Initiated SSO from Oracle Identity Cloud Service
Access the Oracle Identity Cloud Service My Profile console:
https://<IDCS-Service-Instance>.identity.oraclecloud.com/ui/v1/myconsole/.Log in using credentials for a user that is assigned to Oracle Field Service Cloud. Oracle Identity Cloud Service displays a shortcut to the Oracle Field Service Cloud sub app under My Apps. For example, it displays Oracle Field Service Cloud Manage or Oracle Field Service Cloud Mobility.
Click one of the Oracle Field Service Cloud sub apps. The Oracle Field Service Cloud home page appears.
On the Oracle Service Cloud home page, confirm that the user that is logged in is the same for both Oracle Field Service Cloud and Oracle Identity Cloud Service.
This confirms that SSO that is initiated from Oracle Identity Cloud Service works.
Note: In some scenarios, the user might not be assigned to a given app in Oracle Field Service Cloud. The user is still able to view the app in Oracle Identity Cloud Service. However, if the user tries to access the app, the user is logged out of Oracle Field Service Cloud and Oracle Identity Cloud Service. This is a known limitation that users can't be assigned to individual sub apps in Oracle Identity Cloud Service.
Verifying Service Provider Initiated SSO from Oracle Field Service Cloud
Access Oracle Field Service Cloud using the URL:
https://login.etadirect.com/{OFSC-tenantId}/manage/{OFSC-loginPolicy}for the Manage app or\https://login.etadirect.com/{OFSC-tenantId}/mobility/{OFSC-loginPolicy}for the Mobility app. The Oracle Identity Cloud Service login page appears.Enter credentials for a user that is assigned to Oracle Field Service Cloud, and then click Sign In. The Oracle Field Service Cloud home page appears.
Confirm that the user that is logged in is the same for both Oracle Field Service Cloud and Oracle Identity Cloud Service.
This confirms that SSO that is initiated from Oracle Field Service Cloud works.
Verifying Identity Provider Initiated SLO
On the Oracle Identity Cloud Service home page, click the user name in the upper-right corner, and then select Sign Out from the drop-down list. The user is logged out, and the Oracle Identity Cloud Service login page appears.
On the Oracle Field Service Cloud home page, perform any operation. The Oracle Identity Cloud Service login page appears. This confirms that SLO works and that the user is no longer logged in to Oracle Field Service Cloud and Oracle Identity Cloud Service
Verifying Service Provider Initiated SLO
On the Oracle Field Service Cloud home page, click the user name in the upper-right corner, and then select Logout from the drop-down list. The user is logged out of Oracle Field Service Cloud and the Oracle Identity Cloud Service login page appears.
Access the Oracle Identity Cloud Service My Profile console, and then confirm that the user is no longer logged in.
This confirms that SLO works and that the user is no longer logged in to Oracle Field Service Cloud and Oracle Identity Cloud Service.
Troubleshooting
Use this section to locate solutions to common integration issues.
Known Issues
Oracle Field Service Cloud displays the error, "Incorrect request. If the problem persists, please contact the administrator"
Cause: SSO is not configured correctly.
Solution: Verify that your SSO configuration is configured correctly.
In the console, users can view multiple application links. At times, a log-out operation is initiated when users attempt to access a particular application link.
Cause: In the current release, two the applications are displayed in the console, namely Oracle Field Service Cloud Manage application and Oracle Field Service Cloud Mobility application. Few users have access to the Oracle Field Service Cloud Mobility application only. When users, who have access only to Oracle Field Service Cloud Mobility application, attempt to access the Oracle Field Service Cloud Manage application, a Single Logout Operation (SLO) is triggered.
Solution: Users need to verify and then click the application links considering their granted access.
SLO at times is not successful. Consider a scenario where a user is logged in to Oracle Identity Cloud Service, Oracle Field Service Cloud Mobility and Oracle Field Service Cloud Manage applications. In such a scenario, when the user performs a logout operation, then the logout operation is successful from the Oracle Identity Cloud Service application and from one of the Oracle Field Service Cloud applications.
Cause: Oracle Identity Cloud Service logout operation is successful, however, the SLO operation either from Oracle Field Service Cloud Mobility or Oracle Field Service Cloud Manage applications will not get triggered. This is because, Oracle Field Service Cloud Mobility and Oracle Field Service Cloud Manage applications are two different interfaces. Operations in these applications are handled separately.
Solution: Users need to manually logout from Oracle Field Service applications.
Unknown Issues
For unknown issues, contact Oracle Support:
Go to https://support.oracle.com.
Select Cloud Support, and then sign in with your support credentials.
In the Cloud Dashboard, confirm that there are no planned outages in Oracle Identity Cloud Service, and then click Create Service Request.
Select Oracle Identity Cloud Service as the service type.
Complete your service request.