Oracle Service Cloud
Before You Begin
Introduction
This document describes how to configure Oracle Identity Cloud Service to provide Single Sign-On (SSO) using SAML and provisioning for Oracle Service Cloud.
About Oracle Service Cloud
Oracle Service Cloud is designed to help you differentiate your brand by developing lasting, profitable relationships with unified web, social, and contact center experiences. Get training for all job roles in your organization that interact with your Oracle Service Cloud applications.
After integrating Oracle Service Cloud with Oracle Identity Cloud Service:
- Users can access Oracle Service Cloud using their Oracle Identity Cloud Service login credentials.
- Users can start Oracle Service Cloud using the Oracle Identity Cloud Service My Apps console.
- Admins can assign and revoke user access to the Oracle Service Cloud app using the Oracle Identity Cloud Service administration console.
What Do You Need?
- An Oracle Service Cloud application with a minimum supported version of 17.2 GA.
- An Oracle Identity Cloud Service account with authorization rights to manage apps and users (Identity Domain Administrator or Application Administrator).
- An Oracle Service Cloud administrator account with authorization rights to configure Identity Providers, federated authentication, and user profile editing.
- An Oracle Service Cloud account to manage user accounts in Oracle Service Cloud through Oracle Identity Cloud Service.
- Host name and port number of Oracle Service Cloud instance.
- Make sure that the email ID of each user in Oracle Service Cloud matches the primary email ID of the Oracle Identity Cloud Service account.
- Identity Provider metadata. Use the following URL to access the metadata:
https://<IDCS-Service-Instance>.identity.oraclecloud.com/fed/v1/metadata.
Configuring SSO for Oracle Service Cloud
Use this section to configure SSO in Oracle Service Cloud with Oracle Identity Cloud Service. Perform these steps after installing the Oracle Service Cloud desktop application.
Enabling SSO for Oracle Service Cloud
Enable the SSO_ENABLE_EXTERNAL_IDP configuration setting in Oracle Service Cloud by submitting a ticket to https://cx.rightnow.com/app/mysupport/ask/group/techsupport. After the setting is enabled, follow these steps to add the Single Sign-On Configurations component to the navigation set for the administrator.
Access the Oracle Service Cloud instance, and then select Install Oracle Service Cloud -Internal Login.
Click the Navigation gear icon to access Navigation settings.
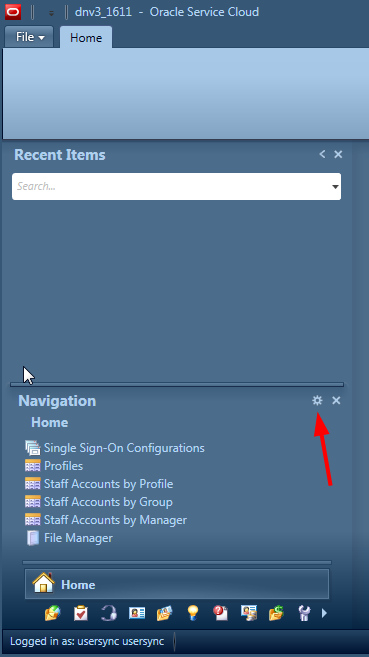
In the Customize List window, click Find in List, enter Single Sign-On Configurations, and then click Find Next. Single Sign-On Configurations is highlighted in the Available Items pane.
Select Single Sign-On Configurations, and then select Add. Single Sign-On Configurations appears in the Selected Items pane.
Click OK. The Single Sign-On Configurations navigation item appears in the Navigation pane.
Enabling SSO Profile Permissions in Oracle Service Cloud
In Oracle Service Cloud, select the Configuration icon from the bottom Navigation toolbar, expand Staff Management, and then double-click Profiles.
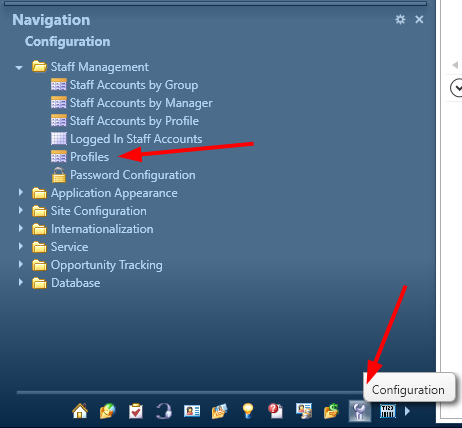
On the Profiles page, double-click the profile that is to be used for SSO.
If an SSO profile doesn't exist, create a new one by selecting New from the toolbar, entering a name for the profile, and then clicking Save.
Click Permissions from the toolbar.
On the Administration tab, verify that the SSO Login (SAML 2.0) check box is selected.
Click Save and Close.
Note: Assign this SSO profile to every user account that should log in through SSO using Oracle Identity Cloud Service.
Setting Up the Identity Provider on Oracle Service Cloud
Double-click Single Sign-On Configurations under Navigation.
Click Import IDP Metadata from the toolbar.
Select the Oracle Identity Cloud Service metadata file that you obtained in the “What Do You Need?” section, and then click Open. A new identity provider row appears in the Identity Providers section of the page.
Select the newly added identity provider. The Identity Provder edit section appears on the right.
Select the Active and Web SSO check boxes.
Note: If multiple identity providers are configured, only one identity provider can be active and enabled for Web SSO.
Select Login Name in the Subject Type drop-down list.
Click Save.
Click Export SP Metadata from the toolbar.
Enter a file name for the SP metadata, and then click Save.
Saving the X509 Certificate in PEM Format
Use this section to convert the X509 Certificate value into a format that is suitable for Oracle Identity Cloud Service.
In the SP metadata file, locate
<ds:X509Certificate>under<samlmd:KeyDescriptor use="signing">.Copy the value between
<ds:X509Certificate>and</ds:X509Certificate>to a text file.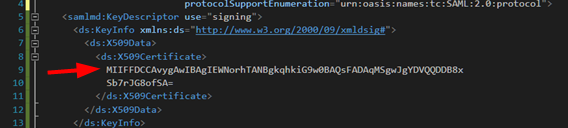
Add
-----BEGIN CERTIFICATE-----at the beginning of the file.Add
-----END CERTIFICATE-----at the end of the file.
Save and change the file extension to .cer.
Alternatively, you can use OpenSSL tools to convert this file.
Copy the value between
Run the following command. This converts the input to DER encoded X509 and writes to a file that is named SPCertDER.cer:
openssl base64 -d -A -in inputfile.cer -out SPCertDER.cerRun the following command to convert the DER encoding to PEM:
openssl x509 -in SPCertDER.cer -inform der -outform pem -out <outfilename>
Specifying Additional Intermediate/Root CA Certificates (if required)
Contact Oracle support at https://support.oracle.com to obtain the CA certificates used by Oracle Identity Cloud Service for signing/encrypting SAML assertions.
In Oracle Service Cloud, click the Configuration icon in the Navigation pane, and then expand Site Configuration.
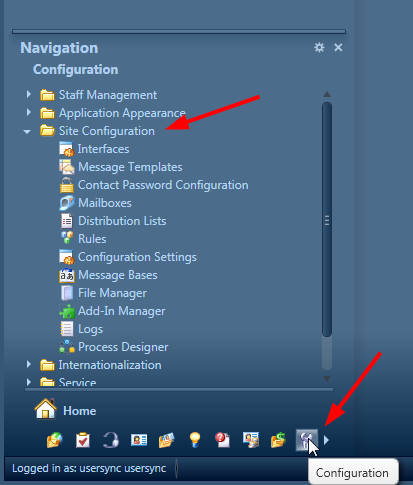
Double-click File Manager, and then select Intermediate Certificates from the Switch to drop-down list.
Click Browse, select the intermediate CA certificate, and then click Open.
Click Go.
Repeat steps 4 & 5 for all intermediate certificates.
Select Additional root certificates from the Switch to drop-down list.
Click Browse, select the root CA certificate, and then click Open.
Click Go.
Configuring Oracle Service Cloud in Oracle Identity Cloud Service
Use this section to register and activate Oracle Service Cloud, and to enable provisioning and synchronization for Oracle Service Cloud. You can then assign users or groups to Oracle Service Cloud and start the user provisioning process.
Note: The Synchronization feature is currently not supported for Oracle Service Cloud. However, you can manually import user accounts from Oracle Service Cloud in Oracle Identity Cloud Service by using a flat file. For details, see the "Creating a Flat File for Manually Importing User Accounts from Oracle Service Cloud" section.
Registering and Activating the Oracle Service Cloud App
Access the Oracle Identity Cloud Service administration console, select Applications, and then click Add.
Click App Catalog.
Search for
Oracle Service Cloud, and then click Add.Use the table to locate the requested values for the General and Advanced Settings sections on the SSO Configuration page. Refer to the Oracle Service Cloud SP metadata file that you downloaded in the "Setting Up the Identity Provider on Oracle Service Cloud" section.
The table lists the values required from the Oracle Service Cloud SP metadata file. Oracle Identity Cloud Service Field XML Element Name in the Metadata XML Attribute Name Value Entity ID samlmd:EntityDescriptor entityID Use the value of this attribute without the quotes. Assertion Consumer URL samlmd:AssertionConsumerService Location Use the value of this attribute without the quotes. Signing Certificate <ds:X509Certificate>under<samlmd:KeyDescriptor use="signing">NA Click Upload, browse to, and then select the .cer file that you created in the “Saving the X509 Certificate in PEM Format” section. Single Logout URL samlmd:SingleLogoutService Location Use the value of this attribute without the quotes. Logout Response URL samlmd:SingleLogoutService Location Use the value of this attribute without the quotes. 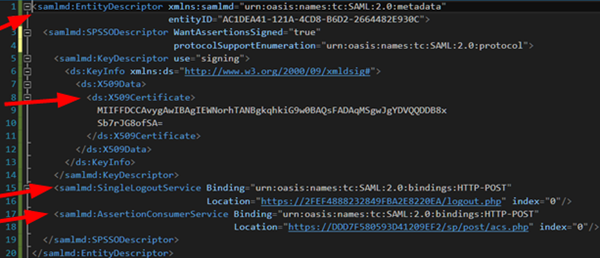
Click Next to enable provisioning and synchronization for Oracle Service Cloud. For details, see the "Enabling Provisioning and Synchronization for Oracle Service Cloud" section.
Click Finish. Oracle Identity Cloud Service displays a confirmation message.
Click Activate, and then click Activate Application. Oracle Identity Cloud Service displays a confirmation message.
Enabling Provisioning for Oracle Service Cloud
Use this section to enable provisioning for managing user accounts in Oracle Service Cloud through Oracle Identity Cloud Service.
On the Provisioning page, select Enable Provisioning.
To view predefined attribute mappings between the user account fields defined in Oracle Service Cloud and the corresponding fields defined in Oracle Identity Cloud Service, click Attribute Mapping. Ensure that you modify the profileID and staffgroupID attribute mapping. You can obtain valid values for these attributes from the RightNow instance that you are using. For details, see the "Obtaining Values for ProfileID and StaffGroupID Attributes" section. Click OK to close the Attribute Mapping window.
Note: To add a new attribute for provisioning, click Add Attribute, specify the attributes in the User and Oracle Service Cloud Account columns, and then click OK. For example, if you want to add the User Name field, enter
$(user.userName)in the User column, and then select the corresponding field from the drop-down list in the Oracle Service Cloud Account column.Use the following table to configure connectivity for establishing a connection with Oracle Service Cloud through Oracle Identity Cloud Service:
This table lists the parameters that Oracle Identity Cloud Service requires to connect to Oracle Service Cloud. Parameter Value Administrator Username User name of the Oracle Service Cloud service account. Administrator Password Password of the Oracle Service Cloud service account. Host Name Enter the host name of the server hosting Oracle Service Cloud. For example, host name value: idcs-17500.qb.lan. Note: The host name value is dynamic and changes for each instance of Oracle Service Cloud.Port Number Enter the port number at which Oracle Service Cloud is listening. For example, port number value: 443Click Test Connectivity to verify the connection with Oracle Service Cloud. Oracle Identity Cloud Service displays a confirmation message.
Specify the provisioning operations that you want to enable for Oracle Service Cloud:
Note: By default, the Create Account, De-activate Account, and the Delete Account check boxes are selected.
Create Account: Automatically creates an Oracle Service Cloud account when Oracle Service Cloud access is granted to the corresponding user in Oracle Identity Cloud Service.
De-activate Account: Automatically activates or de-activates an account in Oracle Service Cloud when the corresponding user is activated or de-activated in Oracle Identity Cloud Service.
Delete Account: Automatically removes an account from Oracle Service Cloud when Oracle Service Cloud access is revoked from the corresponding user in Oracle Identity Cloud Service.
You can now manage Oracle Service Cloud accounts through Oracle Identity Cloud Service. For more information on performing provisioning tasks, see the Managing Oracle Identity Cloud Service Users and Managing Oracle Identity Cloud Service Groups sections in Administering Oracle Identity Cloud Service.
Obtaining Values for ProfileID and StaffGroupID Attributes
Use this section to obtain values for ProfileID and StaffGroupID attributes on the target system:
Log in as an administrator to Oracle Service Cloud.
In the left pane, click the Configure buttons right arrow present next to a list of icons.
Select Configuration and expand Staff Management.
To obtain value for the ProfileID attribute, double-click Profiles. A list of profiles are displayed along with the corresponding Profile ID.
To obtain value for the StaffGroupID attribute:
a. Double-click Staff Accounts by Group. A list of accounts are displayed.
b. Double-click any account. The Account Details – Edit page is displayed.
c. Click the search icon next to the Group field. A list of groups are displayed.
d. Hover the mouse on the group for which you wish to obtain the StaffGroupID value. A tool-tip displays the value of the corresponding staff group.
Creating a Flat File for Manually Importing User Accounts from Oracle Service Cloud
Use this section to generate user data from Oracle Service Cloud and create a compatible flat file for manually importing user accounts in Oracle Identity Cloud Service.
Access the Oracle Service Cloud instance, and generate a user list with values for Account ID, Login, and Status for each corresponding user.
Create a new CSV file and add ID, NAME, and ACTIVE column headers, and then copy corresponding data from the CSV file based on the mappings described in the following table:
This table provides the mapping details, description, and sample values for the Oracle Service Cloud User attributes: Attribute Map To Description ID Account ID Unique identifier NAME Login Account name ACTIVE status Account status Note: Set the value of the ACTIVE column as true for users whose Status value is displayed as ACTIVE based on the user list generated in step 1. For users whose status is otherwise, set the value to false.
You can now use this CSV file to import user accounts into Oracle Identity Cloud Service. For more information on performing this task, see the Importing User Accounts from a Flat File Using REST APIs section in Administering Oracle Identity Cloud Service.
Verifying the Integration
Use this section to verify that SSO works when initiated from Oracle Identity Cloud Service (IdP Initiated SSO) and Oracle Service Cloud (SP Initiated SSO).
Verifying Identity Provider Initiated SSO from Oracle Identity Cloud Service
Access the Oracle Identity Cloud Service My Profile console:
https://<IDCS-Service-Instance>.identity.oraclecloud.com/ui/v1/myconsole.Log in using credentials for a user that is assigned to the Oracle Service Cloud app. Oracle Identity Cloud Service displays a shortcut to Oracle Service Cloud under My Apps.
Click Oracle Service Cloud. The Oracle Service Cloud home page appears.
On the Oracle Service Cloud home page, confirm that the user that is logged in is the same for both Oracle Service Cloud and Oracle Identity Cloud Service.
This confirms that SSO that is initiated from Oracle Identity Cloud Service works.
Verifying Service Provider Initiated SSO from Oracle Service Cloud
Access the Oracle Service Cloud instance, and then select Install Oracle Service Cloud. The log in window displays the Oracle Identity Cloud Service sign-in page.
Enter the credentials of a user that is assigned to Oracle Service Cloud.
On the Oracle Service Cloud home page, confirm that the user that is logged in is the same for both Oracle Service Cloud and Oracle Identity Cloud Service. The user name is located in the bottom left of Oracle Service Cloud home page.
This confirms that SSO initiated from Oracle Service Cloud works.
Troubleshooting
Use this section to locate solutions to common integration issues.
Known Issues
Oracle Service Cloud displays the message, "Single Sign-On is not configured correctly. Please contact your system administrator."
Cause: Either the user account doesn't exist in Oracle Service Cloud or the SSO configuration in Oracle Service Cloud is incorrect.
Solution: Check your SSO configuration and check that the SSO profiles that are assigned to user accounts are configured correctly.
Oracle Service Cloud displays the message that Single Sign On access is denied.
Cause: Either the user account doesn't have the correct SSO profile assigned in Oracle Service Cloud or the SSO configuration in Oracle Service Cloud is incorrect.
Solution: Check your SSO configuration and check that the SSO profiles that are assigned to user accounts are configured correctly.
You may face application grant failure if you are trying to assign the application to more then 5 users at a given point of time. For example, if you are trying to assign Oracle Service Cloud to 10 users at once, it may be assigned to 7 out of 10 users only.
Cause: This issue is a result of target system behavior.
Solution: There is no workaround available for this issue.
While performing a group grant or revoke operation, you may face an average delay of 30 minutes in creation or deletion of users on Oracle Service Cloud.
Cause: This issue is a result of target system behavior.
Solution: There is no workaround available for this issue.
Unknown Issues
For unknown issues, contact Oracle Support:
Go to https://support.oracle.com.
Select Cloud Support, and then sign in with your support credentials.
In the Cloud Dashboard, confirm that there are no planned outages in Oracle Identity Cloud Service, and then click Create Service Request.
Select Oracle Identity Cloud Service as the service type.
Complete your service request.