Create Mappings
After orchestrated the required activities in this example, you need to create the following mappings to ensure the source and target data between activities can be processed successfully for the integration:
-
Create mappings for "RA_Interface_Lines"
-
Create mappings for "Submit_RAXMTR"
Create Mappings for the RA_Interface_Lines Map
-
In the "EBS OIT Demo" integration page, click the Edit icon for the
Map to RA_Interface_Linesicon. -
Perform the following tasks to creating mapping:
In this example, you need to map all the elements under the RA_INTERFACE_LINES_ALL_Input node from the Source section to the corresponding elements in the RA_INTERFACE_LINES Request (Oracle E-Business Suite) node under the Target section.
For example, create the first mapping using the following steps:
-
In the Source section, expand the RA_INTERFACE_LINES Request (Oracle E-Business Suite) node, then the RA_INTERFACE_LINES_ALL_Input note, and then the RESTHeader node.
Select the Responsibility element from the RESTHeader node.
-
In the Target section, expand the RA_INTERFACE_LINES Request (Oracle E-Business Suite) node, and then the RESTHeader node.
Select the Responsibility element.
Drag and drop the Responsibility element from the Source section to the Responsibility element in the Target section to map the data.
-
-
Use the same mapping mechanism described above to map all the elements under the RA_INTERFACE_LINES_ALL_Input node from the Source section to the corresponding elements in the RA_INTERFACE_LINES Request (Oracle E-Business Suite) node under the Target section. Specifically, you need to creating mappings for the following elements:
-
All elements under the RESTHeader node from the Source section to the corresponding elements in the Target section
-
The Select element from the Source section to the Select element in the Target section
-
All elements under the InputParameters node from the Source section to the corresponding elements in the InputParameters node in the Target section
-
-
Click Validate or Close to exit the mapper, then click Save to save your changes when prompted.
Create Mappings for the Submit_RAXMTR Map
-
In the "EBS OIT Demo" integration page, click the Edit icon for the
Map to Submit_RAXMTRicon. -
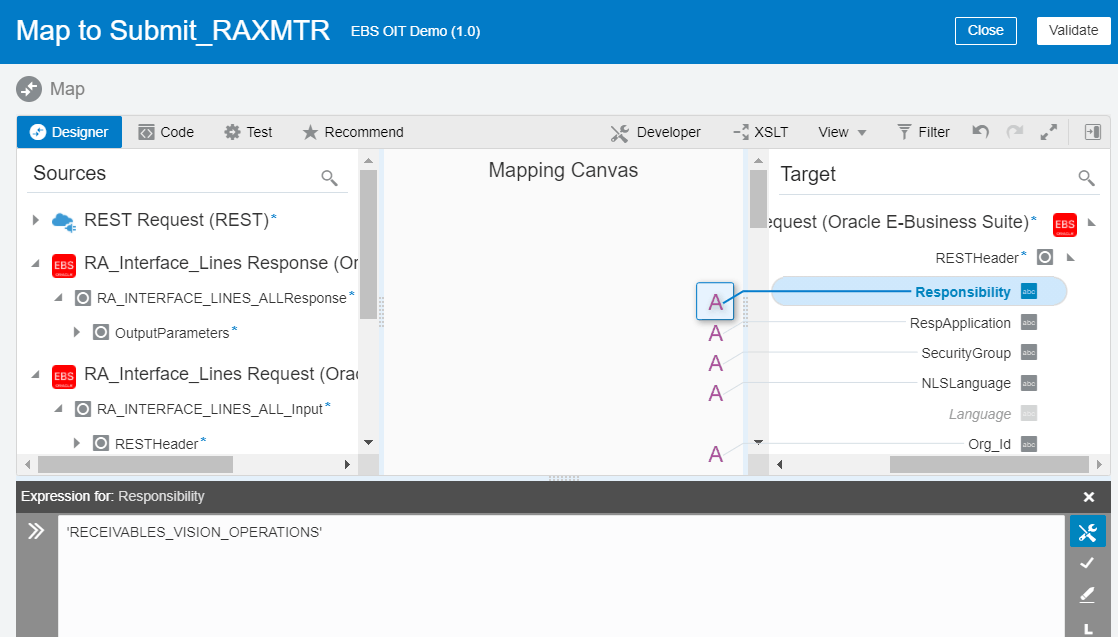
In the Mapper page, assign constant values to the target elements.
-
In the Target section, expand the Submit RAXMTR (Oracle E-Business Suite) node, and then the RESTHeader node.
- Click the Toggle functions icon
 to launch the Components panel.
- Right-click the Responsibility element and select Create Target Node from the drop-down menu.
- In the Expression Builder at the bottom of the page, click the "Switch to Developer View" icon and then enter
'RECEIVABLES_VISION_OPERATIONS'for the Responsibility element.A function icon is added to the Mapping Canvas section for the target Responsibility element node. This icon indicates that a function is used in this mapping.
Similarly, use the same approach to assign appropriate values to the target elements listed in the following table:
Path Element Value Submit RAXMTR (Oracle E-Business Suite)/RESTHeader RespApplication 'AR' Submit RAXMTR (Oracle E-Business Suite)/RESTHeader SecurityGroup 'STANDARD' Submit RAXMTR (Oracle E-Business Suite)/RESTHeader NLSLanguage 'AMERICAN' Submit RAXMTR (Oracle E-Business Suite)/RESTHeader Org_Id '204' Submit RAXMTR (Oracle E-Business Suite)/InputParameters APPLICATION 'AR' Submit RAXMTR (Oracle E-Business Suite)/InputParameters PROGRAM 'RAXMTR' Submit RAXMTR (Oracle E-Business Suite)/InputParameters SUB_REQUEST '0' Submit RAXMTR (Oracle E-Business Suite)/InputParameters NumberofInstances '1' Submit RAXMTR (Oracle E-Business Suite)/InputParameters Organization '204' Submit RAXMTR (Oracle E-Business Suite)/InputParameters BatchSourceId '20' Submit RAXMTR (Oracle E-Business Suite)/InputParameters BatchSourceName 'PROJECTS INVOICES' Submit RAXMTR (Oracle E-Business Suite)/InputParameters BaseDueDateonTrxDate 'Y' After you complete this step, function icons are added in the Mapping Canvas section for the corresponding target elements listed in the table above.
-
-
Click Validate or Close (which also performs validation) to exit the mapper, then click Save to save your work.
