About This Learning Path
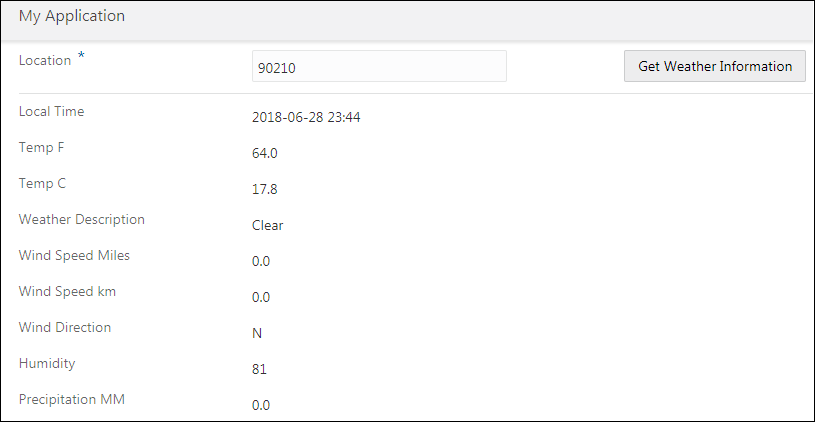
With Oracle Integration, you have the power to build applications and quickly design integrations that connect applications into a seamless unified solution. In this learning path, you’ll build a solution to enable your users to view weather forecast for a given location. You want users to be able to enter the zip code or the name of a location and view details like what’s the local time, temperature, wind speed, and humidity level in that location. Let’s say you want to build something like this:

Description of the illustration run_app.png
You’ll use the Integrations and Visual Builder features of Oracle Integration to retrieve weather forecast from a REST weather API named APIXU. To complete the learning path, you'll need access to Oracle Integration. You’ll also need to sign up with the APIXU weather API to obtain the API key.
You’ll follow these three main steps to build the solution: create connections, set up an integration, and build your Visual Builder application.
You begin by creating connections. You create an integration connection and then a connection to APIXU. After the connections are in place, you create and configure your integration. You need to use the integration connection as the trigger and configure the endpoint by specifying request query parameters and the response data that the integration will send to the Visual Builder application. Next, you use the weather API connection as the invoke and configure the endpoint by specifying the request query parameters and the response data that the weather API returns to your integration.
Applications generally use different data structures. To enable information exchange, you need to map their parameters. In your integration, you define the mappings that transfer data between the trigger and invoke for each request and response. You need to map the request query parameters. You also need to map the response parameters. Then, define business identifiers for tracking payload fields in messages during runtime. After you activate your integration, it’s ready to be invoked.
You can then create the front-end for the integration – your Visual Builder application. You configure your application to create a connection to the integration. Next, you design your application’s user interface. You define the fields that display weather details, define variables corresponding to each field, and map the fields with the variables. When your application’s user interface is ready, you need to define the event that will invoke the integration. Let’s say that the integration is invoked when the user clicks the Get Weather Information button. In the action chain for the button, you need to map the location parameters of the integration and your application and specify the API key. Then, you map the integration’s response parameters with the variables defined in the application.
When your application is ready, run the application, enter a location of your choice, and click the Get Weather Information button. This makes your application to invoke the integration. The integration then connects to the weather API, retrieves the weather forecast, and displays it to you. That’s all there is to it. Let’s begin!

