Quick Start
Set up your environment and use REST APIs to communicate with an application in the Oracle Internet of Things (IoT) Cloud Service instance to:
-
Create your device model in an IoT application of Oracle IoT Cloud Service
-
Register your device in an IoT application of Oracle IoT Cloud Service
-
Activate your device
-
Send messages from your device
-
Retrieve stored messages from the application in Oracle IoT Cloud Service
Complete the following steps sequentially to meet these objectives.
Prerequisites
To obtain the account information, install prerequisite software, and download quick start sample code, complete the following:
| Topic | Description | More Information |
|---|---|---|
| Oracle IoT Cloud Service account information | You received the following account information by e-mail when you purchased the cloud service:
|
Accessing the Cloud Service |
| Operating System | The minimum system requirements are Ubuntu 14.04 LTS or Oracle Linux 6. | Oracle Linux: How To |
| Java | Download and install JDK 1.8. | Java SE Documentation |
| cURL |
|
About cURL |
| Gradle |
|
About Gradle |
| OpenSSL |
|
About OpenSSL |
| REST API Quick Start sample code |
|
Perform the steps described in this document. |
| Oracle IoT Cloud Service Terminology | Get familiar with the common terms used in Oracle IoT Cloud Service. | Terminology |
You are now ready to send requests to the Oracle IoT Cloud Service REST API using cURL.
Preparation
To run the scripts that will send requests to the application in Oracle IoT Cloud Service, complete the following.
-
Have the following information ready for input:
-
Oracle IoT Cloud Service URL, port, user name, and password.
Note:
The format of the Cloud Service instance is
and the default port is 443.https://myinstance-myidentitydomain.iot.us.oraclecloud.com -
Activation ID, device name, and shared secret of your device.
-
Device model name, URN, and URN format of the device model.
-
The target IoT application name in which you'll create the device model and devices. The default application name is Asset Monitoring (AM). The other options are Production Monitoring (PM), Fleet Monitoring (FM), or Connected Worker (CW).
-
-
In a command line, go to the
iotcs/rest/scriptsfolder. -
Run
.set_envorsource set_env. -
Enter the values that the
set_envscript requests for. -
After entering all values, enter your choice that determines how you wish to execute the steps of the scripts:
-
To execute all the steps together, enter
1. The system will pause between each step and will continue when you click enter. -
To run one step at a time, enter
2. Option2allows you to run one step at a time as described in the following steps.
-
Step 1: Create Your Device Model
-
Device models, see Create and Manage Device Models
-
REST method, see POST
/iot/api/v2/apps/{app-id}/deviceModels
The following image illustrates the flow to create a device model in your Oracle IoT Cloud Service instance
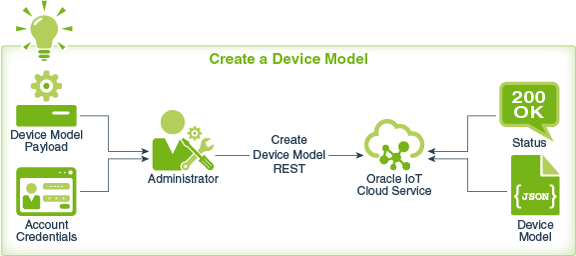
/scripts folder in a command line:
-
Verify that the payload of your device model is stored at
/json/device_model_payload.json. -
Run
./create-device-model.In the script, this displays as step 1 of the process.Note:
To view the usage details of the script, you can do the following:./create-device-model -h or ./create-device-model --help. -
Verify that
device_model.jsonis created in the/jsonfolder that contains the response of the GET request.
Troubleshooting Information
Error: Connection refused
-
Possible causes: Server URL has incorrect name or format.
-
Solution: Verify the name and spelling of the URL for your Oracle IoT Cloud Service instance. Enter
ctrl+cto exit and redo the steps.
Error: Duplicated device model or invalid device model
-
Possible causes: The URN and name of your device model already exists in the Oracle IoT Cloud Service instance or is of incorrect format.
-
Solution: Run
and runsource set_env, enter unique values, select option2./create-device-model.
Step 2: Register a Single Device
-
Single device registration, see Registering Devices
-
REST method, see POST
/iot/api/v2/devices
The following image illustrates the flow to create a device model in your IoT Cloud Service instance:
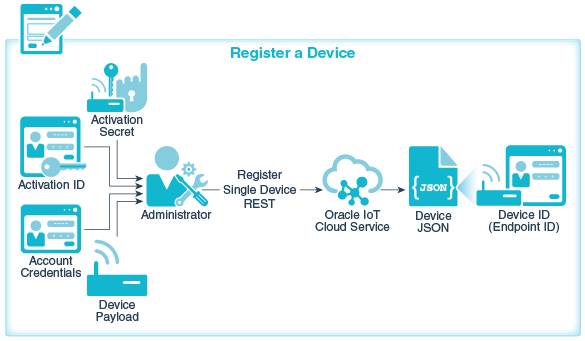
-
Verify that the payload of your device is stored at
/json/device_payload.json. This file was created when you ran theset_envscript in step 1. -
Run
./register-device.In the script, this displays as step 2 of the process.Note:
To view the usage details of the script, you can do the following../register-device -h or ./register-device --help
The script will execute the cURL command that sends a GET request to register a device in Oracle IoT Cloud Service and store the response in a JSON file.
Verify that device.json is created in the /json folder and note the value of Device ID/Endpoint ID.
Troubleshooting Information
Error: Cannot Register.
-
Possible causes: Device payload has incorrect information.
-
Solution: Verify the information in
device_payload.jsonand run./register-deviceagain.
Step 3: Activate the Device
To activate a directly connected device, the device obtains an activation token and an activation policy from Oracle IoT Cloud Service by sending a POST request and a GET request respectively. You then generate a public/ private key pair using Java. Finally the device sends a POST request to activate it.
-
Activating a device, see Activating Your Device
-
Obtaining an activation token, see Example for getting an activation token
-
Generate key pair, see Generate public and private keys
-
REST methods:
- Get activation token, see POST
/iot/api/v2oauth2/token -
Get activation policy, see GET
/iot/api/v2/activation/policy -
Activate a directly connected device, see POST
/iot/api/v2/activation/direct
- Get activation token, see POST
The following image illustrates the flow and sequence of steps to activate your device in your Oracle IoT Cloud Service instance. The flow includes Get Activation Token, Get Activation Policy, Generate RSA Key Pair and then Activate Device.
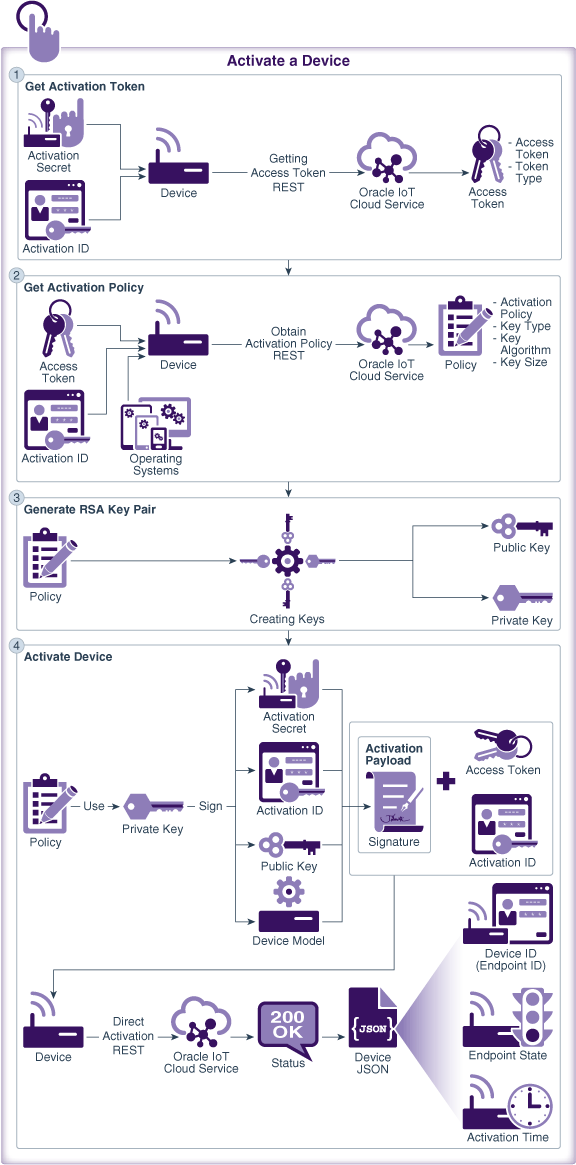
-
To activate the registered device run
./activate.Note:
To view the usage details of a script, you can do the following:./activate -h or ./activate --help.
Ensure all the steps involved in device activation, namely get activation token displayed as step 3 in the script, get activation policy displayed as step 4, generate RSA key pair displayed as step 5 and activate device displayed as step 6 are completed successfully.
Your device is directly connected and is ready to send and receive messages from Oracle IoT Cloud Service.Troubleshooting Information
-
Possible causes: If you are working behind a proxy, proxy information for Gradle is missing.
-
Solution: create
gradle.propertiesfile in the/iotcs/restfolder. In this file, specify your HTTP and HTTPS proxies by setting the following properties and then save and close the file.systemProp.http.proxyHost=your_proxy_server.com systemProp.http.proxyPort=your_proxy_port systemProp.https.proxyHost=your_proxy_server.com systemProp.https.proxyPort=your_proxy_port
Step 4: Send Messages from a Device to Oracle IoT Cloud Service
To send a message from a device to Oracle IoT Cloud Service, the device first obtains a message token by a POST request and then sends the message by another POST request.
-
get activation token, see POST
/iot/api/v2oauth2/token -
send message, see POST
/iot/api/v2/messages
The following image illustrates the flow and sequence of steps to send message from your device to your Oracle IoT Cloud Service instance. The flow includes Get Message Token and Send Message.
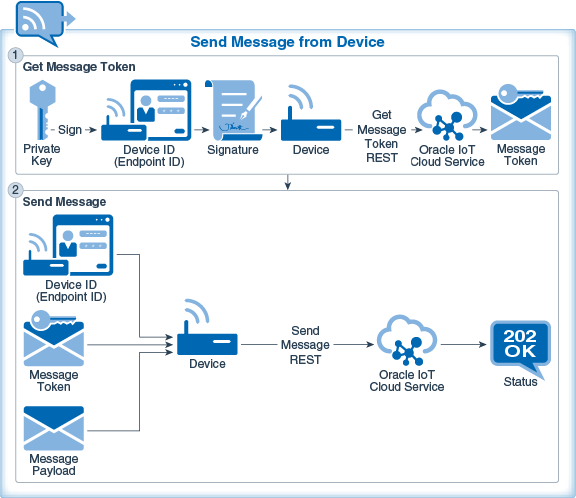
To obtain a message token from Oracle IoT Cloud Service and send a message from the device, complete the following:
-
Run
./generate-token-send-messages.Note:
To view the usage details of a script, you can do the following:./generate-token-send-messages -h or ./generate-token-send-messages --help.
Ensure that all the steps namely, get message token displayed as step 7 in the script and send message displayed as step 8 are completed successfully.
The activated device has sent a message to Oracle IoT Cloud Service. Messages are sent as an array of JSON objects.
Troubleshooting Information
-
Possible causes: The endpoint ID used for obtaining message token is incorrect.
-
Solution:
Run./generate-token-send-messages.
Step 5: Retrieve Device Messages from Oracle IoT Cloud Service
-
REST method, see GET
/iot/api/v2/apps/{app-id}/messages
The following image illustrates the flow to retrieve messages of a device from your Oracle IoT Cloud Service instance:
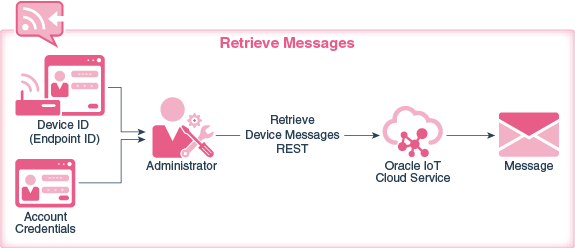
To retrieve messages of a Device ID from Oracle IoT Cloud Service complete the following steps:
- Run
./retrieve-messages.Note:
To view the usage details of a script, you can do the following../retrieve-messages -h or ./retrieve-messages --help.
Ensure that the step, displayed as step 9 in the script completes successfully.
You have received the messages sent by your device to Oracle IoT Cloud Service.
Troubleshooting Information
-
Possible causes: You have provided a Device ID that is not registered or activated in Oracle IoT Cloud Service.
-
Solution: Verify that the Device ID is active and run the script again.
Want to Learn More?