 Set Up a Raspberry Pi for Connecting to Oracle IoT Cloud Service
 Before You Begin
This 15-minute tutorial shows you how to configure a Raspberry Pi device so that you can install Oracle Internet of Things (IoT) Cloud Service software on it.
Background
Oracle IoT Cloud Service enables you to manage very large numbers of devices and provides communication services between devices and enterprise applications. On a lower level, the Oracle IoT Cloud Service Gateway component runs on certain types of devices, enabling you to manage devices that cannot communicate directly with the Oracle IoT Cloud Service. Similarly, the Oracle IoT Cloud Service Client Software Library component can run on devices that do communicate directly with the Oracle IoT Cloud Service.
The Raspberry Pi is a computer that is about the size of a deck of cards, yet it is capable of running a Linux distribution on its ARM11 processor; also supports USB, Ethernet, audio, HDMI, and RCA video output. But most importantly, the Raspberry Pi provides a 26-pin or 40-pin header that connects the computer to the outside world, through general-purpose input/output (GPIO) pins that can drive LEDs, read switches and other electronic signals, and connect to a wealth of inter-integrated circuit (I2C) devices, universal asynchronous receiver/transmitter (UART) devices, and more.
What Do You Need?
- A computer running Windows OS, if you have a system that is running native Linux, the steps may be easier, because your system may be able to access the Raspberry Pi device directly
- Raspberry Pi Model B Revision 2 or Model B+, power supply, Ethernet cable. (This tutorial has been tested with a Raspberry Pi Model B+. It should work equally well with earlier and later models (Model B or Raspberry Pi 2-3)
- 32 GB SD memory card
- Download and install the Raspbian image (make a note of the SHA-1 checksum for the zip file that you downloaded, locate the checksum in the Raspbian part of the page)
- Download and install the SD Association Formatter tool
- Download and install Win32DiskImager
 Create a Bootable Image for the Raspberry Pi
In order to boot, the Raspberry Pi requires a bootable Linux image on an SD memory card. There is no hard drive for the computer. Instead, the 32 GB card stores the image that the computer runs when it is powered on. This SD memory card also acts as the storage for other applications that are loaded onto the card.
- Insert the SD memory card into your computer or connect it to your computer by using an SD card peripheral.
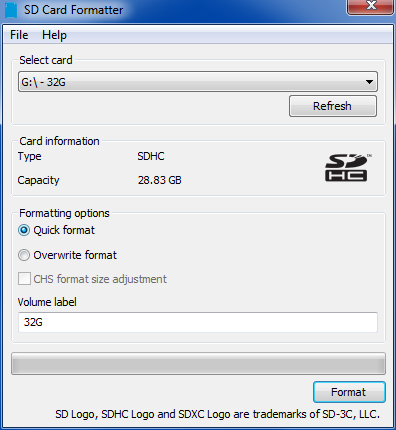
- Start the SD Formatter tool and click Option.
- In the Option Setting dialog box, select FULL (Overwrite) for Format Type and ON for Format Size Adjustment, and then click OK.
- To start the SD Formatter tool, click Format.
- To format the SD memory card, click OK.
- When the format is complete, you are now ready to install the Raspbian image in the SD memory card, now click OK to close the dialog box.
- Open an unzip tool and extract the contents of the Raspbian zip file. The extracted file has the suffix
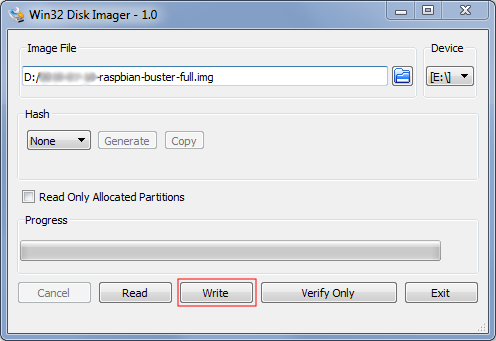
.img. - Start the Win32DiskImager application. Make sure that the device address is the same as the mount point for the SD memory card.
- Click the Folder button, navigate to the location of the image file, and click Write.
- Click Yes to confirm that you want to overwrite the contents of the SD memory card.
- When the Write Successful message is displayed, click OK.
- Close the Win32DiskImager and remove the SD memory card from the computer. You are now ready to boot and configure the Raspberry Pi.
 Set up the Raspberry Pi to Allow SSH Connections
To set up the Raspberry Pi, you configure Raspbian to allow SSH connections by using a USB keyboard, mouse and an HDMI monitor in the Raspbian graphical user interface (GUI).
- Insert the SD memory card into the Raspberry Pi, to start to set up the physical connections for the Raspberry Pi.
- Connect the USB keyboard and USB mouse.
- Connect the HDMI cable for the monitor.
- Connect the Ethernet cable.
- Plug in the power cable.
The connections look like this for a Raspberry Pi Model B+:
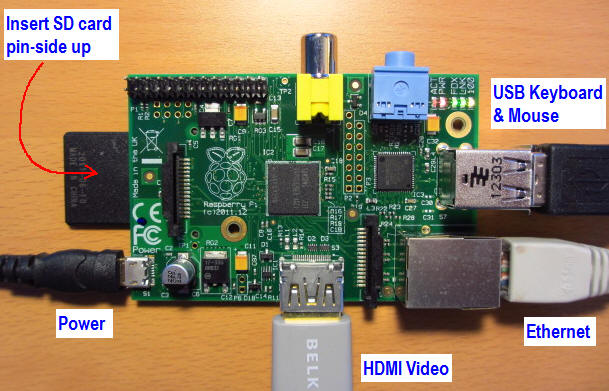
Description of the illustration kbd_01.png - Wait until the Rasperry Pi starts.
- To configure the Raspberry Pi, click the terminal icon to open a terminal window.

Description of the illustration int_01.png - In the terminal window, enter the following command to open the Raspberry Pi configuration file:
sudo raspi-config - The
raspi-configconfiguration screen appears. Select Advanced Options, and then select Expand Filesystem and press Enter to expand the file system and use all of the SD memory card storage.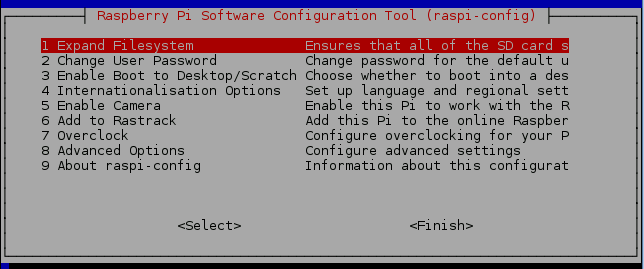
Description of the illustration kbd_02.png - Select Interfacing Options and press Enter.
- Select SSH and press Enter.
- Select Enable and press Enter then Enter again.
Note: After enabling SSH, go through the same steps to enable SPI and I2C
- Select Finish and press Enter.
- Select Yes and press Enter to reboot the Raspberry Pi.
 Configure the Raspberry Pi for Internet Access
If you are behind a firewall, you need to specify the proxy through which you access the Internet. In addition, you need to specify some other Linux configuration settings.
- To open the command prompt window, click the terminal icon.
If you are not behind a firewall, skip to step 6.
- Become root, go to root's home directory, and open a text editor for editing the
.profilefile:sudo su cd nano .profile - Edit the
.profilefile to add the following settings:export ftp_proxy=http://my-proxy:my-port export http_proxy=http://my-proxy:my-port export https_proxy=http://my-proxy:my-portThe
exportstatements look something like the following: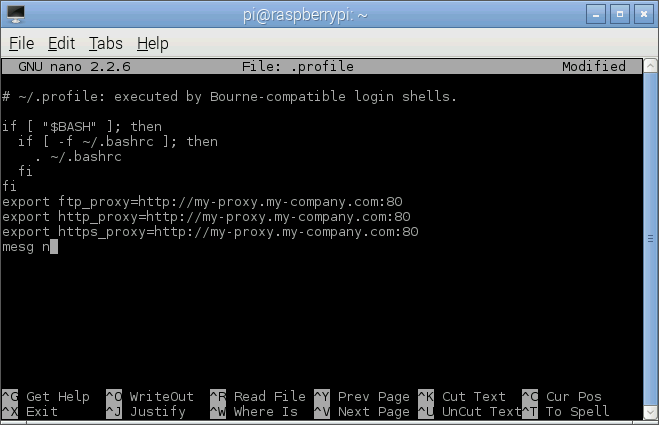
Description of the illustration int_04.png - To save the file press Ctrl + O and then press Enter. To close nano and return to the prompt press Ctrl + X and then press Enter.
- Enter the following to activate your proxy settings:
source .profile - Enter the following to ensure that your Raspberry Pi software is up to date:
apt-get update; apt-get upgradeIt takes several minutes to perform all the updates. You may be asked for confirmation on some packages.

Description of the illustration int_06.png - To obtain software needed (it takes several minutes to obtain all the software), enter the following (all on one line):
apt-get install wget curl git build-essential ant binutils avahi-daemon - Enter the following command to reboot the Raspberry Pi:
reboot