 Creating
an Oracle Java Cloud Service Instance on Oracle Cloud Infrastructure
Creating
an Oracle Java Cloud Service Instance on Oracle Cloud Infrastructure Before You Begin
This 10-minute tutorial shows you how to create an Oracle Java Cloud Service instance in an Oracle Cloud Infrastructure region.
October 2019, Release 19.3.3
Background
When you create an Oracle Java Cloud Service instance in an Oracle Cloud Infrastructure region, you can attach the instance to either a private subnet or a public subnet.
Use this tutorial to create a single-node Oracle Java Cloud Service instance in a public subnet.
To create a multi-node instance with a load balancer and a Coherence cluster in a public subnet, follow the instructions in Create an Oracle Java Cloud Service Instance Attached to a Public Subnet on Oracle Cloud Infrastructure in Administering Oracle Java Cloud Service.
For information about creating an instance in a private subnet, see Create an Oracle Java Cloud Service Instance Attached to a Private Subnet on Oracle Cloud Infrastructure.
What Do You Need?
- An active subscription to Oracle Java Cloud Service and the credentials to access Oracle Cloud. See How to Begin with Oracle Java Cloud Service Subscriptions.
- The required networking and storage resources in Oracle Cloud Infrastructure. See Creating the Infrastructure Resources Required for Oracle Platform Services
- An instance of any of the following database services:
- Oracle Autonomous Transaction Processing. See Provision Autonomous Transaction Processing.
- Oracle Cloud Infrastructure Database. See Managing DB Systems.
- Oracle Database Cloud Service (Classic), with backups enabled. See Create an Oracle Database Cloud Service Database Deployment.
 Start
the Instance-Creation Wizard
Start
the Instance-Creation Wizard
- Sign in to Oracle Cloud at https://cloud.oracle.com/en_US/sign-in.
- From the Oracle Cloud Infrastructure Console, click the Navigation menu
 at the top left corner of the page, expand Platform Services, and then select Java.
Note: On some older Oracle Cloud accounts, you use the Oracle Cloud Infrastructure Classic Console. Click the Navigation menu
, and then select Java.If this is the first time that you're accessing the web console of Oracle Java Cloud Service, the Welcome page is displayed. You can continue to the web console by clicking Go to Console.
- Click Create Instance.
The Create Instance wizard starts.
 Configure
Basic Information
Configure
Basic Information
On the Instance page of the wizard, complete the following steps:
- In the Instance Name field, enter a unique name for your Oracle Java Cloud Service instance.
- Enter your email address in the Notification Email
field.
After the instance is created, you'll receive a notification at the email address that you enter here.
- In the Region field, select an Oracle
Cloud Infrastructure region: us-phoenix-1, us-ashburn-1,
ca-toronto-1, eu-frankfurt-1, or uk-london-1. The field shows
only the regions that are in the default region of your
account.
The database instance that you intend to associate with your Oracle Java Cloud Service instance must be in the region that you select in this field.
- In the Availability Domain field, select an availability domain.
- In the Subnet field, select the Oracle
Cloud Infrastructure subnet to which the nodes of your
instance must be attached.
The subnet that you select for your Oracle Java Cloud Service instance and the subnet of the database instance that you intend to associate must be in the same virtual cloud network (VCN). If the database instance that you want to associate is in a different VCN, then you must configure VCN peering in Oracle Cloud Infrastructure to be able to use that database instance.
- To have the subnet assigned automatically, select No
Preference. The subnet ManagedCompartmentForPaaS
| svc-vcn | svc-subnet-... is used for your
instance.
Note: Don't select No Preference if you plan to associate an Oracle Cloud Infrastructure Database with your service instance. If you want to configure security rules for your instance, then don’t select No Preference or ManagedCompartmentForPaaS | svc-vcn | svc-subnet-.... Select a subnet in a VCN that you created.
- To assign a subnet explicitly, select a suitable subnet from the available options.
- To have the subnet assigned automatically, select No
Preference. The subnet ManagedCompartmentForPaaS
| svc-vcn | svc-subnet-... is used for your
instance.
- If you want to assign any tags to your instance, then select them in the Tags field.
- In the License Type field, choose whether you want to use Oracle middleware licenses that you own.
- Select the required Service Level, Software Release, and Software Edition.
- Click Next.
 Configure
Service Details
Configure
Service Details
On the Details page of the wizard, complete the following steps:
- Click the Advanced tab.
- In the WebLogic Configuration section,
select the Enable Access to Administration Consoles
check box.
Leave the other fields at the default values. - In the WebLogic Access section, click Edit next to the SSH Public Key field.
- Select Create a New Key and then click Enter.
- (Important) In the Download Keys dialog
box, click Download and save the file
sshkeybundle.zipto your local machine.Note: The option to download the SSH keys won't be available again. You'll need the private key to SSH to the compute nodes of the Java Cloud Service instance. So don't skip this step.
- Click Done.
- Enter the WebLogic administration credentials in the Local Administrative User Name and Password fields, and then re-enter the password in the Confirm Password field.
- In the Database Configuration section,
select a database type.
- If you selected Oracle Autonomous Transaction Processing, then select the compartment that contains your Oracle Autonomous Transaction Processing instance, select the instance name, and enter the administrator password.
- If you selected Oracle Cloud Infrastructure Database, then select the compartment that contains your Oracle Cloud Infrastructure Database instance, select the instance name, enter the PDB name, and enter the administrator credentials.
- If you selected Oracle Database Cloud Service (Classic), select the instance name, enter the PDB name, and enter the administrator credentials.
- Set Backup Destination to Both Remote and Disk Storage.
- In the Object Storage Container field,
enter the URL of the object-storage bucket that you created in
Oracle Cloud Infrastructure.
Format:
https://swiftobjectstorage.{region}.oraclecloud.com/v1/{namespace}/{bucket}Example:
https://swiftobjectstorage.us-phoenix-1.oraclecloud.com/v1/myCompany/myBucket - In the User Name field, enter the user name of the Oracle Cloud Infrastructure user who created the bucket or has permission to access it.
- In the Password field, enter the
authentication token (generated in Oracle Cloud
Infrastructure) for the user you specified.
The following screenshot shows the settings you've selected so far on the Details page of the wizard, with the key fields highlighted. In the example, the database selected is an instance of Oracle Autonomous Transaction Processing.
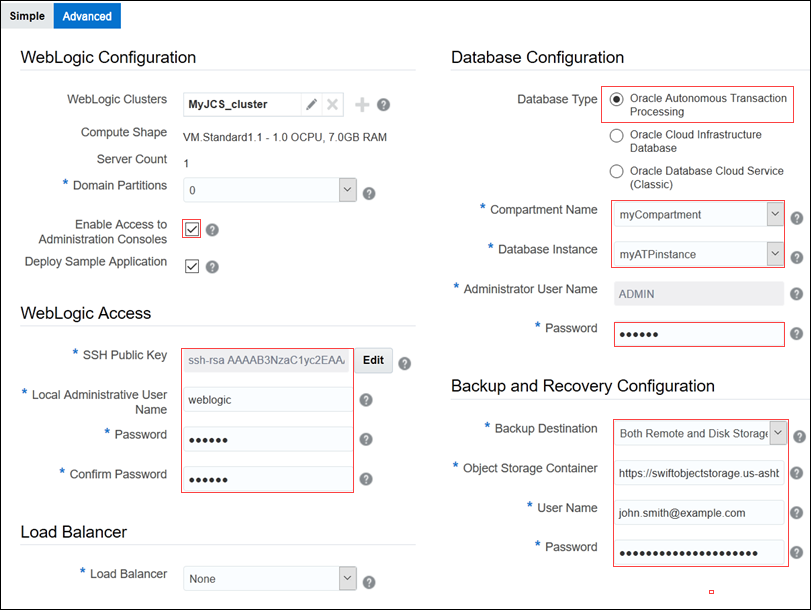
Description of the illustration create-instance-2.png - Click Next.
 Complete
the Instance Creation
Complete
the Instance Creation
- On the Confirm page of the wizard, review
your selections, and click Create.
In the Oracle Java Cloud Service console, the new instance is displayed, with the status Creating Service.
- Refresh the page periodically, until the instance is created. After the instance is created, you'll receive a notification at the email address that you specified earlier.
- To view details of the instance, click the instance name.
Your Oracle Java Cloud Service instance is now ready for you to deploy enterprise applications.
 Want
to Learn More?
Want
to Learn More?
- Creating an instance in a public subnet: Create an Oracle Java Cloud Service Instance Attached to a Public Subnet on Oracle Cloud Infrastructure
- Creating an instance in a private subnet: Set up the infrastructure and platform resources for Java EE applications
- Deploying applications: Deploying an Application to Oracle Java Cloud Service by Using the WebLogic Server Administration Console
- More tutorials