 Collect Database Audit Logs to Analyze Using Oracle Log Analytics
 Before You Begin
This 20-minute tutorial shows you how to set up the environment to use Oracle Log Analytics for analyzing the log data from Database Audit Logs.
Background
Learn to perform the pre-requisite steps for discovering your database entity on Oracle Management Cloud like enabling unified audit trail of the database, and providing the database credentials to Oracle Management Cloud agents. You can then discover the database entity on Oracle Management Cloud and ensure that the log data is collected from the database entity. For successful log collection, customize an out-of-the-box database audit log source and associate it with your database entity to suit your requirement.
What Do You Need?
- Review and understand the deployment topology of Oracle Management Cloud agents. See Understand the Architecture of Oracle Management Cloud in Installing and Managing Oracle Management Cloud Agents.
- An understanding of how to access Oracle Management Cloud. See Access Oracle Management Cloud in Getting Started with Oracle Management Cloud
- Download the agent software that contains the script required to install the Oracle Management Cloud agents. See Download the Oracle Management Cloud Agent Software in Installing and Managing Oracle Management Cloud Agents.
- Install the cloud agent on your database host. See Install Cloud Agents in Installing and Managing Oracle Management Cloud Agents.
- Verify the agent deployment. See Verify the Cloud Agent Installation in Installing and Managing Oracle Management Cloud Agents.
 Enable Auditing on Your Database
For Oracle Database releases 11g, 12c, and 18c, the database auditing is enabled by default, and the audit records are stored in the operating system's audit trail. However, only the releases 12c and 18c support unified audit trail. Here, we discuss the steps to enable unified audit trail on the database.
- Check the values of the auditing parameters on your database:
  SQL> show parameter audit;

	NAME                                 TYPE        VALUE
	------------------------------------ ----------- ------------------------------
	audit_file_dest                      string      /u01/app/oracle/admin/orcl/adump
	audit_sys_operations                 boolean     TRUE
	audit_syslog_level                   string
	audit_trail                          string      OS
	unified_audit_sga_queue_size         integer     1048576
In the above example,
audit_sys_operationsis set toTRUE. Auditing is enabled.- The value of the parameter
audit_trailis set toOS. The audit records are directed to the operating system's audit trail.
- Check the status of the unified audit trail parameter:
  SQL> select parameter , value from v$option where PARAMETER = 'Unified Auditing';

	PARAMETER                             VALUE        CON_ID
	------------------------------------ ----------- -----------------------
	Unified Auditing                       FALSE        0
The value of the parameter
Unified Auditingis set toFALSE. Unified audit is disabled. - The unified auditing feature is available for 12c and 18c revisions of Oracle Database, and is disabled by default. Follow these steps to enable unified auditing on the Oracle Database table:
- Shut down the database listener and the database.
$ lsnrctl stop orcl_lsnr$ sqlplus / as sysdbaSQL> shutdown immediate - Link the Oracle Home binaries.
$ cd $ORACLE_HOME/rdbms/lib$ make -f ins_rdbms.mk uniaud_on ioracle - Restart the database.
$ sqlplus / as sysdbaSQL> startup - Verify that unified audit trail is enabled successfully:
  SQL> select parameter , value from v$option where PARAMETER = 'Unified Auditing';

	PARAMETER                             VALUE        CON_ID
	------------------------------------ ----------- -----------------------
	Unified Auditing                       TRUE        0
The value of the parameter
Unified Auditingis set toTRUE. Unified audit is enabled. - Create an audit policy to enable auditing for specific database users or the entire database. In this example, the the actions are enabled for
sysuser.- Determine the database user name for the role
sysdba.$ sqlplus / as sysdba […] Oracle Database 12c Enterprise Edition Release 12.1.0.2.0 - 64bit Production With the Partitioning, OLAP, Advanced Analytics and Real Application Testing options SQL> show user; USER is "SYS" - Obtain the database instance name.
SQL> select instance_name from v$instance; INSTANCE_NAME ---------------- orcl - Create the audit policy.
SQL> CREATE AUDIT POLICY all_actions_pol ACTIONS ALL; Audit policy created. - Enable auditing for the user
SYS.SQL> AUDIT POLICY all_actions_pol by SYS; Audit succeeded.
- Determine the database user name for the role
- To avoid having both the auditing mechanisms enabled, check the value of the
audit_trailparameter. Ensure that it is set tonone.$ sqlplus / as sysdbaSQL> show parameter AUDIT_TRAIL;The result of the command should be as follows:
        NAME              TYPE      VALUE
    --------------------------------------
   audit_trail        string      NONE
- Shut down the database listener and the database.
 Provide Database Credentials to Oracle Management Cloud Agent
For the cloud agent to collect audit logs from the database entity, you must provide the credentials to access the database. If the credentials are not already registered on the agent credential store, then register.
- Create a JSON file with the information of your database. In the following example,
orclis the Oracle Database instance, andsysis the user whose credentials are added. As in this case, the cloud agent is typically installed on the same host as the database.Enter the parameter value in the corresponding field to see the value in the following JSON example. You could then copy the example and create a JSON file to use in your environment.
Table of parameters and corresponding field boxes. Parameter Enter the value in the box Database SID globalName Description User Name Password Role [{ "entity":"omc_oracle_db_instance.", "name":"LCAgentDBCreds", "type":"DBCredsNormal", "usage":"LOGANALYTICS", "globalName":"", "description":"", "properties":[{ "name":"USERNAME", "value":"CLEAR[]" }, { "name":"PASSWORD", "value":"CLEAR[]" }, { "name":"ROLE", "value":"CLEAR[]" }] }]Customize the above example JSON and ensure the following:
- Replace
orclwith the SID of your database. - Replace
sys,sys_password, andSYSDBAwith the user name, password, and the role. The role property is optional. - The
globalNameparameter must be unique within the credential store managed by the local cloud agent.
Save the changes and store the JSON file on the host where the cloud agent is installed.
- Replace
- Stop the cloud agent.
$ <OMCAGENT_HOME>/agent_inst/bin/omcli stop agent - Create the cloud agent credential store, if it does not exist already.
$ <OMCAGENT_HOME>/agent_inst/bin/omcli add_credential_store agent -no_password - Restart the cloud agent.
$ <OMCAGENT_HOME>/agent_inst/bin/omcli start agent - Add the credentials to the agent credential store using the JSON file that you created earlier.
$ <OMCAGENT_HOME>/agent_inst/bin/omcli add_credentials agent -credential_file <PATH_TO_YOUR_CREDENTIAL_JSON_FILE>
 Add Oracle Database Entity to Oracle Management Cloud
You can discover the database entity on Oracle Management Cloud by using the discovery interface. To complete these tasks, you must have Oracle Management Cloud Administrator role. If this role isn’t assigned to you or you’re not sure, then ask your system administrator to ensure that the role is assigned to you in Oracle Cloud.
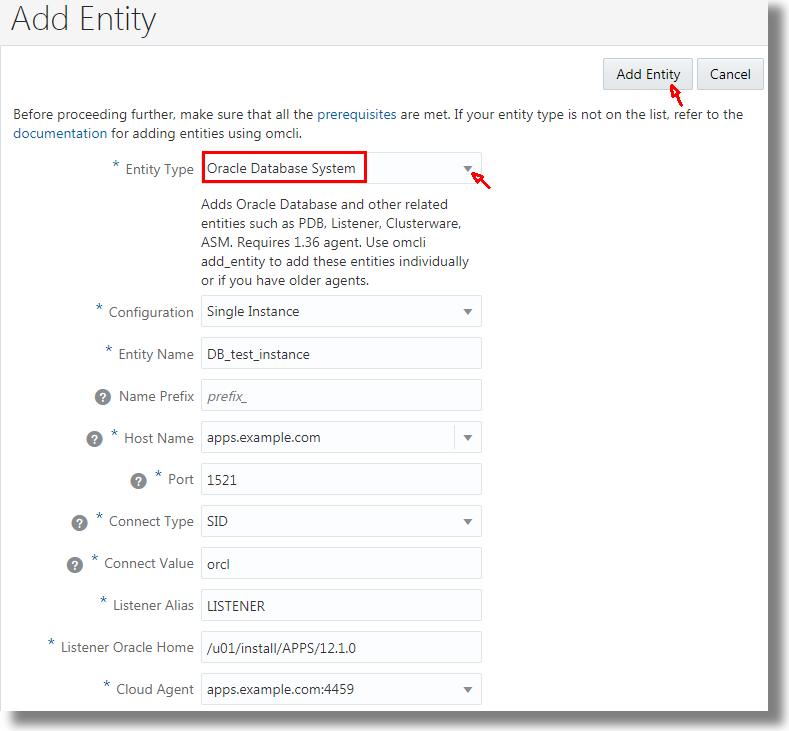
- From the Management Cloud main menu, select Administration > Discovery > Add Entity. The Add Entity page is displayed.
- In the Entity Type list, select Oracle Database System. Provide the following details of the database.
- Entity Name
- Name Prefix - The name that'll be used to avoid duplicates
- Cloud Agent
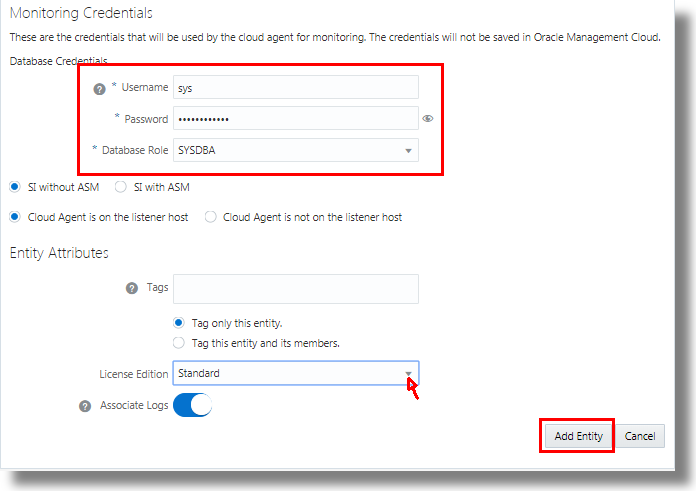
- Monitoring Credentials - Specify Username, Password, and Database Role.
- Tags - Optionally, you can create tags that define additional relationships between the Oracle E-Business Suite entities. These relationships will help search and group these entities in Oracle Management Cloud.
- License Edition - Select Standard or Enterprise edition
- Associate Logs - Associate the logs automatically with the Oracle Database System entity during log collection
- Based on your selection of the Configuration, provide these details:
- In case of Single Instance:
Host Name - Name of the listener host. For example, myhost.mydomain.com or its IP address
Port - Listener port number
Connect Type - Select how to connect to the database, SID or service name
Connect Value - Specify the SID or service name
Listener Alias - For example, DB_LISTENER
Listener Oracle Home - Specify the path
Listener Host SSH Credentials like the SSH Username and SSH Password if the cloud agent is not on the listener host.
- In case of Real Application Clusters (RAC):
SCAN Name - Name of the SCAN listener. For example, myhost.mydomain.com or its IP address
SCAN Port - The port number on which the SCAN listener is listeningfor connections
Service Name
Grid Home - Oracle Home directory for the Oracle Grid Infrastructure
ASM Credentials like Username, Password, and Role if the RAC is with ASM.
Host SSH Credentials like SSH Username, SSH Password, and SSH Private Key if the cloud agent is not installed on the cluster host.
- Click Add Entity.
In the following example, the details of the database instance that has the SID orcl are entered in the Add Entity page.
This is an example of the database credentials information:
 Review and Customize the Out-of-the-Box Log Source
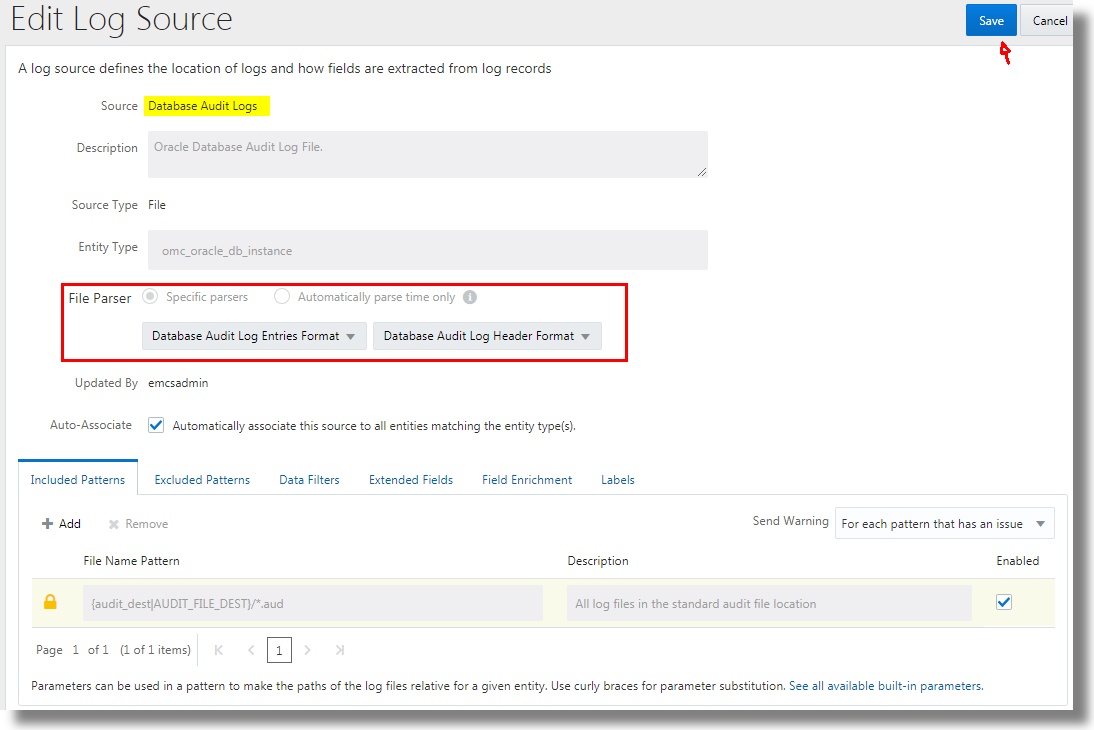
Oracle Log Analytics already has out-of-the box log sources Oracle DB Audit Log Source Stored in Database, Database Audit Logs, and Database Audit XML Logs that are packaged with the relevant parsers and other parameters to collect audit logs from database. Review the log sources and select the one that best suits your requirement. The audit log data is extracted from the Oracle Database based on the SQL query provided in the log source configuration. Review the log source that you selected and edit it, if required, to include additional data filters, extended fields, field enrichment, and labels.
- From Oracle Log Analytics, click the OMC Navigation icon on the top left corner of the interface. In the OMC Navigation bar, click Administration Home.
- In the Log Sources section, click the available count of log sources link.
- Click Open Menu icon next to the log source entry that you want to edit and select Edit. The Edit Log Source page is displayed.
- Review the log source details, modify it if required, and click Save.
In the following example, the Database Audit Logs out-of-the-box log source edit page is displayed:
 Associate Your Database Entity with the Log Source
To begin collecting logs from the database, associate the database entity with the log source you selected in the previous section. After the association, the logs collected from the database entity are processed by applying the parameters defined in the log source.
While discovering your database entity on Oracle Management Cloud, if you've selected the Associate Logs option, then the discovered entity is tagged indicating that the log collection should be enabled. Oracle Log Analytics monitors these tag notifications and enables log collection automatically. Follow these steps to ensure that the database entity is associated with the log sources that you selected in the previous section.
- From Oracle Log Analytics, click the OMC Navigation icon on the top left corner of the interface. In the OMC Navigation bar, click Log Admin, and click Entities.
- In the Entities section, click New Association.
- From Entity Type menu, select Oracle Database Instance.
- Click Add Entities and select the database instance you added through the discovery UI. Click Continue.

Description of the illustration association_add_entities.png - Select the log sources that want to associate the entity with. The selection of log sources must be from the set that you selected in the previous section. Click Continue.
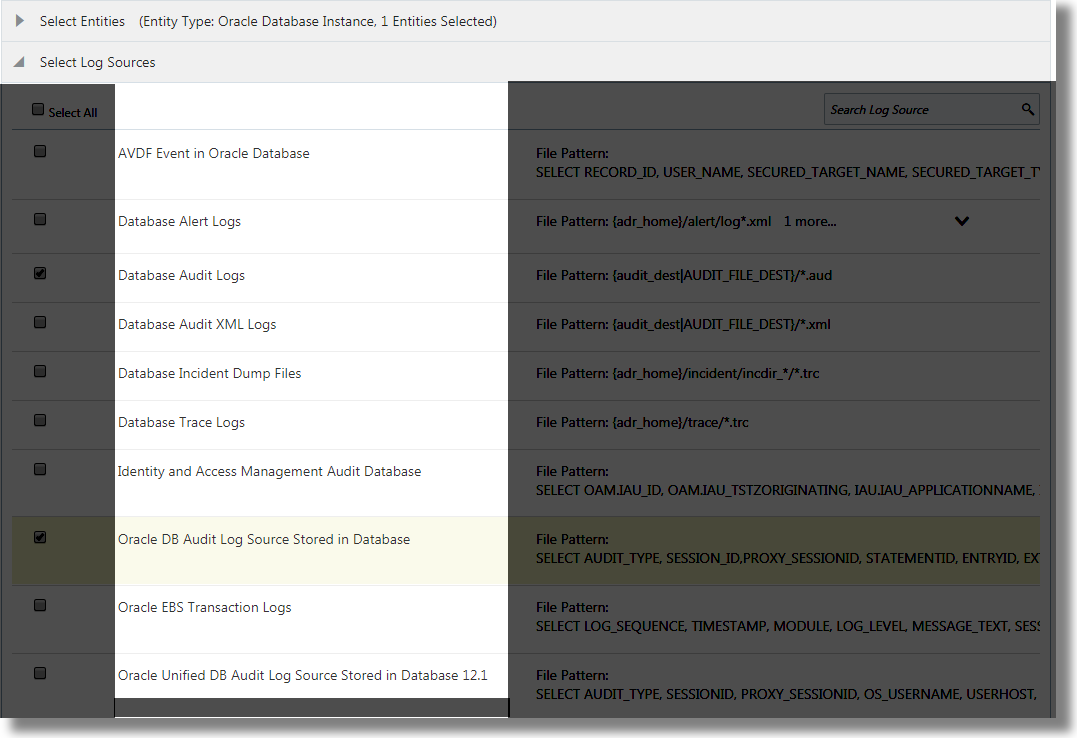
Description of the illustration select_log_source.png - Click Associate Entities.
Now Oracle Log Analytics is ready to collect logs from your database.
 Validate the Log Collection
To ensure that the setup is complete, validate the log collection.
- Navigate to the Log Explorer, and view the log data in the visualization panel. Based on the parameters chosen in the definition of the log source, select the corresponding fields in the visualization panel to customize the view.
The following example indicates the log collection in progress:
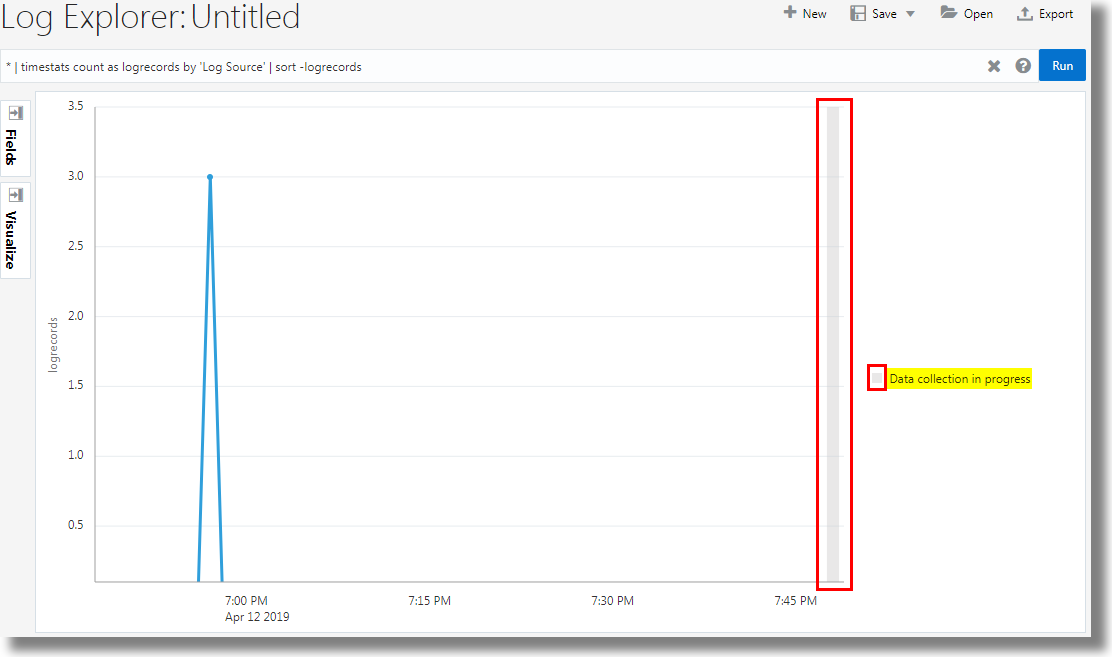
Description of the illustration log_collection_progress.png Notice that the oldest logs are collected first. So, ensure that the time range in the log explorer is sufficiently large to view the data from all the logs.
- From Oracle Log Analytics, navigate to Collection Warnings, and look for any possible warnings from the recent setup. In case of a warning, view the corresponding message to debug the error. Go to OMC Navigation icon > Log Admin > Collection Warnings.
After the validation, you can analyze your logs on Oracle Log Analytics to develop operational insights. View the log data using variety of visualizations, create dashboards for operational efficiency, save and share your log searches, detect anomalies, and perform advanced analytics. For an example of the analysis of the Database Audit Logs performed using the link visualization to group SQLs and analyze their behavior and identify anomalies, see Link by Using SQL Statement as the Field of Analysis in Using Oracle Log Analytics (link in the next section).
 Want to Learn More?
- Link by Using SQL Statement as the Field of Analysis in Using Oracle Log Analytics
- Visualize Data Using Charts and Controls in Using Oracle Log Analytics
- Typical Workflow for Developing Operational Insights in Using Oracle Log Analytics
- Typical Use Cases in Using Oracle Log Analytics
- View Collection Warnings in Using Oracle Log Analytics