Upload Log Files Using ODU Wizard

You can upload your log files using On Demand Upload (ODU) wizard that's available on the service console of Oracle Log Analytics.

ODU wizard is a simple and convenient tool for uploading the files through a friendly user interface. Follow the intuitive steps prompted by the wizard to select the files for upload, set the properties of the files, and review before uploading them. You can start uploading the log files by accessing the wizard in one of the following methods:
  • From the OMC Navigation open menu icon icon on the top left corner of the Oracle Log Analytics interface, click Administration Home. In the Uploads section, click New Upload.
  • From the OMC Navigation open menu icon icon on the top left corner of the Oracle Log Analytics interface, click Log Admin, and click Uploads. In the resulting uploads page, click New Upload on the top left corner of the page.
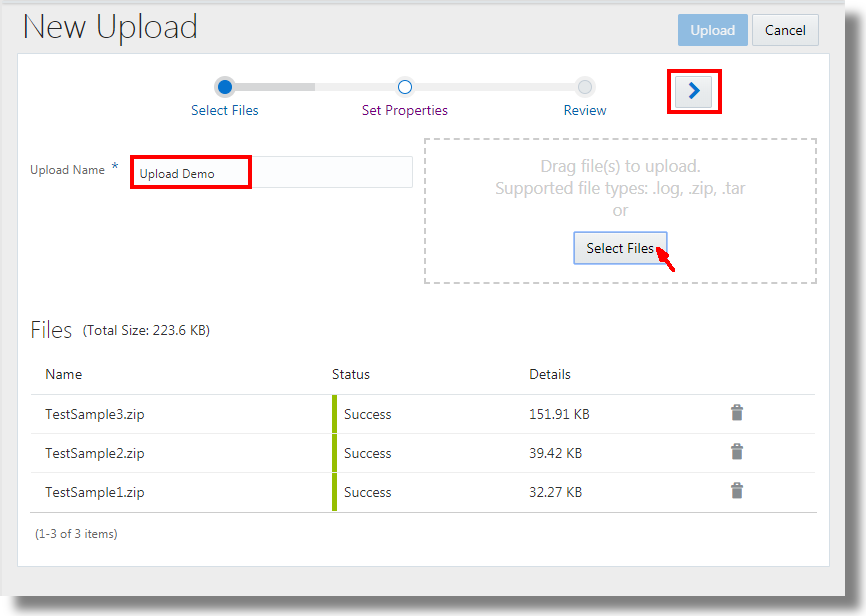
  1. Select Files: Click Select Files button and select the log files or archive files to upload to Oracle Log Analytics. Enter the Upload Name. This is the container name to which you want to upload the log files.
    Description of newupload_selectfiles.png follows
    Description of the illustration newupload_selectfiles.png
    At this point, the files are uploaded to Oracle Management Cloud. The files will be processed after the completion of the final step of the ODU wizard.

    A summary of the files selected for upload is displayed. Note that the maximum individual file size or the overall upload size is 1 GB. You'll be notified if your file size or the upload size exceeds the maximum limit.

    Click Next Next icon to navigate icon. Alternatively, you can also click Set Properties.

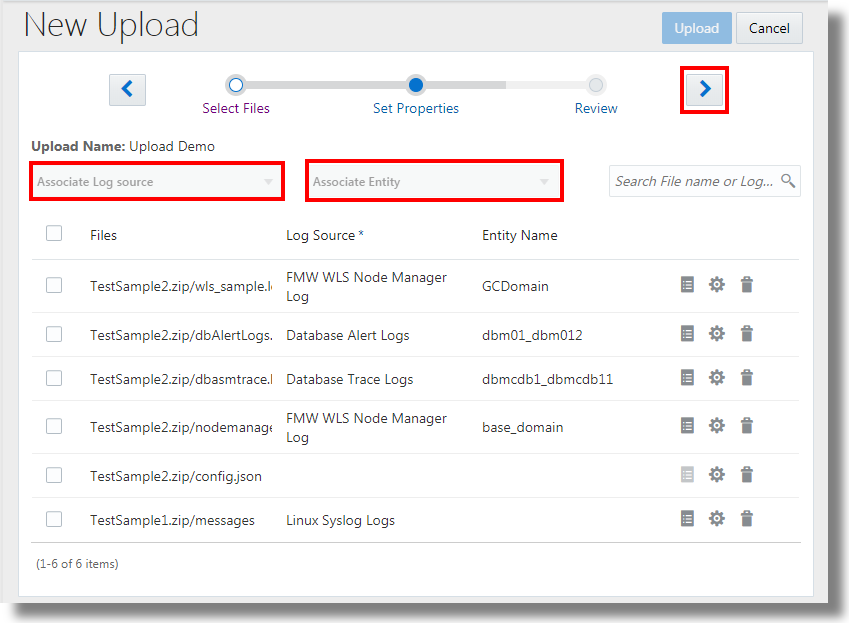
  2. Set Properties: The page displays the list of files selected in the first step, including the individual files in the selected archive. To set the properties of a file,
    1. Select the check box next to the file name.
    2. Select the log source from the Associate Log Source drop down menu.
    3. Based on the log source that you selected, the Associate Entity drop down menu is populated with the corresponding entities that you can associate with the log source. Select the entity.

      Note:

      To generate any configured real time alerts for logs, make sure to specify the entity associated with the logs while uploading.


      Description of newupload_setproperties.png follows
      Description of the illustration newupload_setproperties.png
    4. To preview the result of processing the log entries with the selected log source, click Preview Log Source Preview log source icon. icon. You can change the log source and preview again to ensure that the log file is processed as required.
    5. Optionally, you can specify the advanced properties when the required parameters are not available in the log entry. Click Advanced Properties Advanced properties icon. icon. From the drop down menu, select the values of the parameters Timezone, Char Encoding, Date Format, and Year. Click Save.
      • Timezone: The timezone information to use for processing the log entries. By default, the timezone information in the log entry is used for processing. When the information is not available in the log entry, the value that you select from the menu is considered. In case, the value is not available from this menu or directly from the log entry, then the timezone of the entity is considered. When no information is available on the timezone, the default value considered is UTC.
      • Char Encoding: The character encoding of the log files that are being uploaded.
      • Date Format: The format for the date information that's available in the log files. Use this parameter to remove any ambiguity (like 12/10 can be 10th December or 12th October) in identifying the format of the date in the given log entry. For example, when the date is 12/10, where it can be interpreted as 12th October or 10th December, you can use DAY_MONTH or MONTH_DAY to remove ambiguity. In case the date is 12/10/08, you can use DAY_MONTH_YEAR, MONTH_DAY_YEAR, or YEAR_MONTH_DAY.
      • Year: The year information to use for processing the log entries when the log entries do not have the year information in the timestamp.

      You can remove selected files from the list, if required. If the file that's removed is a part of the archive, then the remaining files of the archive will still be uploaded.

    6. Click Next Next icon to navigate icon. Alternatively, you can click Review.
  3. Review: Review the properties of the files that you've selected for upload. To confirm the properties and initiate the upload, click Upload.
Oracle Log Analytics indexes and processes the files. After the upload is complete, you can view the log data in the Log Explorer. You can verify the upload in the Uploads page.