Storage
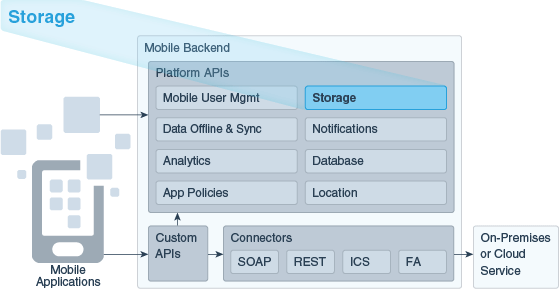
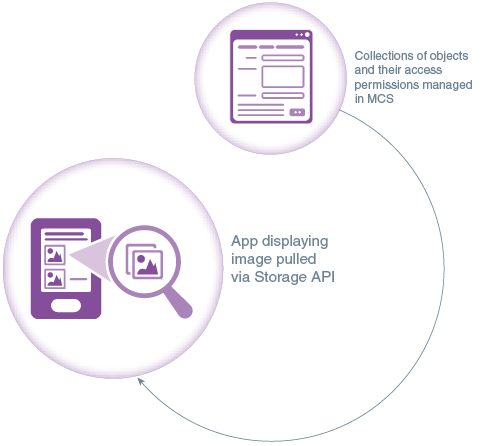
The Storage API enables you to create and work with collections of data in your mobile apps, including data uploaded by users.
Let's create a collection and then configure the sample app to add some objects to that collection.
Note: Before you start, complete the Get Started with Mobile Development tutorial that is offered within Oracle Mobile Cloud Service on its Home page. That tutorial provides the mobile backend and the quickstart project that you will use here.
 Create a collection
- Click
 and select Applications > Storage.
 - Click New Collection.
- Create a collection called
Incident_Reports. - In the New Collection dialog, select Shared.
- Click Create.
 Set access role
You can set access roles based on Mobile User Management roles that have been defined for the realm that mobile backend is using.
- In the Properties page of the collection, type
Technicianin the Read-Write Access field and click Save.
 Associate a mobile backend
So that your collection can be accessed by an app, you need to associate it with a mobile backend corresponding to the app.
- In the breadcrumbs at the top of the page, click Storage to display that lists all collections.
- Make sure that
Incident_Reportsis selected, click More, and select Associate Mobile Backends. - Type the name of the mobile backend you created in the Get Started with Mobile Development tutorial and click Add.
 Add object from the mobile
app
Add object from the mobile
app
The next step is to open the sample project you downloaded as part of the Get Started with Mobile Development tutorial. This project contains code for uploading an object to a collection. You just need to fill in the details in the client code. To keep it simple, you will merely upload some text that you specify.
Here are the instructions for the Android and iOS versions of the sample project.
Android
Open the file GettingStartedAndroid/app/src/main/java/example/com/gettingstartedandroid/UploadText_Activity.java
and scroll down to the following text block:
    private String collectionID = "YOUR_COLLECTION_ID";
    private String payload = "YOUR_PAYLOAD";
    private String contentType = "YOUR_CONTENT_TYPE";
For each variable, fill in the appropriate values:
- For
collection_Id, fill in Incident_Reports. - For
payload, fill in Empty incident report - For
contentType, fill in text/plain.
Open the AndroidManifest.xml file, search for oracle.cloud.mobile.gettingstarted.UploadActivity and change it to oracle.cloud.mobile.gettingstarted.UploadText_Activity.
iOS
In the file GettingStartediOS/GettingStartediOS/UploadViewController.m,
scroll down to the following text block:
NSString* collection_Id = @"";
NSString* payload = @"";
NSString* contentType = @"";
For each variable, fill in the appropriate values:
- For
collection_Id, fill in Incident_Reports. - For
payload, fill in Empty incident report. - For
contentType, fill in text/plain.
Windows
In the file GettingStartedWindows81/MainPage.xaml.cs,
search for the string "YOUR_STORAGE_COLLECTION_NAME" and replace it with Incident_Reports:
In the same file, scroll down to the following text block:
private async void uploadButton_Click(object sender, RoutedEventArgs e)
{
	var backend = ((App)App.Current).Backend;

	var storage = backend.GetService();
	var collection = await storage.GetCollectionAsync(MainPage.CollectionName);

	// Upload an object
	var storageObject = new StorageObject(collection);
	storageObject.Name = "Hello.txt";
	storageObject.LoadPayload("Hello Windows from Mobile Cloud Service", "plain/text");
	storageObject = await collection.PostObjectAsync(storageObject);
	string objectId = storageObject.Id;

	await this.Dispatcher.RunAsync(CoreDispatcherPriority.Normal, async () => {
		MessageDialog dialog = new MessageDialog("Upload completed successfully", "Status");
		await dialog.ShowAsync();
	});
}
For storageObject.LoadPayload, replace Hello Windows from Mobile Cloud Service with the the text of your choice.
Cordova
Open the file www/app/shared/backend/backendService.js
and scroll down to the following text block::
var collectionId = 'YOUR_STORAGE_COLLECTION_NAME';
var fileName = 'YOUR_FILE_NAME';
var payload = 'YOUR_PAYLOAD';
var contentType = 'YOUR_PAYLOAD_CONTENT_TYPE';
For each variable, fill in the appropriate values:
- For
fileName, fill inIncident_Reports.txt. - For
collectionId, fill inIncident_Reports. - For
payload, fill in Empty incident report. - For
contentType, fill intext/plain.
 Run the app
- In your IDE, run the application.
- In the running app, click Sign In, and enter a user name and password.
- Click Upload Incident.
 Verify update of the collection in the mobile backend
In MCS, navigate to the collection to check its contents:
- In the menu on the left, click Mobile Backends. (If you have hidden the menu, click and select Applications > Mobile Backends.)
- Select your mobile backend and click Open.
- In the left navigation bar, select Storage.
- Select the
Incident_Reportscollection and click Open. - Click the Content tab and note that the object has been added.
 Next steps
- Get the rundown on Storage features.
- Learn how to work with collections with JavaScript code in custom APIs.
- Browse the MCS SDK reference docs for iOS, Android, Windows, Cordova, and JavaScript.
- Browse the REST APIs.