Extend Your On-Premises Network with a VCN on Oracle Cloud Infrastructure

Not Oracle Cloud Infrastructure Classic This topic does not apply to Oracle Cloud Infrastructure Classic.

A Virtual Cloud Network (VCN) is a customizable private network in Oracle Cloud Infrastructure. Just like a traditional data center network, a VCN provides you with control over your network environment. This includes assigning your own private IP address space, creating subnets, creating route tables and configuring stateful firewalls. A single tenant can have multiple VCNs, thereby providing grouping and isolation of related resources.

One way to connect your on-premises network and your VCN is to use an Internet Protocol Security (IPSec) VPN. IPSec is a protocol suite that encrypts the entire IP traffic before the packets are transferred from the source to the destination. This topic provides instructions for setting up and managing an IPSec VPN for your VCN for PaaS services. This topic applies to all PAAS services.

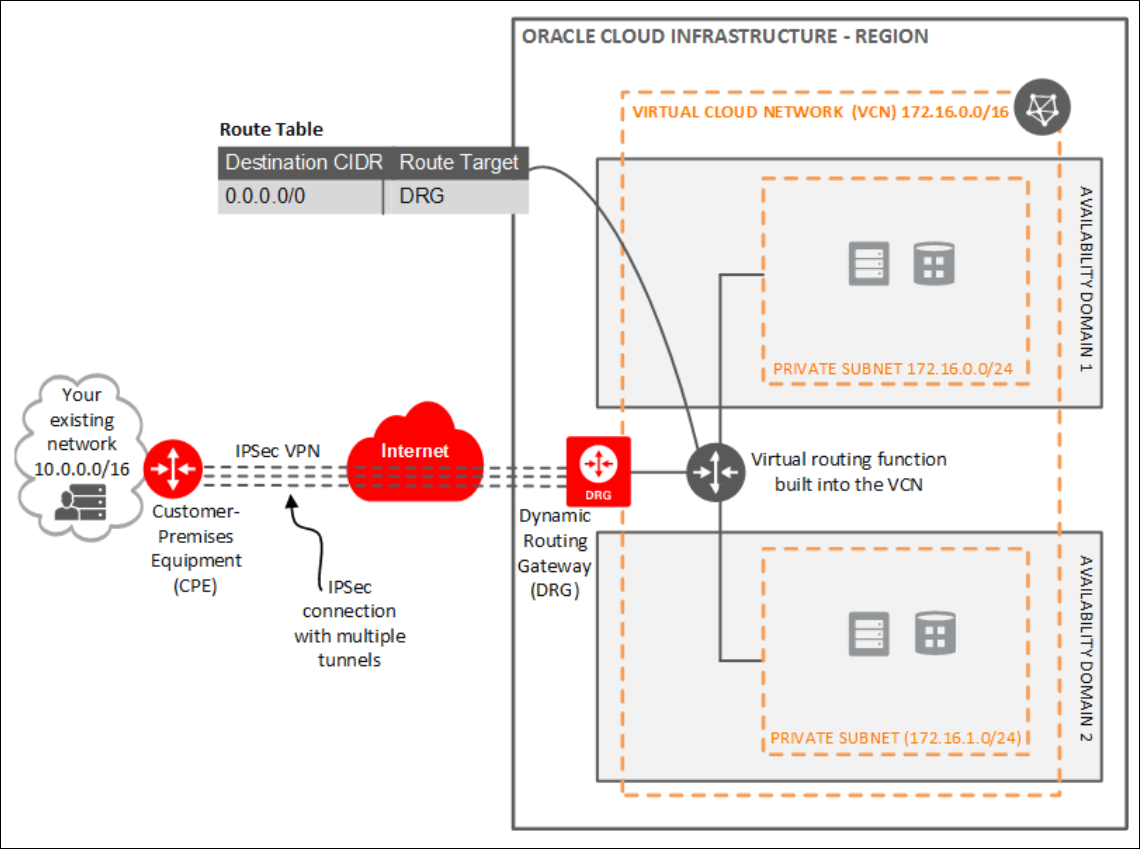
In summary, the process for creating an IPSec VPN comprises the following steps:

  1. Create your VCN.

  2. Create a subnet in the VCN.

  3. Create a Dynamic Routing Gateway (DRG).

  4. Attach the DRG to your VCN.

  5. Create a Customer Premises Equipment (CPE) object and provide your router's public IP address.

  6. From your DRG, create an IPSec connection to the CPE object and provide your static routes.

  7. Get the IPSec tunnel information

  8. Configure the IPSec connection on the remote end.

  9.  Create a route table and route rule for the DRG.

  10. Create a security list and required rules.

  11. Create PaaS Policies.

           .                                          
Description of ipsec_for_vcn.png follows
Description of the illustration ipsec_for_vcn.png
  1. Sign in to your Oracle Cloud Service account and navigate to the Oracle Cloud Infrastructure Console.
    See Sign In to Your Cloud Account in Getting Started with Oracle Cloud.
  2. Create a VCN.
    1. Open the navigation menu, click Networking, and then click Virtual Cloud Networks.
    2. Click Create VCN.
    3. In the Create a Virtual Cloud Network dialog, enter a name for your VCN and select a compartment.
    4. Click Create VCN.
      Your VCN is created with some default components (default route table, default security list, default set of DHCP options).
  3. Next, you’ll create subnets in separate Availability Domains. This allows distributing your instances across the subnets for high availability.
    1. In the Virtual Cloud Network details page, in the navigation pane, under Resources, select Subnets.
    2. Click Create Subnet.

      Enter the following details:

      Field Description

      Name

      Name of the subnet

      Availability Domain

      Select an availability domain for your subnet.

      CIDR Block

      Specify a CIDR block to indicate the network address that can be allocated to the resources.

      Route Table

      Select a route table to provide mapping for the traffic from the subnet to destinations outside the VCN.

      SUBNET ACCESS

      PRIVATE SUBNET: Select this option to prohibit public IP addresses for instances in the subnet.

      PUBLIC SUBNET: Select this option to allow public IP addresses for instances in the subnet.

      DNS HOSTNAMES IN THIS SUBNET

      Select this option to allow assignment of DNS hostname when launching an instance.

      DNS LABEL

      Auto-generated if no name is specified.

      DNS DOMAIN NAME

      Read-only field

      DHCP OPTIONS

      Select the DHCP option for the VCN.

      Security Lists

      Specify security list/s for the VCN.

    3. Click Create.
  4. Create a Dynamic Routing Gateway (DRG) to provide a path for private network traffic between your VCN and on-premises network.
    1. Open the navigation menu and click Networking. Under Customer Connectivity, click Dynamic Routing Gateway.
    2. Click Create Dynamic Routing Gateway.
    3. Specify a compartment, enter a name for the Dynamic Routing Gateway and click Create.
  5. Once the Dynamic Routing Gateway is created, you can attach it to your VCN.
    1. Open the navigation menu, click Networking, and then click Virtual Cloud Networks.
    2. Click your VCN to open its details.
    3. In the Virtual Cloud Network Details page, in the navigation pane, under Resources, click Dynamic Routing Gateways.
    4. Click Attach Dynamic Routing Gateway.
    5. Select the dynamic routing gateway that you created and click Create.
  6. After attaching the Dynamic Routing Gateway to your VCN, create a Customer Premises Equipment (CPE) to logically represent the on-premises VPN device within Oracle Cloud Infrastructure networking configuration.
    1. Open the navigation menu, and click Networking. Under Customer Connectivity, click Customer-Premises Equipment.
    2. Click Create Customer-Premises Equipment.
    3. Select the compartment, enter a name and IP address for the customer-premises equipment, and click Create.
  7. Next, create an IPSec connection to the customer-premises equipment.
    1. Open the navigation menu and click Networking. Under Customer Connectivity, click Dynamic Routing Gateway.
    2. Click the dynamic routing gateway that you created.
    3. In the Dynamic Routing Gateway details page, in the navigation pane, under Resources, click IPSec Connections.
    4. Enter a name and public (external) IP address of the VPN device to be used to establish IPSec VPN and click Create.
    Once the IPSec connection is created , Oracle Cloud Infrastructure creates IPSec tunnel endpoints in each availability domain. You can use the tunnel information to configure the on-premises VPN device.
  8. Get the IPSec tunnel information. Select the IPSec Connection and click Tunnel Information. The tunnel information contains the IP addresses of the tunnel endpoints and the shared secret to be used to initiate the IPSec connection. It also shows the status of the IPSec connection.
  9. Configure the IPSec connection on the remote end. Your network administrator can configure your on-premises VPN device(s) to initiate an IPSec connection to the tunnels created on Oracle Cloud Infrastructure.

    Note:

    It is recommended to establish at least two IPSec tunnels, from the on-premises VPN device.

  10. Configure routing for subnets to go through Dynamic Routing Gateway for on-premises traffic. The default routing table created for a VCN has no rules by default. All instances in VCN have a route to other instances in the VCN only.
    1. Open the navigation menu, click Networking, and then click Virtual Cloud Networks.
    2. Click the VCN to open its details.
    3. In the Virtual Cloud Network details page, in the navigation pane, under Resources, select Route Tables and then click Edit Route Rules.
    4. Modify the default route table to add a default route and set the Dynamic Routing Gateway as the route target. This routes any non-VCN traffic through the Dynamic Routing Gateway into the on-premises network.
  11. Configure security rules to allow valid traffic in/out of your subnets.
    1. Open the navigation menu, click Networking, and then click Virtual Cloud Networks.
    2. In the Virtual Cloud Network details page, in the navigation pane, under Resources, select Security Lists.
    3. Select the security list for your VCN and click Security List Details.
    4. The default security list has only three ingress rules and one egress rule to allow all outgoing traffic. Click Edit All Rules to modify the rules to allow SSH as required and to open up specific ports for the application running on your compute instances within the subnets.
  12. Create a policy the first time you create an Oracle PaaS instance on Oracle Cloud Infrastructure. For subsequent PaaS instances, you can use the same or a new policy.
    1. Open the navigation menu and click Identity & Security. Under Identity, click Policies.
    2. Click Create Policy.
    3. On the Create Policy page, select the root compartment for your tenancy, and then click Create Policy.
    4. In the Create Policy dialog box, enter a name and a description for the policy.
    5. In the Policy Versioning field, specify the definitions of the verbs and resources that the policy must use.
      • To specify that the policy must reflect future changes to the definitions of the policy verbs and resources, select KEEP POLICY CURRENT.

      • To specify that the policy must use the definitions in effect on a specific date, select USE VERSION DATE, and then enter the date in the YYYY-MM-DD format.

    6. In the Policy Statements field, enter the following policy statement.

      Note:

      Replace <compartment_name> with the name of your compartment. Don't change anything else in the policy statement.

      Allow service PSM to inspect vcns in compartment <compartment_name>
    7. Click plus to add the next policy.
    8. Add the following policy.
      Allow service PSM to manage security-lists in compartment <compartment_name>
    9. After you add all the policies, click Create.