11 Use Multiple Layouts for Multi-level Business Objects

When business objects in your REST service have a parent-child relationship of 3 or more levels, you can link layouts in a hierarchy of dependent layouts to perform coordinated download, upload, and clear operations. Many operations triggered in a layout that's part of a hierarchy of dependent layouts work on all layouts in the hierarchy.

In a hierarchy of dependent layouts, the primary layout is always a Form-over-Table, one that's based on the parent business object (in the form) and a child business object (in the table). Additional Table layouts, created on separate worksheets, are based on descendant business objects, relative to the parent business object. In other words, the first Table layout uses a grandchild business object, the next one uses a great-grandchild business object, and so on. Each of these dependent layouts is linked to its direct parent layout. Once the dependencies are established, download, upload, and clear operations act on all the linked layouts, starting from the parent layout, followed by the child layout, the grandchild layout, and so on.

In addition to coordinating operations such as download and upload across multiple layouts, there's another key distinction when using layouts in a dependent hierarchy: In the grandchild layout, the add-in will fetch all rows for each of the child rows and display them all together in the grandchild layout. This behavior applies to the grandchild and lower layouts in the hierarchy (basically, all Table layouts that follow the primary Form-over-Table layout.

Consider this example hierarchy of business objects, where purchaseOrders is the parent, lines is the child, schedules is the grandchild, and distributions is the great-grandchild.
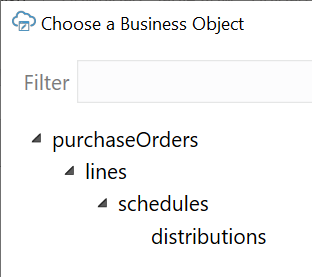
Example business object hierarchy, where purchaseOrders is the parent, lines is the child, schedules is the grandchild, and distributions is the great-grandchild.

In this hierarchy, purchaseOrders is a collection of top-level purchase orders, lines manages the details of each order (such as the item to purchase, quantity, unit of measure, and price), schedules is used for details such as ship-to location and delivery date, and distributions is used for details about accounting or the project. Each purchase order may contain multiple lines, each line may be broken down into multiple schedules, and each schedule may have multiple distributions.

Note:

Sibling relationships (two or more layouts with the same parent layout) are not supported.

Let's use this example to create a hierarchy of dependent layouts that mirrors your business object hierarchy. Remember, the primary layout in the hierarchy must be a Form-over-Table; the dependent layouts must be Tables.

  1. Create a Form-Over-Table layout for the first two levels in the business object hierarchy.
    1. In the Oracle Visual Builder tab, click Designer.
    2. When prompted, provide the service description document.
    3. Choose the parent business object. For example, select purchaseOrders to create a layout for purchaseOrders over lines (the first two levels in our hierarchy) and click OK.
    4. Select Form-over-Table Layout as the new layout and click OK.

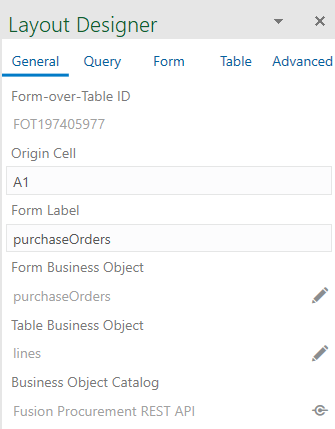
    A Form-over-Table layout is created in the worksheet, where purchaseOrders is the form business object and lines is the table business object. This worksheet is now your primary layout.
    Description of dependentlayout_primary.png follows
    Description of the illustration dependentlayout_primary.png

  2. Create a Table layout for each of the other levels in your business object hierarchy. Ensure that you select the same business object catalog that is used by your primary Form-Over-Table layout.
    1. Click the New Sheet icon to add a new worksheet.
    2. Click Designer.
    3. Choose the business object that's third in the hierarchy, for example, schedules, and click OK.
    4. Select Table Layout as the new layout and click OK.
    5. Repeat steps a to d to create Table layouts for all the remaining levels in your business object hierarchy. Continuing our example, create a Table layout for distributions.

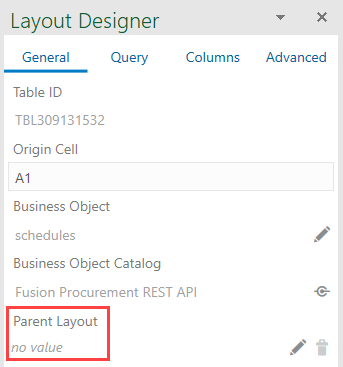
    A Table layout is created for each level in the business object hierarchy. Notice the Parent Layout field in the Layout Designer's General tab, shown here for the schedules layout. This field shows only in layouts where the business object is a child of another business object in the same business catalog.
    Description of dependentlayout_table.png follows
    Description of the illustration dependentlayout_table.png

  3. Starting from the lowest level in the hierarchy, choose the parent for each layout.
    1. On the worksheet for the last item in the hierarchy (distributions in our example), click the Choose Parent Layout icon (Choose Parent Layout icon) in the Layout Designer's General tab.
    2. When prompted, click Yes to confirm the parent layout in the hierarchy, for example:
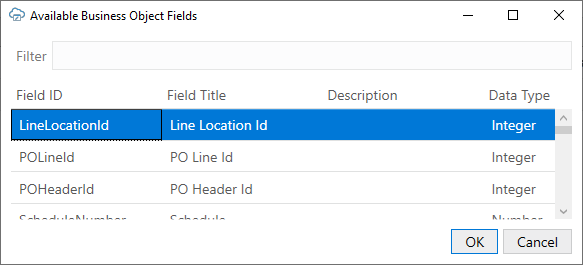
    3. For layouts that are three levels or deeper in the hierarchy (for example, schedules and distributions), if you want to support creating new rows and create is enabled in the Table's capabilities, click the Choose Parent Column icon (Choose Parent Column icon) and select a field from the parent layout to uniquely identify the parent row for a pending create row in the child layout. The field must be exposed as a column in the parent table, for example, the Line Location Id field which exists as a column in the schedules table. (If you don't see the field you want to use, you'll need to add it as a column in the parent table.) Click OK.
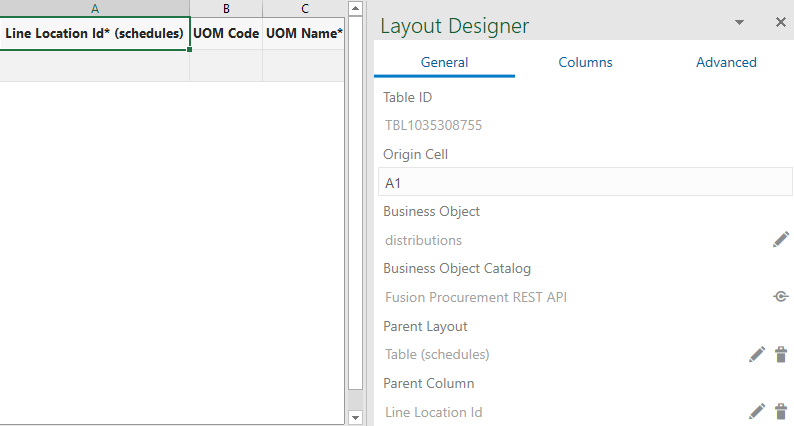
    4. Click Redraw Layout for both the child and parent worksheets.
      A column for the corresponding parent field is created in the child layout, for example, the Line Location Id (schedules) column as shown here:

    5. Repeat steps a to d for each Table layout in your business object hierarchy. Continuing our example, the parent layout for schedules is purchaseOrders-lines (which is also the primary layout). You don't need to set a parent for the primary layout.

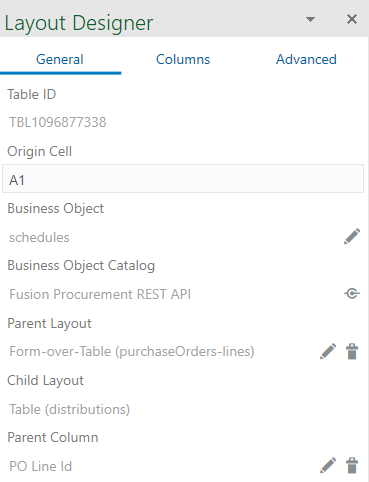
    Once a layout has its Parent Layout defined, you'll notice a Child Layout field in its parent's Layout Designer. Also, search specifications (defined in the Query tab) are no longer available for any dependent layout that is not the primary layout. Here's the Layout Designer for the schedules Table layout, whose parent is purchaseOrders-lines and child is distributions.
    Description of dependentlayout.png follows
    Description of the illustration dependentlayout.png

Configuration for your dependent layout is complete. You can choose to configure the workbook further to limit the data that is downloaded to the primary layout (see Configure Search Options for Download).

Before you publish and distribute your workbook to users, test the workbook to ensure that download, upload, or clear operations work on all layouts in the hierarchy (see Manage Data for Layouts in a Dependent Hierarchy).
Delete a Dependent Layout

When your layout is part of a hierarchy of dependent layouts, the layout cannot be deleted without first removing its dependency in the layout hierarchy.

To delete a dependent layout:
  1. Open the Layout Designer of the Excel worksheet whose layout you want to delete.
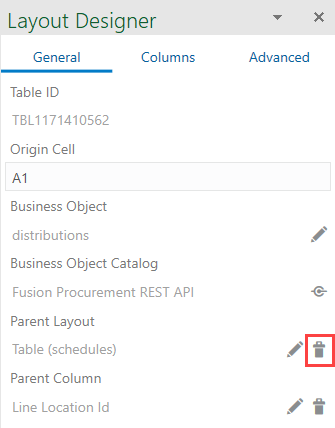
  2. In the General tab, click the Remove Dependency icon (Remove Dependency icon) next to Parent Layout.
  3. When prompted, click Yes to remove the dependency.
  4. Click Delete Layout, then confirm your selection.
  5. On the other layouts in the workbook, click Redraw Layout.