 Create an Integrated Excel Workbook to Manage Data from a REST Service
 Before You Begin
In this tutorial, you learn how to install the Oracle Visual Builder Add-in for Excel, create a Microsoft Excel workbook that retrieves data from a REST service, and publish the workbook so users can do data entry tasks that send data to the REST service. This tutorial takes approximately 10 minutes to complete.
Background
Oracle Visual Builder Add-in for Excel helps you download data from a REST service to a table in an Excel workbook, where users can modify, create, or delete data before sending changes back to the service. Once you install the add-in, you'll enter the service's endpoint to download data from the service to the Excel workbook. You'll also see a new Oracle Visual Builder ribbon tab with commands to help you manage the downloaded data.
What Do You Need?
- A Windows 10 operating system with a 32-bit installation of
Microsoft Excel 2016 or 365
(See Supported Platforms for the Visual Builder Add-in for Excel [2474783.1])
- Access to your Oracle Visual Builder instance
Note: You may be able to complete the tutorial using a REST service of your choice. Make sure you have an OpenAPI service description for the target service (some Oracle services provide such a description by adding
/describeto the URL) and skip step 1. If you go this route, some steps in this tutorial may be different for your service.
 Install
the Oracle Visual Builder Add-in for Excel
Install
the Oracle Visual Builder Add-in for Excel
- Right-click this
file and download it to your computer.
The
Visual_Builder_Addin_for_Excel_1.0.zipfile contains a visual application with an Employees business object and sample data. - In your web browser, sign in to Oracle Visual Builder.
- On the Visual Applications page, click Import,
select Application from file in the dialog
that appears and browse to select the
Visual_Builder_Addin_for_Excel_1.0.zipfile, then click Import. - On the Visual Applications page, click Visual_Builder_Addin_for_Excel-1.0 in the Name column.
- Click Business Objects
 , then click Menu
 and
select Data Manager.
and
select Data Manager.

Description of the illustration vb_data_manager.png - On the Data Manager page, click Edit Data in Excel
to download the installer.
Tip: Check for a newer version on the Downloads page.
- Quit Excel before running the installer.
- Double-click the downloaded installer file to begin the
installation, click Next, and then Close
after the add-in is installed.
A successful installation enables the add-in in Excel, and a new Oracle Visual Builder tab appears when you start Excel.

Description of the illustration excel-configure.png
 Configure
an Excel Workbook to Download Data from a REST Service
Configure
an Excel Workbook to Download Data from a REST Service
In this step, you'll create a table in an Excel workbook that downloads employee data from the REST service that the visual application you imported into Oracle Visual Builder exposes.
- In the Business Objects tab of Oracle Visual Builder, click Employee, then Endpoints.
- Expand the Resource APIs, then click the Clipboard icon to
copy the entire URL for the metadata resource API.

Description of the illustration vb-url-endpoint.png - Create an Excel workbook named
employees.xlsxin a directory on your computer, and open it. - In the Oracle Visual Builder tab of the Excel workbook, click Designer and enter the URL that you copied in the previous step in the Web Address input field of the New Layout Setup dialog that appears, and then click OK.
- In the Sign In dialog, enter the user name and password that you use to access Oracle Visual Builder, and click Sign In.
- Select Employees in the Choose a Business Object dialog, and click OK.
- Select Table Layout in the New Layout
Setup dialog, and click OK.
A new table appears in your Excel workbook. Column headers are shown, with a placeholder data row below the headers. You'll also see the Layout Designer on the right.
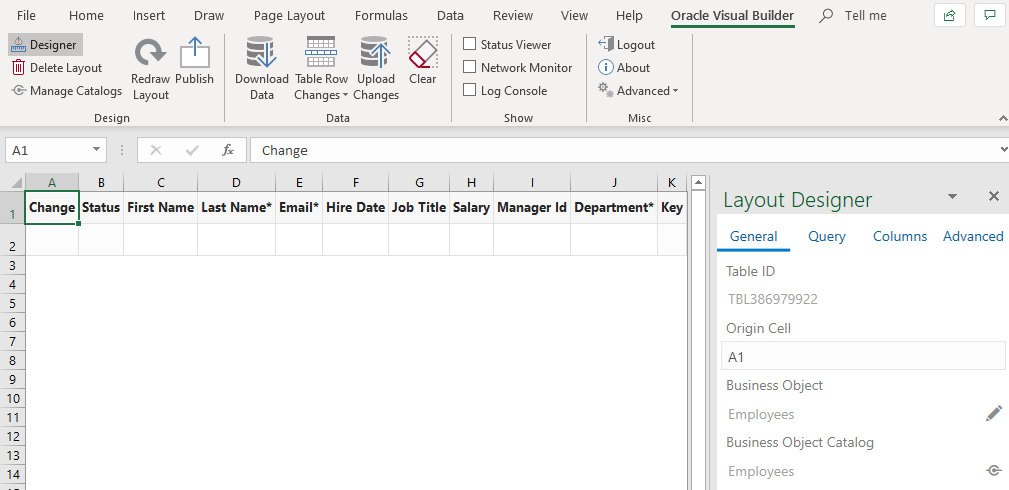
Description of the illustration excel-layout-designer.png - Click Download Data to download the data that the Employee business object references.
 Customize
the Table in the Excel Workbook Before Publishing
Customize
the Table in the Excel Workbook Before Publishing
You may want to customize the table that the add-in creates in the Excel workbook before you publish and distribute it to users for data entry tasks. For example, you might want to change the order of the columns so that the Email column appears before the employee's first name. You can also add a search query to filter the data that is downloaded from the service. For example, you can add the Salary field from the Employees business object as a search field to let users enter search criteria that lets them download only the records of employees who match that criteria.
- In the Oracle Visual Builder tab, click Designer if necessary. Then, click the Columns tab in the Layout Designer.
- Re-order the columns by dragging and dropping the icon that
appears to the left of the Email entry, as
shown in the following image:

Description of the illustration excel-layout-designer02.png Note: The Changed, Status, and Key columns are automatically generated. You can't customize or remove these columns.
- Click the Query tab to add a search query.
- Click the Edit icon next to Search.

Description of the illustration excel_query_search.png - Select Salary in the Business Objects Field Editor and click OK.
- In the Search dialog, select greater than in the comparator list, leave the value empty, and click OK.
- Click Redraw Layout to see your changes reflected in the worksheet.
- Click Download Data.
- In the Search dialog box, enter
10000and click OK.The add-in downloads only the records of employees whose salary exceeds 10,000.

Description of the illustration excel_query_search_download.png
 Publish
and Distribute the Excel Workbook to Users
Publish
and Distribute the Excel Workbook to Users
Now that you've created the Excel workbook and configured it to download data from your REST service, you may want to publish it. This optional step is useful if you distribute the workbook to other users for data entry as it removes the Design options (Designer, Delete Layout, and Publish) and turns on worksheet protection. That said, you can distribute the source Excel workbook without publishing it.
- In the Oracle Visual Builder tab of the
Excel workbook, click Clear
before you publish the Excel workbook.
This optional step removes downloaded data from the Excel workbook so that users who open the published Excel workbook download the latest data from the REST service.
- In the Clear Table confirmation dialog box, click Yes.
- Click Publish, then OK
in the Publish Workbook dialog.
Leave the Remove the service host from each service in the published workbook check box clear. You select this check box when a user of the published Excel workbook connects to another service host to access the REST service.

Description of the illustration excel-servicehost.png - Save the published Excel workbook on your computer.
By default, the add-in appends
–pubto the current file name of the workbook (for example,employees-pub.xlsx) to distinguish the published Excel workbook that you distribute to users from the source Excel workbook that you configured to display the data table from your REST service. After you select a valid directory and file name and click Save, a confirmation is displayed in the Status pane. - Save and close the source Excel workbook that you used to
publish the Excel workbook.
Now, you can distribute the published Excel workbook to users for data entry tasks. Each user must have a user name and password that enables access to the REST service you entered when creating the Excel workbook.
The next step in this tutorial shows how business users complete data entry tasks using the Excel workbook that you just published.


 Create,
Read, Update, and Delete Data in a Published Excel Workbook
Create,
Read, Update, and Delete Data in a Published Excel Workbook
Users who receive a copy of the Excel workbook that you published must install the add-in to download data from the REST service. They can then create, read, update, and delete downloaded data in the workbook before uploading changes to the REST service.
- Open the published Excel workbook from the location that you
saved it to.

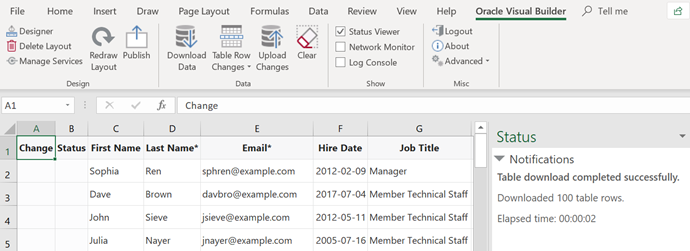
Description of the illustration excel-publish-user.png The Design section doesn't appear in the Oracle Visual Builder tab because users of a published workbook don't have access to the Designer, Delete Layout, and Publish commands that you, as a workbook author, can access. The table displays the column headers, but no data, because you clicked the Clear ribbon command before you published the Excel workbook.
- Click Download Data to download the data that the workbook is configured to retrieve.
- Enter a user name and password in the Sign In dialog, and click OK.
- Because you set up a search query to limit data downloads based on employee salary, you'll be prompted to enter a value for the query. Leave the value empty and click OK.
The add-in downloads all employee data.
- Make the following changes:
- In Row 1, change
SophiatoSophie. - Click cell G2 and select Manager from the list of values to change Dave Brown's Job Title.
- Select the row for John Sieve (Row 4) by, for example, clicking his email address. In the Oracle Visual Builder tab, click Table Row Changes, and then click Mark for Delete.
- Select the entire row 5, right-click, and choose Insert
from the context menu. Enter this data for the
newly-inserted row: Email =
jmcgahern@example.com, First Name =John, Last Name =McGahern, Hire Date =2018-01-30, Job Title =Accountant, Salary =19,000, and Department =Accounting.Note: Another way to add new rows in the table is to select the row immediately below the last downloaded row in the table, click Table Row Changes and Insert Rows . The add-in creates a new row within the table, which you can then update.
- Select the row for Ken Ster at the very end of the table
(Row 102) by, for example, selecting his email address. In
the Oracle Visual Builder tab, click Table
Row Changes, and then click Mark for
Delete.
Once you make these changes, your table is similar to that shown in the following image. That is, an
Update,Delete, orCreatemessage appears in the Changed column for each row where you made a change.
Description of the illustration excel-publish-crud2.png
- In Row 1, change
- In the Oracle Visual Builder tab, click Upload Changes.
A confirmation dialog appears with a message that the table has pending deletions. Click Yes to confirm that you want to proceed with the upload. A progress dialog box is displayed. After the upload completes, the table refreshes the Status column to describe the change for each modified row that was uploaded. The row that you marked for deletion, containing the entry for John Sieve, no longer appears as the REST service has deleted it from its collection.

Description of the illustration excel-publish-crud3.png Note: All data is validated before it is uploaded to the REST service. If you run into errors, you can always fix the errors and upload your changes again. If you have partial errors, for example, if update and delete rows were successful but create rows failed, you'll only need to fix data for the failed create row.
To verify that the changes to your Excel workbook were successfully uploaded, go to the Data tab of the Business Objects page in your visual application.
Description of the illustration excel-publish-crud3-web.png

 Want
to Learn More?
Want
to Learn More?
- Get Started with the Oracle Visual Builder Add-in for Excel in Developing Integrated Spreadsheets Using Oracle Visual Builder Add-in for Excel
- Configure Search Options for Download in Developing Integrated Spreadsheets Using Oracle Visual Builder Add-in for Excel