8 Custom Actions
Workbooks that integrate with Oracle business object REST API services can allow the user to perform custom actions on rows of data.
For example, an expense report business object might support a custom action called "reject". Users could download many expense reports and reject many of them in a single upload.
Use Custom Actions
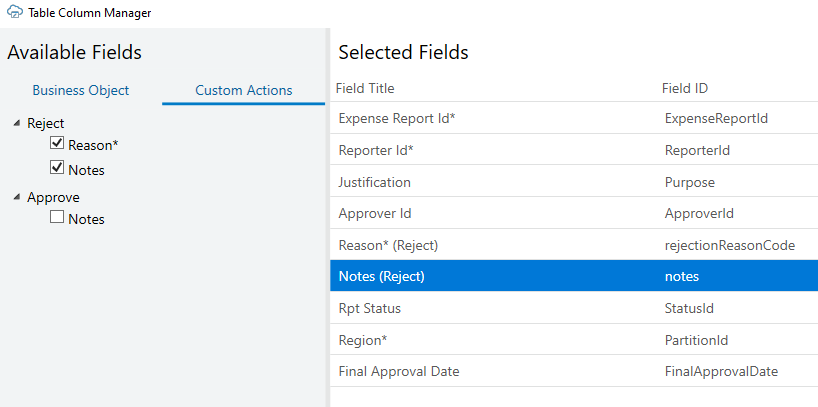
Let's take a look at how you can invoke a custom action in your Excel workbook, for example, the "reject" custom action that's exposed by an expense report business object to reject expenses.
Note:
Your REST API must expose custom actions on the item path for your resource, something like a POST to/contextRoot/v1/myBusObj/{itemId}/action/doMyAction. Actions defined on the collection path are not supported.
Edit Custom Actions
Custom actions exposed by the service that your workbook uses can be viewed and edited in the Custom Actions tab of the Business Object Editor.
Properties such as Title (which appears in the UI that the workbook user sees) and Description can be edited as needed in the Custom Action Editor. Other properties of the custom action should generally be left as is.
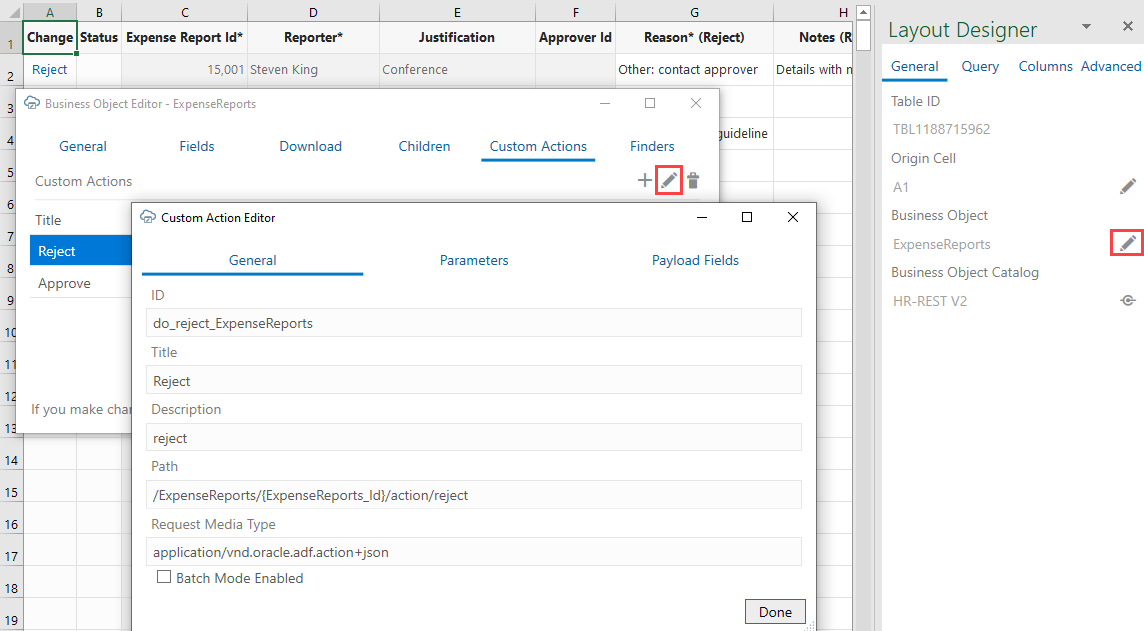
Description of the illustration excel-custaction.png
Payload fields can be edited on the Payload Fields tab of the Custom Action Editor. Properties such as the Title, Data Type, and Required can be changed. For example, you can change the Data Type of a payload field from String to Integer, as long as the change is compatible with the service. You can also update the Required property to mark the payload field as required or not: 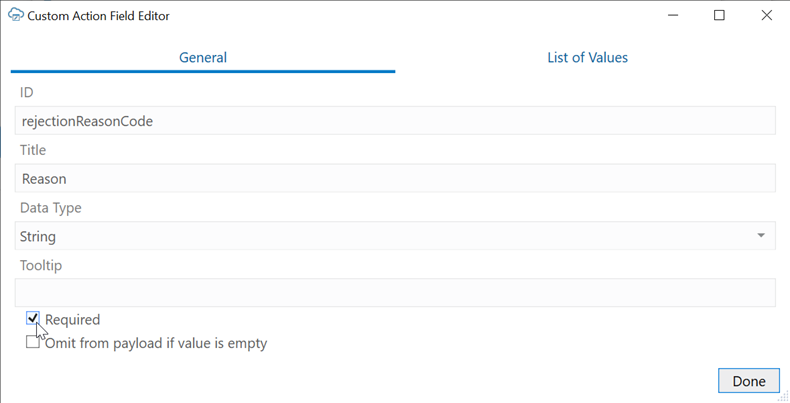
Description of the illustration custom_action_general_prop.png
You can also use the Tooltip field to add a description of the payload field to help your users determine what information or values are expected. Users can display the tooltip in the worksheet by selecting the column header for a payload field.
You can also define a list of values for the payload field (see Configure a List of Values for a Custom Action Field).
Service Description for Custom Actions
If a given REST API supports custom actions, they are described in the OpenAPI v3 service description document generated by the Oracle business object REST API service. For example, a reject custom action would appear in the paths collection:
// Note: some JSON content has been omitted for brevity/clarity

"/ExpenseReports/{ExpenseReports_Id}/action/reject": {
    "parameters": [
      {
        "$ref": "#/components/parameters/ExpenseReports_Id"
      }
    ],
    "post": {
      "summary": "reject",
      "description": "reject",
      "operationId": "do_reject_ExpenseReports",
      "responses": {
        "default": {
          "description": "The following table describes the default response for this task.",
          "content": {
            "application/vnd.oracle.adf.actionresult+json": {
              "schema": {
                "type": "object",
                "properties": {
                  "result": {
                    "type": "string"
                  }
                },
                "required": [
                  "result"
                ],
                "additionalProperties": false
              }
            }
          }
        }
      },
      "requestBody": {
        "description": "The following table describes the body parameters in the request for this task.",
        "content": {
          "application/vnd.oracle.adf.action+json": {
            "schema": {
              "type": "object",
              "properties": {
                "rejectionReasonCode": {
                  "type": "string",
                  "nullable": true
                },
                "notes": {
                  "type": "string",
                  "nullable": true
                }
              },
              "additionalProperties": false
            }
          }
        }
      }
    }
}- The path entry contains a path parameter for the row/item ID, for example,
/ExpenseReports/{ExpenseReports_Id}/action/reject" - The end of the path entry (
reject) matches the name of the custom method defined in the service (see Publishing Custom Service Methods to UI Clients) - The presence of a POST operation for the action path entry is required
- In the
requestBodyschema, there are properties that match the parameters defined in the custom method signature from the service. In this document, these properties are referred to as custom action payload fields.
Batch Mode for Custom Actions
If a custom action supports batch mode, the add-in can process custom actions and other types of changes in batches.
To enable the add-in to process changes in batches, select the Batch Mode Enabled check box in the Custom Action Editor.
If the custom action doesn't work properly in batches, clear the check box to disable batch processing. If the check box is cleared, the add-in invokes the custom action one row at a time.
Note:
The "batchEnabled" : false parameter in the service description only determines the default value of the Batch Mode Enabled check box in the Custom Action Editor. If the parameter is not configured, the Batch Mode Enabled check box is selected by default.After the catalog is created, the check box setting controls how the add-in behaves.
Custom Action Limitations
Here are some things to keep in mind when using custom actions:
- Custom actions that correspond to view object methods (as opposed to view object row methods) are not currently supported.
- Custom actions are not supported for pending Create rows or form in Create mode.
- Custom actions defined in the OpenAPI 3 service description document that have request payload schema members that match business object fields are unlikely to function properly.
- Oracle business object REST API service OpenAPI 3 service descriptions do not indicate which custom action request payload fields are required. You can use the Business Object Editor to adjust the Required property on payload fields.
- The results of custom actions that return complex object values for the "result" member in the JSON response payload are not shown in the Status Viewer.
