4 Create Layouts in an Excel Workbook
To integrate a workbook with a REST service, create a layout for a business object on a new worksheet. You can then download data for the business object to the layout and start working with it.
Layouts
Oracle Visual Builder Add-in for Excel lets you create different layouts to work with data in an Excel worksheet. Layouts are a way to display a business object in an Excel worksheet. Each worksheet supports one of two layouts: Table or Form-over-Table.
- Use a Table layout to view and edit data from a REST service in a tabular format. Here's a worksheet showing employee data in a Table layout:
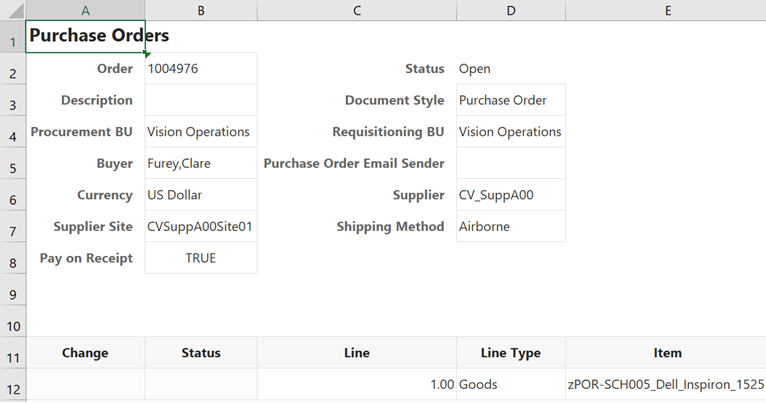
- Use a Form-over-Table layout when a parent-child relationship exists in the business objects used by your web application. Here's a worksheet showing purchase order and line data in a Form-over-Table Layout, where the parent object's data (Purchase Orders) is shown in the form and the child object's data (Lines) is shown in the table:
You can create one layout per worksheet in your Excel workbook. Layouts are created by workbook developers and are visible to data entry users in their workbooks.
Service Descriptions
To create a layout in the workbook, the REST services that you use must provide a service description that complies with the OpenAPI specification. The service description can be a URL or a local file. For Oracle business object REST API services, the URL typically includes a describe path segment, as in https://my-service-host/fscmRestApi/resources/latest/invoices/describe. For Oracle REST Data Services (ORDS), the URL may be similar to https://host/ords/great_app/open-api-catalog/employees/.
You can provide the service description document when you create a layout by clicking Designer in the Oracle Visual Builder tab, as described in subsequent sections. You can also provide the service description document by clicking Manage Catalogs in the Oracle Visual Builder tab (see Edit Service Descriptions and Business Objects).
The service description that you provide helps generate a business object catalog for the workbook. A business object catalog is essentially a list of business objects. As a workbook developer, you can edit portions of the business catalog as desired, or use it as is to create layouts.
Create a Table Layout in an Excel Workbook
Create a Table layout in the Excel worksheet when you want to view and edit data from a REST service in a tabular format.
When you create a table layout, you'll be prompted to point to the service description document. The service description document can be stored on your local drive or accessed remotely using an URL.
You'll also have the option to provide authentication details for accessing your REST service. Consult with your REST service owner for access requirements.
- Create a blank Excel workbook using the standard
.XLSXfile format or the macro-enabled.XLSMformat. Other Excel formats (.XLSand so on) are not supported. - In the Excel ribbon, select the Oracle Visual Builder tab.
- Click the cell where you want to locate the data table.
- In the Oracle Visual Builder tab, click Designer to launch the New Layout Setup wizard.
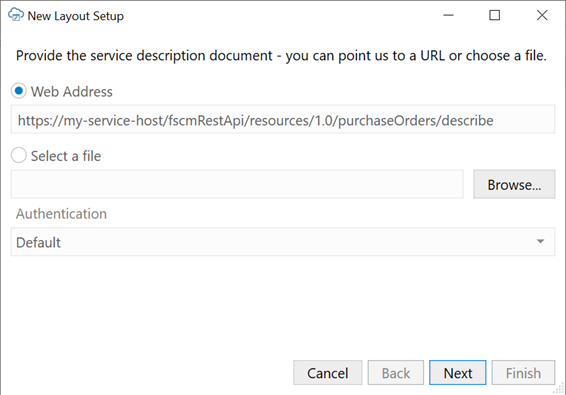
Description of the illustration excel-apiinput.png - From the first screen, provide the service description document using one of these options:
- Web Address option (the default) if you access the service description from a URL. Note that you can't provide a data URL (a URL that returns data) as the starting point to creating a layout.
- Select a file option if the service description document is a local file on your computer.
Tip:
If you are working with Oracle business object REST API services, the URL for the service description usually ends with/describe, for example,https://my-service-host/fscmRestApi/resources/<version>/purchaseOrders/describe. - Select the authentication method for your service from the Authentication list and click Next.
See Authentication Options for more information.
- If you selected OAuth 2.0 Authorization Code, enter the required properties and click Next.
Required fields are outlined in red. Refer to OAuth 2.0 Authorization Code Flow for descriptions of the fields.
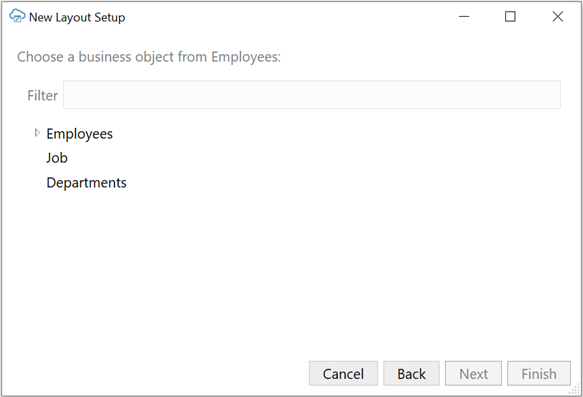
- Select a business object and click Next.
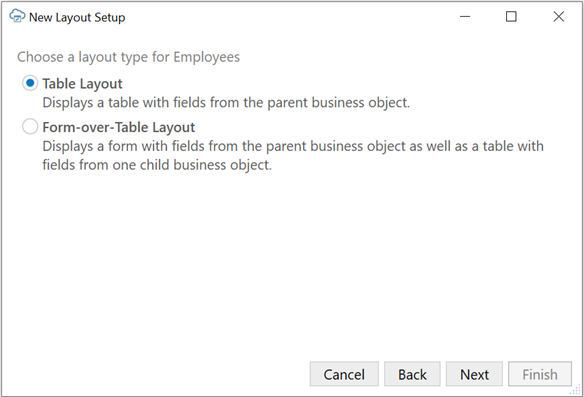
- Select Table Layout and click Next.
- Review the Table layout details and then click Finish.
The add-in creates a Table layout in the Excel workbook that includes column headers and a placeholder data row. The Layout Designer opens in the Excel Task Pane.
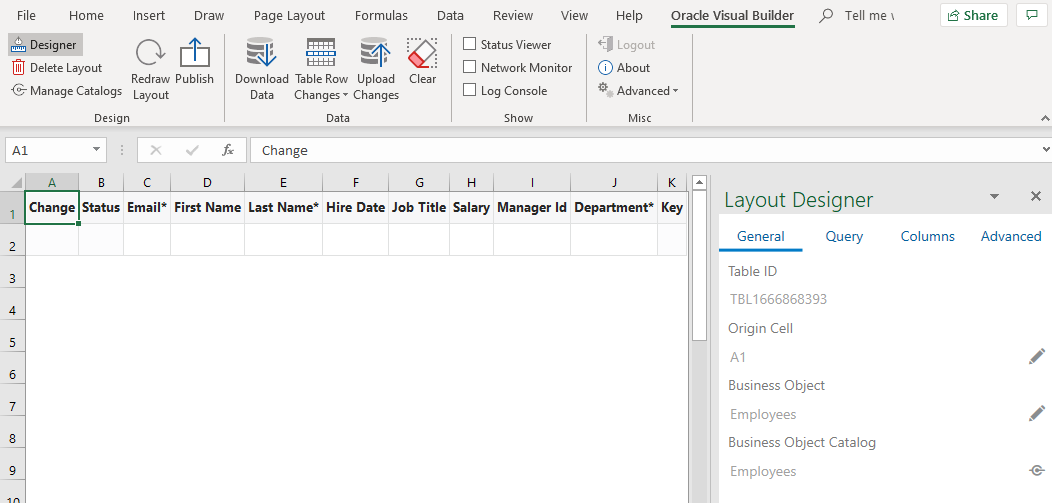
Description of the illustration layout-designer-table.png - Click the Columns tab in the Layout Designer to add or remove columns, or change the order in which columns appear. When a data table is created, most (but not all) fields are added as columns. Click the Manage Columns button (
 ) to add or remove columns as needed.
You can also modify a field associated with a column to, for example, show a tooltip or display a list of input values for your business users. To update a field, select it from the Table Columns table and click the Edit button (
 ) to open the Business Object Field Editor. To add a tooltip, click the General tab and type help text in the Tooltip property. The tooltip is displayed when the user selects the table column header. To create a list of values, see Configure a List of Values.
- After making changes, click Redraw Layout in the ribbon tab to see your changes reflected in the worksheet.
- Optionally, configure the workbook further to limit the data that the add-in downloads, as described in Configure Search Options for Download.
The workbook is now complete and ready to be published. At this point, it's a good idea to perform various data operations, such as download, update, and upload, to test the workbook before you publish and distribute it to users. For information on managing data, see View and Edit Data Using an Excel Workbook in Managing Data Using Oracle Visual Builder Add-in for Excel.
Work with Service Path Parameters in a Table Layout
Some service paths include path parameters. The add-in provides support for configuring a Table layout using a parameterized service path. It automatically extracts the path parameters and prompts the user to provide the corresponding values at download time.
To configure a Table layout with a parameterized service path, first provide an OpenAPI-compliant service description. When prompted, choose a child business object or any parameterized path from the business object picker.
Tip:
When working with Oracle business object REST API services, you should start with the web address to the parent business object description (and not the child address). For example, for a parameterized service path such as/ExpenseReports/{ExpenseReports_Id}/child/Expenses/, provide the address to the ExpenseReports description (not Expenses). Oracle business object REST API services cannot provide OpenAPI service descriptions for parameterized service paths.
Complete the layout configuration. When users click Download Data in the Oracle Visual Builder tab, the add-in displays the Service Path Parameter Editor where users provide the required path parameter values that enables the download of data to complete.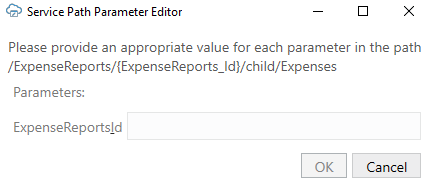
Description of the illustration service_path_parameter_editor.png
Path parameters of type string or integer are supported; other data types are not supported. For string-typed path parameters, values that users enter in the Service Path Parameter Editor are used verbatim when the add-in constructs the request to the service. For integer-typed values, certain culture-specific formatting is removed (for example, commas for thousands separators, parentheses for negative). In all cases, the values used on the URL path are not URL-encoded, so the values entered must be acceptable by the REST service.
Here is an example of a service path with an embedded parameter:
/ExpenseReports/{ExpenseReports_Id}/child/Expenses/
Note {ExpenseReports_Id} is in the middle of the service path.
Using the Service Path Parameter Editor, you provide the proper value for {ExpenseReports_Id}, for example, 123456, which results in the add-in using the following path:
/ExpenseReports/123456/child/Expenses/
Accessing this service path will provide all the expenses for expense report 123456.
The Service Path Parameter Editor does not validate the value(s) that users enter. The value(s) that users provide must be valid. If the path includes multiple embedded parameters, the Service Path Parameter Editor prompts the user to provide a value for each embedded parameter.
The add-in remembers the values provided at download time. These values are used again at upload time to construct the upload requests. If you upload without having done a previous download (for example, when exclusively creating new rows), you'll be prompted for the path parameter values at the beginning of the upload.
Create a Form-over-Table Layout in an Excel Workbook
You can create a Form-over-Table layout in an Excel worksheet when a parent-child relationship exists in the chosen service.
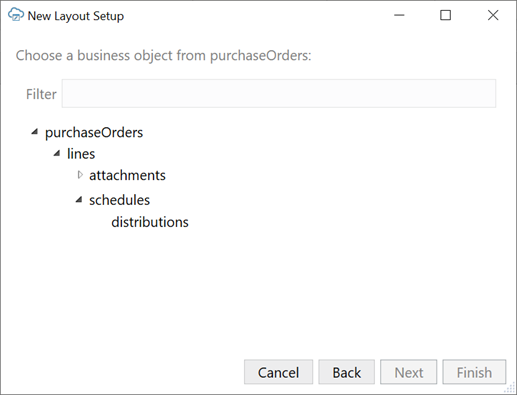
A Form-over-Table layout can only be created for the top-level business object in a business object hierarchy. Suppose you have a hierarchy with three levels: purchaseOrders, lines, and schedules. In this hierarchy, purchaseOrders is a collection of top-level purchase orders each with one or more lines for managing the details of each order. Each of these lines may include one or more schedules for tracking shipping details.
In this scenario, you can only create a Form-over-Table layout for the purchaseOrders and lines business objects. You can't use lines for the form and schedules for the table in a Form-over-Table layout. See Use Multiple Layouts for Multi-level Business Objects.
A parent-child relationship at the service level requires:
- A parent service path, for example,
fscmRestApi/resources/1.0/purchaseOrders - A child service path with a parameter, for example,
fscmRestApi/resources/1.0/purchaseOrders/{purchaseOrder-id}/child/lines
In your workbook, both business objects must be declared in the same catalog. Continuing our example, lines must appear as a child of purchaseOrders. The add-in uses the primary ID of the parent row and inserts it into the child's path. The workbook service must be able to support operations on these paths.
When you create a Form-over-Table layout, you may be prompted to point to the service description document. The service description document can be stored on your local drive or accessed remotely using an URL.
You'll also have the option to provide authentication details for accessing your REST service. Consult with your REST service owner for access requirements.
- Create a blank Excel workbook using the standard
.XLSXfile format or the macro-enabled.XLSMformat. Other Excel formats (.XLSand so on) are not supported. - In the Excel ribbon, select the Oracle Visual Builder tab.
- Click the cell where you want to locate the form and table.
- In the Oracle Visual Builder tab, click Designer to launch the New Layout Setup wizard.
- From the first screen, provide the service description document using one of these options:
- Web Address option (the default) if you access the service description from a URL. Note that you can't provide a data URL (a URL that returns data) as the starting point to creating a layout.
- Select a file option if the service description document is a local file on your computer.

Description of the illustration excel-apiinput.pngTip:
If you are working with Oracle business object REST API services, the URL for the service description usually ends with/describe, for example,https://my-service-host/fscmRestApi/resources/1.0/purchaseOrders/describe. - Select the authentication method for your service from the Authentication list and click Next.
See Authentication Options for more information.
- If you selected OAuth 2.0 Authorization Code, enter the required properties and click Next.
Required fields are outlined in red. Refer to OAuth 2.0 Authorization Code Flow for descriptions of the fields.
- Choose the top-level business object for the form (in this case,
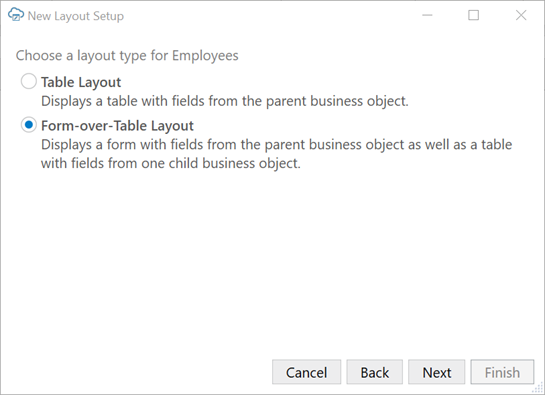
purchaseOrders), and click Next. - Choose Form-over-Table Layout, and click Next.
The Form-over-Table layout option is unavailable if you didn't select the top-level business object or there is no available child business object.
- Choose a child business object (in this case,
lines), and click Next. - Confirm the details of your Form-over-Table layout, and click Finish.
The add-in creates a Form-over-Table in the Excel worksheet and opens the Layout Designer that you use to modify the newly-inserted form and table, as shown here:
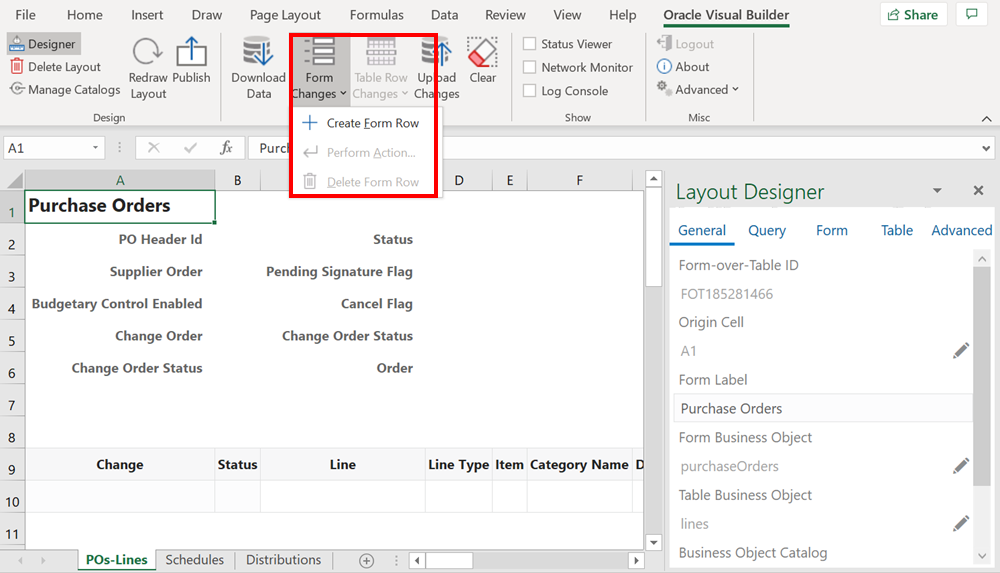
Description of the illustration fot-result.pngIf the form business object (in this case,
purchaseOrders) supports a create action, a Create Form Row option appears in the Form Changes menu, as shown in the image. Use this option to create a new form row during your next upload (see Create a Parent Row in a Form-over-Table Layout in Managing Data Using Oracle Visual Builder Add-in for Excel). - Customize the form and table by modifying the automatically populated properties in the Layout Designer.
Use the Form page to add, remove, or rearrange fields on the form. The Table page includes the same functionality for the table under the form.
Tip:
From the Form or Table page of the Layout Designer, right-click a field or column to see choices for changing the order.To modify a form field or table column, select it from the table and click the Edit button (
 ) to open the Business Object Field Editor. From here, you can add a tooltip or a list of values to a field. To add a tooltip, click the General tab and type help text in the Tooltip field. The tooltip is displayed when the user selects a form field label or table column header. To create a list of values, see Configure a List of Values.
- Click Redraw Layout to see changes you make in the Layout Designer reflected in the form and table.
- Optionally, configure the workbook to limit the data that the add-in downloads, as described in Configure Search Options for Download. If, for example, you do not specify a value for the Search field or Row Finder property, the add-in downloads the first parent item it encounters in the REST service to the form, and the child items, if any, to the table.
Configuration is now complete and you can publish the workbook. At this point, it's a good idea to test the workbook before you publish and distribute it to users. For information on managing data in a Form-over-Table layout, see Manage Data in Form-over-Table Layouts in Managing Data Using Oracle Visual Builder Add-in for Excel.
Create Layouts for Attachment Business Objects
Create a table layout using an attachment business object that let's your business users upload and download attachments.
You can create a standalone table layout, the table layout of a Form-over-Table layout, or a table layout in a set of dependent layouts based on an attachment business object. You cannot use the form in a Form-over-Table layout.
Service Requirements
Oracle Visual Builder Add-in for Excel supports attachments in integrated workbooks if the REST service has:
- An Attachment Record Business Object that contains the metadata for attachments, such as the attachment type, file name, and file size.
- The following fields in the Attachment Record Business Object:
- Type: A string field representing the attachment type. Valid values for this field are
TEXT,FILE, andWEB_PAGE. These values are case-sensitive. - File Name: A string field representing the attachment file name. This field is used by text and file type attachments.
- Url: A string field representing the attachment URL. This field is used by web page type attachments.
- Type: A string field representing the attachment type. Valid values for this field are
- An Attachment Data Business Object that is a child of the attachment record business object and allows for the sending and receiving of attachments
- An Attachment Data Business Object as a child business object with a path ending in
/enclosure/FileContents; and, - Fields with field Ids of
DatatypeCode(for the Type field),FileName(File Name), andUrl(Url).
Configure an Attachment
If the workbook was created before version 2.8 of the add-in or the naming does not match, configure the attachment record business object manually from the Business Object Editor.
- Open the Business Object Editor for an attachment business object and click the Attachments tab.
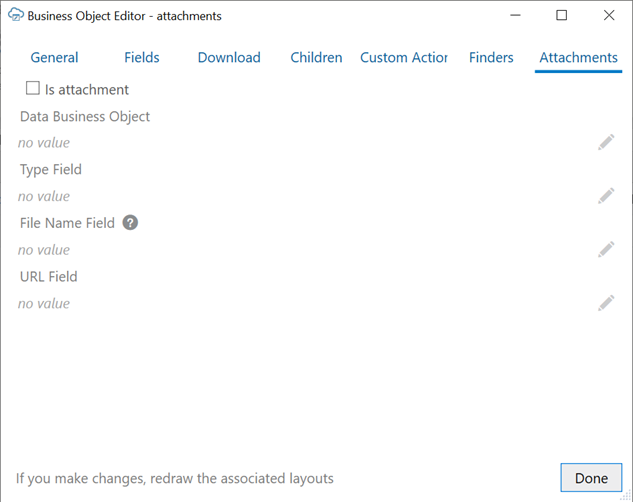
Description of the illustration attachment-bo-editor.png - Select Is attachment.
- Click the Edit icon (
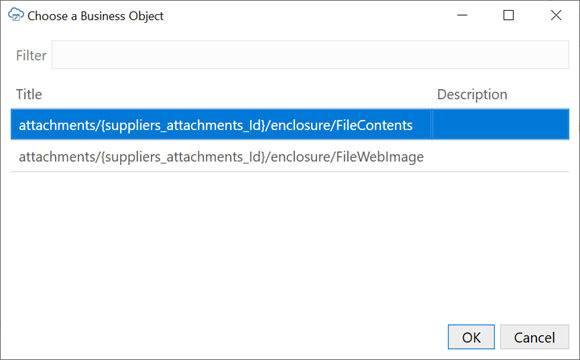
 ) next to Data Business Object to open the Choose a Business Object dialog.
The dialog displays the paths for all child business objects for the Attachment Record Business Object.
- Select the required child Attachment Data Business Object from the list, then click OK.
The child business object must support sending and receiving attachment data. This means that the child endpoint has a collection path that supports:
- GET to retrieve attachment data
- PUT to send attachment data
- Request content type of
application/octet-stream
The path may be similar to this:
{parent attachment record item path}/enclosure/FileContents. - Click the Edit icon (
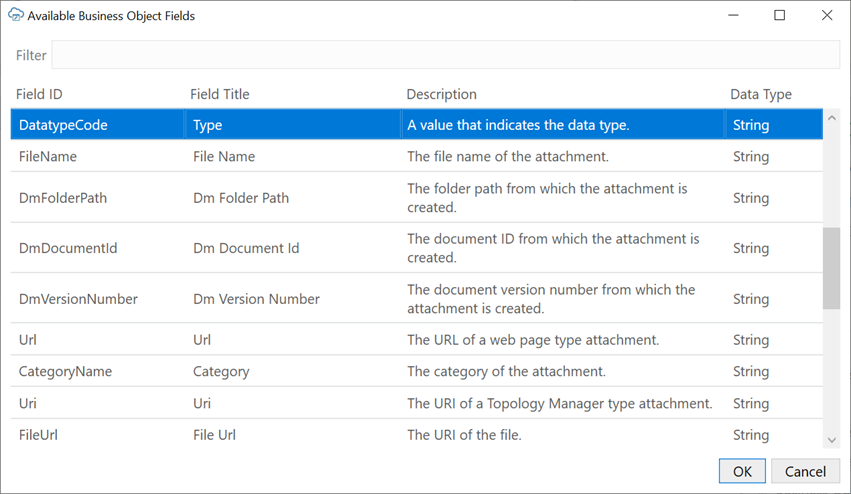
 ) next to Type Field to open the Available Business Object Fields dialog.
- Select the field to represent the attachment type, then click OK.
This field must be a string field with valid values of
TEXT(text type attachment),FILE(file type attachment), andWEB_PAGE(web url-based attachment). Typically, the field ID for this field isDatatypeCode. - Use the available Edit icons to set the File Name and URL fields.
Field Description File Name Field A string field representing the attachment file name. This field is used for text and file type attachments. Typically the field ID for this field is FileName.URL Field A string field representing the attachment URL. This field is used by web page type attachments. Typically the field ID for this field is Url. - When finished, click Done.
- Click Redraw Layout to see changes you made reflected in the attachments table layout.
If properly configured, the resulting table layout includes a Local File Path column that keeps track of the location of local copies of attachments. Selecting cells in the table opens an attachment pop-up that can be used to interact with attachments. See Manage Attachments in Managing Data Using Oracle Visual Builder Add-in for Excel.
Known Limitations
- See Service Requirements in this topic for the limitations on services that support this feature.
- Binding an attachment record business object to the form portion of a form-over-table layout is not supported.
- The only supported attachment types are file, text, and web page. The specific supported values for the field are
TEXT,FILE, andWEB_PAGE. These values are case sensitive. Unknown attachment types are treated as file type attachments. - File download is not asynchronous and may make the UI appear frozen for large attachment files.
- It is not possible to change the position of the Local File Path column in the table. It always appears at the end of the table before the Key column.
- Manually editing the file path in the Local File Path column is not supported. The attachment pop-up should always be used to specify the local file location.
- For some services, create may fail for text-based attachments. Ensuring all required attachment metadata, such as the
Title, is present and resubmitting the record generally resolves this issue. - Attachment metadata records may have additional fields, such as
DmDocumentId,UploadedFileContentType, that should generally be managed by the service and not altered by the business user. It is recommended that you mark these fields as read-only in the Business Object Editor if they aren't already or omit them from the table layout.
Use Descriptive Flexfields in a Layout
Oracle Visual Builder Add-in for Excel supports the use of descriptive flexfields (DFF) in your layout's forms and tables. DFFs expand to display additional fields for tracking supplemental information. These fields are supported in REST services using Oracle ADF Business Components.
A DFF consists of a top-level field, or "discriminator", and a number of sub-fields called "segments". Segments may be global (available for all values in the discriminator) or context-sensitive (dynamic based on the value in the discriminator).
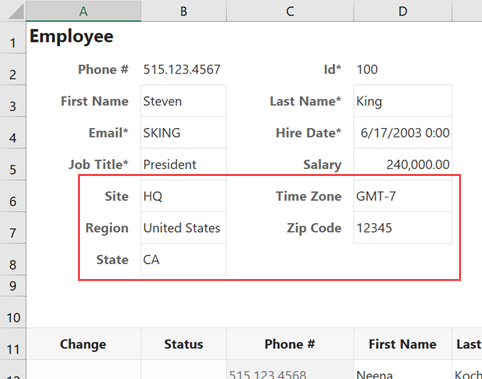
For example, an "Employees" REST resource may include a child DFF that defines regional information for employees. When added to a table, the DFF displays a Region column (for the discriminator) as well as additional columns for the DFF's segments. These columns could, for example, be used to capture extra regional information such as site and time zone. The DFF may also include context-sensitive columns such as a "Postal Code/Zip Code" column for employees in the North American region.
See Use Descriptive Flexfields for more information.
Add DFFs to Forms and Tables
Add DFFs to forms and tables using the Form Field Manager or Table Column Manager. You can add multiple DFFs and place them anywhere in the form or table.
- Open the worksheet with the layout that you want to modify.
- Click either the Form or Columns tab in the Layout Designer as needed.
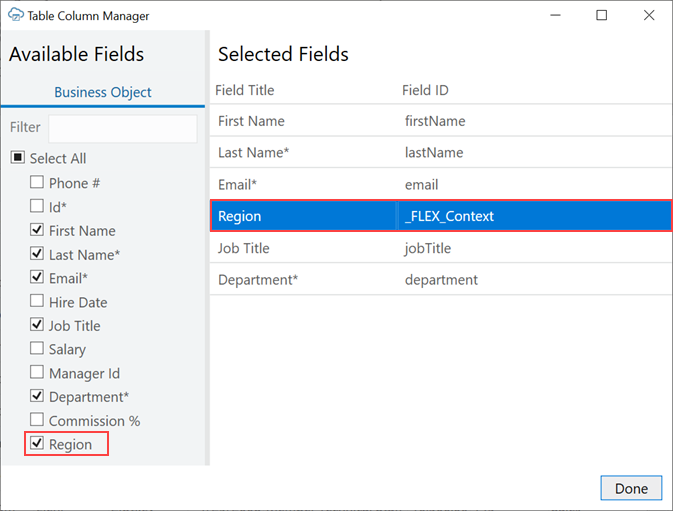
- Click the Manage Columns button (
 ) to add your DFF.
Available DFFs are identified by the title of the discriminator field (in this case, "Region") and appear at the bottom of the list of available fields. The field ID is the discriminator field ID ("__FLEX_Context").
- Select the DFF from the Available Fields list.
You can also change the order of fields in the form or table by dragging and dropping fields in the Selected Fields list.
- After you add a DFF to a layout, click Redraw Layout to expand the DFF.
The associated segments appear in the following order: global segments, the discriminator, and context-sensitive segments.
Context-sensitive columns for all possible discriminator values are included in the table. However, only those cells in a row that are relevant to the value in the discriminator field are editable. All other context-sensitive cells are read-only (grayed out).
In a form, the context-sensitive form fields relevant to the current discriminator value appear after the discriminator field. Context-sensitive fields that are not relevant are not included in the form. If you change the value in the discriminator field, the form automatically updates to include the relevant context-sensitive field for that value.
Showing and Hiding Context-Sensitive Columns in a Table Layout
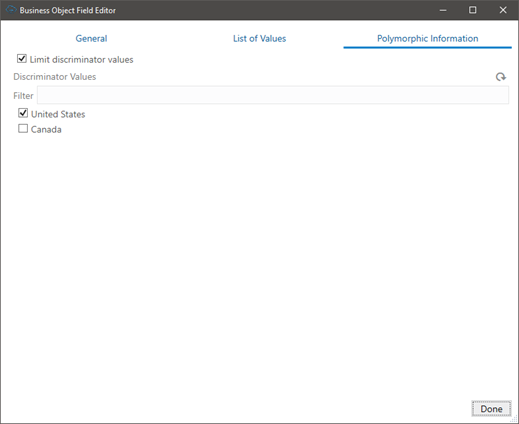
Once you add a DFF to a Table layout, you can select which context-sensitive columns you want to display using the Polymorphic Information tab of the DFF's Business Object Field Editor.
In the case of the region DFF, you may choose to show regional information for US employees only.
To show or hide context-sensitive columns:
- Open the worksheet with the layout that you want to modify.
- From the Layout Designer, click the Edit icon (
 ) next to the Business Object field.
- From the Business Object Editor, click the Fields tab and then select the business object's field.
- Click the Edit icon (
 ) in the Business Object Editor to open the Business Object Field Editor.
- From the Polymorphic Information tab, select Limit discriminator values.
- To ensure you see all available discriminator values, click the Refresh icon (
 ) to fetch the latest DFF metadata from the service.
- From the Discriminator Values list, select the discriminator values for the context-sensitive segment columns that you want to display. For example, to show zip code and state columns in your Table layout, select the United States check box.
- After you select or clear discriminator values, click Redraw Layout to show or hide the context-sensitive segment columns.
Refreshing DFF Metadata
Because DFFs are configurable by customers and subject to change, metadata stored in the workbook for the DFF may become stale.
To clear metadata when publishing a workbook, select Clear all layouts from the Publish Workbook window. The add-in refreshes the DFF metadata during the first download operation performed after you open the workbook.
Limitations
- A DFF child resource must have a one to one relationship with its parent resource.
- A DFF child resource can only contain a single discriminator field. Multiple discriminators are not supported.
- Changing the order of the global or context-sensitive segments is not supported.
- Binding layouts directly to a DFF resource is not supported. Layouts must be bound to the parent resource of the DFF resource.
- Before you can add a DFF to a table, it must expose polymorphic business object metadata. This means that the OpenApi3 describe document must contain a "discriminator" and "oneOf" syntax in the schema for the business object. "anyOf" polymorphic business object syntax is not supported.
- When a layout contains a DFF, the "fields" and "expand" query parameters should not be manually configured in the "Search Parameters" in the "Query" tab of the designer.
- Limiting discriminator values for a DFF displayed in a Table layout does not limit:
- The set of values that can be chosen in a list of values (LOV) for a discriminator field
- The values users can provide for a discriminator field
Manage Layout Capabilities
Each layout in Oracle Visual Builder Add-in for Excel enables you to perform various standard and custom actions in an Excel workbook, so long as the operation is supported by your service. You can enable or disable these supported capabilities to control their availability in a layout.
- In the Excel ribbon, click Designer to open a workbook's Layout Designer.
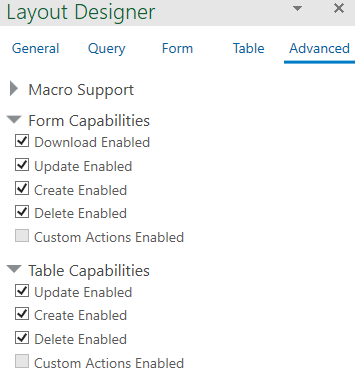
- Click Advanced to see the layout's capabilities. Here's an example of a Form-over-Table layout, indicating form capabilities and table capabilities:
- Select or deselect options as required. If the business object doesn't support an action, it won't be available for selection (like Custom Actions Enabled in the example).
- Click Redraw Layout.

