9 Appearance of an Integrated Excel Workbook
Oracle Visual Builder Add-in for Excel automatically manages the appearance of an integrated Excel workbook through built-in styles and data format types.
The add-in automatically formats cells in a workbook by creating a set of named Excel styles when the workbook is first initialized. The styles created by the add-in are consistent with Oracle Alta UI standards and Oracle accessibility guidelines. The format portion of the styles is sensitive to the user's preferences as defined in the Windows region settings. So a US user will see US dates and a French user will see French dates.
Once the styles are initialized, the add-in applies those styles to the integrated cells, according to the field's properties, at key points (such as during a data download). Typically, the styles are created once for a workbook and are never updated, but you can take advantage of the options described in this chapter.
Reset Workbook Styles
You have the option to reset styles in an Excel workbook when a new add-in version has updated style definitions and you want to use those styles in an older workbook, or when a user has changed style definitions in a workbook and wants to revert to the current definitions.
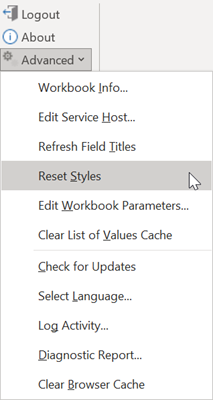
To reset the style definitions in a workbook, select Reset Styles from the Advanced drop-down.
Note:
The Reset Styles command is only available when the designer tools have been enabled.
Description of the illustration reset-styles.png
You are prompted to confirm. After confirmation, each style definition used by the add-in is updated. The list of styles includes any style that would be created by the current add-in, including the Normal style.
Choose Field Formats
Cell formats in an Excel workbook are applied by the add-in according to a field's data type and based on whether the field is editable (create or update). While this behavior works for most scenarios, sometimes you might want to extend a field's formatting options.
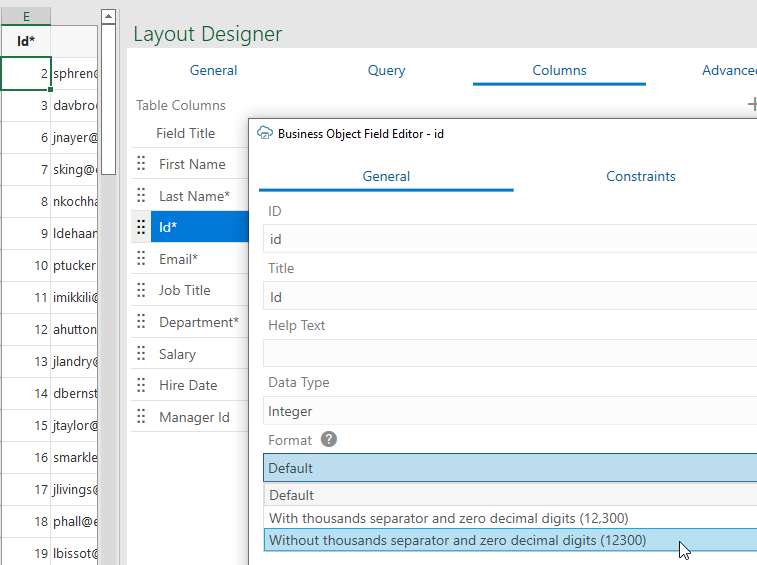
Let's consider the example of an employee workbook that includes ID and Salary fields, both of which are integers. A value of 10,000 for the Salary field can be formatted with the thousands separator (10,000 versus 10000). But an ID value of, say, 12300 seems odd with the thousands separator (12,300). In this case, you can override the ID field's default format to choose a format without the thousands separator.
- In the Layout Designer's Columns tab, select the field you want to update and click the Edit icon.
- In the Business Object Field Editor that appears, select an option in the Format drop-down. The default value is
Default, which tells the add-in to apply the usual automatic styles without any override.Remember, the format types shown to you are based on what's appropriate for the field's data type. In this image of an employee's workbook, the ID field uses the Integer data type and the available options let you format the ID with or without the thousands separator. The options also follow user preferences as defined in the Windows Region settings, so a US user will see a decimal point (π = 3.14) while a French user will see a decimal comma (π = 3,14).

Description of the illustration field_format.png - Click Done.
- Click Download Data to process the change.
Add Help Text to Your Workbook
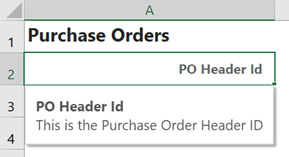
You can add help text for business object fields you use in forms and tables in your workbook to provide help to your business users. Your users will see a popup with this help when they select a form field or column header in a layout.
You can also add help to:
- Custom actions
- Custom action payload fields
- Row finders
- Row finder variables
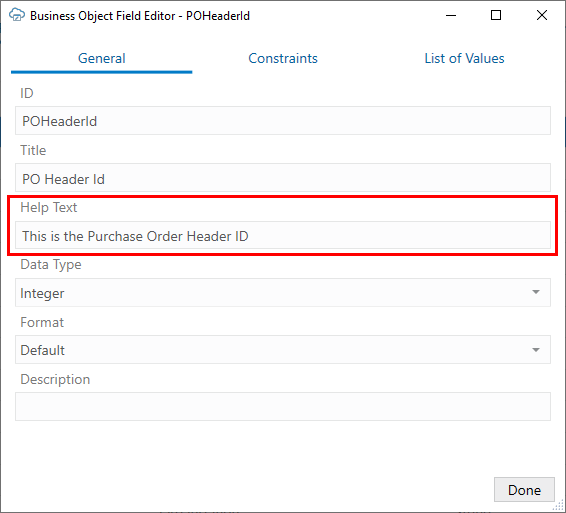
To add help text, open the editor for the field, action, finder, or variable and type help text in the Help Text field on the General tab, as shown here:
Help Text values, as well as Title values, can be localized. See Manage Workbook Translations.
Once configured, help text for business object and item-level custom action payload fields is displayed when the user selects the form field label or table column header in a layout.
Help text for custom actions and business object-level payload fields is displayed in the custom action wizard, either in the Description field for custom actions or in a popup when you hover over the payload field. Help text for row finders and variables is displayed in the Search Editor when you hover over the finder or variable label.