Create New Rows to Upload to the Web Application
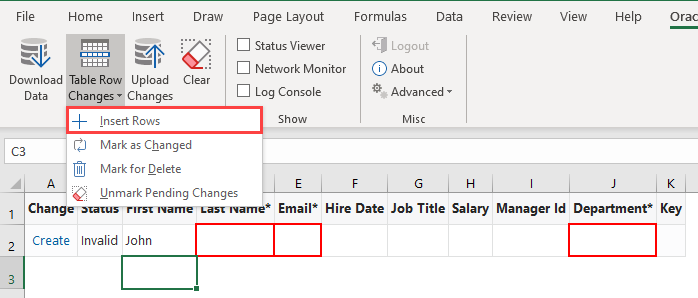
Create new rows in the table using the Insert Rows option in the add-in’s Table Row Changes menu or by using Excel options to insert a full row.
- To create new rows in a table with downloaded data, click Table Row Changes and select Insert Rows, or right-click and choose Insert from the Excel context menu (you can choose any Excel option to insert a row). You can create new rows either at the end of the data table or in the middle.
Tip:
To insert multiple rows, select cells from multiple rows, then select Table Row Changes > Insert Rows. The add-in will create multiple pending Create rows for you to fill out as needed, as shown here:
Description of the illustration excel-insert1.png - To create several new rows without downloading data, if create is enabled for the Table, add values in the empty row that appears below the column headers. This empty row is known as the placeholder row:
Once you enter data in the placeholder row (for example, in the cell for First Name), the add-in automatically recognizes the row as a pending Create row. To insert more rows, select a cell in the first row after the table and select Table Row Changes > Insert Rows.

Description of the illustration excel_placeval_user.png
Any time a new row is created, it is validated for data entry. An Invalid message appears in the Status column if the row contains a cell where you are required to enter a value and have yet to do so. A red border also appears around the cell where a value is required or invalid. See Understanding Data Validation.
WARNING:
Never insert partial rows into a table layout as this can lead to data corruption. Also, never use the Excel Insert option to shift cells down or to the right.