Upload Changes to the Web Application
Once you make all the changes that you want to make, you are almost ready to upload all your changes to the web application.
Review the Change column in your layout. You'll see a message for each row marked for change: Create for new rows, Update for changed rows, and Delete for rows marked for deletion. If you have marked a row for an action, the Change cell for the row will indicate the action to be performed (such as Approve for an expense report) on the next upload.
Tip:
If you change your mind about a pending change, select the row, then select Unmark Pending Changes from the Table Row Changes menu. Oracle Visual Builder Add-in for Excel won't include the row when it sends other rows back to the service for update, creation, or deletion.When you are ready, click the Upload Changes button from the Oracle Visual Builder Add-in for Excel tab. The add-in performs all the requested operations, as indicated in the Change column. When the upload has completed, the add-in displays an Upload completed message in the Status Viewer and status messages for each processed row in the Status column of the table.

Description of the illustration excel-upload-error.png
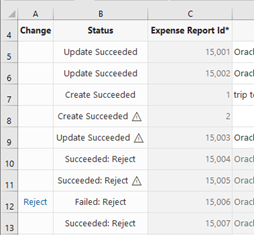
Review the Status column to see which rows succeeded and failed. You might see status messages such as Create Succeeded, Update Failed, Delete Failed, and Skipped. Skipped means that a row marked for update had no changes and was not included in the upload.
In this example, the Status column displays a Create Failed message in the cell of a row that the add-in failed to create. You can review the Selected Row Status in the Status Viewer for additional information on the failure. Here, a required value for Hire Date was not entered. Enter a hire date and click Upload Changes to try and upload the modified data again.
Successfully deleted rows are removed from the Excel worksheet while failed attempts to delete a row result in the row remaining in the Excel worksheet. You can inspect the reason for the failure to delete in the status in the Status Viewer.
Some web applications may issue warning messages for successfully uploaded rows. The message in the Status column contains an indication that there were one or more warnings for that row. Select a row with a warning icon to display details of the warning in the Status Viewer.

Note:
Following a successful upload, you may see a message like this: "This row may not contain the latest information from the service. Download to refresh the information for this row." If you see this message, click Download Data to refresh your workbook with the latest data from the web application.If there are one or more errors in a set of changed rows, those rows and their associated rows are marked as failed. To troubleshoot the error, review the errors in the Status Viewer for each form, table, and descendant table in your workbook. Once you've fixed the errors in the pending changes, you can retry the upload operation.
Note:
You may have to fix and retry the upload more than once before it succeeds. The REST service may not report all errors that occur during a single upload operation.