 Configure a Pipeline to Build and Deploy a Node.js Microservice in Visual Builder Studio
 Before You Begin
This 10-minute tutorial shows you how to configure a pipeline to automate and build a Docker image of a Node.js microservice, push it to Oracle Cloud Infrastructure Registry (OCIR), and then deploy the Docker image to OCI Container Engine for Kubernetes (OKE) using Oracle Visual Builder Studio (VB Studio).
Background
In VB Studio, you can create a build pipeline to define dependencies of jobs and create a path or a chain of builds. You define a pipeline either using a pipeline designer or through YAML (YAML Ain't Markup Language) script, a human-readable data serialization language that is commonly used for configuration files.
In this tutorial, you'll create a pipeline using YAML that does the following:
- Runs a build of the job that creates the Docker image of the Node.js microservice and pushes it to Oracle Cloud Infrastructure Registry (OCIR)
- Runs a build of the job that deletes the microservice objects from Oracle Container Engine for Kubernetes (OKE). If the microservice is already deployed, the job is successful. If the microservice isn't deployed, the job fails.
- Runs a build of the job that deploys the Docker image to OKE, irrespective of the undeploy job's build status
What Do You Need?
- A web browser
- Your Oracle Cloud account credentials
- The Docker, Node.js, and Kubernetes VM template configured in the previous tutorial. The jobs you'll add in the pipeline use this Build VM template.
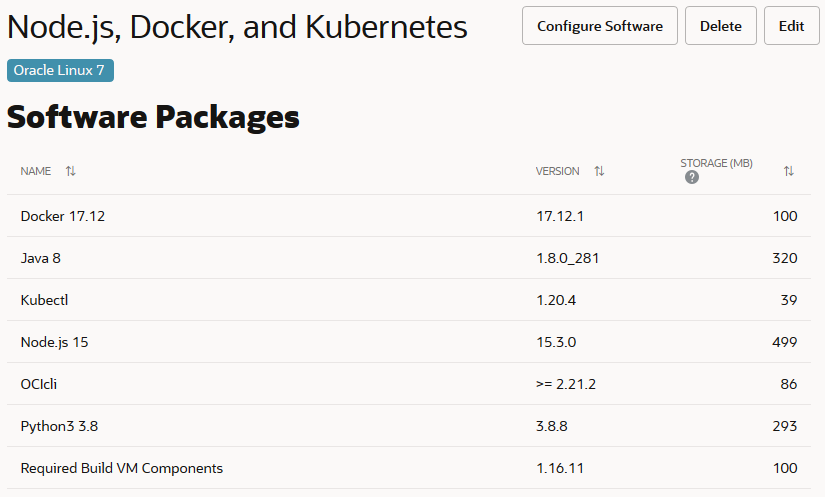
Description of the illustration org_vmtemplate_software.png - The build job you created in this tutorial to build the Docker image and push it to OCIR
If you changed the job's name in the tutorial, enter the new name here:
Build Job Name
- The deploy and undeploy jobs you created in this tutorial to deploy and undeploy the Node.js microservice objects from OKE
If you changed the job names in the tutorial, enter the new names here:
Deploy Job Name
Undeploy Job Name
 Create a Pipeline File using YAML
- Open the VB Studio project.
- In the left navigation menu, click Git.
- From the Repositories list, select my-nodejs-app.
- Click + File.

Description of the illustration git_populated_repo.png - In File Name, enter
.ci-build/pipeline.yml.All YAML files must reside in the
.ci-builddirectory in the root directory of a hosted Git repository'smasterbranch. Within the.ci-builddirectory, a job or a pipeline configuration file must be saved with the extension.yml. - In the content area, copy and paste this script.
Click to copy the script.
pipeline: name: build-deploy-pipeline-yaml auto-start: false start: -- - on succeed, fail: - The above script performs these actions:
- Sets the pipeline's name to
build-deploy-pipeline-yaml - Sets
auto-starttofalse. This is required to disable pipeline's builds if its jobs are triggered externally (outside the pipeline). - Defines the order of builds as:
- Run a
job's build - Run a
job's build
The undeploy job deletes Kubernetes objects deployed to OKE. If the objects exist, the job is successful. If the objects don't exist, the job fails. - Run a
job's build
By default, if a job's build fails in a pipeline, VB Studio stops the pipeline's builds immediately and doesn't progress to the next job. Using theon succeed, failcondition, you've configured the pipeline to progress to the nextjob irrespective of the previous job's build status.
- Run a
- Sets the pipeline's name to
- Click Commit.
- In the Commit Changes dialog box, click Commit.
 Run the Pipeline
- In the left navigation menu, click Builds.
- Click the Pipelines tab and verify the pipeline.
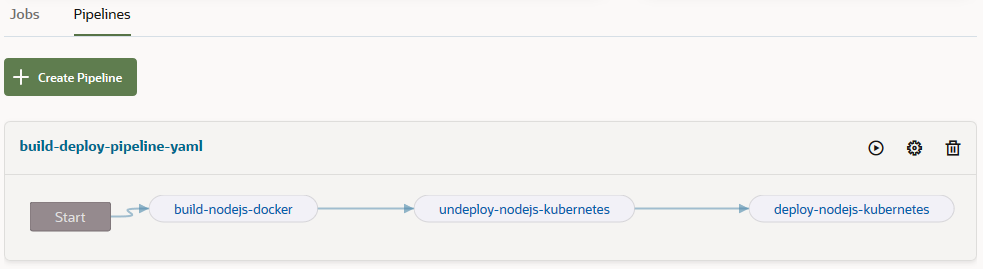
Description of the illustration build_pipeline.png - In the build-deploy-pipeline-yaml pipeline's box, click Build
 .
. - Click the pipeline's build-deploy-pipeline-yaml name.
- On the pipeline's instances page, monitor its builds.
If the service and deployment objects exist on OKE, builds of all jobs are successful. Your pipeline instance should look like this:

Description of the illustration pipeline_jobs_successful.png If the service and deployment objects don't exist on OKE, the
job's build fails and the pipeline progresses to the next job. Your pipeline instance should look like this: 
Description of the illustration pipeline_jobs_onefail.png - To get the deployed microservice's URL, click the
job's build link. - On the build's details page, click Build Log
 to see the build's log and the deployed microservice's URL.