 Create
a Project for Visual Applications in Visual Builder Studio
Create
a Project for Visual Applications in Visual Builder Studio Before You Begin
This 15-minute tutorial shows you how to create a project for a visual application, which serves as the foundation to build a basic web application in Oracle Visual Builder Studio.
Background
Visual Builder Studio (VB Studio) is a development platform that helps you plan and manage your application's lifecycle, from design and build right through test and deploy. It lets you create engaging web and mobile applications using a visual application template, which provides everything you need to develop a visual web or mobile application.
In this tutorial series, we'll build a very simple Human Resources visual application, using a project as a starting point. Every project in VB Studio is devoted to a discrete software effort, and the project we create in this tutorial is exclusive to the HR visual application. A project brings together all the tools you need to create your application, such as a Git repository to store your source code, a pipeline to provide continuous integration and delivery, an issue tracking system, wikis, and more.
Once we have our project, we'll create a workspace, a completely private area for you to work on your visual application. All your work within this space is stored in a clone of the project's Git repository, and is not visible to others until you share or publish your changes. A workspace also connects you to the development environment where you plan to deploy your application, which must be a separate Visual Builder instance.
What Do You Need?
- Access to VB Studio
This tutorial does not provide access to a VB Studio instance. Talk to your administrator to get the URL of a VB Studio instance as well as user credentials to access the instance.
- A supported browser
- The name of a separate Visual Builder instance used for development
- The credentials of a user who can deploy to the Visual Builder instance
 Create
a Project for a New Visual Application
Create
a Project for a New Visual Application
The first thing you'll do is create a project. As someone who creates a project, you'll automatically become the project's owner, responsible for project management. For the purposes of this tutorial, we'll assume that you're also the developer who will create the HR web application.
- In the web browser, log in to VB Studio. If
you're logging in for the first time, you'll see a Welcome
screen with a link to an introductory video, along with a news
feed of additional screens. You can dismiss the news feed at
any time, or keep it around.
You are on the Organization page, which has a list of the projects you own or are a member of. Click + Create.

Description of the illustration welcome.png - On the Details page of the New Project wizard, enter:
- Project Name:
Tutorial HR
                        Project
(you may want to add your name to the project name if you're in a large organization) - Description:
Tutorial project
- Security: Private (the default)
- Preferred Language: the language of your choice
Click Next.
- Project Name:
- On the Template page, select Visual Application and click Next.
- On the Properties page, click Select an instance to choose the Visual Builder development instance where you plan to deploy your application. If only one Visual Builder instance is associated with your VB Studio instance, it is automatically selected as your development instance.
- Change the Workspace Name from the default
Workspace1toHR Visual Application. Also change the Working Branch Name frombranch1tohrbranch. - Leave other fields to their default settings and click Finish.
Wait for the project to be provisioned. Once provisioning completes, you'll see the Project Home page, which serves as a window to the Designer, as well as to your environments, repositories, and a recent activities feed. On the left are a series of tabs showing all the project components that are available.
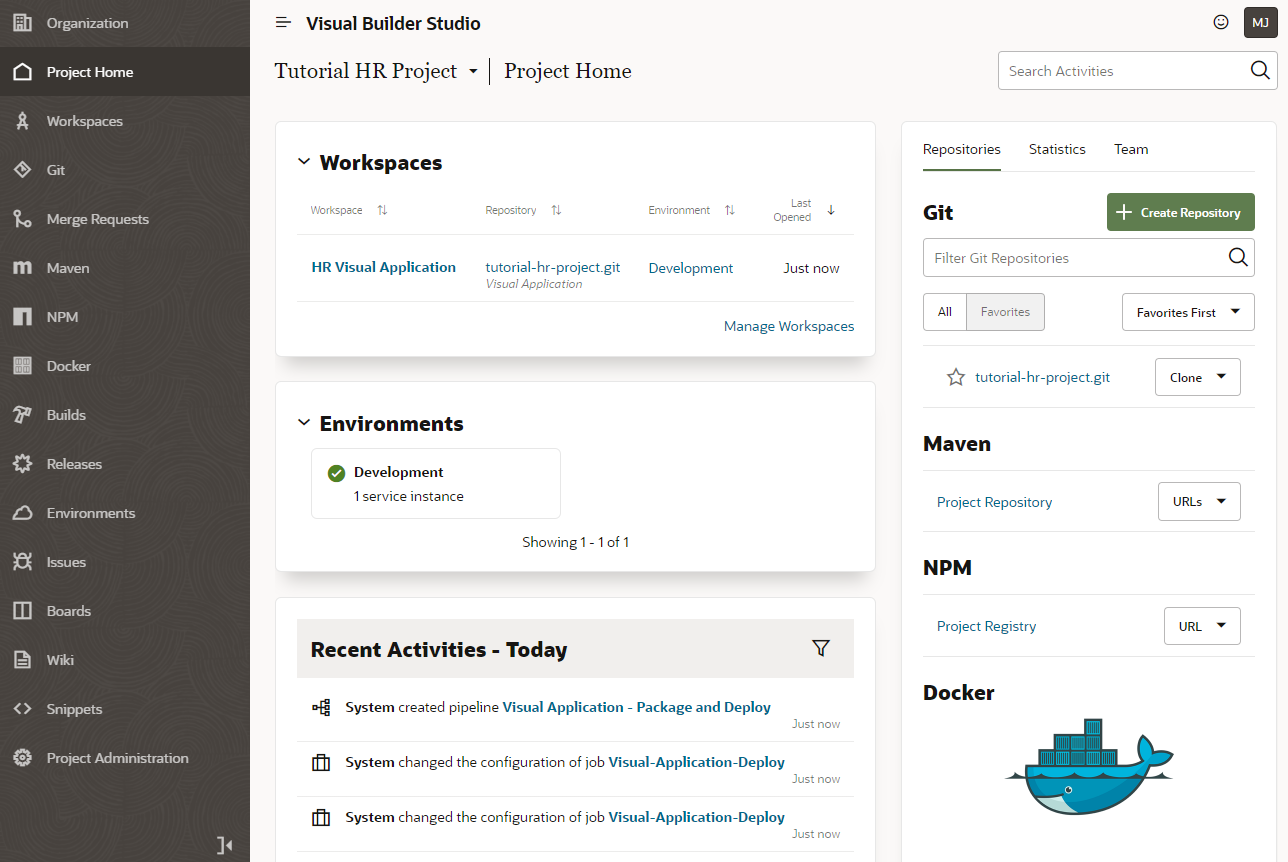
Description of the illustration project_home.png
 Explore
the Project Environment
Explore
the Project Environment
Everything you need to start building a visual application is now created for you in this project. Let's step through some key components to better understand your project environment.
- On the Project Home page, you'll see the tutorial-hr-project.git
repository on the right in the Repositories tab. This Git repository
stores your visual application's source files and is also
known as the project's remote repository. Click the tutorial-hr-project.git
link to see your project's remote branches, master and hrbranch,
created with initial content for your visual application.

Description of the illustration repo.png - In the left navigation, click Workspaces
 to
view the HR Visual Application workspace.
This workspace contains your working branch, hrbranch, and
serves as your local repository. The hrbranch
initially has the same set of source files as the master
branch, but as you work with your visual application, it will include the changes you make. Your changes can't be seen
by others until you save them from the local branch to a
remote branch.
to
view the HR Visual Application workspace.
This workspace contains your working branch, hrbranch, and
serves as your local repository. The hrbranch
initially has the same set of source files as the master
branch, but as you work with your visual application, it will include the changes you make. Your changes can't be seen
by others until you save them from the local branch to a
remote branch.

Description of the illustration workspace.png - Click Environments
 in the left
navigation to view the Development environment that points to
your Visual Builder instance. Here, you can view details of your
Development instance and the applications that you deploy to
this instance.
in the left
navigation to view the Development environment that points to
your Visual Builder instance. Here, you can view details of your
Development instance and the applications that you deploy to
this instance.

Description of the illustration env.png - Click Builds
 in the left navigation to view two build jobs that package and
deploy your visual application to the Development instance.
The Visual-Application-Package job generates the visual
application's artifact files. The Visual-Application-Deploy
job deploys the artifact files to the Development instance.
in the left navigation to view two build jobs that package and
deploy your visual application to the Development instance.
The Visual-Application-Package job generates the visual
application's artifact files. The Visual-Application-Deploy
job deploys the artifact files to the Development instance.

Description of the illustration build_jobs.png - On the Builds page, click Pipelines
to view the sequence of build jobs that package and deploy your
application to your Development environment.

Description of the illustration build_pipeline.png
 Add
Credentials to Deploy the Visual Application
Add
Credentials to Deploy the Visual Application
Now that your project is provisioned, let's set up the credentials that VB Studio will use to deploy your visual application to the Visual Builder Development instance.
- Click Jobs on the Builds page, then click Configure
 for the Visual-Application-Deploy job.

Description of the illustration build_auth.png - On the Job Configuration page, click Steps.
- In the Username and Password
fields, enter the credentials of a user who can deploy to the
Visual Builder Development instance. Click Save.

Description of the illustration build_auth_credentials.png
 Add
Team Members to the Project
Add
Team Members to the Project
For the purposes of this tutorial, let's assume that other members of your team will work with you on this visual application, which means you'll need to add them to this project. As the project owner, you can restrict what others can do in this project by granting them membership as a Developer Full Access, Developer Limited Access, or Contributor.
- Click Project Home
 in the left
navigation.
in the left
navigation. - On the Project Home page, click Team, then
+ Add Member.

Description of the illustration team.png - In the Add Member dialog box, select the new user's
membership, enter the username of a teammate, and click Add.
For demonstration purposes, this tutorial adds Clara Coder with the Developer Limited Access role, which lets her access most project components but limits
management actions.

Description of the illustration team_add_member.png An email containing project details is sent to Clara Coder. Your recent activities feed is also updated.