 Add
Pages to a Web Application for Data Manipulation in Visual Builder
Studio
Add
Pages to a Web Application for Data Manipulation in Visual Builder
Studio Before You Begin
This 15-minute tutorial shows you how to use Quick Starts in VB Studio to create pages and buttons that allow you to edit data, view details of data, and delete data in a table.
Background
You can use Quick Starts for table components to create specific kinds of pages to create, edit, and delete business object data. The Quick Starts add buttons and action chains that save you the work of creating these elements yourself.
In a previous tutorial, you used a couple of the table Quick Starts. In this tutorial, you'll use the rest of them. You'll also get a chance to test your web pages as they will appear to the user.
What Do You Need?
- Access to VB Studio
- A supported browser
- Completion of the previous tutorials
 Add an
Edit Page for the Department Business Object
Add an
Edit Page for the Department Business Object
An Edit page lets you edit a row in your table. In this step, you'll add an edit page that lets users change a department's Name and Location.
- Click Web Applications
 , go to the main-departments
page and click the Table component in the Page Designer. If necessary, click Reload page
, go to the main-departments
page and click the Table component in the Page Designer. If necessary, click Reload page  to view the new departments.
 - In the properties pane, click Quick Start to display the Quick Start
menu, then click Add Edit Page.
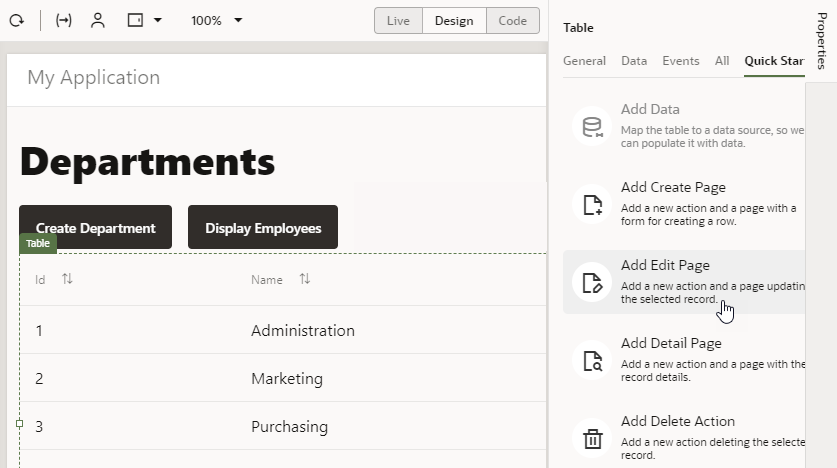
Description of the illustration departments_add_edit_quick_start.png - On the Select Read Endpoint page, select the Department business object (if necessary) and click Next. VB Studio will automatically select the Department object's read endpoint.
- On the Select Update Endpoint page, select the Department business objects (if necessary) and click Next. As with the read endpoint, VB Studio will automatically select the Department object's update endpoint.
- On the Page Details page, select location
(name
is already selected). Click Finish.
An Edit Department button is displayed in the toolbar on the main-departments page. The button is inactive.
 Add a
Detail Page for the Department Business Object
Add a
Detail Page for the Department Business Object
A Detail page lets you view additional details of a row in your table. In this step, you'll add a detail page for users to see more information about each of your departments.
- In the Quick Start menu, click Add Detail Page.
- On the Select Endpoint page, select the Department business object (if necessary) and click Next. VB Studio will automatically select the endpoint to read a single record.
- On the Page Details page, select name. Expand the locationObject
and items nodes (expand item[i] if it isn't already expanded) and select name.
With this selection, both the department's name and location
will show as additional details for the user. Change the Button label field to
View Department Detail. Click Finish.A View Department Detail button is displayed in the toolbar on the main-departments page. The button is inactive.
- Click Live, select a row, and then click View Department Detail to open the main-department-detail page.
- Click Design to return to Design view.
- Click the Input Text field for the second
Name label to open the Input Text's properties. In the General tab,
change the Label Hint value to
Location.
 Add a
Delete Button for the Department Business Object
Add a
Delete Button for the Department Business Object
A Delete button lets you delete a selected row in your table. In this step, you'll add a delete button to remove a department if you wanted.
- Return to the main-departments page. Click Quick Start if necessary, and click Add Delete Action.
- On the Select Endpoint page (the only page of the Quick
Start), select the Department business object (if
necessary) and click Finish. As with other
quick starts, the endpoint to delete a record will be
automatically selected.
A Delete Department button is displayed in the toolbar on the main-departments page. The button is inactive.
 Test
Your New Department Pages
Test
Your New Department Pages
Now, let's test your web pages.
- Click Preview
 .
.
The application opens in another browser tab. The three buttons you created are inactive.
- Select a row. All the buttons are now active.
- Click Edit Department.
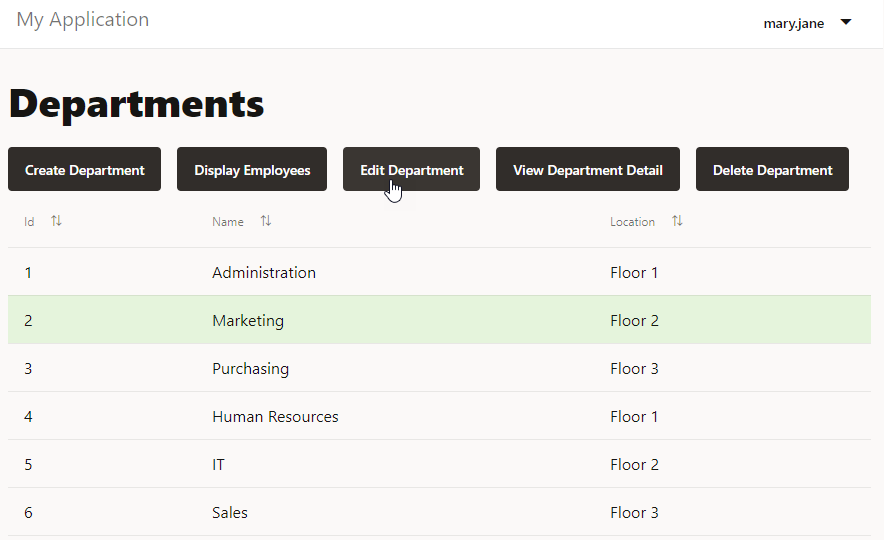
Description of the illustration departments_edit.png - On the Edit Department page, change the Location
field to
Floor 4and click Save. A success message appears briefly, and you are returned to the Departments page. - Select the row again and click View Department Detail
to display the data.

Description of the illustration departments_detail.png - Click Back.
- Click Create Department and specify the name and location of a new department, and then click Save. A success message appears. The new department is displayed in the table.
- Select the new department and click Delete Department. A success message appears. The department is no longer displayed.
- Close the browser tab.
 Add an
Edit Page for the Employee Business Object
Add an
Edit Page for the Employee Business Object
Now that we've added options to let users manage departments, we'll do the same for employees. In this step, you'll add an Edit page to update details of your employees.
- Go to the main-employees page, then click the Table component in the Page Designer.
- Click Quick Start to display the Quick Start menu, then click Add Edit Page.
- On the Select Read Endpoint page, select the Employee business object (if necessary) and click Next.
- On the Select Update Endpoint page, again select the Employee business object (if necessary) and click Next.
- On the Page Details page, select hireDate,
email, and department (name is
already selected) and click Finish.
An Edit Employee button is displayed in the toolbar on the main-employees page. The button is inactive.
- Click Live, select a row, and click Edit Employee to open the main-edit-employee page.
- Click Design.
- Click within the form on the page but outside of a component (that is, in the Form Layout component on the page). In the General tab of the form's properties, set the Max Columns value to 2. The fields now appear in two columns.
 Add
Detail and Delete Pages for the Employee Business Object
Add
Detail and Delete Pages for the Employee Business Object
- Go to the main-employees page. If necessary, click the table, then click Quick Start.
- In the Quick Start menu, click Add Detail Page.
- On the Select Endpoint page, select the Employee business object (if necessary) and click Next.
- On the Page Details page, select name,
hireDate, and email. Expand the departmentObject
and items nodes (expand item[i] if it isn't already expanded) and select name. Change the Button label field to
View Employee Detail, then click Finish.A View Employee Detail button is displayed in the toolbar on the main-employees page. The button is inactive.
- In the Quick Start menu, click Add Delete Action.
- On the Select Endpoint page (the only page of the Quick
Start), select the Employee business object (if
necessary) and click Finish.
A Delete Employee button is displayed in the toolbar on the main-employees page. The button is inactive.
- Click Live, select a row, and click View Employee Detail to open the main-employee-detail page.
- Click Design.
- Click the Input Text component for the
second Name label. In the properties pane, change the Label Hint
value to
Department. - Click within the form on the page but outside of a component (that is, in the Form Layout component on the page). In the General tab, set the Max Columns value to 2.
 Test
Your New Employee Pages
Test
Your New Employee Pages
- Click Preview .
The application opens in another browser tab, displaying the Departments page.
- Click Display Employees.
The three buttons you created are inactive.
- Select a row. All the buttons are now active.
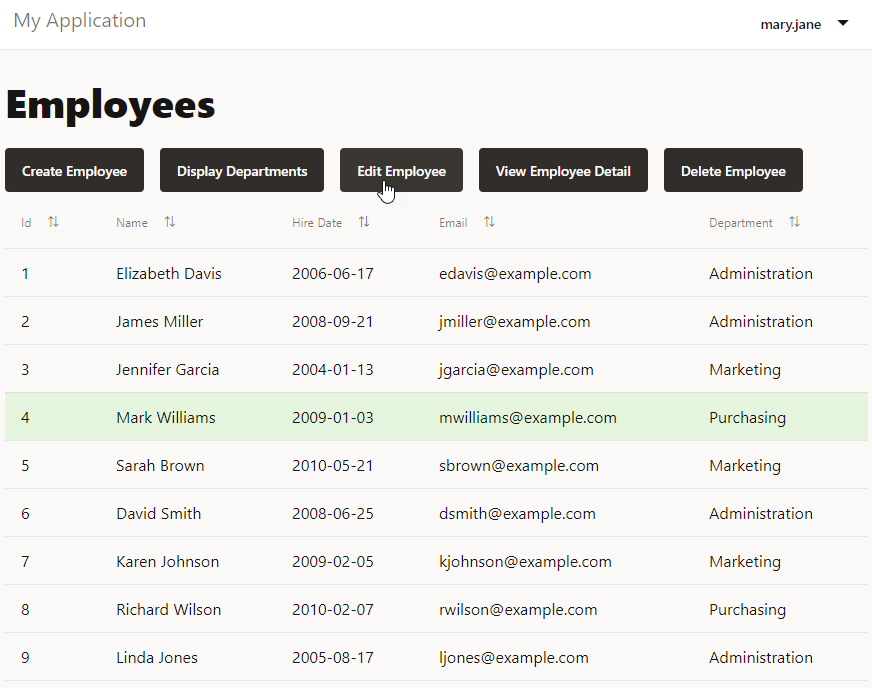
Description of the illustration employees_edit.png - Click Edit Employee.
- On the Edit Employee page, change Department
to
ITand click Save. A success message appears, and you are returned to the Employees page. - Select the row again and click View Employee Detail to display the data, then click Back.
- Click Create Employee and specify the data for a new employee, then click Save. A success message appears, and the new employee is displayed in the table.
- Select the new employee and click Delete Employee. A success message appears. The employee is no longer displayed.
- Close the browser tab.