Create a Simple Extension
The easiest way to set up VB Studio so that others can configure Oracle Cloud Applications pages is to create a simple extension yourself. This lets you ensure everything is working properly.
Before you begin, decide how you want to set up the projects for your team:
- In general, it’s easiest to use a single VB Studio project for all your extension work, with a different Git repository for each pillar (like HCM, SCM, and so on). Using a single project keeps everything together in one place, limits the number of permissions each user requires, and generally makes sense if your team is on the smaller side. This is how VB Studio does things by default, so if this works for your team you can go right to step 1 and get started.
- If, on the other hand, you have users that need to be isolated from each other’s work—say, different consultant organizations doing implementation work for different pillars, or a larger team that uses a common Oracle Cloud Application environment family to develop, test, and host extensions from multiple pillars—you may opt to separate your work by creating one project for each pillar. If this direction makes the most sense for you, go to your Organization page in VB Studio and start creating projects, using Create a Project to guide you. When you’re done, proceed to step 1 below.
- Navigate to a page in your Oracle Cloud Application.
-
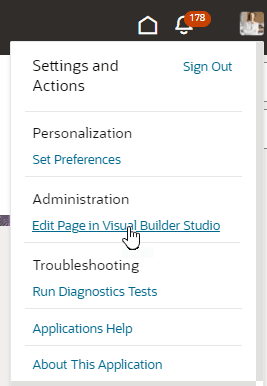
Click your user name at the top-right corner to open the Settings and Actions menu, then select Edit Page in Visual Builder Studio:
-
In the New App Extension Project dialog, enter a unique name for the project, as well as some team members or groups you think might use this project to extend this Oracle Cloud Application:
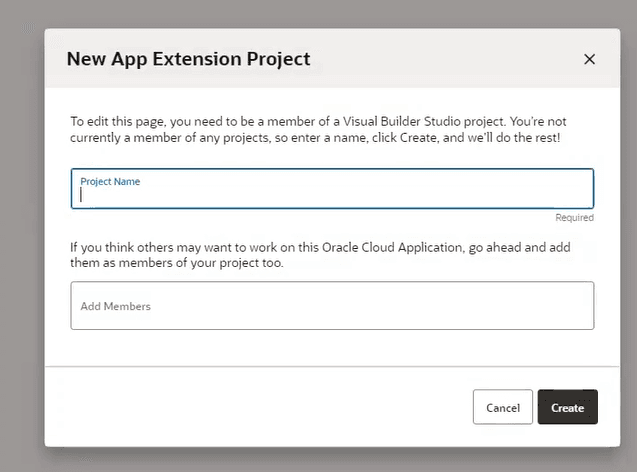
Description of the illustration newappextproj1.png
After you’ve completed this procedure, make sure that the team members you’ve added have the proper roles, by following the steps in Set Up VB Studio Users.
VB Studio shows you a status dialog so you can follow along as each asset is created:
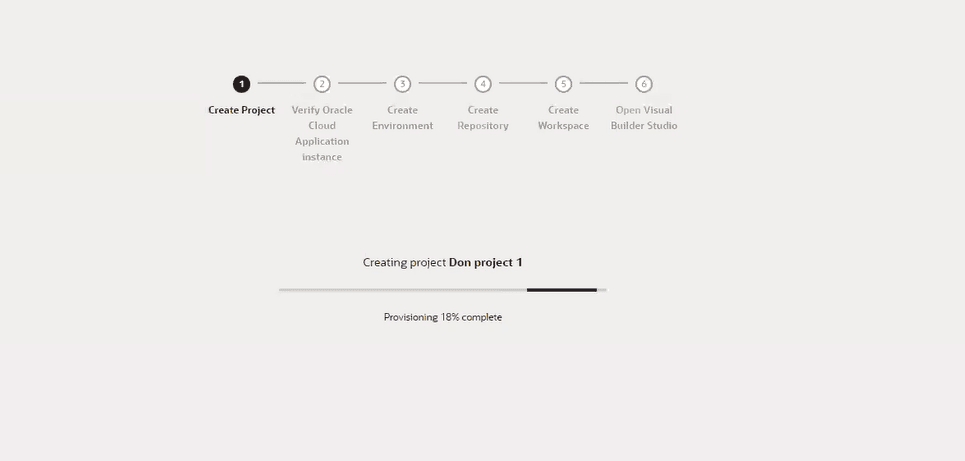
Description of the illustration projprogress.png
If you’re curious about these assets, you can find out more about them in What Project Artifacts Are Created?. By default, VB Studio creates a private project that’s discoverable, which means that users you haven’t added explicitly to the project will be allowed to choose the project when they click Edit Page in Visual Builder Studio from the associated Oracle Cloud Application. Remember, it’s best to keep all work for a given Oracle Cloud Application within the same project, so VB Studio will place a “Recommended” badge next to the project’s name to encourage users to select it. Note: The default workspace name generated when you jump over to VB Studio typically uses the pillar of the page you’re trying to extend, in the format
Workspace PILLAR, for example,Workspace HCM. If that name already exists, a number is added to the name and incremented as needed, for example,Workspace HCM 1,Workspace HCM 2, and so on. -
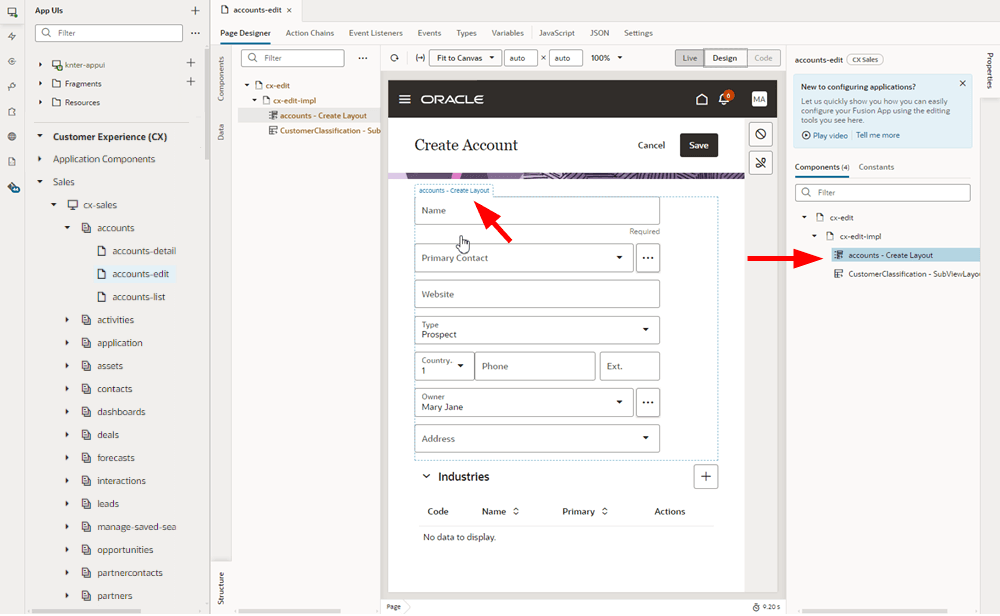
VB Studio opens the page you were just viewing, in the Designer. When you hover over an extendable component on the canvas, it is outlined in blue, like this:
- Make a small change to the page, just for testing purposes. You can drag a Heading component onto the page, for example, or add or remove a field on a dynamic form. VB Studio implicitly saves your changes as you work.
-
In the Designer’s header, click Publish:

- Since this is just a test, accept the defaults in the Publish dialog and click Publish. By default, your extension’s sources are merged to the default branch (
main) of the workspace’s Git repository, then built and deployed immediately to the Oracle Cloud Applications instance within your DEV environment.Note: If you prefer, you can change the default and instead deploy your changes via a continuous integration and delivery (CI/CD) pipeline. CI/CD pipelines give you the option of deploying an extension to multiple environments as well as automating some lifecycle operations. For more information, see Use CI/CD Pipelines for Deployment.
-
Now click the link in the Publish dialog to see your published changes:

Description of the illustration publish-pipelinedisabled1.png
Note: Make sure you copy and paste the deployment URL to your clipboard before you click Close. You won’t have access to the URL after the Publish dialog is closed.