Deploy an Extension From Your Local System

After an extension is packaged as a .vx archive, you can use a REST request to install the extension on an Oracle Cloud Application environment instead of using a Visual Builder Studio deploy build job.

For example, you might want to deploy an extension to an Oracle Cloud Application production environment that has restricted IP access, so the environment is not accessible from Visual Builder Studio. To get around this, you can use curl to install the extension from an IP address that's able to access the environment. To install the extension, you'll need a valid .vx extension archive and the URL and credentials for the Cloud Application environment.

The Package build job for your extension in VB Studio will build a valid extension archive for you. After running the build job, you can download the archive to your local system.

To install an extension from your local system:

  1. Make sure you have curl installed on your local system, and that the system can access the Cloud Application environment.
  2. Download the extension archive to your local system.
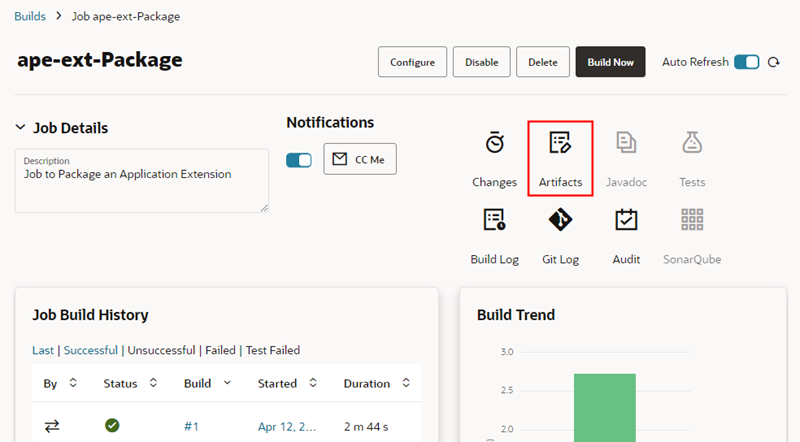
    1. On the project's Builds tab, open the Package build job for the extension.
      You can use the same Package build job used to build the extension for testing.
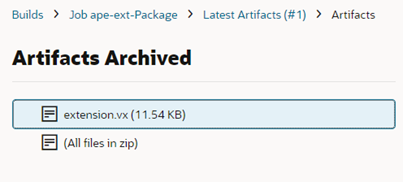
    2. Click Artifacts to open the Artifacts Archived page.
    3. Click the extension archive to automatically download it to the default location on your local system.

      The extension will have .vx appended to the name as the file type ( extension.vx).


      If you don't see an extension archive, click Build Now to run the build job.

  3. Use curl to install the extension on the Cloud Application.
    1. Open your command terminal.
    2. In the terminal, navigate to the location of the extension archive on your local system.
    3. Type the curl request at the command prompt to install the extension.

      In the curl request you'll need to provide:

      • The USERNAME and PASSWORD for the Oracle Cloud Application instance.
      • The name of the extension archive (for example, EXTENSION_NAME.vx).
      • The path to the v2/extensions directory of your Cloud Application, which will include the URL and port (INSTANCE_URL:PORT/fscmRestApi/vx/v2/extensions).
      Your curl request will look similar to this:
      curl -v --noproxy '*' -X POST -L -H Content-Type: application/octet-stream -H 'X-OAM-AUTHN-HINT: 0' 
       -u USERNAME:PASSWORD --data-binary @EXTENSION_NAME.vx
       http://INSTANCE_URL:PORT/fscmRestApi/vx/v2/extensions

      The curl request contains a POST method to add the extension archive to the extensions directory.

      After installing the extension, you can use the following curl request to see a list of installed extensions:
      curl -v --noproxy '*' 'X-OAM-AUTHN-HINT: 0' -u
              USERNAME:PASSWORD http://INSTANCE_URL:PORT/fscmRestApi/vx/v2/extensions/
  4. (Optional) To delete an extension using curl:
    To delete a specific version of an extension:
    curl -v --noproxy '*' -X DELETE -L -H 'X-OAM-AUTHN-HINT: 0' -u
            USERNAME:PASSWORD http://INSTANCE_URL:PORT/fscmRestApi/vx/v2/extensions/{extensionId}/{extensionVersion}
    To delete all versions of an extension:
    curl -v --noproxy '*' -X DELETE -L -H 'X-OAM-AUTHN-HINT: 0' -u
            USERNAME:PASSWORD http://INSTANCE_URL:PORT/fscmRestApi/vx/v2/extensions/{extensionId}

The extension is automatically installed and registered when it's added to the directory.

Note:

Extensions deployed from a local system using curl will not be in the list of deployed application extensions in the project's Environments tab.