Add Display Logic to Determine What's Displayed at Runtime

You control what’s displayed at runtime on a page through the use of display logic, which you configure on the Layouts' Rule Sets tab.

Suppose you want to show employee data (say, whether an employee's credentials can be sent by email) only when the user viewing the page is a manager. You'd then create a dynamic table or form and associate it with a rule set that checks the user's role. If the user has, for example, the IT Manager role, the page shows the layout that includes the Send Credentials Email Flag field. All other users would see the page with the default layout.

You can have more than one rule for a given component, and the rules are listed in a display logic tree when you select the dynamic form or table in the Rule Sets tab. The order in which they appear in the display logic tree is important because at runtime the rules are evaluated from top to bottom. The first rule where all the conditions are met—in this case, the user is a manager—is the one that's used, and the associated layout is applied to the component. No other rules are tested. Keep this in mind as you’re working in the Rule Sets tab.

To configure the display logic for a dynamic component:
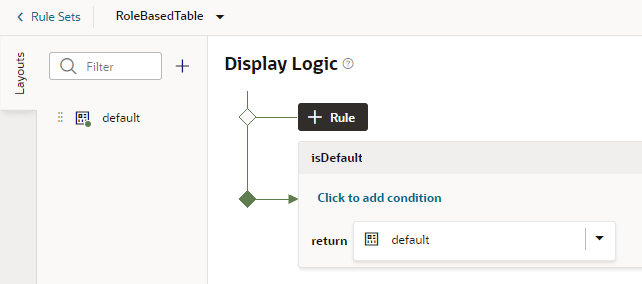
  1. From a dynamic table or form's Properties pane, click Go to Rule Set to open the component's rule set in the Layouts' Rule Sets tab.
  2. In the Rule Set editor, create a rule by clicking + Rule and giving it a name.

    The rule set for a dynamic component always contains a default rule. You can choose to edit it, copy it and use it as the basis for your own rules, or you can create a rule from scratch.

    Tip:

    It's helpful to give your rules meaningful names. For example, to show a particular layout only when the user is in Canada, you might call the rule inCanada. To edit a rule's name, hover near the name, then click Edit icon, and click Save iconwhen you are done.
    1. In your new or default rule, click Click to add condition.
    2. Select an Attribute and Operator from the drop-down lists, and select or enter a Value.

      The Attributes drop-down list contains the fields and variables that you can use in your layout, and the Operators list contains the operators (for example, '=' and '<=') that are valid for the attribute you select. The Values list shows values already defined for the attribute (for example, 'true' and 'false'), if any, but you can also enter your own value.

      You can select built-in context variables that provide a way to access various pieces of information when building conditions for a rule. For example, you can check the size of the device accessing your app, or information about the user using the app such as their role or email. Built-in context variables include:

      • $fields variables (available when working with dynamic forms) determined by the fields displayed in the Fields editor. For example, the $fields.firstName.value lets you access the value of the First Name field in your data source. Look for these variables under the Fields group in the condition builder.

        Note:

        For each field, regardless of type, you can choose $numberValue (for example, $fields.ConflictId.numberValue()) or $value ($fields.ConflictId.value()). You should use $numberValue when you know the field's value should contain a number. For example, if the ConflictId field's type is a string and you choose $numberValue, the field's value will be converted to a number, if possible. If the value can't be converted, the $numberValue will be NaN (Not a Number).

        The only limitation is that $numberValue is limited by the maximum precision allowed by the Number type in Javascript.

      • $responsive variables determined by the screen size of the device the app is currently displayed on. For example, the responsive.mdUp variable's value is True if the current user is using a device where the screen width is 768 pixels or more, such as a tablet. Look for these variables under the Responsive group in the condition builder.
      • $user variables determined by the current user. For example, the user.isAuthenticated variable's value is True if the current user is an authenticated user. You can use the user.roles variable to check the role of the user using the app. Look for these variables under the User group in the condition builder.

        Note:

        When using user.roles, the Value drop-down lists the available Oracle Cloud Applications job and abstract roles. (The drop-down will not list any duty roles. If you want to specify a duty role, you can manually type the duty role name in the Value field.)

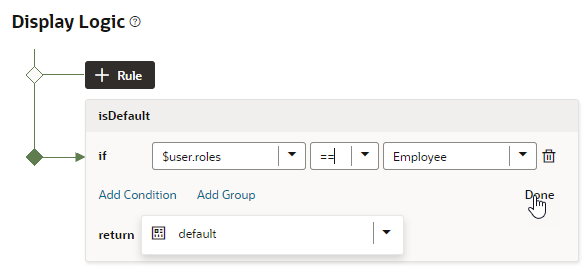
      Here's the condition to check whether the current user has the Employee role:
      Description of dynamic-components-table-condition.png follows
      Description of the illustration dynamic-components-table-condition.png

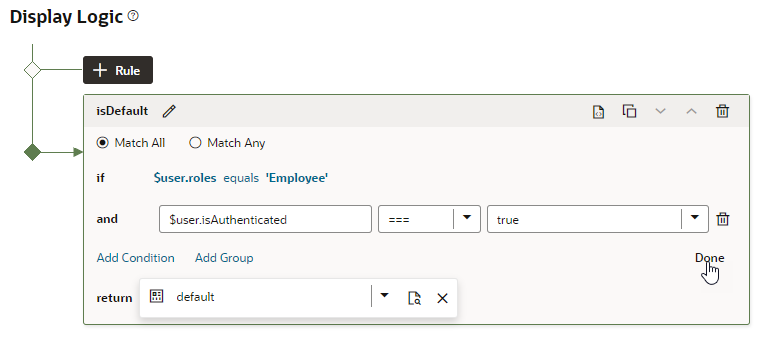
    3. You can add more conditions and group conditions if you want to use more attributes to make the rule more precise, for example, you can make sure the user has the Employee role AND is authenticated. You would then create a rule with two conditions, and select Match All to require that both conditions be true.
    4. Click Done.
    5. In the return field, select the layout you want to apply when the rule is true.

      If you created a copy of a layout when you created the rule, it is selected by default in the return field. You can use the same layout with multiple rules.

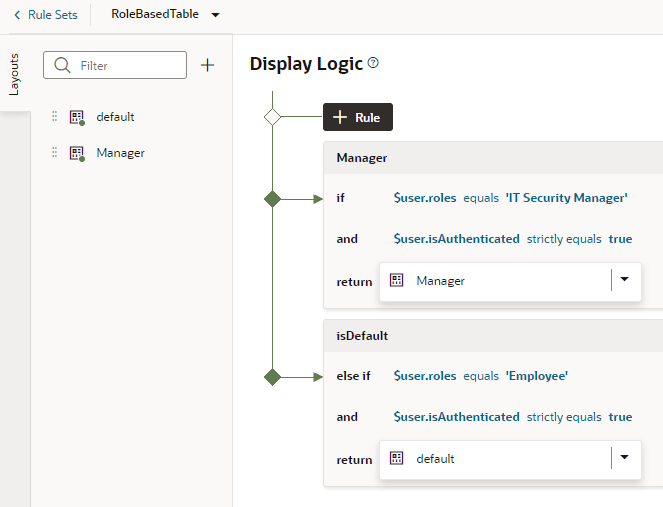
  3. Create more rules as required, for example, to display a Manager layout only to authenticated users who have the IT Manager role:
    1. Click the Duplicate icon (Duplicate icon), then enter a name for the new rule in the Duplicate Rule dialog box.

      To also create a copy of the layout to use as a starting point, make sure that check box is selected. Click Duplicate.

    2. Edit the new rule and define its conditions. To continue our example, you might set the rule to show the Manager layout when the current user's role is IT Manager and extend it to show only to authenticated users:


      If you click Display code, you can see and edit the rule's expression. For the rule above, you'd see the following expression:
      $user.roles == 'IT_SECURITY_MANAGER_JOB' && $user.isAuthenticated === true ? 'Manager' : null
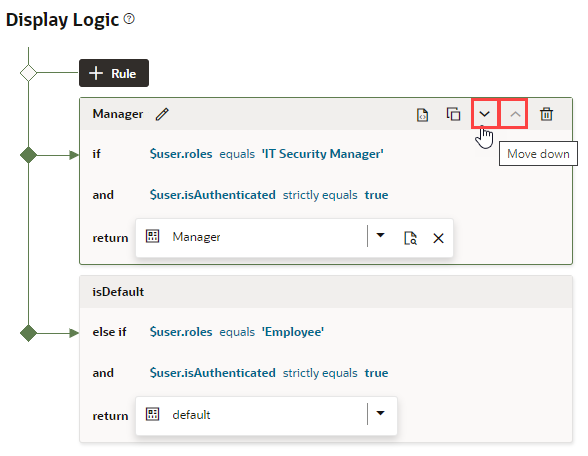
    3. Use the Move Up and Move Down buttons to make sure you have the rules in the order you want them evaluated.


      The order and precision of your rules is important. The rules are evaluated from the top down, so the first rule evaluated as true will determine the layout that is used. When configuring the display logic, it's not a problem if there are rules that will never be used or evaluated.

      The default layout is usually the last rule in the display logic tree and is displayed if none of the conditions you've defined are met.

    4. As part of configuring the new rule, click the newly created layout in the Layouts tab (Manager, in our example), then select the fields you want to show when the user is a manager (for example, the fields you included in the default layout plus SendCredentialsEmailFlag):
  4. Preview your layout in different roles (for example, as Employee and Manager). See Preview Different Layouts.