What's the Extension Lifecycle?
Whether you're configuring an Oracle Cloud Application or creating an App UI from scratch, the evolution of your extension follows a very similar path. Here's the typical process for creating and publishing an extension:
Note:
If you're creating a new App UI, steps 1-3 don't apply. Instead, you'd create a new workspace, create a new App UI, then start dropping components on the page. The remaining steps in this topic are common to both App UI creation and configuration.- In Oracle Cloud Applications, open the application you want to configure.
Make any necessary data model changes in your sandbox before proceeding.
The changes you make are upgrade-safe, meaning that they will persist from one version of your Oracle Cloud Application to the next.
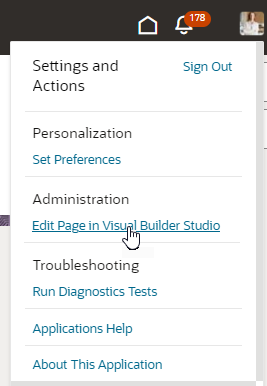
- Click your user name at the top-right corner to open the Settings and Actions menu, then select Edit Page in Visual Builder Studio:
-
Select a project and a workspace.
To edit a page in VB Studio, you need a project that has been set up to configure Oracle Cloud Applications in this environment. If you're a member of several projects, select one. If a project already has a workspace for the page you're editing, you'll want to pick one of those. These projects are badged as
 . If a project is recommended but you're not a member—you'll see these under Other Projects—select the project and click Request Membership to contact the project owner and get yourself added. You'll be notified by email when your request is approved, at which point you can try editing the page again.
If you're not a member of any projects, and you don't have any recommended projects, you'll need to create one. Click + Create, then enter a Project Name in the New App Extension Project dialog. If you know others may work with you in this project, optionally select their names in the Add Members list. (Make sure someone has enabled these users to access VB Studio by following the instructions in Set Up VB Studio Users.) Click Create.
. If a project is recommended but you're not a member—you'll see these under Other Projects—select the project and click Request Membership to contact the project owner and get yourself added. You'll be notified by email when your request is approved, at which point you can try editing the page again.
If you're not a member of any projects, and you don't have any recommended projects, you'll need to create one. Click + Create, then enter a Project Name in the New App Extension Project dialog. If you know others may work with you in this project, optionally select their names in the Add Members list. (Make sure someone has enabled these users to access VB Studio by following the instructions in Set Up VB Studio Users.) Click Create.Tip:
Projects created this way use default settings to get you started right away. Once the project is created, you can access its properties to explore all the options available to you (click Go to project page at the top left of the header, then look for Properties under Project Administration
 in the VB Studio left navigator). As someone who creates the project, you automatically become the project owner, with rights to manage it.
At this point, you can customize the left navigator to show or hide menu items, both for yourself as well as other project users. By default, you'll see Organization, Project Home, Workspaces, Git, Merge Requests, Builds, Environments, and Project Administration in the menu, but you can customize this view by clicking
 in the left navigator. See Configure the Left Navigator. More importantly, you may want to set merge restrictions on the
 mainbranch in the project's Git repository to control who pushes commits to it and how. See Set Merge Restrictions on the main Branch.Whether you create a new project or select an existing one, you'll need a workspace, which we'll create for you if you don't have one. For example, this is what you see when a workspace is created as part of the new project workflow:

Description of the illustration workflow.pngIf you already have a workspace in the project for a page in a given pillar, VB Studio will either automatically open that workspace for you, or present you with options as described in Configure an Oracle Cloud Application.
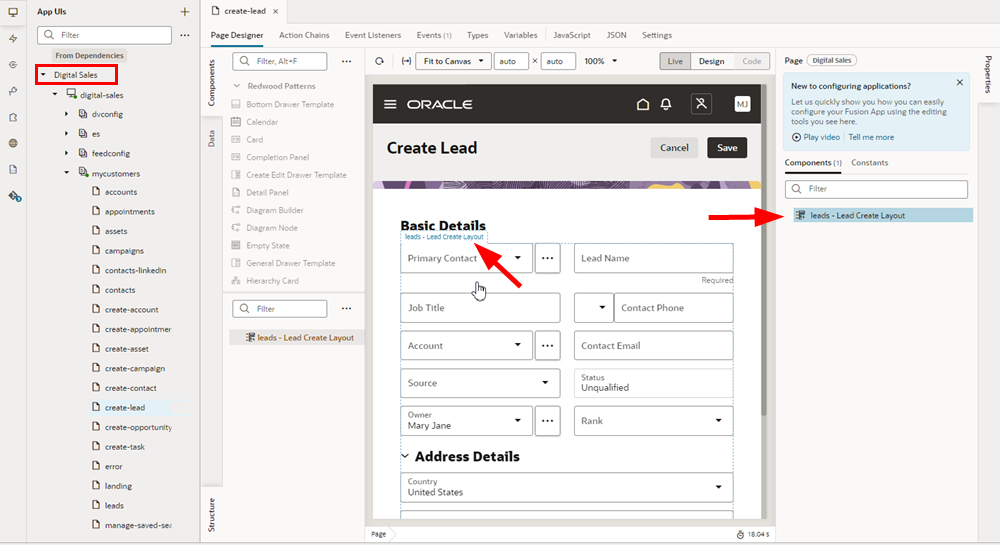
- Once you access a project and a workspace, you'll see your page open in the Designer with several editor tabs. In the canvas, you'll see the page you were just viewing, with the configurable components outlined in blue, both in the canvas and in the Properties pane:

Description of the illustration extendableareasingreen.pngIn the Navigator pane on the left, you can see that your Oracle Cloud Application—in this case, Sales—has automatically been added as a dependency for this extension (as has the Unified Application, which is considered a dependency for all extensions).
Your view of the Navigator may be different depending on the base application you're configuring, or if you're working with pages in a brand new App UI—but the lifecycle phases are the same.
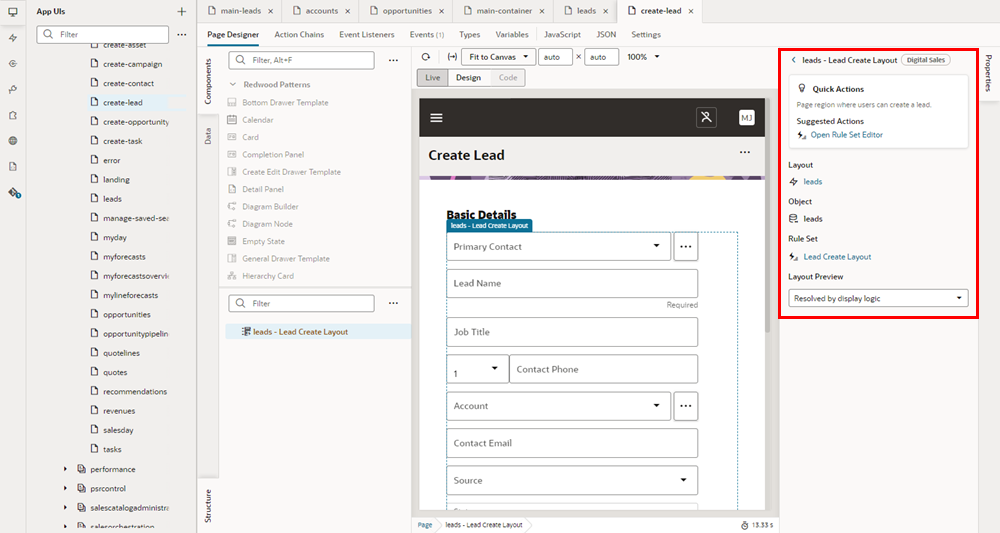
- When you click a component on the canvas, you'll see some of the component’s properties in the Properties pane:

Description of the illustration dyncompproperties.pngIn this example, you can see details about the dynamic component defined in the dependency. To configure the component, you can use the Open Rule Set Editor link under Suggested Actions to open the editor.
- View your changes with the preview tools.
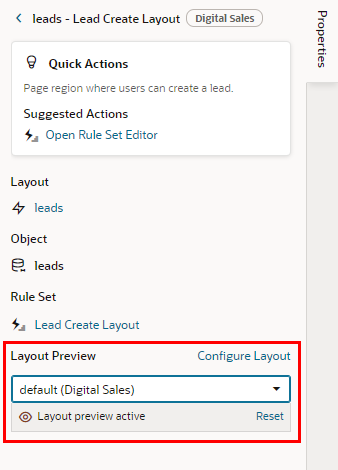
For some components, you can also use the Layout Preview in the Properties pane when editing a page to check your layouts in the Page Designer:

Description of the illustration designer-layoutpreview.pngOr use Preview in the Designer's header to see your changes as they'll appear in the browser page:

Description of the illustration preview-ready.png - Share your changes to get feedback.
It's good practice to ask your team members to review the changes you make to an extension before you publish it. Click Menu in the upper right corner and select Share to generate a URL for the preview, which you can then give to team members so they can test your work. If you're working with a sandbox, be sure to give the testers the name of the sandbox along with this URL. If you're not working with a sandbox, simply share the URL.
- Commit your changes to a branch.
Click the Git menu in the header and select the command to commit and push the changes in your workspace to the remote branch. Alternatively, click Publish in the header to automatically commit, push, and merge your changes.
- Create a merge request asking team members to review your changes.
Your team members can review the changes to the source files in the branch and approve the request if they look good. For some projects the merge requests might be optional, but a project owner can make merge requests and reviews mandatory.
- Merge your changes into the project repository.
When your changes have been reviewed and approved, you can merge the branch containing your changes into the project repo's
mainbranch. If you're using the Publish option, your changes are also deployed to your environment's Oracle Cloud Applications instance. How this is done depends on your extension's CI/CD pipeline setting:- When the CI/CD pipeline is disabled, your changes are deployed directly to your target instance during publish. This is the default setting when you create a workspace to configure your Oracle Cloud Application.
- When the CI/CD pipeline is enabled, your changes are deployed by triggering package and deploy jobs included as part of a CI/CD pipeline. The package job will create the build artifact that is deployed to your Oracle Cloud Applications Development environment, or a Test environment for further tests. After testing, a separate build job can publish the build artifact to the live (production) environment, assuming your administrator has set things up that way.
Note:
To ensure your changes will load successfully, the target instance must be running the same Oracle Cloud Application release version as your development instance. If you develop an extension on, say, 24D in your Test environment, then want to deploy the extension to your 24C Prod environment, you should wait until your Prod instance has been upgraded to 23D before you deploy the extension. In most cases, there shouldn't be more than a two-week gap between pod upgrades. See Oracle Applications Cloud – Fusion Applications Update Policy (Oracle account sign-in required). - View your published changes.
After your changes are deployed (either directly or via build jobs), you'll be able see your work by going to your Oracle Cloud Applications instance and pointing your browser to the App UI you just created or configured. You may need to re-authenticate to see your latest changes.
What happens if someone else is working on an extension that modifies the same page that you're working on? See How Are Extensions Applied at Runtime? for answers.
