Introduction
The Oracle WebCenter Content desktop app keeps files and folders on your computer synchronized with your files and folders in the cloud. Your current files will always be available and if you use more than one computer, you can sync your files to all of them.
It’s easy to get started. Just install the client software and set up your account. Administrators can deploy the software to multiple client machines.
Sync your Files. You can automatically sync your personal folder (the default selection when you first install the app) or you can choose folders to sync, including enterprise libraries and ad hoc folders. If you choose to sync all folders, it may take some time for the sync process to finish depending on how many folders you have.
Work with synced files. You can manage the synced files similar to how you’d manage any other files on your computer. You can even directly add files and folders into your local account folder and they’ll be added to your cloud account. The files are available to use in your browser or a mobile device. All your information stays up-to-date while the sync client is running.
Sync files from multiple accounts. If your company has several Oracle WebCenter Content accounts, you may be a member of more than one service.
Get notifications, letting you know when events of interest happen (e.g. your account goes offline or files or folders are deleted in the cloud). You can customize what notifications you’ll receive.
If you have any problems, check the sync activity and try to resync, or refer to the troubleshooting section.
Installation
Enable Required Server Component
The desktop app requires the Desktop Sync component to be enabled on the server:
- As an administrator, go to Advanced Component Manager in the native user interface.
- Select Show System Components.
- In the Disabled Components list, select Desktop Sync and click the Enable button.
- The UCM server will need to be restarted for this to take effect.
Install Desktop App
Your desktop app may have come pre-installed on your computer. If so, you may need to set it up. Otherwise, to install and configure the desktop app:
- Sign in to the Oracle WebCenter Content native user interface.
- Navigate to My Content Server and select My Downloads.
- Click the Desktop Sync link for the appropriate operating platform and save the file.
- Take note of your server URL. You’ll use this to sign in and set up your account after the app is installed.
- When the file is done downloading, open it and follow the instructions to install. When finished installing, launch the app.
-
Enter the server URL you noted earlier. You will be prompted to sign in.
A local account folder is set up named after the account. This is the location where your synced files will be placed.
After you have successfully signed in, you need to set up your account by selecting which folders you want to sync. By default your personal folder is synced automatically, but you have to select additional folders you want to sync.
By default, the desktop app starts automatically when you turn on your computer. This can be changed in your preferences.
Enterprise Deployment
Some enterprise environments may not allow users to install their own software. In those cases, you can roll out the desktop app to multiple client machines with the help of the EXE and MSI installer packages.
Set Up Local File Sync
Oracle WebCenter Content keeps your files safe in the cloud while allowing you to conveniently sync them to a local account folder. This lets you work on your computer as you like, and is useful in several situations:
-
while traveling without access to the cloud.
-
if working on multiple computers.
-
when uploading a folder with multiple files.
To set up local file sync, you first have to make sure that desktop sync is installed. It may come pre-installed or you may need to download and install from your Oracle WebCenter Content cloud account.
Choose Folders to Sync from the Cloud to Your Local Account Folder
When desktop sync is installed, an account folder is created where local copies of all cloud folders you choose to sync are stored. You can explicitly choose the cloud folders to sync by clicking ![]() to open sync activity and then click
to open sync activity and then click ![]() , and select Choose Folders to Sync from Cloud to open up the folder sync dialog.
, and select Choose Folders to Sync from Cloud to open up the folder sync dialog.
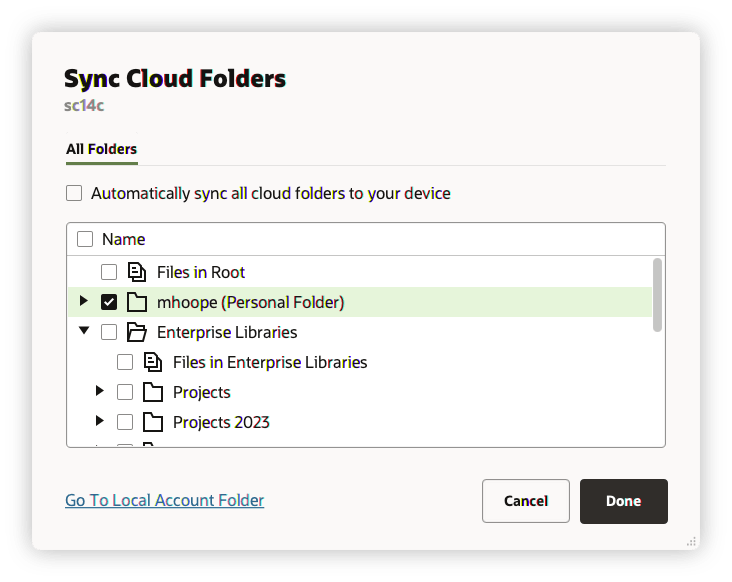
Folders listed in the dialog are already in your cloud account. The list includes folders directly under the root and your personal folder (i.e. /Users/USER_NAME). By default, your personal folder is synced automatically. Check any folders you want to sync and uncheck any folders you don’t want to sync. If you want to sync all folders, check the Automatically sync all cloud folders to your device checkbox.
Note
Synced folders copy files from the cloud to your local hard drive. Depending on how your preferences are set to handle unsynced content, unchecking a folder may not remove the files from your hard drive. To remove unsynced files to save space, review your preferences to see how unsynced content is handled and if necessary, locate the files to remove.Sync Subfolders and Files
If you want to sync subfolders but not entire cloud folders, there are a couple of ways to do it. You can either unselect the cloud folder then select the subfolders you want to sync, or you can leave the cloud folder syncing everything and just unselect the subfolders you don’t want to sync. The way you choose determines the sync behavior.
If you uncheck a folder so the checkbox is empty ![]() then check a subfolder to sync
then check a subfolder to sync ![]() , the checkbox of the folder that contains the subfolder (called the parent folder) changes to white with a dash
, the checkbox of the folder that contains the subfolder (called the parent folder) changes to white with a dash ![]() . This means that the selected subfolder will sync, but any folder that gets added in the cloud to the parent folder later will not sync.
. This means that the selected subfolder will sync, but any folder that gets added in the cloud to the parent folder later will not sync.
If a folder is checked so the checkbox is black with a white check ![]() and you uncheck a subfolder
and you uncheck a subfolder ![]() , the checkbox of the parent folder changes to black with a white dash
, the checkbox of the parent folder changes to black with a white dash ![]() . This means that the unchecked subfolder will not sync, but anything that gets added to the parent folder later will sync.
. This means that the unchecked subfolder will not sync, but anything that gets added to the parent folder later will sync.
| Parent Folder Selection State | Sync Behavior |
|---|---|
|
|
No subfolders or items in the parent folder will sync. |
|
|
All subfolders and items in the parent folder will sync. New additions to the folder will also sync. |
|
|
Only subfolders and items specifically selected in the parent folder will sync. New additions to the parent folder will not sync. |
|
|
Subfolders and items specifically deselected in the parent folder will not sync. New additions to the parent folder will sync. |
Set Notifications and Preferences
You have two ways to access menu options to update your preferences or notifications:
- Right-click
 in the notification area (Windows) or in the menu bar extras area (Mac).
 - Click to open sync activity and then click
 .
.
To check and change your preferences, choose Preferences from one of the menus. Preference settings are available in the following categories:
- Sync
- Problems
- Notifications
- Status Icons
- Accessibility
- Advanced
| Sync Preferences | Description |
|---|---|
Deleted and Stopped Content
|
By default this preference is set to move content that is no longer being synced into a folder called Sync Trash. The Sync Trash folder is in your local account folder and makes it easier to recover files in some situations. For example, you may lose access to files if someone stops sharing a folder you were syncing. Or someone may have mistakenly deleted or moved files in the cloud that you were syncing. Your local content is moved to the Sync Trash folder in those situations. This makes recovering the content easy, but also takes up local disk space until you delete the files from the Sync Trash folder. You can empty this folder at any time if you are confident there is nothing you wish to recover.
If you select Recycle Bin on Windows, folders that are no longer being synced will be moved to your Windows system recycle bin. This can save local disk space when the recycle bin is emptied, but depending on your recycle bin properties, any content that you lose access to might be permanently deleted from your local account folder without giving you the option to recover it. Similarly, if you select Trash on Mac, folders that are no longer being synced will be moved to your trash and might be permanently deleted when the trash is emptied. |
Deleted Folders
|
Choose what sync should do when you delete a folder on this device. Selecting Stop syncing keeps the synced folder in the cloud. Selecting Delete in the cloud puts the deleted folder into the cloud trash. |
Moved Folders
|
Moving folders out of your account can be treated differently than deleting a folder. Selecting Stop syncing here keeps the synced folder in the cloud. Selecting Delete in the cloud puts the moved folder into the cloud trash. |
| Problems Preferences | Description |
|---|---|
| Disk Space | Specify the amount of disk space (in megabytes) that is required for files to sync. If space drops below the specified amount, sync will stop. Files cannot then be downloaded from the cloud, which will show as a sync problem. |
| Notifications Preferences | Description |
|---|---|
| Accounts | Specify to be notified when an account goes online, offline, and requires sign in. |
| Documents | Specify to be notified when a file you uploaded is infected with a virus. Also specify to be notified of actions you take that delete files and folders in the cloud or causes folders to stop syncing. |
| Status Icons Preferences | Description |
|---|---|
| Sync Status Icons | Windows File Explorer lets you specify a status column in the synced folders in your account. Icons in the status column indicate if a file is syncing, pending sync, is locked, or has sync problems. In some situations sync status icons can get stuck on the sync pending icon. Click Repair Icons to fix if you think this may be happening. Note If your account folder syncs a large number of files or a number of large files, repairing icons can take some time. |
| Accessibility Preferences | Description |
|---|---|
| Dynamic Sync Activity | Enable dynamic sync activity to have the sync status update automatically in real time in the sync activity list. Disable to manually refresh the sync status list by pressing F5 on your keyboard. |
| Advanced Preferences | Description |
|---|---|
| Performance | Choose an option based on your hardware capabilities and your sync needs. For example, if you are using a desktop with a fast processor, or you are syncing large amounts of files on a dedicated computer, you may want to select High for the fastest sync rate. Or if you are syncing to a laptop with a slower processor while working in several other applications, you may want to select Low for a slower sync rate but minimal impact to your work. Medium is the default priority. Options are:
|
| Startup Start Oracle WebCenter Content on login |
Enabled by default, this option starts the app automatically when you sign in on your computer. If you disable this option, you will need to manually start Oracle WebCenter Content in order to sync files. |
| Updates | Enable to automatically check for updates. |
Sync Your Files
By default your personal folder (i.e. /Users/USER_NAME) is synced automatically. If you have a lot of files, this may take a while the first time you sync. If there are folders in the cloud that you don’t actively work with, you may want to skip selecting these folders to sync.
To choose what folders to sync, click ![]() to open sync activity and then click
to open sync activity and then click ![]() , and select Choose Folders to Sync from Cloud to open up the folder sync dialog.
, and select Choose Folders to Sync from Cloud to open up the folder sync dialog.
You can also open the dialog by right-clicking ![]() in the notification area (Windows) and selecting Choose Folders to Sync from Cloud from the contextual menu.
in the notification area (Windows) and selecting Choose Folders to Sync from Cloud from the contextual menu.
In the dialog, you can choose to automatically sync all folders or you can choose folders to sync. You don’t have to do anything more. The desktop app is “set and forget” software. It runs until you tell it to stop.
If you want to sync subfolders but not entire cloud folders, there are a couple of ways to do it. You can either unselect the cloud folder then select the subfolders you want to sync, or you can leave the cloud folder syncing everything and just unselect the subfolders you don’t want to sync. The way you choose determines the sync behavior.
Storage Location
When you initially signed in, a local account folder was created for you by default named Oracle WebCenter Content. If you have only one account, this is where your synced files are stored and where you add files and folders you want synced to the cloud. To view the contents, right-click ![]() in the notification area (on Windows) and select Open in Explorer or in the menu bar extras area (on Mac) and select Open in Finder.
in the notification area (on Windows) and select Open in Explorer or in the menu bar extras area (on Mac) and select Open in Finder.
If you are a member of multiple services and sync more than one account, then your synced files are stored in a folder that you name when you add each account.
In Windows, the default location for all local account folders is:
C:\Users\USER_NAME
On a Mac, the default location for all local account folders is:
/Users/USER_NAME
You can change the location of any local account folder using the sync activity dialog.
- Click in the notification area (Windows) or in the menu bar extras area (Mac) to open the sync activity.
- Click
 to open the Accounts dialog.
 -
Hover over the account to change and click
 , then select Edit.
 -
Click Change Location and navigate to the place you want the local account folder.
- Once you’ve selected a new location, click Done.
Note
You can’t move the location to an external drive.Sync Files in Multiple Accounts
If you are a member of multiple services, you may need to sync more than one account. You can display the Accounts dialog to add and edit multiple accounts by clicking ![]() on the sync activity dialog or right-clicking
on the sync activity dialog or right-clicking ![]() in the notification area (Windows) or in the menu bar extras area (Mac) and selecting Accounts from the contextual menu.
in the notification area (Windows) or in the menu bar extras area (Mac) and selecting Accounts from the contextual menu.
You can set up a maximum of five separate accounts, so that you can sync with each Oracle WebCenter Content account you have.
To add an account from the Accounts section of the sync activity dialog:
- Click Add New Account to open the Add Account dialog.
- Enter the service URL of the account you want to add.
- Click Sign In to open the web browser to sign in.
- Enter the user name and password for the account in the browser.
- Once signed in, you are redirected to a page to complete the authentication flow and take you back to the desktop app. If you don’t see a browser popup to allow this page to open the Oracle WebCenter Content desktop app, click Open WebCenter Content. If the desktop app doesn’t open automatically, click Copy Sign-In Key and switch to it manually. You can close this page when the desktop app has logged you in.
- Add an account name. The account name is used for the folder created on your computer that holds the synced files.
- If desired, Click Change Location to change the location where synced files will be place, and navigate to the place you want the local account folder.
- Click Next. After you have successfully signed in, you need to set up your account by selecting which folders you want to sync.
- Click Done. The account is listed in the Accounts section of the sync activity dialog. Depending on the number of size of the folders you have chosen to sync, the sync process can take some time initially.
If you need to edit any account information, including where the local account folder is located, hover over the account in the Accounts section of the sync activity dialog and click ![]() , then select Edit.
, then select Edit.
In the Edit Accounts dialog you can change the account name, the service URL, and the local account folder location.
Work With Synced Files
You manage many of the same sync tasks using one of several methods.
- Right-click in the notification area (Windows) or menu bar extras area (Mac) to access a context menu.
- Right-click a folder or file in your local account folder to access a context menu that has some sync tasks. Select Oracle WebCenter Content in the context menu to access most sync tasks.
- Click to open the sync activity dialog and click to access most of the same options found in the context menus. A few options in the sync activity dialog are accessed using icons on the title bar.
Typical tasks and options are detailed in the following table.
| Task | Description |
|---|---|
| Sync folders from the cloud | Select Choose Folders to Sync from Cloud and click the checkbox for items to sync. To stop syncing, de-select an item. |
| Pause sync of all folders | Most of the time you can let the desktop app do its job and always sync your files. But sometimes you may want to temporarily pause sync if you have a slow connection and need to improve the performance of other online tasks. For example, you may want to pause sync if the online training video you are viewing is stuttering, or if a download keeps failing.
Access the sync menu using one of the above methods and choose Pause All Sync. To resume sync, choose Resume All Sync. When you resume sync, changes you made during the pause are applied, and any conflicting changes in the files need to be fixed. |
| Initiate a sync | Select Sync Now. |
| Stop syncing a specific folder | If you want to stop syncing a specific folder in your local account folder, you can right-click the folder and select Oracle WebCenter Content then Stop Sync. This is the same as deselecting the folder in the Choose Folders to Sync from Cloud dialog.
If you stop syncing a folder on a computer, the folder and its files are removed from the local account folder on that computer. Nothing is lost because the folder and its files remain in the cloud and on any other computer you have synced. You can restart sync of the folder later. Note If you mistakenly choose a folder to sync and then stop syncing the folder shortly after, it's possible content in the folder didn't finish syncing, and so not all the content gets to the cloud. If this happens and you've set Oracle Desktop to move unsynced content to the Recycle Bin (Windows) or Trash (Mac), it's possible some content could be permanently deleted, depending on your Recycle Bin/Trash settings and available storage space. To avoid this, set Oracle Desktop to move unsynced content to the Unsynced Content folder, where it can easily be restored. The Unsynced Content folder is found in the Oracle WebCenter Content folder of the account. |
| Delete a local folder and its content from the cloud | If you want to delete a specific folder and content in your local account folder from the cloud, you can right-click the folder and select Oracle WebCenter Content then Delete from Cloud to send the folder to your Trash folder in the cloud. |
| Investigate sync problems | Select Sync Problems. To view sync problems for a specific folder, right-click the folder in the local account folder and select Sync Problems from the right-click menu. |
| Go to a local account folder | From the context menu on Windows, select Open in Explorer. From the context menu on a Mac, select Open in Finder.
From the sync activity dialog, click If you sync to multiple accounts, choose the account folder to open. If you want to open a specific local folder that is listed in the sync activity dialog, or that contains an item listed in the sync activity dialog, click the title. |
| Open the cloud version of a folder | From the context menu, select Open in the Cloud.
From the sync activity dialog, click If you sync to multiple accounts, choose the account folder to open. If you want to open a specific cloud folder that is listed in the sync activity dialog, select it, click If you want to locate a specific file listed in the sync activity dialog, select it, click |
| Stop all notifications | Select Disable Notifications to prevent all your notifications from appearing (for example, during a conference call or a webinar). To start them again, select Enable Notifications. |
| See the properties of a folder or file | Right-click the file in your local account folder, then choose Oracle WebCenter Content and then Properties. |
| Stop sync activity dialog animations | If your sync is running slowly or if you want to stop animations on the sync activity dialog for some other reason, open sync activity and click |
| Edit an account | From the notifications area context menu, select Accounts.
From the sync activity dialog, click Select the account to edit and click It may be useful to put your content on a drive with a large amount storage space. If you move an account folder to a different drive, you must re-sync all the folders. |
| Remove an account | From the notifications are context menu, select Accounts.
From the sync activity dialog, click Select the account to remove and click |
| Repair an account | In some rare instance you may have sync problems that persist and are difficult to resolve. You may want to repair an account or folder. If the account is large, or the individual folder is large, repair can take a long time. It's a good idea to try to initiate a sync first to see if that resolves the problem. If it does not, you can try to repair the account or individual folder.
To repair an account:
|
| Save a log file showing the sync transactions on your desktop | Choose Troubleshoot from the Help menu then choose Save Logs. |
Troubleshooting
Here are some questions you might have about using the desktop app and sync.
- I can’t sign in to the desktop app
- I don’t see a folder to sync or I can’t find a synced file
- PDF files created in a synced folder disappear
- Links in my synced files aren’t working
- I have sync problems or slow syncing
- I can’t change an Oracle WebCenter Content account folder location
- Icons in an Oracle WebCenter Content account folder don’t show sync status
- My files aren’t compressed when I add them to a compressed folder
- I can’t check for updates
- Files and folders in my Oracle WebCenter Content folder are wrong or out of date
- I can’t work with a file on my desktop after I rename it
- I exited or quit the desktop app and don’t know what’s happened to sync
- I can’t restore a folder I deleted
I can’t sign in to the desktop app
If you’re having trouble signing in to the desktop app, here are some things to try:
- Make sure you’re using the correct server URL.
- Make sure you’re using the correct user name and password.
I don’t see a folder to sync or I can’t find a synced file
If a file is edited or moved on your desktop computer while the file or the folder it’s contained in is modified, the file might be missing from your list of synced files. Check the local trash folder on your desktop computer for the file.
PDF files created in a synced folder disappear
If you try to use Microsoft Print to PDF to create a PDF in a synced folder, the operation won’t complete correctly and the file disappears. Instead use Export to PDF or PrimoPDF.
Alternatively, you can create the PDF in another folder, and then move it to the synced folder; or pause syncing while you create the PDF, and then restart syncing after it’s done.
Links in my synced files aren’t working
Fixed links (links that include the drive and directory structure of the target document’s location, for example C:\Finance\Sales\sales-report.doc) probably won’t work in synced files because the drive and directory structures of the synced computers are probably not identical.
Relative links (for example, ..\..\sales-report.doc) should continue to work in synced files, if the linked files are kept in the same locations relative to each other on all computers.
I have sync problems or slow syncing
You probably won’t encounter problems with file sync, because the desktop sync client resolves most of them automatically. However, sometimes a more serious underlying cause is found and you may have to intervene to resolve it.
If there is a problem, you might see  in the notification area or next to a file in your Oracle WebCenter Content folder.
You can view all problems by selecting Sync Problems using one of these methods:
- Right-click in the notification area (Windows) or in the menu bar extras area (Mac).
- Click and then click .
The Problems window opens where you see a list of files and problems. Click on one and click View Details and you’ll get an explanation of the problem and a suggestion on how to resolve it. After you make changes, the list may refresh automatically or you can click Retry or Retry All to clear all problems.
If your sync process is running slowly, your desktop app can be optimized for better performance. Over time, the database that tracks your synced files grows slowly and can reduce productivity. From the ![]() menu, click Help and then Troubleshoot. Click Optimize to clear out old data.
menu, click Help and then Troubleshoot. Click Optimize to clear out old data.
File Conflicts
Conflicts happen when a file is changed on more than one computer at the same time. The first version of the file to be saved or uploaded to the cloud is considered the new authentic file, and that file is then synced across all computers and the cloud. One exception to this is if the only change is the file’s name. In that case, the new name is applied to the authentic file, and it’s synced.
If someone tries to save or upload another version of the file, it’s kept in Oracle WebCenter Content but is given a different name. That file isn’t automatically synced across computers.
If you want to sync a version of the file that wasn’t the first saved, rename that file yourself. This triggers the desktop app to treat the file like a new one and it will be synced to all computers and the cloud. This new version of the file is kept with the original. You can then decide whether to keep both versions, keep only the latest, or merge the content of the two.
The desktop app doesn’t merge the contents of conflicting files for you. Some applications (for example, Microsoft Word) let you compare the contents of files. You can use it to view the differences between two files and decide what material from each file should be kept.
Items Not Syncing
The following types of files or folders aren’t synced:
- System libraries
- Query folders
- Retention folders
- Hidden files, like system files
- Temporary files (beginning with a tilde (~) or with a .tmp extension)
- Windows shortcuts
- Symbolic links (symlinks)
- Hidden folders
- Encrypted folders
-
A file with a name containing any of these characters: \ / ? “ : < > * - Files known to contain viruses. If a local virus scanner isn’t enabled, an infected file is transferred from the Oracle WebCenter Content folder to the cloud during sync. There it’s scanned for viruses and moved to the Trash folder.
Files with file paths exceeding the 247-character limit in Windows will sync, but long paths can cause issues when using Windows. This limit doesn’t apply to files in the cloud or on Mac computers.
Windows Briefcase folders are synced as if they were typical Windows folders. The special features of Windows Briefcase folders aren’t supported.
I can’t change an Oracle WebCenter Content account folder location
You can change the location of an account folder if you need to, but only to a new location on a local hard drive. Hard drives must use NTFS formatting for Windows computers, or Apple File System (APFS) formatting for Mac computers. FAT32 formatting isn’t supported. You can’t use other locations, such as network drives and external hard drives.
Icons in an Oracle WebCenter Content account folder don’t show sync status
In some situations, the sync status overlays may disappear in the Oracle WebCenter Content account folder. Often this is due to the Microsoft Windows operating system limiting the number of overlays that can be made to icons in the Windows file system. If you exceed the limitation, you may not see any sync status on your icons. If this happens, your files will still sync as long as the desktop app is still running.
Sometimes the overlays may disappear for a different reason. To try to restore the sync overlays, you can re-run the installer and select the option to repair the application.
- In Windows 10, open the Start menu and click Settings.
- On the Windows Settings page, click Apps.
- Scroll to the bottom of the page to find the Related settings section and click Programs and Features.
- Select Oracle WebCenter Content in the list of programs, then click Uninstall/Change. If you are prompted to let the application make changes, click Yes.
- When the installer is opened, click Next to continue.
- Select Repair and click Next.
- Verify that the screen specifies that it is ready to repair the program and not remove it. If it is ready to repair, click Install.
- Once the installation is done, click Finish.
After you finish the repair, you need to restart the Oracle WebCenter Content app. This happens automatically when you restart your computer, or you can do it manually.
- Right-click on the Oracle WebCenter Content icon in your Windows task bar and click Exit.
- Locate the Oracle WebCenter Content app in your Start menu and open it. The sync overlays should now be displayed in the account folder.
Note
If the sync overlays do not reappear, then the issue is likely the problem imposed by the Microsoft Windows operating system limiting the number of overlays that can be made to icons in the Windows file system.My files aren’t compressed when I add them to a compressed folder
Compression of synced files is not supported. You’re able to add compressed folders to the Oracle WebCenter Content folder for sync, but files added to these folders aren’t compressed. Sync and sharing does work correctly for such folders.
I can’t check for updates
If you install the desktop app, you can typically check for updates at any time by selecting Check for Updates from the Help menu.
If the desktop app was installed for you by a service administrator, they may prevent the ability to check for updates. If so, the option in the help menu is disabled.
Files and folders in my Oracle WebCenter Content folder are wrong or out of date
There are different potential causes for this, and different levels of action that you can take to fix it.
-
Refresh your content
Right-click
in the notification area (Windows) or in the menu bar extras area (Mac), choose Help, choose Troubleshoot, and then choose Refresh. -
Rebuild your synced folders
If changes made in the cloud or on other computers aren’t showing correctly on your current computer, it may be because the number and complexity of changes made to folders and files in an Oracle WebCenter Content folder has caused sync to be permanently lost.
If only one or a few folders are affected, you can rebuild those folders one at a time. This uses sync records from the desktop sync client and from the cloud to rebuild each folder in an Oracle WebCenter Content folder on the affected computer. To rebuild a single folder, select it from your Oracle WebCenter Content folder, right-click and select Oracle WebCenter Content and choose Rebuild Folder.
-
Delete the Oracle WebCenter Content account from your computer
If most or all of your folders become unsynced, or if there are other problems that can’t be fixed by rebuilding individual folders, you can remove the Oracle WebCenter Content account from your computer and start over.
This process will automatically remove the account folder from your computer. All files that were in the cloud will continue to be available from there.
To remove the account, select Preferences using one of these methods:
- Right-click in the task bar (Windows) or in the menu bar extras area (Mac).
- Click and then click .
Select the account to delete and click Delete. Deleting an account clears your user account information and deletes the Oracle WebCenter Content folder on your computer. You must reenter your user account information. You can re-select folders to sync and you can bring those folders back onto your computer by starting sync in the usual way.
- Right-click
I can’t work with a file on my desktop after I rename it
There is a limit to how long the combination of file name and path to a file can be on a desktop, which is lower than that in the cloud. If you rename a file in your web browser to a length that exceeds the desktop limit, the file syncs to your computer but you can’t rename, edit, or delete it. It’s best to avoid lengthy file names. Try to ensure that the length of the combination of path and file name does not exceed 256 characters.
I exited or quit the desktop app and don’t know what’s happened to sync
If you exit or quit the desktop app on your current computer, changes to files on this computer are no longer synced to other computers, and changes from other computers are no longer synced to this computer. Sync does continue between the cloud and other computers running the desktop app (that is, between the cloud and your other computers, and those of people you are sharing files with).
When you restart the desktop app on your current computer, the files are synced with those in the cloud.
If restarting sync causes a file conflict, you see an error icon overlaid on the app icon in the system trap. Select Sync Problems from one of these menus to view any errors.
- Right-click in the notification area (Windows) or in the menu bar extras area (Mac).
- Click and then click .
I can’t restore a folder I deleted
When you delete a folder from your cloud account using your browser, that folder is moved to your Trash folder in the cloud and if you’re synchronizing that folder, it’s also moved to the Recycle Bin on your desktop. If you need to restore the folder, it is easiest to do it from the cloud Trash. However, if you try to restore the folder from your desktop Recycle Bin, the “restore” location is a “.tmp” folder in your desktop account folder, not the original location. Make sure you can view all files, including hidden files, in your account folder and you can then restore the folder by moving it from the temporary location to the location you want.
WebCenter Content Desktop Sync Client, 14c (14.1.2.0.0)
G40482-04