Overview
Learn about the integration between WebCenter Content (on Marketplace) and Oracle Cloud Infrastructure Process Automation (OCI Process Automation). You can do the following.
- Establish connection between WebCenter Content and OCI Process Automation
- Register processes from OCI Process Automation in WebCenter Content and optionally associate them with WebCenter Content profiles.
- Provide mapping between OCI Process Automation process inputs and WebCenter Content document attributes.
- Invoke OCI Process Automation process in one of the following ways.
- Register the process specifying the WebCenter Content profile. Any document checked in with the profile will trigger the process invocation.
- Associate process with WebCenterContent workflow. Any document entering the workflow can be configured to trigger process invocation.
- WebCenter Content tracks the lifecycle of invoked OCI Process Automation processes to determine its completion status. This can be used to make suitable workflow decisions.
Prerequisites
- A Client app in OCI Process Automation’s IDCS stripe.
- This is needed to talk to IDCS and fetch the token for the designated OCI Process Automation user. See Create a Client App in IDCS for steps to create the client app in IDCS.
- An OCI Process Automation user with administrator role.
- All calls to OCI Process Automation will be made as this user.
- Credentials of the client app and OCI Process Automation user should be seeded in weblogic server’s credential map ‘oracle.wsm.security’ with below CSF key names.
- process.idcs.credentials - Client app
- process.provider.credentials - OCI Process Automation administrator.
See Create CSF Entries with Credentials in Weblogic for steps to create CSF keys.
- OCI Process Automation process requirements:
- All processes that need to be registered with WebCenter Content should have “Message start” activity as the entry point.
- The designated OCI Process Automation administrator should have access to initiate all the required processes, or “Message start” activity of these processes should be marked as “All users and external applications” for users who can run the activity.
- WebCenter Content requirements
- WebCenter Content profiles to be associated with OCI Process Automation processes. A profile can be associated with only one OCI Process Automation process.
- WebCenter Content workflows to be associated with OCI Process Automation processes.
Deployment and Configuration
- Log in to WebCenter Content as an administrator.
- Navigate to Administration, Admin Server, Component Manager, and then Advanced Component Manager.
- Enable the ProcessAutomation component.
- Restart the servers.
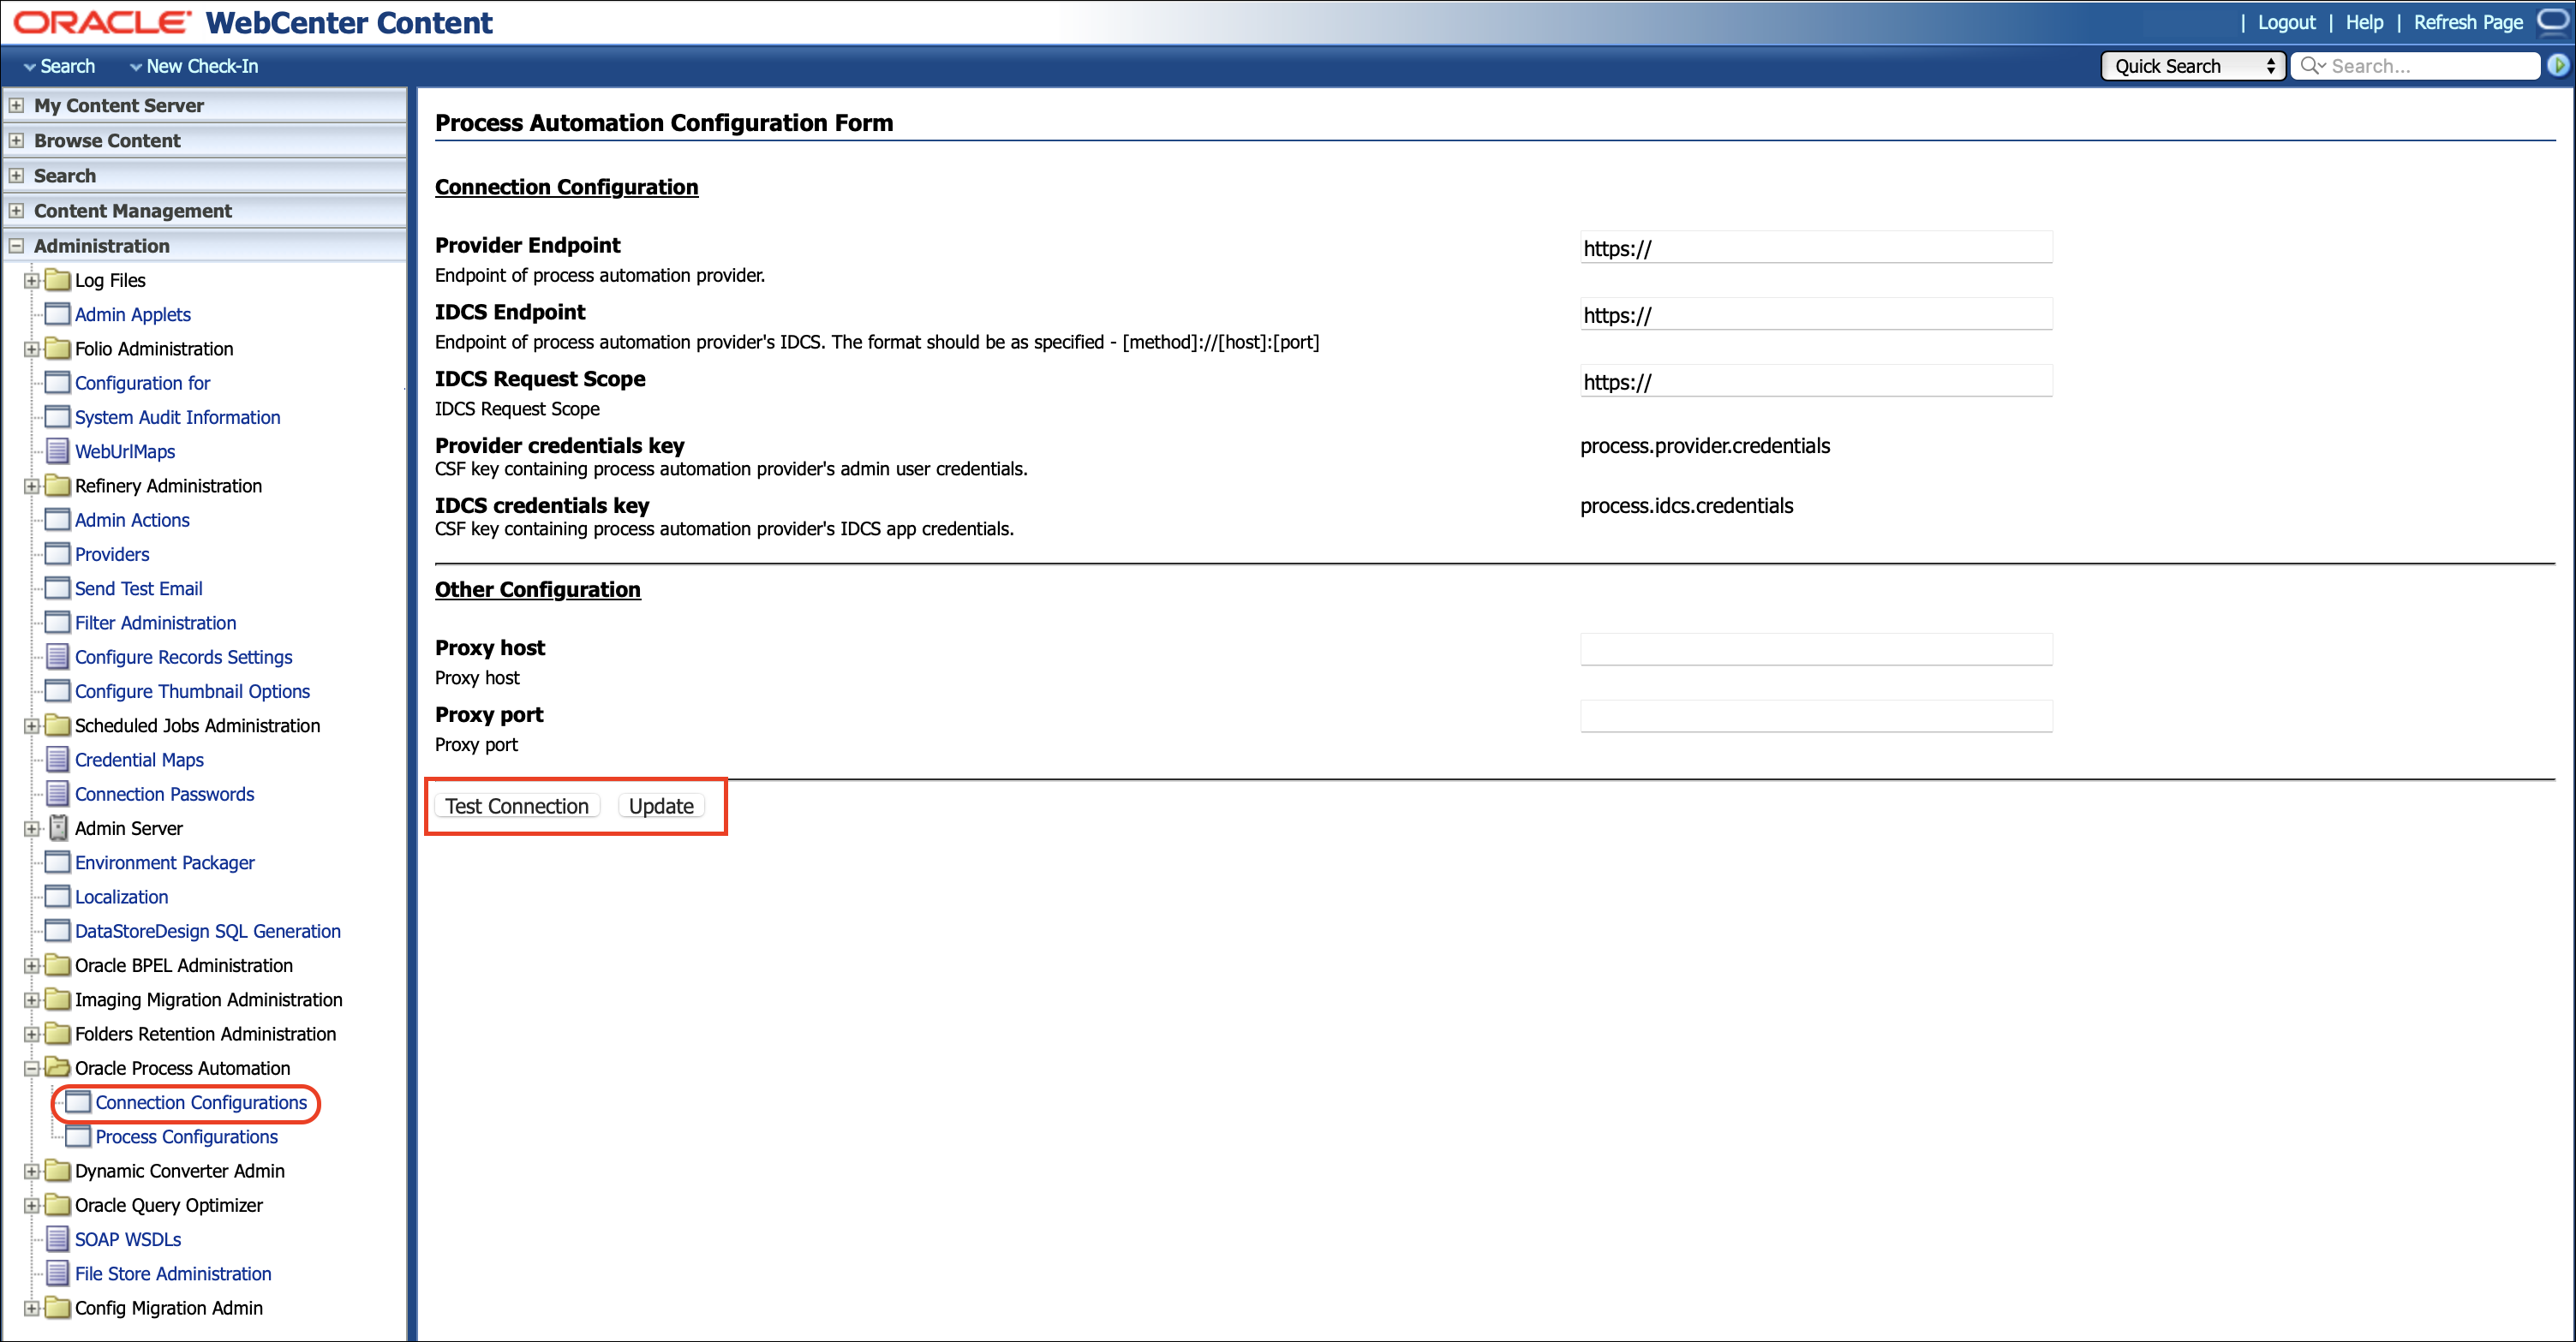
Once successfully enabled, OCI Process Automation integration related configurations will be available under Administration, Oracle Process Automation, Connection Configurations.

Provide the following values in the configuration screen.
| Name | Description |
|---|---|
| Provider Endpoint | OCI Process Automation endpoint. Format: method://opa-domain/process/api/v1 |
| IDCS Endpoint | OCI Process Automation’s IDCS endpoint. Format: method://idcs-domain/ |
| OPA Request Scope | OCI Process Automation scope registered in the IDCS Client app. Usually will be of format: method://opa-domain/process |
| Proxy Host | Proxy host, if any. |
| Proxy Port | Proxy port, if any. |
Once configured, click Update to save the configuration. Once updated, click Test Connection to test the connectivity to OCI Process Automation. If all the provided values are correct and all prerequisites are completed, the connection to OCI Process Automation will be established and a message indicating a successful connection will be shown.
Process Registration and Payload Mapping
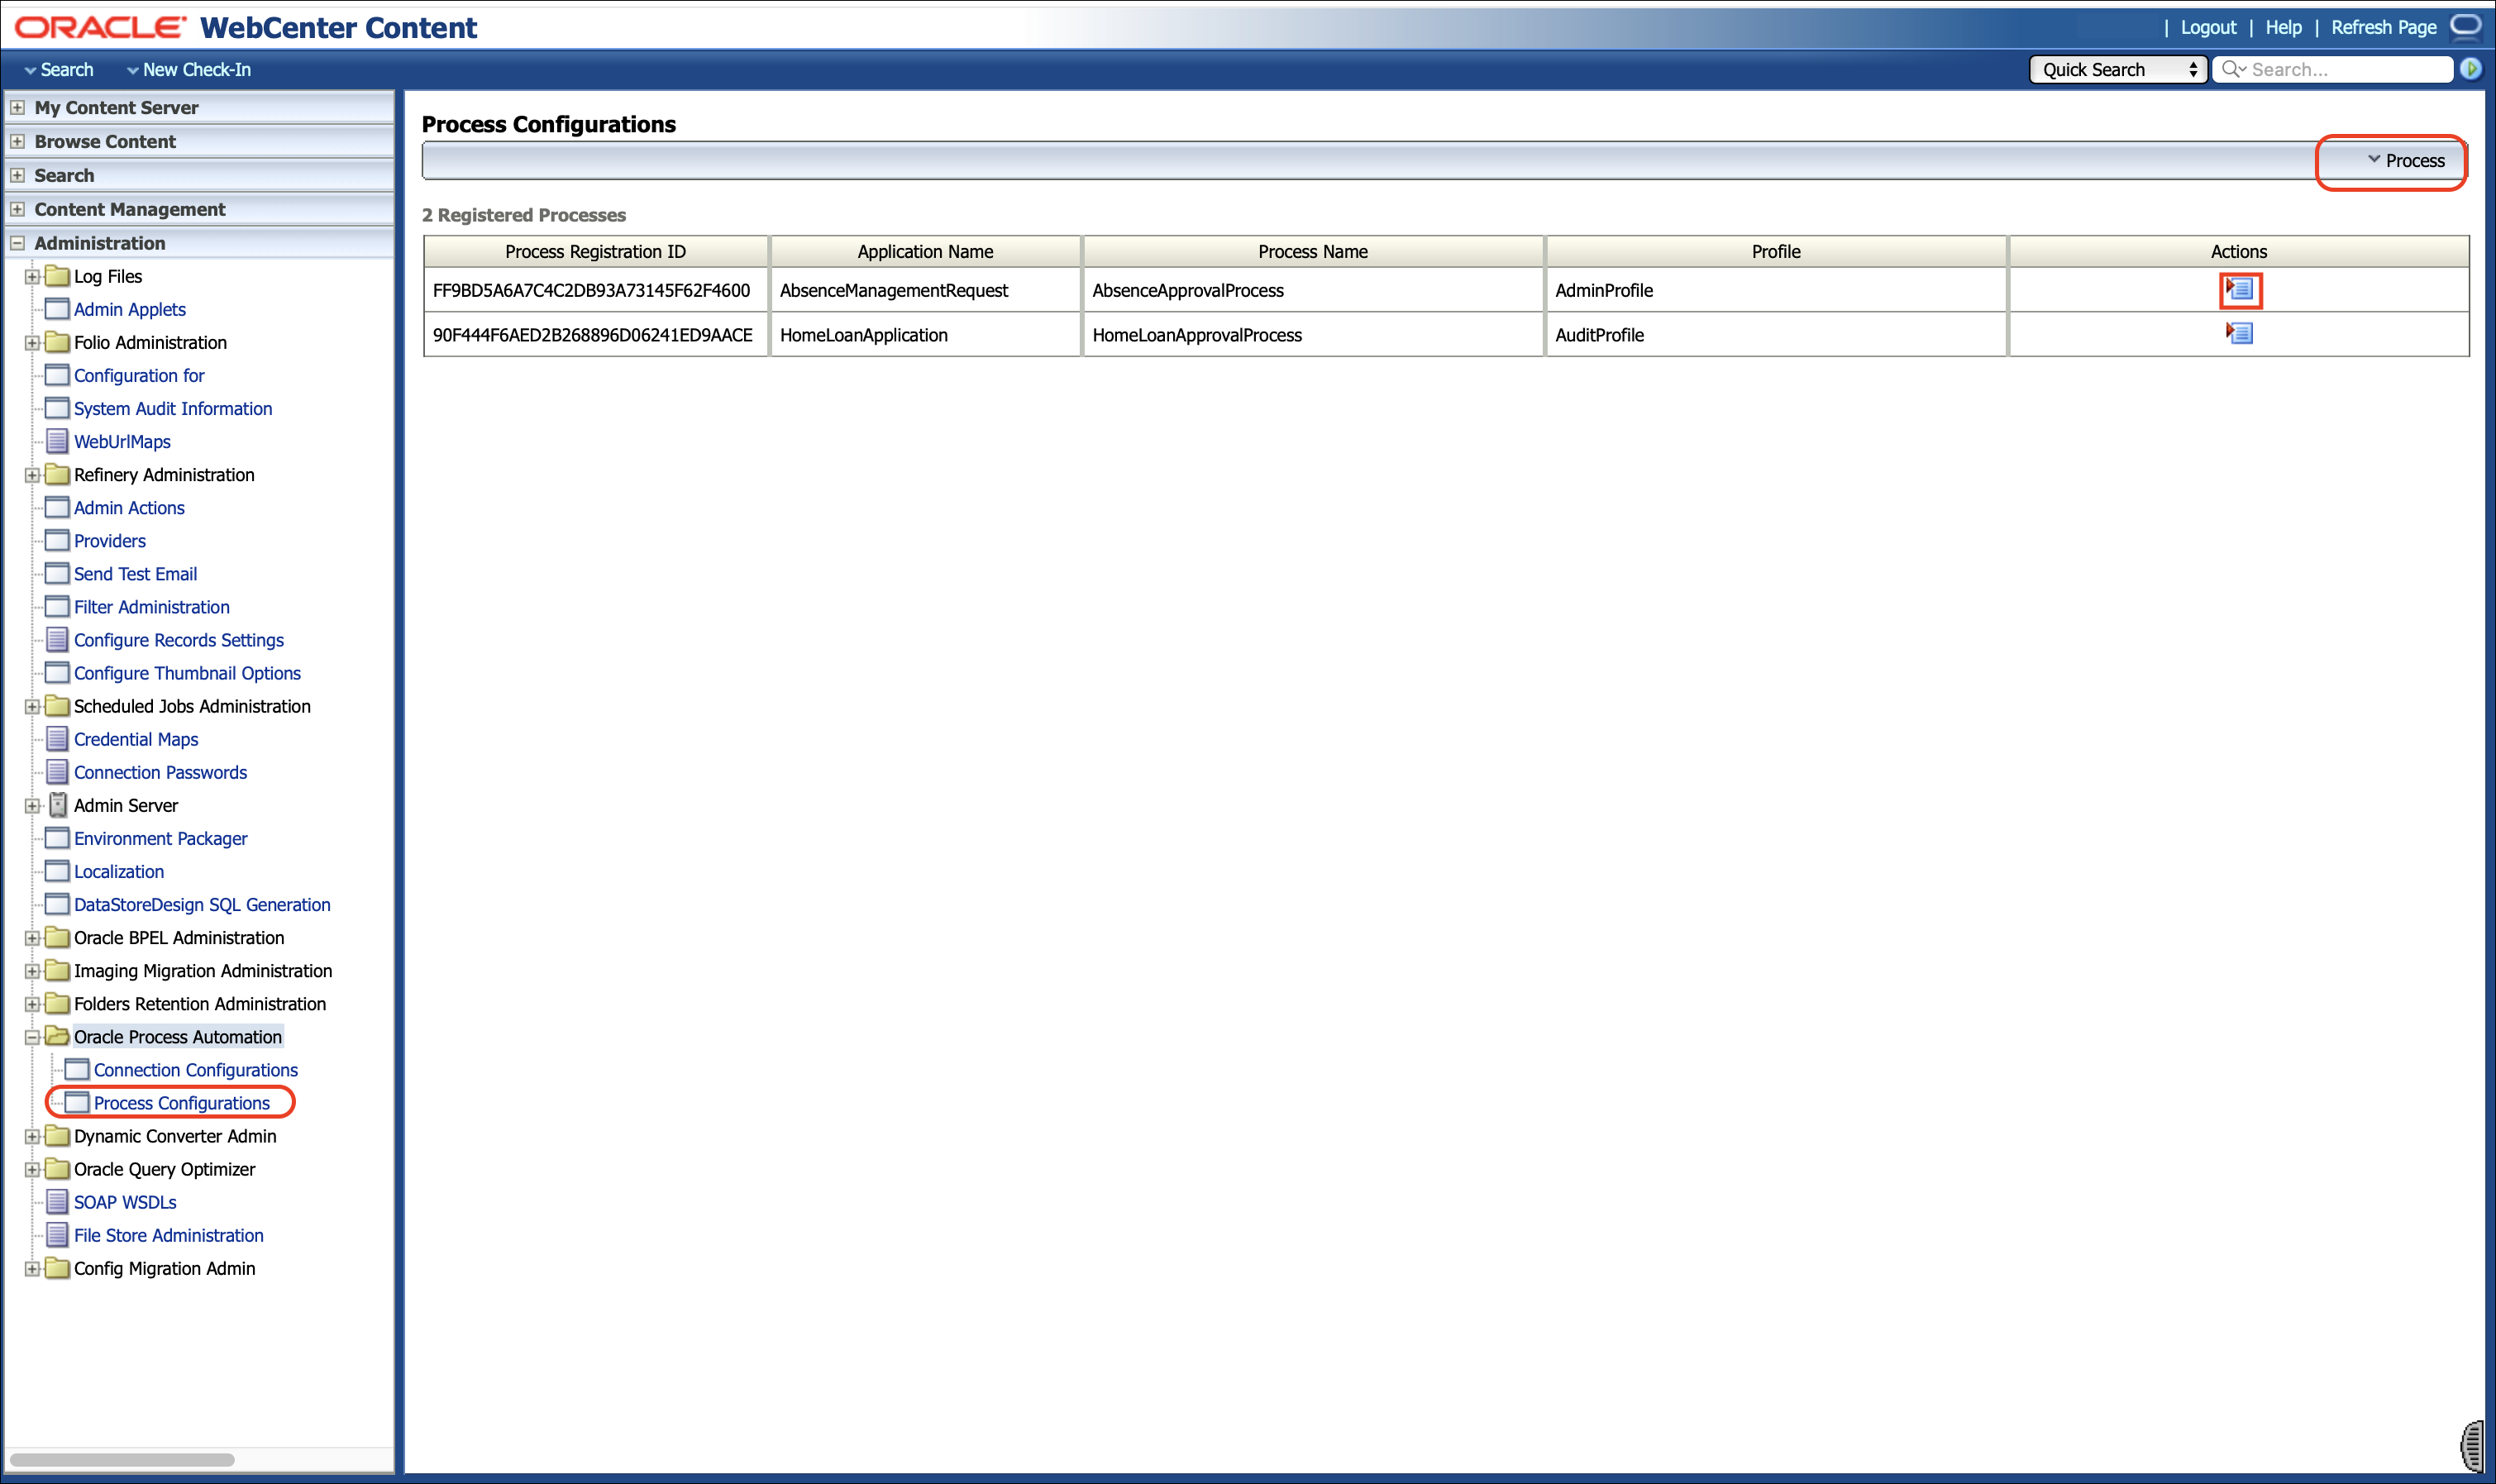
After a connection is established with OCI Process Automation, the OCI Process Automation processes can be registered with WebCenter Content for automated invocation. This can be completed by navigating to Administration, Oracle Process Automation, and then Process Configurations.

By default, this page will show the ‘Process Configurations’ listing, i.e. processes that are already registered along with links to modify/delete them. This page also shows a link to register a new process.
To Register a New Process
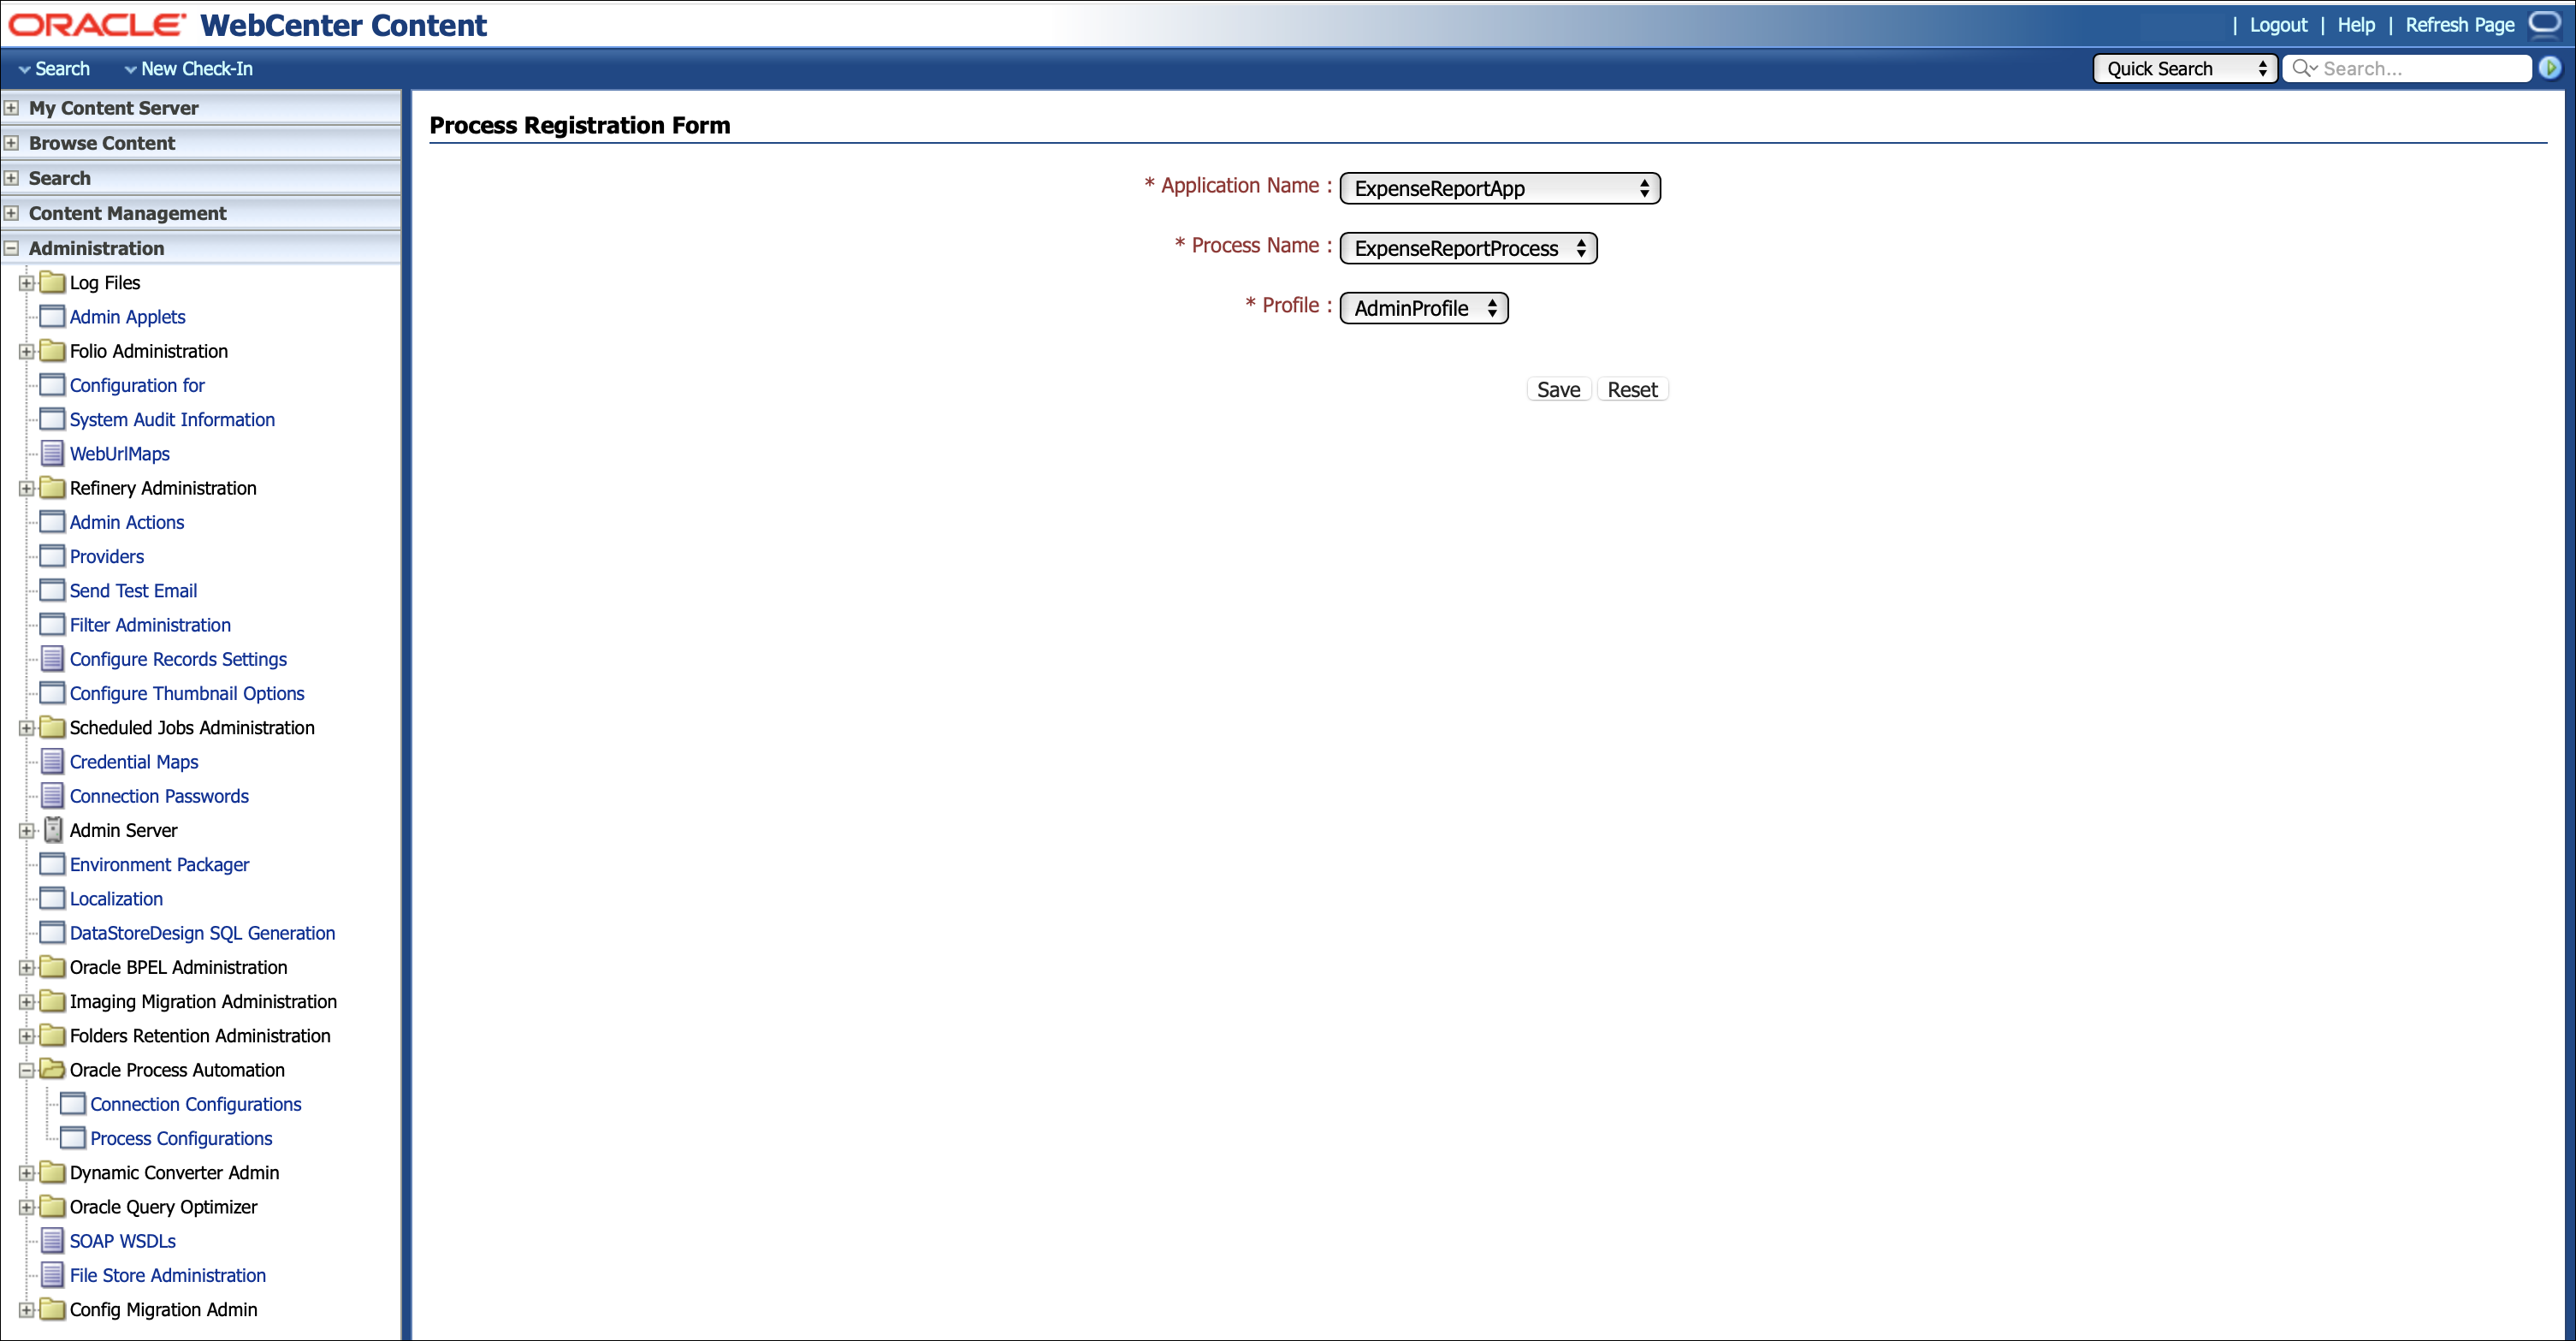
- On the Process Configuration listing page, click Process and then Add Process.
- In the Process Registration Form, select the required values in the Application Name, Process Name, and WebCenter Content Profile fields.
- Note that ‘Profile’ is optional.
- If ‘Profile’ is not specified, process can be invoked only via WebCenter Content Workflow. If process is not registered with any workflows, then it becomes a no-op registration.
- Click Save.
On successful registration, you will be redirected to the Process Configuration listing page, and the new entry will be displayed.
On failure, a suitable error message will be displayed.

To Update or Delete a Registered Process
- On the Process Configuration listing page, click the Actions icon next to the required process.
- To update the process, select Update Process from the pop-up menu.
- You’ll be allowed to update the selected profile only. Update the profile as needed and click Update.
- On successful update, you will be redirected to the Process Configuration listing page, and the updated entry will be displayed.
- On failure, a suitable error message will be displayed.
- To delete the process, select Delete Process.
- On successful delete, you will be redirected to the Process Configuration listing page. The deleted entry will no longer be available.
- On failure, a suitable error message will be displayed.
To Update the Payload Mapping for a Process
- On the Process Configuration listing page, click the Actions icon next to the required process.
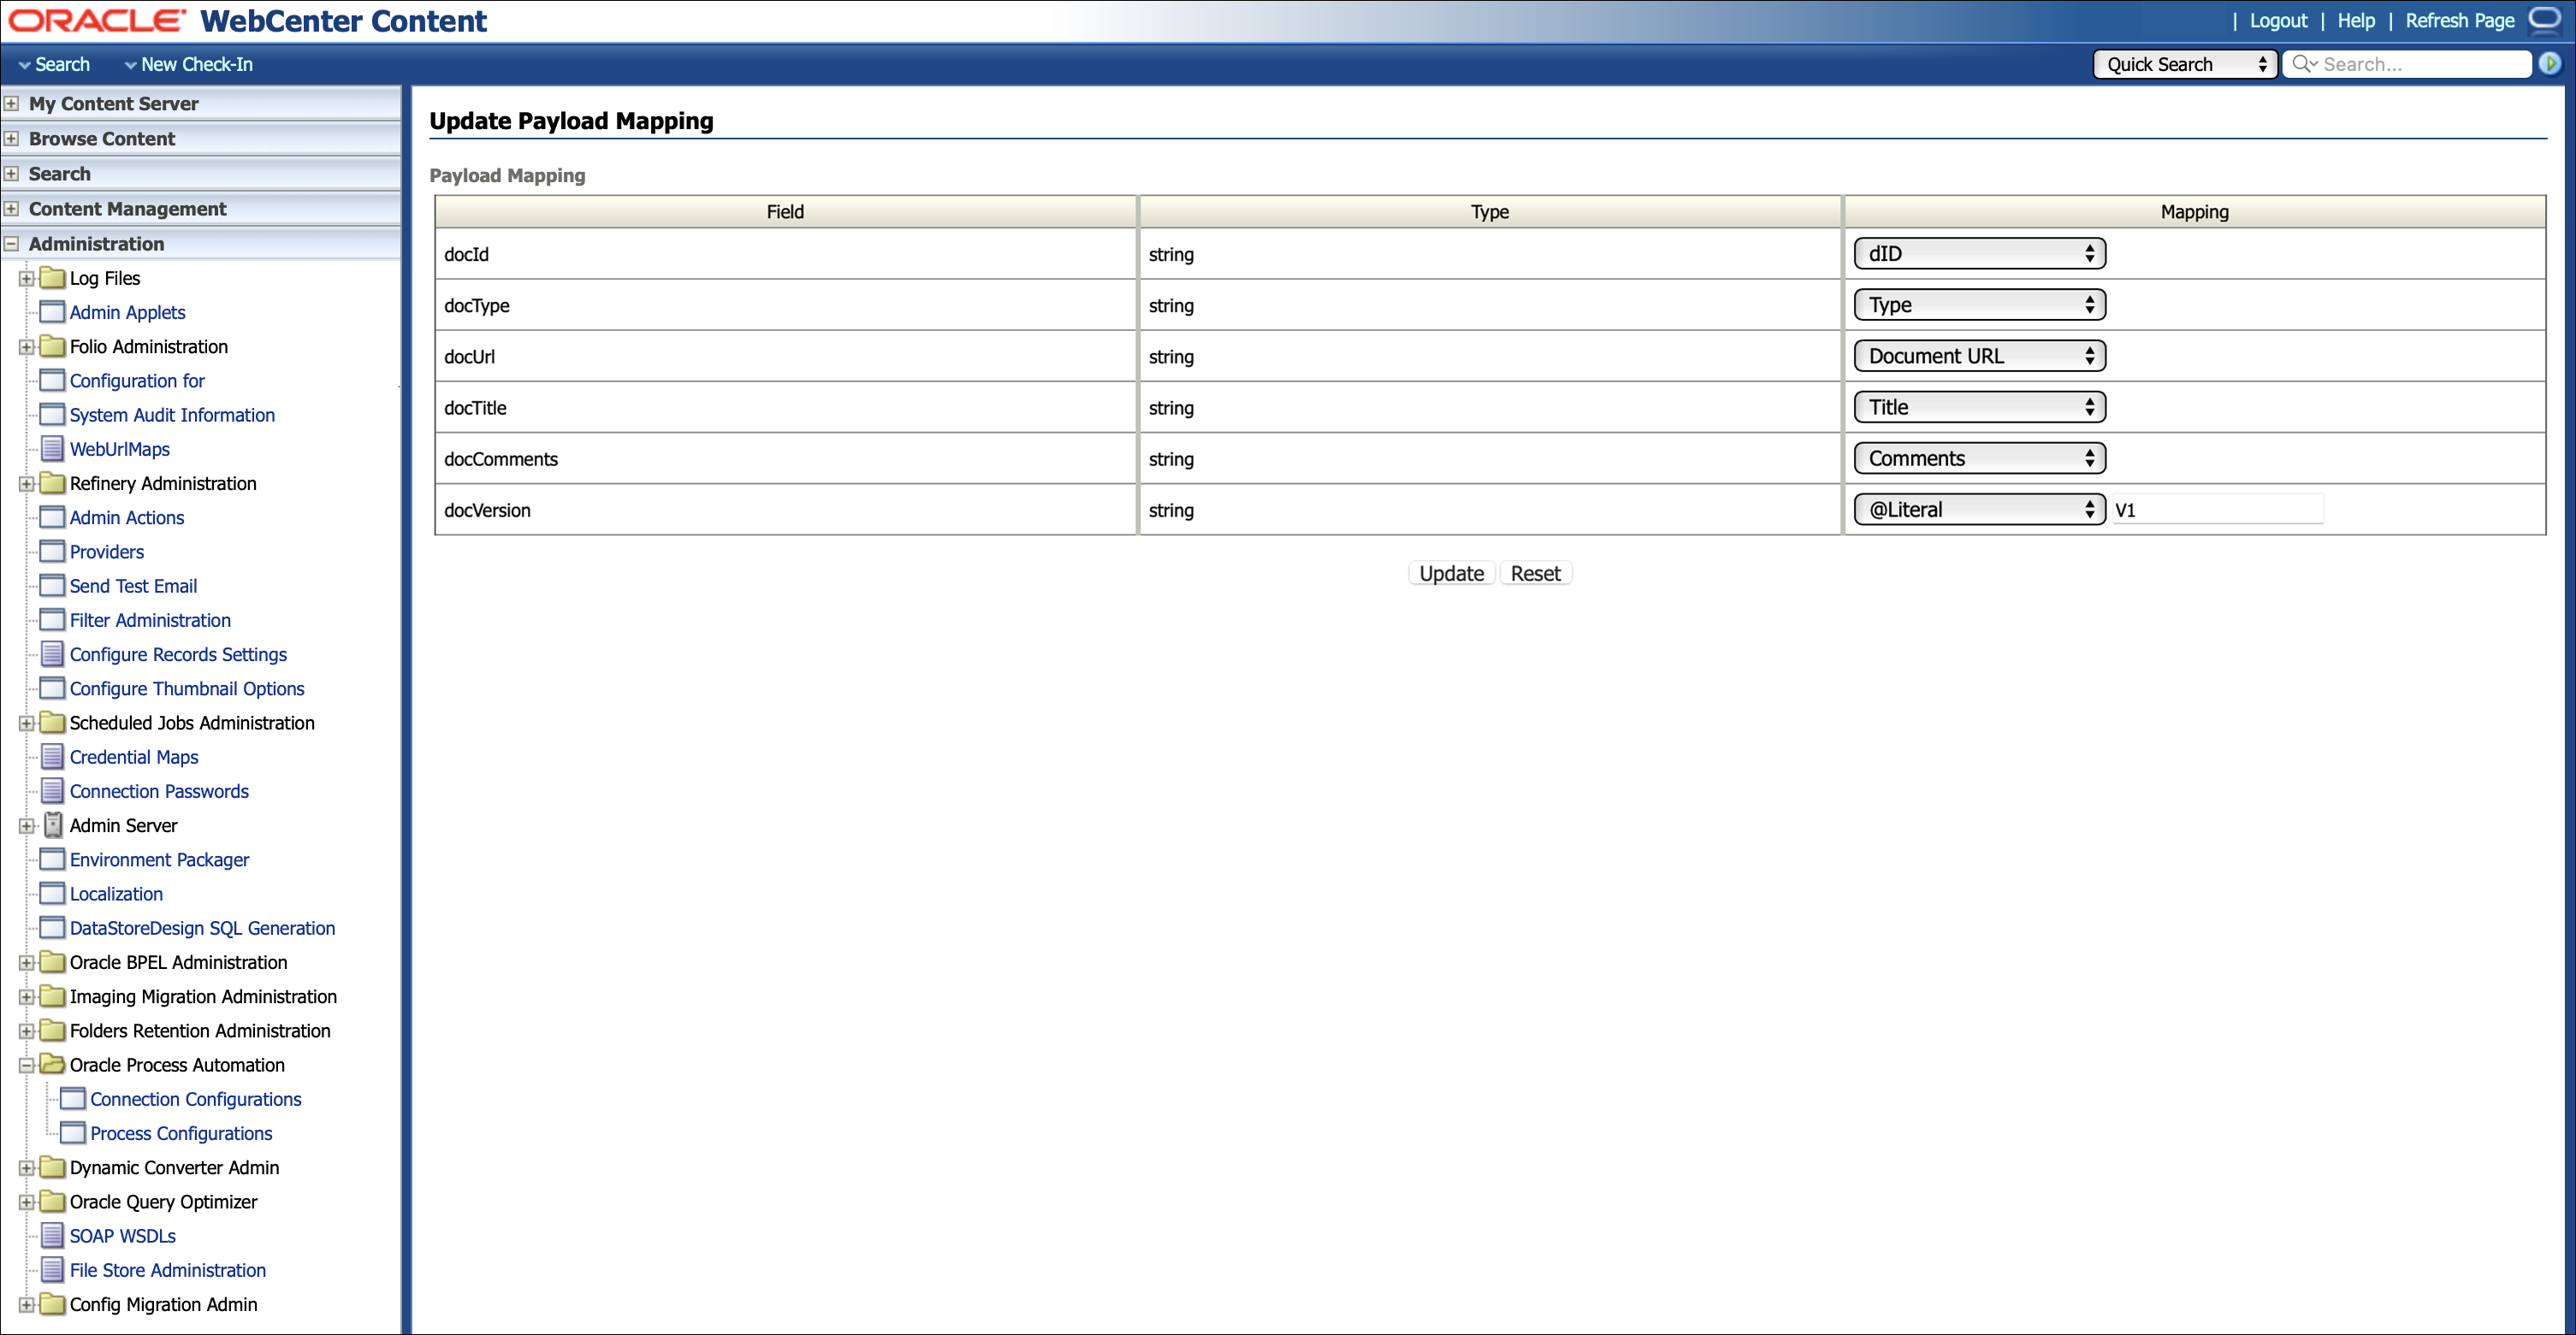
- Select Update Payload. The Update Payload Mapping form will be displayed.
- The Field column will show the attributes from the OCI Process Automation process interface.
- The Type column will show the type of the OCI Process Automation process attribute.
- The Mapping column will show the available document attributes from WebCenter Content to map to the OCI Process Automation attribute.
- For each OCI Process Automation attribute, select the corresponding WebCenter Content attribute. The @Literal attribute will allow to specify a literal value.
- Note that only attributes of simple type are allowed. Complex data objects will not be shown.
- Click Update to save the mapping. Click Reset if you need to reset the mapping.
On successful update of the mapping, you will be redirected to the Process Configuration listing page.
On failure, a suitable error message will be displayed.

To Fetch the Latest Mapping for a Process from OCI Process Automation
- On the Process Configuration listing page, click the Action icon next to the required process.
- Select Refresh Payload.
- On the Update Payload Mapping page, the latest process attributes fetched from OCI Process Automation are displayed. Note that any existing mapping will be reset.
- Update the mapping as needed and click Update.
- On successful update, you will be redirected to the Process Configuration listing page.
- On failure, a suitable error message will be displayed.
Usage
With OCI Process Automation process registered in WebCenter Content (with optional profile) and with appropriate payload mapping updated, the process automation is ready to be triggered. Once triggered, a background job periodically polls OCI Process Automation for status of the invoked processes and updates them locally.
OCI Process Automation process invocation can happen in one of the following ways:
Via direct checkin with profile.
- OCI Process Automation process needs to be registered with a profile for this mode.
- Any document checked in with a registered profile will trigger WebCenterContent to start corresponding process in OCI Process Automation.
- WebCenter Content will map suitable document attributes to corresponding OCI Process Automation process attributes as specified in the mapping.
- This flow of invoking the OCI Process Automation process happens in the background and can take up to 10 seconds to reflect in OCI Process Automation (on single file check-in).
Note: Status of the process invoked this way will not be synced with the release status of the checked-in document.
Via WebCenter Content workflow.
- OCI Process Automation process needs to be associated with WebCenter Content workflow for this mode.
- The ProcessAutomation component provides several idoc method extensions to associate WebCenter Content flow with registered processes. This includes methods to invoke a process and to check status of invoked process. See IDOC method extensions for available idoc methods.
- There are several ways to design a workflow. Following steps describes one such approach to create a basic criteria workflow and configure it to invoke and monitor a registered process.
Start the Workflow Administration applet.
In the criteria tab, add a new Criteria Workflow. For this example, the workflow name is OPAInvocationTest. Provide a security group and necessary criteria definition.

Add a step to the workflow. For this example, use initiateprocess as the step name.
Add step users. (These can be any arbitrary users as it is mandatory to specify them. These users need not have to play any role in approval.)
Add an entry event.
On the Events tab, click Edit for the Entry event.
In the Edit Script dialog, click the Custom tab.
Select the Custom Script Expression check box to enable the script window.
Type the following lines into the script window
<$if not wfCurrentGet("paConverstionID")$>
<$paPRID="BF14311EA303DA6086C10AE51F0278ED"$>
<$paInvokeProcess(paPRID)$>
<$endif$>
Note:
paPRID is set to process registration ID of the required process. This can be obtained from the Process Configuration page under Administration. The method ‘paInvokeProcess’ takes this as input and invokes the corresponding process.
The if block checks if “paConversationID” already exists, which means process has already been invoked. This avoids duplicate invocation if step is re-entered. To allow invocation of process on re-entry to the step, remove the if block.
The above method saves an identifier corresponding to the invocation as workflow parameter ‘paConversationID’.
Click OK to finish editing the script.

Add exit condition.
Select the Exit Conditions tab and set number of reviewers required to 0. (This is so that the step does not wait for a manual approval once the OCI Process Automation process completes.)
Add an exit condition by selecting the Use Additional Exit Condition check box and then clicking Edit.
In the Edit Additional Exit Condition dialog, check ‘Custom Condition Expression’ and add the following script.
wfCurrentGet("paConversationID") and paIsProcessCompleted(wfCurrentGet("paConversationID"))Note: This script invokes paIsProcessCompleted method and exits the step if return value is true. The input ‘paConversationID’ is available from workflow data.
This script is executed every one hour by WebCenter Content workflow to evaluate the exit condition. On meeting the condition, workflow step exits.

Click OK to finish editing the workflow step.
Enable the workflow.

- Now, when a document is checked in with parameters matching the criteria workflow:
- The document enters the workflow and triggers the entry event.
- The entry event script calls the ‘paInvokeProcess’ method which will invoke specified OCI Process Automation process instance.
- The document stays in this workflow step until OCI Process Automation process is completed.
- The evaluation of exit condition happens every hour. Once the OCI Process Automation process is completed and exit condition is evaluated, workflow step exits and document is released.
Note:
- WebCenter Content tracks only the final status and outcome of the OCI Process Automation process. No intermediate statuses or outcomes are tracked.
- There can be chance of multiple process invocations in one of the below conditions:
- Process is registered with both profile and workflow.
- Process is registered with multiple workflows and document check-in attributes matches criteria of two or more workflows.
Appendices
Create a Client App in IDCS
- Log in to OCI Process Automation’s IDCS administration console (
https://<IDCS URL>/ui/v1/adminconsole) as an administrator. - In the Application and Services section, click +Add to add a new application.
- Select Confidential Application.
- Give the application a name and optionally, a description, and click Next.
- Choose to configure this application as a client.
- Under Authorization, Allowed Grant Types, select Resource Owner and Refresh Token grants.
- Scroll down to the Token Issuance Policy section and under Resources, click Add Scope to give the application access to the required Oracle Process Automation instance.
- Select the correct instance. Click the right arrow to select the scope. The only scope required is the one ending with /process, so select the check box next to it and then click Add.
Note down the scope string as it will be used in the configuration screen. - Click Next until the end of the train.
- Click Finish.
- Note the Client ID and Client Secret values as these values will need to be seeded to weblogic’s CSF credentials.
- Select Activate and then click Save to enable the application.
Create CSF Entries with Credentials in Weblogic
- Log in to Enterprise Manager.
- Navigate to the Weblogic Domain drop-down, Security, and then Credentials.
- Select oracle.wsm.security. If it does not already exist, create a map (by clicking Create Map) with the name oracle.wsm.security and select it.
- Click Create Key. Create a key for the IDCS Client app. Complete the following:
- Key - process.idcs.credentials
- Type - password
- User Name - Specify the client ID of the client app created.
- Password - Specify the client secret of the client app created.
- Confirm password and click Ok.
- Create a key for the OCI Process Automation administrator in a similar way by specifying the key name process.provider.credentials and the credentials of the OCI Process Automation administrator.
IDOC Method Extensions
| Method | Description |
|---|---|
| paInvokeProcess [PRID] | This method takes process registration ID (PRID) as input, and invokes the corresponding process with payload asynchronously. Once invoked, it associates an identifier paConversationID with the workflow, which can be used to track the process further. |
| paIsProcessActive [paConversationID] | This method takes ‘paConversationID’ (from the workflow) as input, and returns true if OCI Process Automation process is still active. Any status other than ‘NEW’ or ‘ACTIVE’ will return false. |
| paIsProcessCompleted [paConversationID] | This method takes ‘paConversationID’ (from the workflow) as input, and returns true if OCI Process Automation process is completed. Any status other than ‘COMPLETED’ will return false. |
| paRetrieveProcessStatus [paConversationID] | This method takes ‘paConversationID’ (from the workflow) as input, and returns status of the process. Status can be one of the following. NEW - Process is new and status is yet to be tracked. ACTIVE / COMPLETED / FAULTED / SUSPENDED / TERMINATED - One of the OCI Process Automation process statuses. UNKNOWN - Process does not exist or could not be tracked. Method also returns below process related variables in the data binder. • paPrID - process registration ID • paDocID - ID of the checked-in document. • paDDocID - Version ID of the checked-in document. • paProcessInstanceID - ID of the invoked instance of the process from OCI Process Automation. • paStatus - Status of the process. • paOutcome - Outcome of the last human task of completed process. This will be null for non-completed processes. • paCreatedDate - Date when process was invoked by WebCenter Content • paLastModifiedDate - Date when process status was last updated. |
Note: paConversationID can be retrieved from the workflow using idoc method wccCurrentGet("paConversationID").
Integrating Oracle WebCenter Content with OCI Process Automation
F99281-05
Last updated: September 2024
Copyright © 2024, Oracle and/or its affiliates.
Primary Author: Oracle Corporation