Configure Object Workflows to Trigger Approval Requests for Creating Sales Leads
This topic contains an end-to-end example showing how you configure an object workflow to trigger approval requests for creating sales leads.
You're a sales administrator and your management has asked you to create a workflow to automate the business process as follows:
-
An approval process should be triggered when a sales representative creates a sales lead with a deal amount greater than USD 100000.
-
When the approval process is triggered, the sales manager of that representative should automatically receive a request for approving the deal.
You use three applications and two roles to configure and test the automated flows; therefore, for ease of understanding, the end-to-end procedure has been logically organized under the following steps:
-
Creating a field to track the approval status.
You use Application Composer to create a custom field to track the status of approvals.
-
Publishing the sandbox and verifying the addition of the field.
You publish the sandbox to bring the custom field into the mainline metadata.
-
Creating and deploying an approval flow.
You use BPM Composer to create and deploy an approval flow.
Note: Modifying templates in BPM Composer might be disabled for your implementation in this release. If so, contact Oracle Support for assistance. -
Creating object workflow to trigger the approval flow.
You create an object workflow using the Sales Lead object and set the trigger condition on the Deal Amount field.
-
Triggering and testing the object workflow and approval flow.
You trigger the object workflow, test the triggering of the associated approval flow, approve the request using Worklist, and then verify the approval.
Step 1: Create a Field to Track the Status of Approvals
In this step, you create a field to track the status of the approval and add this field to the desired pages.
-
Sign in using Administrator role.
-
Create a sandbox and activate it.
For more information on sandboxes, see Sandboxes: Explained topic.
-
Navigate to Application Composer.
-
In the left pane, expand Standard Objects.
-
Expand Sales Lead.
-
Click Fields.
Fields page opens.
-
Under the Custom tab, select .
Select Field Type dialog box appears.
-
Select Text.
-
Click OK.
Create Text Field page opens.
-
In the Appearance region, enter Large Deal Approval in the Display Label field.
-
Click Save and Close.
-
In the left pane, select Pages under Sales Lead.
Sales Lead: Pages page opens.
-
Under Desktop Pages tab, click Create Lead.
Create Lead page opens.
-
In the Configure Detail Form region, move the Large Deal Approval field from the Available Fields box to the Selected Fields box.
-
Click Save and Close.
You have now added a custom approval field to the Create Lead page. You're back to Sales Lead: Pages page.
-
Under Desktop Pages tab, click Show Details.
Show Details page opens.
-
In the Configure Detail Form region, move the Large Deal Approval field from the Available Fields box to the Selected Fields box.
-
Click Save and Close.
You have now added a custom approval field to the Show Details page.
Note: You're currently working within your sandbox. You have created a custom field and have added that field to two pages. Configurations done within a sandbox for object workflows aren't available to the mainline metadata unless published.
Next, publish your sandbox to make your changes available for use in the mainline metadata.
Step 2: Publish the Sandbox and Verify the Addition of the Field
In this step, you publish your sandbox and verify that the Large Deal Approval field has been added to Create Lead and Show Details pages.
For more information on creating and managing sandboxes, and the considerations involved when working with sandboxes, see Sandboxes: Explained topic and its related topics.
To publish the sandbox and verify the addition of the fields:
-
On the Sandboxes page, select your sandbox and click Publish.
-
Click the Navigator menu at the top.
-
Click Lead Qualification under Sales.
-
Click Create Lead.
Create Lead page opens.
-
Verify that Large Deal Approval field has been added to the Create Lead page.
-
Click Cancel. You create a deal later in this example.
Step 3: Create and Deploy an Approval Flow
In this step, you create and deploy a business process (also called project) for approval flow using BPM Composer.
For more information on working with business process flows, see related topic Object Workflows and Business Processes.
To create and deploy a process using BPM Composer:
-
Navigate to Application Composer.
-
Select Business Processes.
Business Processes page opens.
-
Select .
The Create Business Process Flow dialog box appears.
-
Enter Sales Lead Approval in the Name field.
-
Click OK.
BPM Composer opens in a separate Window.
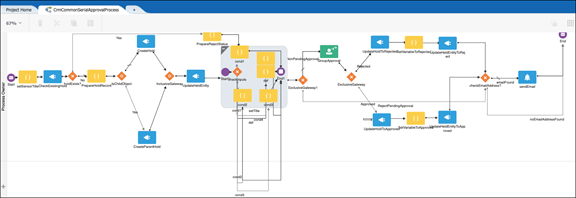
Note: If a blocker is enabled on your browser, BPM Composer may not open after you click OK, and your browser may get locked. If that happens, use the browser back button to go back to the Business Processes option in Application Composer, and click Edit for the business process (approval flow) that you were creating.For this example, you're using a seeded template called ExtnBusinessProcess on an as is basis. You can edit this template to suit your business case.
For more information on this template, see the Object Workflows and Business Processes topic.
This figure shows the seeded template. 
-
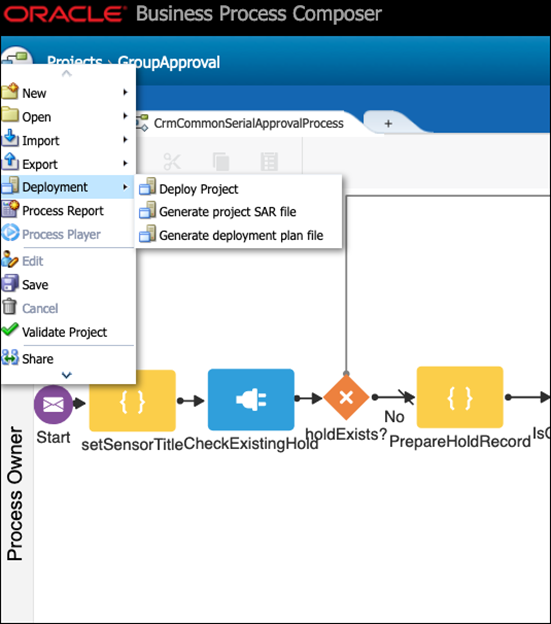
Click Deploy Project using the main menu.
This figure shows the main menu. 
The Deploy Project dialog box appears.
-
In the Deploy Project dialog box, enter the following information:
Field
Value
New Revision ID
Provide an identifiable ID.
Deployer Name
Your sign in name.
Password
Your password.
Mark composite revision as default
Select this option.
Version
Current project.
-
Click Deploy.
A confirmation message appears after your project has been deployed successfully.
-
Close BPM Composer.
-
Confirm as follows whether the project has been deployed successfully:
-
On the Overview page of Application Composer, click Business Processes.
The Business Processes page opens.
-
A green check-mark appears under the Deployed column for the project you created.
-
You have now successfully deployed a project with the name Sales Lead Approval.
Next, configure an object workflow to call the Sales Lead Approval project.
Step 4: Create Object Workflow to Trigger Approval Flow
In this step, you configure an object workflow with the required trigger condition and specify the inputs to pass from object workflow to the Sales Lead Approval process.
To configure an object workflow:
-
Navigate to Application Composer.
-
On the Overview page, click Object Workflows.
The Object Workflow page opens.
-
Select .
The Create Object Workflow page opens.
-
Select Sales Lead from the Object list.
-
Enter Deal amount more than USD 100000 in the Name field.
-
In the Event Point and Condition region:
-
Select When a record is created option.
-
Click the Expression Builder icon.
Expression Builder opens.
Enter
if(DealAmount>100000 && CurrencyCode=='USD') return true; -
Click OK.
-
-
In the Actions region, select Business Process Flow. Create Action: Business Process Flow page opens.
-
Configure the event action as follows:
-
Enter Sales Lead Approval in the Name field.
-
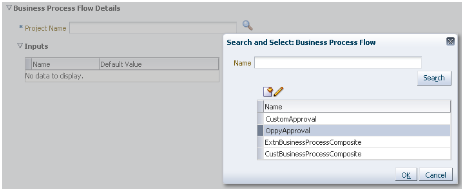
In the Project Name field, search and select Sales Lead Approval project that you had created and deployed.
This figure shows how you search and select a deployed business process (approval flow). 
-
Click OK.
-
In the Inputs region, specify the input parameters that you want to pass to the deployed approval flow using the Select Default Value button. You can also type-in these parameters.
For more information on input parameters, see Object Workflows and Business Processes topic. You must mark these values as Literal to pass the values as is. Literal values appear enclosed in single quotes.
Note: In this example, we are mapping only the mandatory parameters. For more information on the available input parameters in the default template, see Object Workflows and Business Processes topic.Name
Default Value
Description of the Parameter
approvers
'SALES_MANAGER'
One or more recipients of the approval request.
heldEntityStatusField
'LargeDealApproval_c'
The field that holds the status of the approval.
-
-
Click Save to save the event action.
-
Click Save to save the object workflow.
You have now configured the object workflow.
Next, test whether the object workflow calls the approval flow when the trigger condition is satisfied
Step 5: Trigger and Test the Object Workflow and Approval Flow
In this step, first trigger the object workflow and then test whether the approval flow runs fine.
-
Sign in using Sales Representative role.
-
Click the Navigator menu at the top.
-
Click Lead Qualification under Sales.
-
Click Create Lead.
Create Lead page opens.
-
Enter New Deal in the Name field.
-
In the Deal Size field, select USD and enter 120000.
-
Click Save and Close.
Creating a lead with deal size (or amount) of more than USD 100000 triggers the object workflow, because you had set the trigger condition for object workflow as:
if(DealAmount>100000 && CurrencyCode=='USD')
return true;
To verify whether the workflow has been triggered, check the status in the approval field as follows:
-
Edit New Deal lead.
-
Note the status in the Large Deal Approval field, which is set to APPROVALPENDING by default.
You're currently signed in using Sales Representative role. You must first sign out and then sign in using Sales Manager role to approve the request.
-
-
Sign out, and then sign in using Sales Manager role.
A new task or request appears on the Home page under the Worklist region.
-
Approve the request.
You're currently signed in as a Sales Manager. You must first sign out and then sign in as a Sales Representative to verify whether the status in the Large Deal Approval field has changed.
-
Sign out, and then sign in using Sales Representative role.
-
Click the Navigator menu at the top.
-
Click Lead Qualification under Sales.
Overview page opens.
-
Under Leads tab, click New Deal.
Edit Lead: New Deal page opens.
-
Verify that the status in the Large Deal Approval field has been set to APPROVED.
You have now successfully triggered the object workflow to run the associated approval flow.