Overview of Subtabs
Every top-level object (such as an opportunity, account, or contact) has an edit page, also known as a details page. The details page is where users go to view record details, and make changes.
An object's details page typically has multiple subtabs displayed along the left side of the page. Subtabs are useful because they display details that are related to the current record but derived from another record, or even from an external source. For example, when editing a trouble ticket record, your users might want to view the list of products that are reported on the trouble ticket. You create that subtab using Application Composer.
Where Do Subtabs Appear?
Subtabs are displayed via icons on the left side of an object's details page. Every top-level object has a details page, also known as the edit page, as part of its work area.
The details page is the page where users can view more details about an object. Depending on the security setup, users access the details page by clicking the Edit icon or by selecting the Edit menu item from the Actions menu on the summary table's toolbar. Users can also access the details page by clicking the object record name itself in the summary table.
Note that a subtab displays data in a list. Users can click any record in the list to drill down to view more details about that subtab record.
Let's look at the subtabs that are delivered for an object in Oracle CX Sales. In this example, these are the subtabs delivered for the Opportunity object.
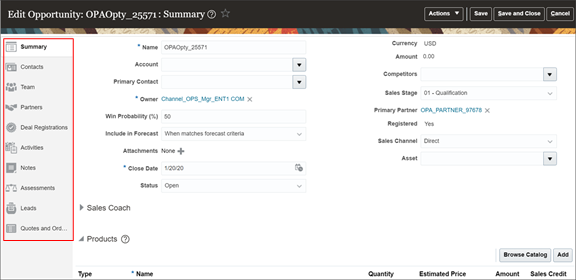
Here are some subtabs that are available from the Edit Opportunity page.
-
Contacts
This subtab lists records from the Opportunity Contact object, which is a child of the Opportunity object. Your users can click this subtab to review contacts that are related to the current opportunity record.
Tip: Child objects have a cascade delete relationship with parent objects. This means that if the parent record is deleted, then child records are also deleted. -
Opportunity Team
This subtab lists records from the Opportunity Team Member object, which is a child of the Opportunity object. Your users can click this subtab to review team members that are related to the current opportunity record.
-
Leads
This subtab lists records from the Sales Lead object. This is a context link type of subtab, which displays data from any object. There is no cascade delete relationship between the Opportunity and Sales Lead objects. Your users can click this subtab to review leads that are related to the current opportunity record.
Standard Subtabs
Standard objects come with a set of standard subtabs. You can configure some regions of standard subtabs using Application Composer.
To configure standard subtabs:
-
Navigate to Application Composer.
-
Under the Objects navigation tree, expand Standard Objects, then expand any standard object.
-
Click the Pages node.
-
Click the Application Pages tab.
-
In the Details Page Layouts region, select the standard layout and click the Duplicate Layout icon to duplicate it. Click the Edit icon.
-
On the Edit Application Details Page, scroll down through the Subtabs Region and click a subtab to configure it.
Note that some subtabs aren't configurable.
-
Make your subtab changes by clicking the pencil icon.
For example, you can hide and show fields. You can also apply a default search filter. See the "Adding Default Search Criteria to Subtabs" section later in this topic.
Custom Subtabs
You can add custom subtabs to both standard and custom objects. You do this by adding subtabs to a details page layout, and specifying the source of subtab data.
Let's say you want to add a new subtab to the Edit
Opportunity page. In this example, let's show the customer's address.
(For the sake of this example, let's assume that you previously created
a custom field, Customer Address (CustomerAddress_c), on the Opportunity object to capture this information.)
Use this procedure to add a new subtab to the Edit Opportunity page.
-
Navigate to Application Composer.
-
Under the Objects navigation tree, expand Standard Objects, then expand the Opportunity object.
-
Click the Pages node.
-
Click the Application Pages tab.
-
In the Details Page Layouts region, select a layout. You can select the standard layout and click the Duplicate Layout icon to duplicate it, or select another layout. Click the Edit icon.
-
On the Edit Application Details Page, scroll down through the Subtabs Region and, at the end of the subtabs, click the Add icon.
You can add one of five types of subtabs:
-
Related object subtab
-
Child object subtab
-
Context link subtab
-
Common component subtab
-
Mashup content subtab
-
Intelligent Advisor interview subtab
These subtab types are described in "Subtab Types."
-
-
Once you have added a custom subtab, you can then configure it.
For example, you can hide and show fields. You can also apply a default search filter. See the "Adding Default Search Criteria to Subtabs" section later in this topic.
Adding Default Search Criteria to Subtabs
Optionally add a default search filter to a subtab to help your users work more efficiently. This means that when a user opens a subtab, the records displayed are automatically filtered according to the default search filter that you configure here. Users can change the default search value, but they can't change the default search field. They can, however, further refine their search by adding additional search fields and values at runtime.
You can add a default search filter to custom subtabs, as well as to standard, extensible subtabs for select objects (such as Lead and Opportunity). Note that some standard subtabs aren't extensible, and so you can't add a default search filter to those subtabs (such as the Activities, Notes, and Social subtabs). Also, setting a default search filter isn't enabled for the Account object's Service Requests subtab.
Adding a default search filter to a subtab is optional. Skipping this step doesn't hide the subtab's search region from users (you actually can't hide this region). It just means that no search fields are automatically added to the subtab. Users can still see the search region and add fields to perform their desired search.
-
Click to edit the subtab's list region and navigate to the Configure Summary Table: Search Region section.
-
Select one default search filter field, operator, and value to apply to the subtab.
You can select from a list of both standard and custom fields. Note that you can't pick dynamic choice list fields, set ID-based fixed choice list fields, and any fields that aren't searchable. Also, if this is a subtab that was added based on a many-to-many (M:M) relationship, then you can select from only those intersection object fields that are already displayed on the subtab table.
For an example, see Configure Default Search on Standard Subtabs for Leads in the Related Topics.
Hiding Subtabs
Let's say you want to hide the Appointments subtab on the Edit Opportunity page.
Use this procedure to hide subtabs.
-
Return to the Edit Application Details Page for the Opportunity object.
-
Click the Configure Subtabs icon (green arrows).
-
In the Configure Subtabs dialog, in the Selected Subtabs list, double-click the Appointments subtab.
-
Click OK.
-
Click Done.
-
When you navigate to the Edit Opportunity page at runtime, the Appointments subtab is no longer available.