Configure an Approval Process for Opportunities
In this example, you learn how to set up approvals for opportunities using a business process flow provided by Oracle.
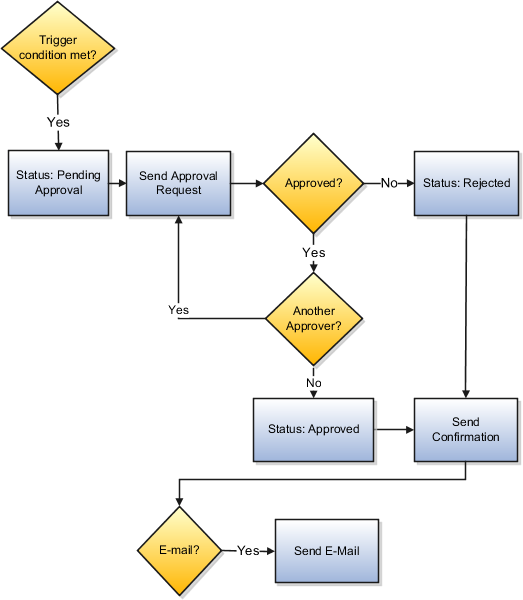
The approval process outlined in the diagram is triggered when a condition you enter as a Groovy script is true. In this example, the process is triggered when a salesperson enters an opportunity revenue amount greater than USD 100,000. Here's what happens when the process is triggered:
-
The approval process sends approval requests to one or more users.
In this example, the notification is sent to one user. If you specify multiple users, then all users must approve before the opportunity is considered approved.
You can enter identifying information into the subject line of the approval notification to help approvers understand what they're approving. In this example, you enter the opportunity name and the account. The body of the notification includes the name of the person who updated the opportunity.
-
The approval process updates the approval status to PENDING APPROVAL to indicate that an approval request was sent.
In this example, you create a custom field to display the status on the Edit Opportunity page.
-
After the approver views the notification and clicks the Approve or the Reject button, the process updates the status to APPROVED or REJECTED and sends a confirmation back to the user who updated the opportunity.
-
Optionally, the process can send an informational e-mail about the process outcome to the recipients of your choice.
You create the object workflow that triggers the approval process using Application Composer while working in a sandbox, so you can test the process before publishing it.
The overall configuration of the approval process includes these steps:
-
Create a custom text field to display the approval status.
-
Add the custom field to the Edit Opportunity page.
-
Create an object workflow that triggers the approvals business process provided by Oracle and supplies the required inputs, including the name of the user who receives the approval notification.
-
Test the approval process before publishing it.
Create a Custom Field to Display the Approval Status
-
Sign in as a sales administrator or a setup user.
-
Activate an existing sandbox with Application Composer as one of the available tools, or create a new one.
The sandbox name appears at the top of the page.
-
Navigate to Application Composer.
-
In the left pane, expand Standard Objects.
-
Expand Opportunity.
-
Click Fields.
-
On the Fields page, Custom tab, select Create from the Action menu.
-
In the Select Field Type window, select Text.
-
Click OK.
-
On the Create Text Field page, in the Display Label field in the Appearance region, enter
Large Deal Approval.The applications creates the technical name and API Name based on your entry. The API name is the name followed by an underscore and the letter c (_c). You enter the API name as one of the parameters of the workflow to indicate this is the field that displays the approval status.
-
Click Save and Close.
You're now ready to display the custom field on the Edit Opportunity page.
Display the Custom Field on the Edit Opportunity Page
-
In the Application Composer left pane, select Pages under Opportunity.
-
On the Opportunity: Pages page, Application Pages tab, scroll down to Details Page Layouts section and edit any custom layout. If none exists, then duplicate the standard layout and edit the resulting custom layout.
-
In the Subtabs region, click Edit for the Summary.
-
In the Edit Summary page, move the Large Deal Approval field from the Available Fields box to the Selected Fields box.
-
Click Save and Close.
-
Click Done.
-
Click the Application Composer link at the top left corner of the screen to return to the Application Composer Overview page.
Create an Object Workflow to Trigger the Approval Flow
With the sandbox still active, configure an object workflow with the trigger condition and the inputs to pass to the approvals process.
-
On the Application Composer page, make sure that Sales is still selected as the Application.
-
Click Object Workflows.
-
On the Object Workflow page, select Create from the Actions menu.
-
On the Create Object Workflows page, select Opportunity from the Object list.
-
Enter Deal amount more than USD 100000 in the Name field.
-
In the Event Point and Condition region:
-
Select the When a record is updated option.
-
Click the Groovy Builder icon, highlighted with callout 1 in the screenshot
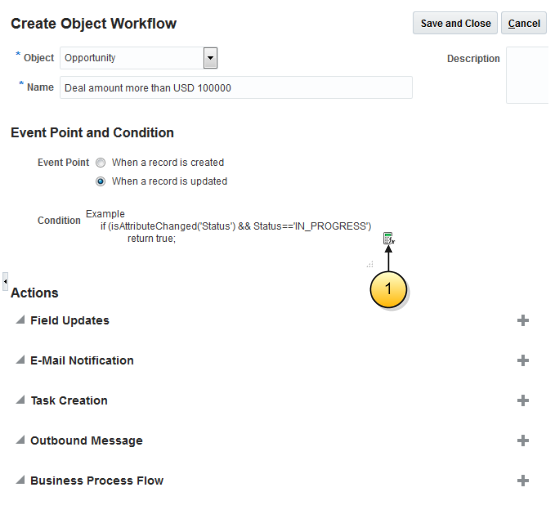
In the Expression Builder window, enter the Groovy script:
if (nvl(Revenue,0)>100000 &&
isAttributeChanged('Revenue')) return true;
You can ignore the warning.
-
Click OK.
-
-
In the Actions region, click Create (the plus icon on the right side of the page) for Business Process Flow.
-
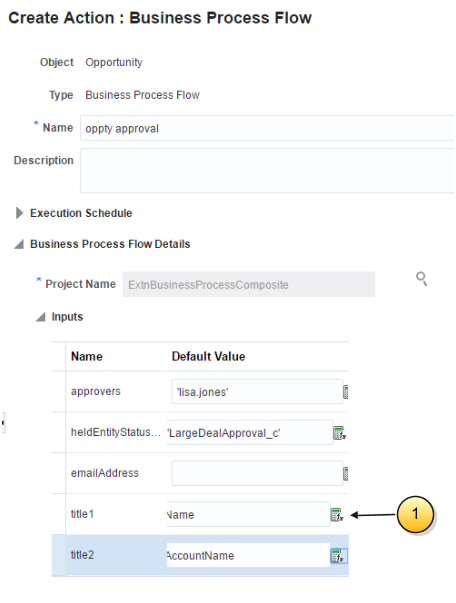
In the Create Action: Business Process Flow page, enter Opportunity Approval in the Name field.
-
In the Project Name field, search and select ExtnBusinessProcessComposite. This is the name of the approval business process provided by Oracle.
-
The Inputs region lists the parameters you can pass to the business process. In the Inputs region, make the following entries:
-
In the approvers field, enter the user name of the user who's to receive the approval notifications in single quotation marks. For example:
'lisa.jones'. -
In the heldEntityStatusField, enter the API name of the custom field you created in single quotation marks. For example:
'LargeDealApproval_c'. -
In the emailAddress field, enter the e-mail addresses in single quotations of people you want to be notified of the process outcome. Separate multiple e-mails with commas. For example:
'JoanneWong@nomail.com', 'tanakas@nomail.com' -
In the title1 and title2 fields, enter the two fields that you want to display in the subject line of the notification:
The notification subject line appears as: Opportunity <title1><title2> Is Submitted for Your Approval
In this example, we are adding the opportunity name and the account fields, so make the following entries in the Default Value field:
-
For title1, enter
Name. -
For title2, enter
AccountName.
You can view all of the fields available for insertion, by clicking Select Default Value, the function icon to the right of the field, highlighted by callout 1 in the screenshot.
Here's how to insert a field:
-
Select the field.
-
Click Insert to move the field to the Value region.
-
Click OK.
-
-
-
Click Save and Close.
Test the Approval Flow
To test the approval flow, create an opportunity and enter a revenue amount greater than USD 100,000. Then sign in as the approver to view the notification and approve.
-
While signed in as the same user who performed the setup, click the Home icon to return to the springboard.
-
Double-click on the Sales icon and on the Opportunities icon to open the Opportunities work area.
-
Click Create Opportunity.
-
In the Create Opportunity page, enter a name.
-
Click Save and Continue.
-
On the Edit Opportunity page, click Add in the Products region to add a revenue line to the opportunity.
Notice that the Large Deal Approval field you added to the page doesn't display a status. This is because the approval flow is not triggered yet.
-
Enter a product group or a product and an amount greater than 100000 to trigger the approval workflow.
-
Click Save and Close.
Saving triggers the approvals process.
-
Wait a few minutes to let the approval process run and view the opportunity again. The Large Deal Approval field now displays PENDING APPROVAL.
-
Sign out by clicking the user name and the Sign Out link.
-
Sign in as the approver.
-
Click Notifications (the bell icon) at the top of the screen.
The Recent Notifications window displays the new approval notification.
-
Click the notification subject line to display the notification body and click Approve .
-
Sign out and sign in again as the administrator.
-
Click Notifications (the bell icon) at the top of the screen.
The Recent Notifications window displays the approval confirmation.
-
Navigate back to the Opportunities work area and view the opportunity you created.
-
The Large Deal Approval field displays APPROVED.
-
You must publish the Sandbox if you want to make the opportunity approval available for use.