Manage Security by Role
When you create custom objects, by default their UIs are visible only if you have the Custom Objects Administration (ORA_CRM_EXTN_ROLE) role. For other roles, you can provide access to multiple custom objects using the Role Security link in the Common Setup pane.
Use the Role Security link to specify not only which custom objects and pages that a single role can access, but also the levels of access. Provision data security for custom object records and specify whether or not the role can view, update, or delete records. You can provision this type of security to all the users, owners of records, owner and management hierarchy, and user-defined roles. For example, you can make it possible for owners to update records, while managers can only view records. The Owner field is available on all pages for custom objects. When you create a record, by default, you're the owner. With this security provisioned, you can filter records owned by you or your subordinates.
Alternatively, you can update the security policy for a custom object, across multiple custom roles, using each custom object's Security node. See "Manage Security by Object."
Managing Role Security
The Role Security page displays a list of the custom roles available for selection. Click a custom role name to navigate to the role-centric security policies page, which displays a list of the custom objects for your implementation. Use this page to manage access for users with the corresponding custom role by specifying a security policy for one or more top-level or child custom objects. When you do this, users with the corresponding custom role can access the custom objects and related data, depending on the security policies you define.
To access the role-centric security policies page:
-
Ensure that you're in an active sandbox session.
-
Navigate to Application Composer and in the Common Setup pane, select the Role Security node.
Or, select the Role Security hyperlink in the local area of the main Overview page.
Or, from the object-centric Define Policies page, select a role.
-
Click a custom role name to navigate to its role-centric security policies page.
-
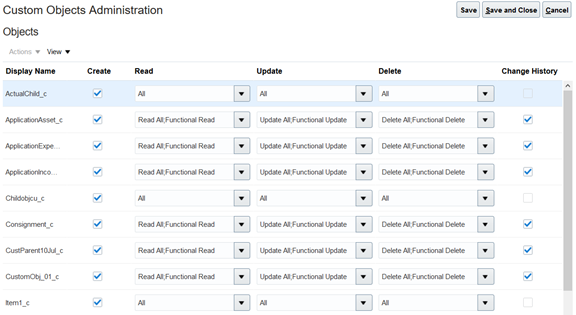
Enable data security across multiple objects. For each object in the table, indicate if the role can create records, and indicate the level of access for viewing, editing, and deleting records.
If data security is selected, the corresponding functional security is automatically selected.
-
Select the Change History check box for each object whose Change History subtab should be visible to the current role.
For the Change History subtab to be visible to users on a custom object record, you must do two things:
-
Check the Change History check box.
-
Add the Change History subtab to the custom object's details page layout.
Refer to your product's implementation documentation for more information. For example, for Oracle CX Sales and Fusion Service, see "Enable the Change History Subtab" in the Implementing Sales guide.
-