Considerations for Managing Flexfields
Managing flexfields involves planning and configuring flexfields.
You plan and configure the registered flexfields provided in your applications by applications developers. How you configure flexfield segments determines how the flexfield segments appear to users. Optionally, you can modify the UI page to change how the flexfield segments appear to users on that page.
Consider the following aspects of managing flexfields:
-
Planning flexfields
-
Configuring flexfields
-
Enabling a flexfields segment for business intelligence
-
Deploying flexfields
-
Optionally changing a flexfield segment's appearance in a user interface page
-
Identifying flexfields on a page and troubleshooting
Planning Flexfields
Before you begin planning flexfields, determine what type is appropriate to your needs, and which business objects are available for modifying flexfields. All flexfields consist of segments which represent attributes of an entity. The value a user enters for an attribute is stored in a column of the entity table. Carefully plan flexfields before configuring them. Before configuring new segments for your flexfields, be sure to plan their implementation carefully.
If you have determined that a business object supports flexfields, and those flexfields have been registered, you can begin planning their configuration. Note the code name of the flexfield you intend to configure so that you can find it easily in the Define Flexfield activity. In some cases you can determine and configure how the flexfield appears on the page. See Oracle Fusion Cloud Applications Help for specific products to determine any restrictions on using product-specific flexfields.
Configuring Flexfields
Administrators or implementors configure flexfields so they meet the needs of the enterprise. Some flexfields require configuration to make an application operate correctly. You can configure flexfields using the following methods:
-
Use the manage flexfield tasks in the Setup and Maintenance work area.
-
Use the Highlight Flexfields command in the Administration menu while viewing a page.
-
Use the Configure Flexfield icon button to manage all aspects of a flexfield, such as change a segment's sequence number or configure a flexfield segment's business intelligence label.
-
Use the Add Segment and Edit Segment icon buttons to add and edit descriptive or extensible flexfield segments with simple configurations.
-
Use the Add Context icon button to add descriptive or extensible flexfield context values.
-
Configuring a flexfield includes the following:
-
Defining value sets against which the values entered by users are validated
-
Defining the structure or context of the segments in the flexfield
-
Specifying the identifying information for each segment
-
Specifying the display properties such as prompt, length and data type of each flexfield segment
-
Specifying valid values for each segment, and the meaning of each value within the application
When creating table-validated, independent, dependent, or subset value sets while creating descriptive and extensible flexfield segments, you can optionally specify to display the description of the selected value next to the segment. You can assign sequence order numbers to global segments and to context-sensitive segments in each context. Segment display is always in a fixed order based on the segments' sequence numbers. You can't enter a number for one segment that is already in use for a different segment. Therefore, you may consider numbering the segments in multiples, such as 4, 5, or 10, to make it easy to insert new attributes.
A flexfield column is assigned to a new segment automatically, but you can change the assignment before saving the segment. If you must set a specific column assignment for a segment, create that segment first to ensure that the intended column isn't automatically assigned to a different segment.
Enabling a Flexfield Segment for Business Intelligence
You can enable flexfield segments for business intelligence if the flexfield is registered in the database as an Oracle Transactional Business Intelligence-enabled flexfield. For more information about enabling segments for business intelligence, see points to consider when enabling descriptive, extensible, and key flexfield segments for business intelligence. For extensible flexfield segments, you can't assign labels to equalize segments across contexts that are semantically equivalent.
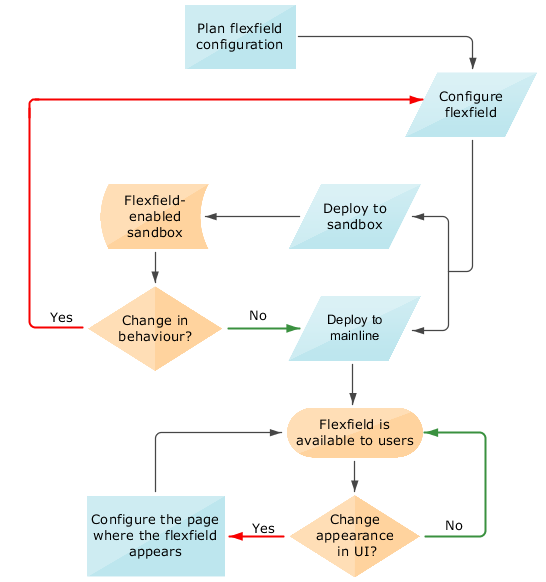
Deploying Flexfields
Once you have configured a flexfield, you must deploy it to make the latest definition available to users. In the Define Flexfields tasks, you can deploy a flexfield using either of the following commands:
-
The Deploy Flexfield command deploys a flexfield to the mainline metadata. This command is for general use in a test or production environment.
-
The Deploy to Sandbox command deploys a flexfield to sandbox. This command is for confirming that the flexfield is correctly configured before deploying it to the mainline metadata.
In Highlight Flexfields mode, when using the:
-
Add Context, Add Segment, and Edit Segment tools for extensible flexfields, use the Save command to save your changes. Then use the Deploy command to deploy the flexfield to the mainline metadata
-
Add Segment and Edit Segment tools for descriptive flexfields, use the Save and Deploy command to save your changes. Then deploy the flexfield to the mainline metadata
Once deployed, the deployment status indicates the state of the currently configured flexfield relative to the last deployed definition.
Optionally Changing a Flexfield Segment Appearance
The flexfield attributes that you define integrate with the user interface pages where users access the attributes' business object. Application development determines the UI pages where business objects appear and the display patterns used by default to render flexfield segments.
After a flexfield has been deployed to the mainline MDS repository so that it appears on application pages, you can modify it on a per-page basis using Page Composer. For example, you can hide a segment, change its prompt or other properties, or reorder the user-defined global attributes so that they're interspersed with the core attributes in the same parent layout. You can modify the appearance of descriptive and extensible flexfield segments in the UI page using Page Composer, once the flexfield is deployed to the mainline metadata.
If the applications are running in different locales, you can provide different translations for translatable text, such as prompts and descriptions. Enter translations using the locale that requires the translated text. Click your user image or name in the global header to open the Settings and Actions menu, and select Set Preferences. Then change the text to the translated text for that locale.
Identifying Flexfields on a Page
The Highlight Flexfields command in the Administration menu of the Setup and Maintenance work area identifies the location of flexfields on the page by displaying an Information icon button for accessing details about each flexfield.
Even if a descriptive or extensible flexfield isn't yet deployed and no segments appear on the page in normal view, the flexfield appears in the Highlight Flexfield view for that page. For descriptive flexfields, the segments as of the last deployment appear. For extensible flexfields, any segments and contexts that have been saved but not yet deployed also appear as disabled.
Highlight Flexfields accesses the current flexfield metadata definition. Use the highlighted flexfield's Configure Flexfield icon button to manage flexfields directly. Alternatively, note a highlighted flexfield's name to search for it in the tasks for managing flexfields.