Configure OAuth to Access Oracle Fusion Cloud Applications REST APIs
Oracle Fusion Cloud Applications expose REST APIs through two resource platforms: Fusion Applications and Spectra services, each serving different purposes.
Fusion Applications provide REST APIs for Fusion application business functionality, while Spectra provides service-oriented REST APIs for platform services. Although both platforms use Oracle Cloud Infrastructure (OCI) Identity and Access Management (IAM) for OAuth-based authentication and authorization, they support different OAuth grant types, client types, scopes, and configuration procedures.
OAuth in Oracle Fusion Cloud Applications uses an access token, issued as a JSON Web Token (JWT), to grant access to protected resources. The access token is issued by the OCI Identity and Access Management identity domain associated with your Fusion Applications instance, which acts as the authorization server. All Fusion Applications users are automatically available in the associated identity domain for OAuth-based authentication to access protected REST resources.
The following sections explain the supported OAuth flows and their differences, describe the available OAuth grant types and their applicability to Fusion Applications and Spectra resources, explain how to identify the appropriate OAuth scopes, and provide step-by-step procedures for configuring the supported grant types.
Difference Between 2-Legged OAuth and 3-Legged OAuth
Both the 2-legged and 3-legged flows result in an access token that the client application uses to access the REST resources. However, your decision to pick one of them is based on how you want to authorize the access to the REST resources.
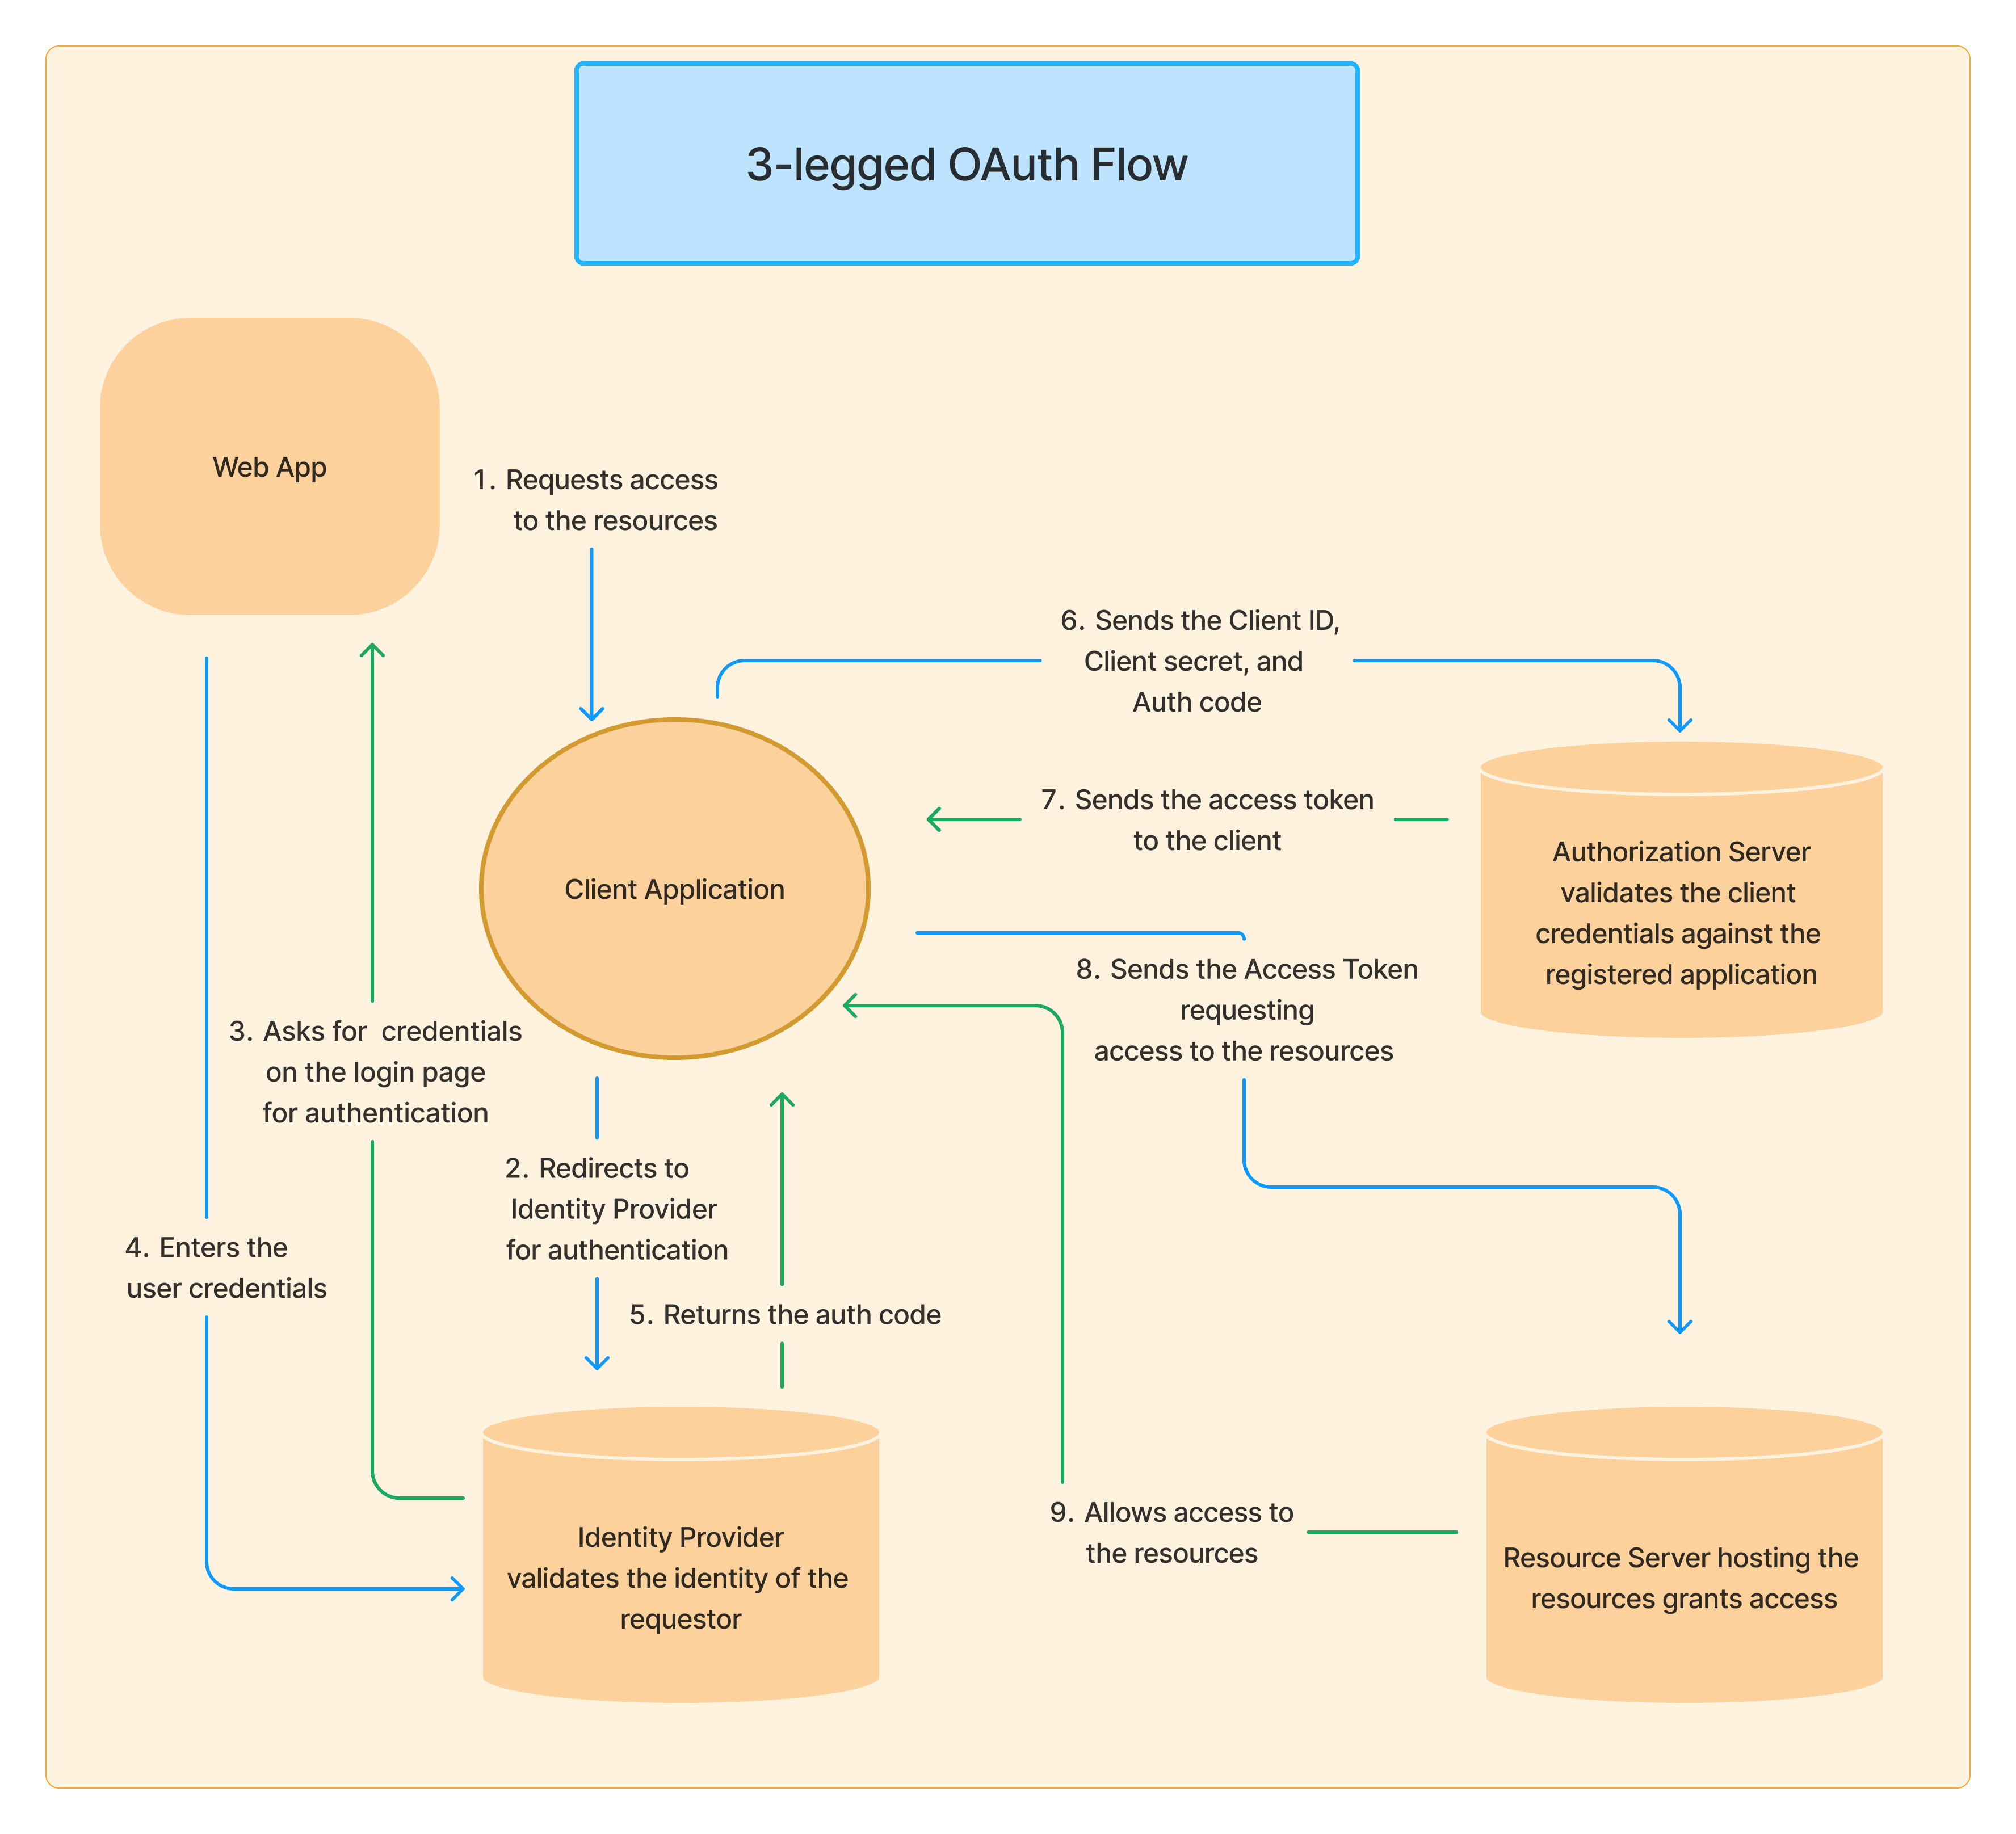
A 3-legged OAuth flow is an interactive authorization flow in which a user authenticates with the identity provider and grants consent to the client application to access protected resources on their behalf. If the user is already authenticated, they might not be prompted to sign in again. The OAuth client must be registered with the authorization server (in this case the identity domain). After successful authentication and authorization, the authorization server issues an authorization code to the client application. The client application exchanges this authorization code along with its preassigned client assertion to obtain the access token. Finally, the client sends the access token to the resource server to access the REST resources.
The following illustration explains the flow.
A 2-legged OAuth flow is an authorization flow in which the client application requests an access token directly from the authorization server without requiring user interaction during token acquisition. Depending on the integration scenario and the supported grant type, the client application can either obtain an access token on behalf of a user by presenting a signed JWT user assertion or authenticate itself using the Client Credentials grant type. For details about client or user assertion, see Client/User JWT Assertion.
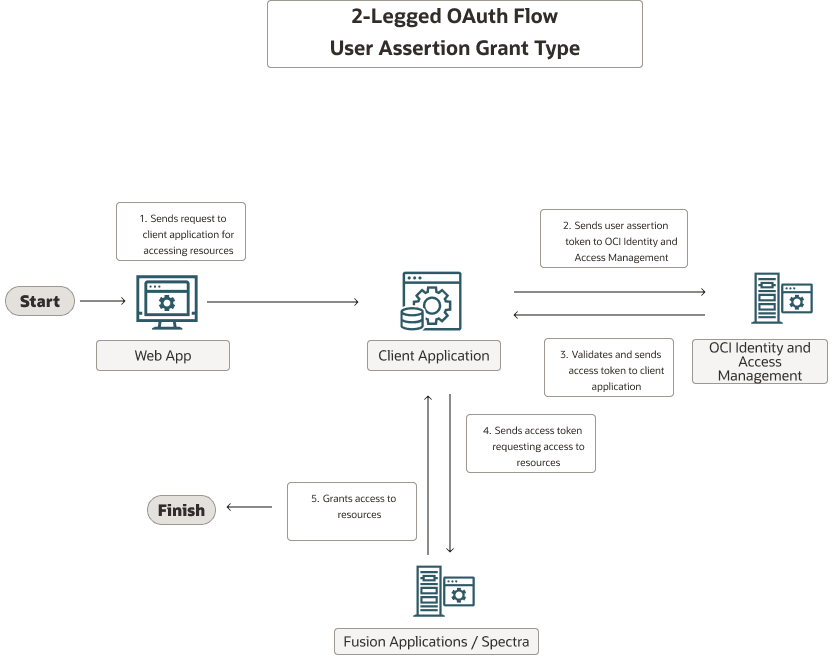
Scenario 1: If you want an application (the OAuth client) to access the REST resources on behalf of a user without collecting the user’s credentials at runtime, you can use the JWT User Assertion grant type. In this configuration, the client obtains a user assertion from a trusted identity provider and presents it to the authorization server to request an access token. After successful validation, the authorization server issues an access token that represents the user and can be used to access the REST resources on the resource server. In this case, there's no user interaction with the identity provider but the user identity is conveyed through the assertion.
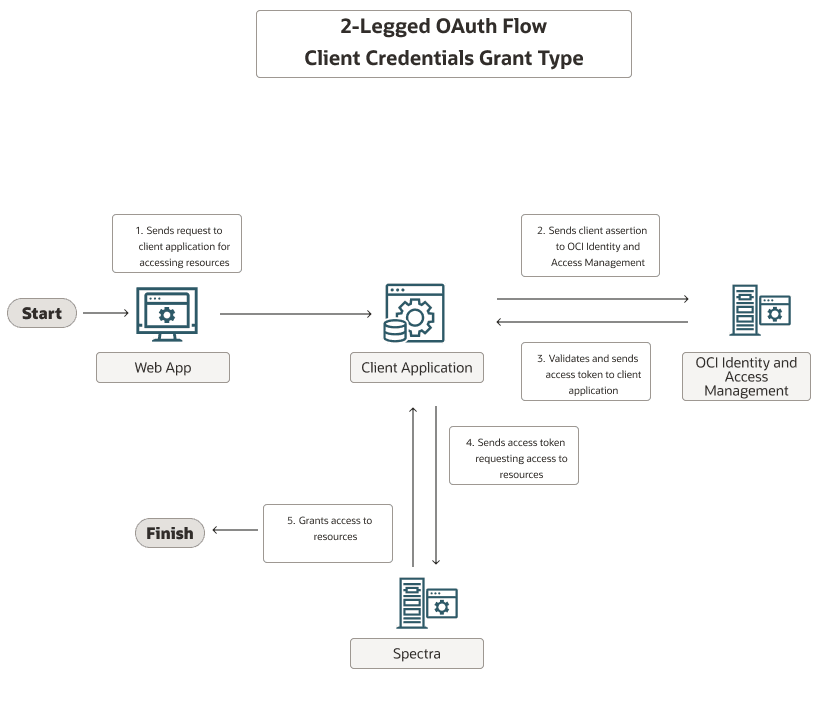
Scenario 2: If you want an application to directly access the REST resources without a user context, you can use the Client Credentials grant type. In this configuration, the client application uses a client assertion to authenticate itself to the authorization server and request an access token. The application then uses the access token to access the REST resources on the resource server. This flow is typically used for service-to-service integrations where user context isn't required.
Note:
The Client Credentials grant type can be used only for Spectra services.The following illustrations will help you understand the differences between these two grant types used in a 2-legged OAuth flow.
Before You Proceed Further
Before configuring OAuth, ensure that you're familiar with OCI Identity and Access Management and have the necessary privileges to create and manage applications in the identity domain associated with your Fusion Applications instance. To learn more, see Overview of OCI Identity and Access Management. Also, make sure that you or other required users have the necessary privileges to access the Identity and Access Management Admin Console to navigate to the identity domain. For details, see Managing Users.
At a high level, configuring OAuth involves the following steps:
- Identify whether you're accessing Fusion Applications or Spectra services, and select the appropriate OAuth grant type for your integration requirements.
- Identify the identity domain where you'll create the OAuth client application. The identity domain acts as the OAuth authorization server.
- Configure the OAuth client application in the selected identity domain based on the selected OAuth grant type.
- Select the appropriate OAuth scope for the REST API that you want to access.
- Authenticate and obtain an access token from the authorization server.
- Access the REST resources using the access token.
Identify Your Resource Platform, Supported Grant Types, and OAuth Flows
Configuring OAuth involves identifying the REST API endpoint and the resource platform, selecting a supported OAuth grant type, and selecting the appropriate OAuth flow to obtain an access token. Because the supported grant types, OAuth flows, client types, and scopes differ between Fusion Applications and Spectra services, identify the resource platform before you begin the configuration. Use the following table to identify the appropriate OAuth configuration for your integration.
| REST API Endpoint Pattern | Resource Platform | Supported Grant Types and OAuth Flows |
|---|---|---|
/api/…Example:
|
Spectra |
|
| Any other format
Example:
|
Fusion Applications |
|
- Access Grant Types in Oracle Cloud Infrastructure Documentation.
- Access Grant Types in REST API for Oracle Identity Cloud Service.
Identify the Client Scope for Your REST Resource
A resource scope defines whether users have access to the application's resources. The scope is defined by the resource application administrator. When a client requests authorization, the returned access token contains this information, including information on whether it's read-only or has create, read, update, and delete (CRUD) access.
To find the scope, go to your domain and look for the Oracle provisioned resource application, such as Fusion Applications. On the service details page, go to the section OAuth Configuration, then Configure application APIs that need to be OAuth Protected, and then Scopes. You'll find the resource scope listed in that section.
While configuring OAuth for your application, you'll need to provide the client scope. The scope would vary based on the type of REST API you're allowing access to. Let's understand the differences between these versions and how the scope varies, and where to look for the scope.
Note:
The scope examples here are only to explain the OAuth configuration process and shouldn't be treated as the definitive scope values for your integration. Scope values can vary depending on the application, service, and REST API. To identify the correct scope, look for the OAuth configuration of the corresponding application in the identity domain or the product documentation.| REST Resource Type | Finding Scope Definition |
|---|---|
For Spectra REST APIs where the resource path is in the format
/api/… for example,
/api/boss/data/objects/ora/hcmHrCore/employment/v1/workers,
look for the scope in the Oracle BOSS Cloud service in the identity
domain.
|
|
For the Fusion Applications REST APIs where the resource path is
in any other format for example,
crmRestApi/resources/latest/accounts, look for
the scope in the Fusion Applications service in the identity
domain.
|
|
Based on the type of the REST API you're using, select the scope and proceed with the OAuth configuration.
Configure OAuth Using Authorization Code Grant Type (Supported for Fusion Applications and Spectra)
In the case of an Authorization Code (3-legged OAuth) configuration, the involved parties are: the user, the application, the identity provider, the authorization server, and the resource server. For the user to get authorized, the application must be registered with the authorization server (in this case Fusion Applications identity domain). Therefore, you'll need to create a confidential application that can be accessed by multiple users but can keep the OAuth credentials confidential and protected. Let's look at how to do this in the application.
Caution:
Never change the name of the OAuth token issuer.Note:
This procedure focuses only on the fields and data entry points essential for the configuration. You can ignore and skip any other fields on the UI that aren't mentioned here. Where relevant, instructions to skip the fields are included in the procedure.- Register your client and resource applications with the authorization server.
- Sign in to the Fusion Applications identity domain as an Administrator.
- From the list of identity domains, click Integrated applications and click Add application.
- On the Add application page, select Confidential Application and click Launch workflow.
- On the Add Confidential Application page, enter a name for the application that you're adding.
- Skip all other fields and click Submit.
- In the OAuth Configuration section, select Edit OAuth and select Configure this application as a client now to proceed with the client configuration settings. Because you're creating a client application, only this option is relevant.
- In the Authorization section, select the Authorization code checkbox to specify the grant type. This is the only grant type required for this flow.
- In the Redirect URL field, enter the URL of your
custom application that requires access to the Fusion Applications REST
resources.
Note:
The URL path might vary depending on the type of application. See the documentation of your custom application for the exact information regarding the redirect URL used for OAuth configuration. - In the Client type section, select Trusted. A trusted client is allowed to request access tokens using a signed JWT assertion.
- Click Import Certificate and select the public
signing certificate that matches the private key used to sign the JWT
assertion.
Note:
While importing the certificate, set the certificate alias to match the Key Identifier (kid) value used in the JWT assertion header. - Skip the next few fields and go to the Token issuance policy section.
- In Authorized resources, select specific so that the user is granted access only to the specific resources.
- Add resources for your product.
- Turn on Add resources to include the resources that are accessible to the users.
- In the Resources subsection, click Add
scope.
Tip:
A scope defines the level of access you need to use the application's resources. The scope is defined by the resource application administrator. To find the scope, go to your domain and look for the Oracle provisioned resource application, such as Fusion Applications. On the service details page, go to the section OAuth Configuration, and then Configure application APIs that need to be OAuth Protected, and then Scopes. You'll find the resource scope listed in that section. - On the Add scope dialog box, select the applications containing the
resources, and click Add. The resources are
added. The scope defined by your application administrator appears in
the format:
<resource primary audience name><resource
                                scope name>
. - Review the added resources. If you don't need any resource, select and click Remove to exclude it from the scope.
- Complete the application creation and activate the application.
- Go to the Actions menu and select Activate. A confirmation message appears asking for a confirmation to activate the application.
- Click Activate application. The confidential
application is activated and ready for use.
Also, on the OAuth Configuration page, look for the Client ID and make a note of it because you'll need it for requesting the access token.
- Request an access token. You can do so using a client application such as
Postman or a cURL command. Let's look at both these options.
Note:
The procedures use the client assertion. Oracle recommends using client assertion instead of client secret because client assertions provide stronger authentication, reduce the risk associated with shared secrets, and simplify secure key management in enterprise environments. The process of obtaining the client assertion token is outside the scope of this document. It's assumed that you already have a valid signed JWT client assertion.Using Postman Using cURL - In Postman, create a new request.
- On the Authorization tab, select OAuth 2.0 as the Authorization Type.
- In the Configure New Token section, enter the
following client configuration:
- Token Name: Enter a generic name for the token.
- Grant Type: Set the grant type to Authorization Code.
- Callback URL: Enter the Redirect URL value
that's entered in the identity domain.
Note:
The URL value must match what's configured in the confidential application. - Auth URL: The IDCS URL appended with
/oauth2/v1/authorizeis used as the Auth URL. You can get the URLs fromhttps://idcs-<idcs-id>.identity.oraclecloud.com/.well-known/idcs-configuration. - Access Token URL: The IDCS URL appended with
/oauth2/v1/tokenis used as the Access Token URL. You can get the URLs fromhttps://idcs-<idcs-id>.identity.oraclecloud.com/.well-known/idcs-configuration. - Client ID: Enter the Client ID that was generated after creating the confidential application.
- Scope: Mention the scope defined in the confidential application.
- Client Authentication: Select Send client credentials in body.
- In the Advanced section, got to the Token
Request fields and add the client
assertion details.
Key Value Send In client_assertion_typeurn:ietf:params:oauth:client-assertion-type:jwt-bearerRequest body client_assertionThe signed client assertion JWT Request body - Click Get New Access Token. Postman passes the information to the identity domain for authentication and receives the access token.
- Open a browser and send a request to obtain the
authorization code using this URL:
The browser gets redirected to the <redirect URL> specified in the confidential application. In the URL path, you can find the authorization code as a value in thehttps://<identity domain URL>/oauth2/v1/authorize?response_type=code&client_id=<clientid>&redirect_uri=<redirect url>&scope=<scope>codequery parameter. Copy the authorization code for use later in step c. - Launch the command prompt.
- Enter the cURL command below, replacing the text in
angle brackets ( < > ) with the appropriate
values:
curl --request POST "https://<identity domain URL>/oauth2/v1/token" -H "Content-Type: application/x-www-form-urlencoded;charset=UTF-8" -d "grant_type=authorization_code&code=<authorization_code>&redirect_uri=<redirect_url>&client_assertion_type=urn:ietf:params:oauth:client-assertion-type:jwt-bearer&client_assertion=<client_assertion_JWT>" - You can expect the response in a format as shown
here:
Status: 200 "access_token":"eyJ4NXQiOiI4Wk. . ." "token":"Bearer", "expires_in":3600 - Copy the value displayed for
access_token. This is the token you'll need to request access to the resources.
- Access the resource using the access token.
In Postman, click Use Token to use the token (auto-fill the Token field) and access the resources from the resource server. Or, if you used the cURL command in the previous step, you could continue with the command prompt to send the REST request and get access to the resources. You'd need to structure your request as shown here:
Note that the Authorization header is set to Bearer token and you'd provide the access token retrieved earlier as its value.curl –-request GET "https://<REST API endpoint URL>" -H "Content-Type:<as needed by your REST endpoint, such as, application/json>" -H "Authorization: Bearer <access_token>"
Configure OAuth Using Authorization Code with PKCE Grant Type (Supported for Fusion Applications and Spectra)
Use the Authorization Code with PKCE (Proof Key for Code Exchange) grant type to enable OAuth 2.0 authentication for public clients, such as mobile applications, that can't securely store a client secret. PKCE enhances the Authorization Code flow by protecting the authorization code from interception during the authorization process.
The Authorization Code with PKCE flow involves four parties: the user, the client application, the authorization server, and the resource server. During the OAuth flow, the user authenticates with the identity provider. After successful authentication, the authorization server issues an authorization code to the client application. The client application then sends the authorization code and the PKCE code verifier to the authorization server. After validating the request, the authorization server issues an access token to the client application to access protected resources on behalf of the user. Let's look at how to configure this flow in the application.
Caution:
Never change the name of the OAuth token issuer.Note:
This procedure focuses only on the fields and data entry points essential for the configuration. You can ignore and skip any other fields on the UI that aren't mentioned here. Where relevant, instructions to skip the fields are included in the procedure.- Register your client and resource applications with the authorization server.
- Sign in to the Fusion Applications identity domain as an Administrator.
- From the list of identity domains, click Integrated applications and click Add application.
- On the Add application page, select Mobile Application and click Launch workflow.
- On the Add Mobile Application page, enter a name for the application that you're adding.
- Skip all other fields and click Submit.
- In the OAuth Configuration section, select Edit OAuth and select Configure this application as a client now to proceed with the client configuration settings. Because you're creating a client application, only this option is relevant.
- In the Authorization section, select the Authorization code checkbox to specify the grant type. This is the only grant type required for this flow.
- In the Redirect URL field, enter the URL of your
custom application that requires access to the Fusion Applications REST
resources.
Note:
The URL path might vary depending on the type of application. See the documentation of your custom application for the exact information regarding the redirect URL used for OAuth configuration. - Skip the next few fields and go to the Token issuance policy section.
- In Authorized resources, select specific so that the user is granted access only to the specific resources.
- Add resources for your product.
- Turn on Add resources to include the resources that are accessible to the users.
- In the Resources subsection, click Add scope.
Tip:
A scope defines the level of access you need to use the application's resources. The scope is defined by the resource application administrator. To find the scope, go to your domain and look for the Oracle provisioned resource application, such as Fusion Applications. On the service details page, go to the section OAuth Configuration, and then Configure application APIs that need to be OAuth Protected, and then Scopes. You'll find the resource scope listed in that section. - On the Add scope dialog box, select the applications containing the
resources, and click Add. The resources are
added. The scope defined by your application administrator appears in
the format:
<resource primary audience name><resource
                                scope name>
. - Review the added resources. If you don't need any resource, select and click Remove to exclude it from the scope.
- Complete application creation and activate the application.
- Go to the Actions menu and select Activate. A confirmation message appears asking for a confirmation to activate the application.
- Select Activate application. The mobile
application is activated and ready for use.
Also, on the OAuth Configuration page, look for the Client ID and make a note of it because you'll need it for requesting the access token.
- Request an access token. You can do so using a client application such as
Postman or a cURL command. Let's look at both these options.
Using Postman Using cURL - In Postman, create a new request.
- On the Authorization tab, select OAuth 2.0 as the Authorization Type.
- In the Configure New Token section, enter the
following client configuration:
- Token Name: Enter a generic name for the token.
- Grant Type: Set the grant type to Authorization Code (With PKCE).
- Callback URL: Enter the Redirect URL value
that's entered in the identity domain.
Note:
The URL value must match what's configured in the confidential application. - Auth URL: The IDCS URL appended with
/oauth2/v1/authorizeis used as the Auth URL. You can get the URLs fromhttps://idcs-<idcs-id>.identity.oraclecloud.com/.well-known/idcs-configuration. - Access Token URL: The IDCS URL appended with
/oauth2/v1/tokenis used as the Access Token URL. You can get the URLs fromhttps://idcs-<idcs-id>.identity.oraclecloud.com/.well-known/idcs-configuration. - Client ID: Enter the mobile application Client ID that was generated after creating the mobile application.
- Code Challenge Method: Select SHA-256.
- Scope: Mention the scope defined in the confidential application.
- Client Authentication: Select Send client credentials in body.
- Select Get New Access Token. Postman passes the information to the identity domain for authentication and receives the access token.
- Before you construct the cURL request, generate the
code_challengefrom acode_verifier. You'll need to use thecode_challengevalue in the request. Generating thecode_challengefrom acode_verifieris the standard mechanism defined by the OAuth 2.0 PKCE specification. To generate thecode_challengefrom acode_verifier, follow these steps:- Encode the
code_verifieras UTF-8 bytes. - Compute the
SHA-256hash of those bytes. - Base64URL-encode the hash (replacing
+with-,/with_, and removing any trailing=padding).
For example, the following Python code generates thecode_challenge:
The code generates theimport hashlib import base64 def generate_code_challenge(code_verifier: str) -> str: digest = hashlib.sha256(code_verifier.encode("utf-8")).digest() return base64.urlsafe_b64encode(digest).decode("ascii").rstrip("=") code_verifier = "dBjftJeZ4CVP-mB92K27uhbUJU1p1r_wW1gFWFOEjXk" print(generate_code_challenge(code_verifier))code_challengevalue. Use this value in the next step when you send the authorization request. Use thecode_verifiervalue in step d when you send the token request. The authorization server validates thecode_verifieragainst thecode_challengebefore issuing the access token. - Encode the
- Open a browser and send a request to obtain the
authorization code using this URL:
The browser gets redirected to the <redirect URL> specified in the confidential application. In the URL path, you can find the authorization code as a value in thehttps://<identity domain URL>/oauth2/v1/authorize?response_type=code&client_id=<clientid>&redirect_uri=<redirect url>&scope=<scope>&code_challenge_method=S256&code_challenge=<BASE64URL-ENCODE(SHA256(ASCII(code_verifier)))>codequery parameter. Copy the authorization code for use later in step d. - Launch the command prompt.
- Enter the cURL command below, replacing the text in
angle brackets ( < > ) with the appropriate
values:
curl --request POST "https://<identity domain URL>/oauth2/v1/token" -H "Content-Type: application/x-www-form-urlencoded;charset=UTF-8" -d "grant_type=authorization_code&code=<authorization_code>&redirect_uri=<redirect_url>&code_verifier=<code_verifier>&client_id=<mobile_application_client_id>" - You can expect the response in a format as shown
here:
Status: 200 "access_token":"eyJ4NXQiOiI4Wk. . ." "token":"Bearer", "expires_in":3600 - Copy the value displayed for
access_token. This is the token you'll need to request access to the resources.
- Access the resource using the access token.
In Postman, click Use Token to use the token (auto-fill the Token field) and access the resources from the resource server. Or, if you used the cURL command in the previous step, you could continue with the command prompt to send the REST request and get access to the resources. You'd need to structure your request as shown here:
Note that the Authorization header is set to Bearer token and you'd provide the access token retrieved earlier as its value.curl –-request GET "https://<REST API endpoint URL>" -H "Content-Type:<as needed by your REST endpoint, such as, application/json>" -H "Authorization: Bearer <access_token>"
Configure OAuth Using User Assertion Grant Type (Supported for Fusion Applications and Spectra)
If you're setting up an application that's going to process requests on behalf of a user without requiring the user’s credentials, but needs to use the user permissions in the requests, you can use the User Assertion grant type to set up a 2-legged OAuth flow. In this scenario, the client creates or obtains a signed JWT user assertion that contains the user identity and presents it to the authorization server for validation, without requiring any interaction from the user. Let's look at how to set it up in the application.
Caution:
Never change the name of the OAuth token issuer.Note:
This procedure focuses only on the fields and data entry points essential for the configuration. You can ignore and skip any other fields on the UI that aren't mentioned here. Where relevant, instructions to skip the fields are included in the procedure.- Create an application that allows users to access the resources.
- Sign in to the identity domain as an Administrator.
- From the list of identity domains, click Integrated applications and click Add application.
- On the Add application page, select Confidential Application and click Launch workflow.
- On the Add Confidential Application page, enter a name for the application that you're adding.
- Skip all other fields and click Submit.
- In the OAuth Configuration section, select Edit OAuth and select Configure this application as a client now to proceed with the client configuration settings. Because you're creating a client application, only this option is relevant.
- In the Authorization section, select the JWT assertion checkbox to specify the grant type.
- In the Client type section, select Trusted. A trusted client is allowed to request access tokens using a signed JWT assertion.
- Select Import Certificate and select the public
signing certificate that matches the private key used to sign the JWT
assertion.
Note:
While importing the certificate, set the certificate alias to match the Key Identifier (kid) value used in the JWT assertion header. - Skip the next few fields and go to the Token issuance policy section.
- In Authorized resources, select specific so that the user is granted access only to the specific resources.
- Add resources for your product.
- Turn on Add resources to include the resources that are accessible to the users.
- In the Resources subsection, click Add scope.
- On the Add scope dialog box, select the applications containing the
resources, and click Add. The resources are
added. You'll notice that the scope defined by your application
administrator is available in the format:
<resource audience
                                name><resource scope name>
. - Review the added resources. If you don't need any resource, select and click Remove to exclude it from the scope.
- Complete application creation and activate the application.
- Go to the Actions menu and select Activate. A confirmation message appears asking for a confirmation to activate the application.
- Click Activate application. The confidential application is activated and ready for use.
- Request an access token. You can do so using a client application such as
Postman or a cURL command. Let's look at both these options.
Note:
The procedures require a valid signed JWT user assertion and a valid signed JWT client assertion. The user assertion is used as the authorization grant to obtain an OAuth access token, while the client assertion is used to authenticate the client application. Oracle recommends using a client assertion instead of a client secret because client assertions provide stronger authentication, reduce the risks associated with shared secrets, and simplify secure key management in enterprise environments. The processes for obtaining the user assertion and client assertion are outside the scope of this document. It's assumed that you already have both assertions.Using Postman Using cURL - In Postman, create a new request.
- Set the request method to POST and enter the token
endpoint URL:
 https://<identity domain
                                                  URL>/oauth2/v1/token
. - On the Authorization tab, select No Auth as the Authorization Type.
- On the Headers tab, select Content-Type as the key and application/x-www-form-urlencoded as its value.
- On the Body tab, select
x-www-form-urlencoded and
add the required form fields along with the
values:
Key Value grant_typeurn:ietf:params:oauth:grant-type:jwt-bearerassertionThe user assertion token scopeThe client scope defined in the confidential application client_assertion_typeurn:ietf:params:oauth:client-assertion-type:jwt-bearerclient_assertionThe signed client assertion JWT - Click Get New Access Token. Postman passes the information to the identity domain for authentication and receives the access token.
- Launch the command prompt.
- Enter the cURL command below, replacing the text in
angle brackets ( < > ) with the appropriate
values:
curl --request POST "https://<identity domain URL>/oauth2/v1/token" -H "Content-Type: application/x-www-form-urlencoded;charset=UTF-8" -d "grant_type=urn:ietf:params:oauth:grant-type:jwt-bearer&assertion=<user_assertion_token>&scope=<scope>&client_assertion_type=urn:ietf:params:oauth:client-assertion-type:jwt-bearer&client_assertion=<client_assertion_JWT>" - You can expect the response in a format as shown
here:
Status: 200 "access_token":"eyJ4NXQiOiI4Wk. . ." "token":"Bearer", "expires_in":3600 - Copy the value displayed for
access_token. This is the token you'll need to request access to the resources.
- Access the resource on the resource server using the access token.
In Postman, create a new request with Bearer Token as the authentication type and paste the obtained access token in the Token field. Or, if you used the cURL command in the previous step, you could continue with the command prompt to send the REST request and get access to the resources. You'd need to structure your request as shown here:
Note that the Authorization header is set to Bearer token and you'd provide the access token retrieved earlier as its value.curl --request GET "https://<REST API endpoint URL>" -H "Content-Type:<as needed by your REST endpoint, such as application/json>" -H "Authorization: Bearer <access_token>"
Configure OAuth Using Client Credentials Grant Type (Supported only for Spectra)
If you're setting up an application that processes requests without any user intervention and doesn't require user-delegated permissions, you can use the Client Credentials grant type to implement a 2-legged OAuth flow. In this scenario, the application securely stores its private key and uses it to generate a signed client assertion, which the authorization server validates to authenticate the client without requiring any user interaction. This setup is typically recommended for client-server interactions that handle automated, application-level requests. Let's look at how to set it up in the application.
Caution:
Never change the name of the OAuth token issuer.Note:
This procedure focuses only on the fields and data entry points essential for the configuration. You can ignore and skip any other fields on the UI that aren't mentioned here. Where relevant, instructions to skip the fields are included in the procedure.- Create an application that allows users to access the resources.
- Sign in to the identity domain as an Administrator.
- From the list of identity domains, select Integrated applications and select Add application.
- On the Add application page, select Confidential Application and select Launch workflow.
- On the Add Confidential Application page, enter a name for the application that you're adding.
- Skip all other fields and click Submit.
- In the OAuth Configuration section, select Edit OAuth and select Configure this application as a client now to proceed with the client configuration settings. Because you're creating a client application, only this option is relevant.
- In the Authorization section, select the Client credentials checkbox to specify the grant type.
- In the Client type section, select Trusted. A trusted client is allowed to request access tokens using a signed JWT assertion.
- Click Import Certificate and select the public
signing certificate that matches the private key used to sign the JWT
assertion.
Note:
While importing the certificate, set the certificate alias to match the Key Identifier (kid) value used in the JWT assertion header. - Skip the next few fields and go to the Token issuance policy section.
- In Authorized resources, select specific so that the user is granted access only to the specific resources.
- Add resources for your product.
- Turn on Add resources to include the resources that are accessible to the users.
- In the Resources subsection, click Add scope.
- On the Add scope dialog box, select the applications containing the
resources, and click Add. The resources are
added. The scope defined by your application administrator appears in
the format:
<resource primary audience><resource
                                scope>
. - Review the added resources. If you don't need any resource, select and click Remove to exclude it from the scope.
- Complete application creation and activate the application.
- Go to the Actions menu and select Activate. A confirmation message appears asking for a confirmation to activate the application.
- Select Activate application. The confidential application is activated and ready for use.
- Request an access token. You can do so using a client application such as
Postman or a cURL command. Let's look at both these options.
Note:
The procedures use the client assertion. Oracle recommends using client assertion instead of client secret because client assertions provide stronger authentication, reduce the risk associated with shared secrets, and simplify secure key management in enterprise environments. The process of obtaining the client assertion token is outside the scope of this document. It's assumed that you already have a valid signed JWT client assertion.Using Postman Using cURL - In Postman, create a new request.
- On the Authorization tab, select OAuth 2.0 as the Authorization Type.
- In the Configure New Token section, enter the
following client configuration:
- Token Name: Enter a generic name for the token.
- Grant Type: Select Client Credentials.
- Access Token URL: The IDCS URL appended
with
/oauth2/v1/tokenis used as the Access Token URL. You can get the URLs fromhttps://idcs-<idcs-id>.identity.oraclecloud.com/.well-known/idcs-configuration. - Client ID: Enter the Client ID value that was generated after creating the confidential application.
- Scope: Mention the scope defined in the confidential application.
- Client Authentication: Select Send client credentials in body.
- In the Advanced section, go to the Token
Request fields and add the client
assertion details.
Key Value Send In client_assertion_typeurn:ietf:params:oauth:client-assertion-type:jwt-bearerRequest body client_assertionThe signed client assertion JWT Request body - Click Get New Access Token. Postman passes the information to the identity domain for authentication and receives the access token.
- Launch the command prompt.
- Enter the cURL command below, replacing the text in
angle brackets ( < > ) with the appropriate
values:
curl --request POST "https://<identity domain URL>/oauth2/v1/token" -H "Content-Type: application/x-www-form-urlencoded;charset=UTF-8" -d "grant_type=client_credentials&scope=<scope>&client_id=<client_id>&client_assertion_type=urn:ietf:params:oauth:client-assertion-type:jwt-bearer&client_assertion=<client_assertion_JWT>" - You can expect the response in a format as shown
here:
Status: 200 "access_token":"eyJ4NXQiOiI4Wk. . ." "token":"Bearer", "expires_in":3600 - Copy the value displayed for
access_token. This is the token you'll need to request access to the resources.
- Access the resource using the access token.
In Postman, click Use Token to use the token (auto-fill the Token field) and access the resources from the resource server. Or, if you used the cURL command in the previous step, you could continue with the command prompt to send the REST request and get access to the resources. You'd need to structure your request as shown here:
Note that the Authorization header is set to Bearer token and you'd provide the access token retrieved earlier as its value.curl --request GET "https://<REST API endpoint URL>" -H "Content-Type:<as needed by your REST endpoint, such as application/json>" -H "Authorization: Bearer <access_token>"