Configure the Page Template Header
In this section, you configure the search page title, which currently displays the default content.
- Open the manage-orders page.
- If it's not already selected, in the Page Designer's Structure view, select
Welcome Page Template so that you can see its
properties in the Properties pane.

- Set the default value for the page title. The value for the page title is held
in a variable.
- In the Properties pane, All tab, find the Page Title field.
- Hover over the Page Title field and select the Make String
Translatable globe icon.

- In the Translatable String dialog box, make sure that the Use Existing option is selected.
- In the Search for existing string field, enter
page in the search filter, and select the
entry found.
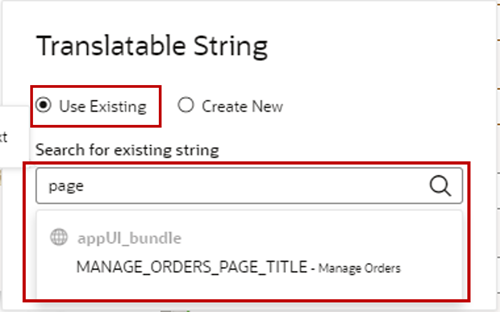
- Click Use.
 The Page Title field displays the string value of the referenced translation bundle entry. You should be able to see the Manage Orders page title.
 Note: If you don't see the Manage Orders page title, or the Properties pane doesn't match what you see here, try to refresh the browser.
- Upload a new background and foreground graphic for the page header to replace
the default images.
- Right-click and save the following image as
illust-welcome-banner-bg-04.png. The image is
transparent, so it looks blank, but serves as the background
graphic.

- Right-click and save the following image as
illust-welcome-banner-fg-04.png.

- In the AppUI pane, expand Resources.
You see a list of Resource folders.
- Click the + icon next to
images. The Import Resources window displays.

- Drag and drop the first image that you downloaded and click Import, or you can click inside the Drag and Drop field to select the image from your files and click Import.
- Repeat the previous step for the second image.
- Right-click and save the following image as
illust-welcome-banner-bg-04.png. The image is
transparent, so it looks blank, but serves as the background
graphic.
- Make the images available as variables.
- On the manage-orders tab, click the Variables subtab.
- Click + Variable to add a variable.
- Enter fgImage in the ID field. Leave type as String.
- Click Create & New to save this one and easily add a variable for the second image.
- Enter bgImage in the ID field. Leave type as String.
- Click Create.

- Select the bgImage variable, and in the Properties pane, find Default Value.
- Enter oj-ux-icon/illust-welcome-banner-bg-04.png
in the Default Value field.

- Select the fgImage variable, and in the Properties pane, find Default Value.
- Enter oj-ux-icon/illust-welcome-banner-fg-04.png in the Default Value field.
- Add the image variables to the page properties.
- Click the Page Designer tab to view your page.
- Select the Welcome Page Template component in the Structure pane.
- Select the All tab of the Propeties pane.
- Enter [[ require.toUrl($variables.bgImage) ]] in the Illustration background source URL field.
- Enter [[ require.toUrl($variables.fgImage) ]] in the Illustration foreground source URL field.
-
Click Live to see your app in Live mode.