How do I configure Oracle Address, Email, and Phone Verification service?
You can configure Oracle Address, Email, and Phone Verification by completing the following tasks:
-
Setup Your Account.
-
Create Users.
-
Configure the Manage Integration with Oracle Verification Service task in the application.
-
Configure Manage Administrator Profile Values task in the application.
Set Up Your Account
Complete these steps to setup your account for Oracle Address, Email, and Phone Verification:
-
Subscribe to Oracle Address, Email, and Phone Verification:
-
Log on to the Oracle Cloud Application Console at https://cloud.oracle.com/sign-in. In case you don't yet have an Oracle Cloud account, you can sign up for Oracle Cloud.
-
Purchase a subscription account for Oracle Address, Email, and Phone Verification.
-
-
Add subscription to your Oracle Cloud account.
You'll receive an email titled “Action Required: Welcome to New Oracle Cloud Service Subscription(s).” Follow the instructions in the email:
-
If you have an Oracle Cloud account, then click the Add to existing cloud account button. We recommend using your existing Oracle Cloud account to manage all your Oracle services.
- Specify your cloud Tenant name and click Continue
- Specify your username and password and click Sign
In.
The Add Subscription page is displayed.
- Add the new subscription to your tenancy. This page indicates the
subscription name, subscription ID, and subscription description (with
product SKU).Note: Adding a subscription to a tenancy can't be done.
-
If you're a new customer, then click the Create new cloud account button. The New Cloud Account Information sign up form is displayed.
- Specify your First name, Last name, and Email address. The email address is also the username for signing into the account. The person you specify here is the first administrator who can access the account and can create other users. This role also has full administrator permissions in your account.
- Specify a password and confirm.
- Specify a Tenancy Name. This is also called your cloud account name.
When choosing a tenancy name, note the following:
- The tenancy name or cloud account name is used to identify your
account. The name is also used to create the URLs to access your
cloud services. For example, if you call your tenancy "abccorp", an
application URL might look
like:
https://abccorp-oracleservice.service.us.phoenix-1.ocs
- The tenancy name must be unique, start with a lowercase letter and have no more than 25 lowercase letters or numbers. You can't use spaces or special characters.
- The tenancy name or cloud account name is used to identify your
account. The name is also used to create the URLs to access your
cloud services. For example, if you call your tenancy "abccorp", an
application URL might look
like:
- Select a Home region where your services will be hosted.Note: Your home region is the geographic location where your account and identity resources will be created. You can't change this after signing up. If you are not sure which region to select as your home region, contact your sales representative before you create your account.
- Read the terms of use and click Create Tenancy.
-
-
Create the Data Environment.
You'll receive a another email titled “Get Started Now with Oracle Cloud”. Click the Sign In button in the email. The Create environment page is displayed.- Specify the cloud account name, credentials that you provided while creating cloud account and click Create.
- On the Create environment page, specify the admin email and click
Create.Note: Ensure that you don’t select the Update option.
A page containing the environment information is displayed.
- Click the environment name to view the environment details.
- Copy the Service console URL from the Environment information tab and other links you need from the Additional links tab.
- Create the OAuth client credentials as follows:
- In the Oracle Cloud Console home page, login to your cloud account.
- Click .
- On the User Management page, click the link on the message that the page is part of the new identity and access management experience.
- Click Integrated applications and click Add application.
- On the Add application popup, select Confidential Application and then click Launch app catalog.
- Type the name on the Add Confidential Application and click Next.
- On the Client configuration section, select Configure this application as a client now and select Resource Owner, Client credentials, and Refresh token options.
- Click Next.
- On the Web tier policy page, click Finish. You are now directed back to your application's Cloud Console.
- Scroll up and click the Activate button.
- Click the Activate application on the Activate application popup.
Note: For any integration or using Oracle Cloud service with Address, Email, and Phone Verification APIs, you require the client credentials. Use these steps:- Scroll down to the General Information section and copy the Client ID.
- Click Show secret in the Client secret section.
- Click the Copy link in the Client secret popup and click Close to copy the password.
Create Users
As part of creating users, you need to create administrators and application users.
Here is how you can go about creating administrators:
-
Log in as the Account Administrator to My Account.
-
Assign a Service Administrator (to monitor the service) and an Identity Administrator (to manage users).
Here is how you can go about creating application users:
-
Log in as the Identity Administrator to the Oracle Cloud Applications Console.
-
On the Users page, click Add.
-
Enter the data center where Oracle Address, Email, and Phone Verification is located, your identity domain and your temporary password. This information is listed in your Welcome e-mail. If you can't find this e-mail, the account administrator can resend it from My Account.
-
Expand the Advanced Roles section, and add the Data Service Client AppID role for this user.
-
Click Add to create this user.
If the new users don't already have a password for this domain, they get an e-mail with a temporary password. They can reset the password in the Oracle Cloud console. (The user now has credentials, but still needs to know the service URLs to log on. The Service administrator or the Identity administrator can provide this from the Welcome e-mail.)
Configure Customer Data Management Cloud to Verification Services Integration
Complete these steps to configure Customer Data Management Cloud to Data Cloud Integration:
-
Sign in to Customer Data Management Cloud as a setup user.
-
Navigate to Setup and Maintenance.
-
Click the Tasks side panel to open it, and click Search.
-
Search for and go to the task: Manage Integration with Oracle Verification Services.
-
Enter the following information on the Manage Integration with Oracle Verification Services page:
Select OAuth Authentication.
For information about adding a confidential application and getting the Client ID and Secret, see Add a Confidential Application topic in the Administering Oracle Identity Cloud Service guide.
Note:On the Client page of the Add Confidential Application wizard, in the Authorization section, select Resource Owner, Client Credentials, Authorization Code, and Refresh Token as Allowed Grant Types. Leave Redirect URL blank.
Note:We strongly recommend that you use OAuth authentication method because Basic authentication isn’t supported in later releases. If you use Basic Authentication, don't include the question mark special character (?) in the password. For URL, remove /data/ui from the end of the instance address listed in your Welcome email and in the Cloud Console.
For URL, remove /data/ui from the end of the instance address listed in your Welcome email and in the Cloud Console.
For example, https://mydataservice-myidentitydomain.data.us2.oraclecloud.com.
-
Click Save and Close.
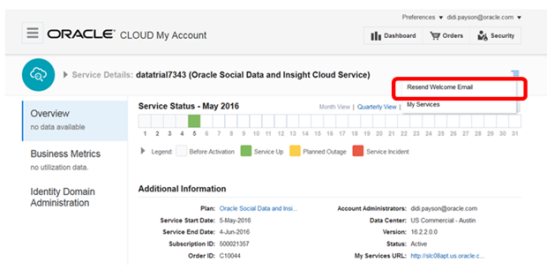
Requesting the Welcome E-mail to be Resent
Setup steps for this service are sent through a welcome e-mail to the customer when the license is purchased. If the Oracle Address, Email, and Phone Verification URL is missing and the customer administrator has already activated the service, then the customer administrator can request resend of the Welcome e-mail by going to http://cloud.oracle.com > My Account (see the following figure).
However, if the customer administrator didn't receive a welcome e-mail with links to activate the service, then the customer will have to log a service request to have Oracle Support resend the welcome e-mail so that the customer administrator can activate the service. Instructions on how to log a service request and the Customer Support Identifier associated to the service request are described in the FAQ section of Getting Started with Oracle Cloud in the Help Center.
Manage Administrator Profile Values
Complete the following steps to manage administrator profile values:
-
Navigate to Setup and Maintenance.
-
Search for and go to the Manage Administrator Profile Values task.
-
Enter DAAS_PRODUCTION_MODE as the Profile Option Code on the Manage Administrator Profile Values page.
-
Click Search. The specified Profile Option appears as the search result.
-
Make sure that theProfile Level is Site and the Profile Value is set to No.
Note:Don't set the Profile Level Site value to Yes. The only supported value today is No.
-
Click Save and Close.
The integration between Oracle Address, Email, and Phone Verification and Oracle Customer Data Management Cloud is now complete.
You can find more information about Oracle Address, Email, and Phone Verification in the Using Oracle Address, Email, and Phone Verification guide.