Manage Address Cleansing Configurations
Address cleansing configuration maps the Customer Data Management application address attributes to Oracle Address, Email, and Phone Verification attributes.
As part of managing an address cleansing configuration, you can:
-
Use the predefined address cleansing configuration shipped ready-to-use with the application.
-
Adapt the predefined address cleansing configuration to your address cleansing requirements by duplicating and editing it.
Copy a Predefined Address Cleansing Configuration
To copy or make a duplicate of a predefined address cleansing configuration, complete these steps:
-
Sign is as a setup user having the role Master Data Management Applications Administrator.
-
Open the Manage Address Cleansing Configurations task from the implementation project. Alternatively, in the Setup and Maintenance work area, go to the following:
-
Offering: Customer Data Management
-
Functional Area: Data Quality Foundation
-
Task: Manage Address Cleansing Configurations
-
-
Select the Address Cleansing configuration, and click Duplicate.
-
Enter a name, such as Vision Corp. Address Cleansing Configuration, in the Name field. In case you don't enter a unique name, the application defaults the auto-generated configuration code for example, C1_DQ_SEED_LOC_CLEANSE, as the name.
-
Click Save.
Adapt a Copy of the Predefined Address Cleansing Configuration
To edit a copy of the predefined address cleansing configuration to your cleansing requirements, you need to:
You can't edit a predefined address cleansing configuration. You can only make a copy of it and edit it by following this procedure.
-
Sign in as a setup user having the role Master Data Management Applications Administrator.
-
Open the Address Cleansing Configurations task from the implementation project. Alternatively, in the Setup and Maintenance work area, go to the following.
-
Offering: Customer Data Management
-
Functional Area: Data Quality Foundation
-
Task: Manage Address Cleansing Configurations
-
-
Select the copy of the predefined Address Cleansing configuration that you created earlier, in our example, Vision Corp. Address Cleansing Configuration, and click Edit. The Edit EDQ Cleansing configuration page appears.
Note that the Usage option is set to Both, which indicates that configuration makes Address Cleansing available real-time in the UI when creating or editing Organizations (Accounts) or Persons (Contacts), as well as for batch matching.
-
Select the Active check box to activate your copy of the address cleansing configuration, Vision Corp. Address Cleansing Configuration.
By default, the predefined configurations are set to active. If there are copies of the predefined configurations, then you can set any of them to active by selecting the Active check box.
Note:You can activate only one configuration at a time. You must rebuild the keys when you activate a configuration.
-
Click Yes in the warning dialog box to activate this configuration.
-
In the Cleansing Attributes Mapping section, to modify the existing mapping, change the mapping between Oracle Address, Email, and Phone Verification attribute and address attribute to your business requirements by selecting appropriate attributes from the Address Attribute drop down.
For more information about mapping cleansing attributes, see the topic How You Map Address Cleansing Attributes.
-
In the Cleansing Configuration Parameters section, you can carry out the given tasks:
-
In the Default Country drop-down list, select the relevant country name. In our case study it's United States.
-
In the Output Casing drop-down list, select Upper Case to print the addresses in upper case.
-
In the Minimum Verification Level drop-down list, select
5-Verifiedto Delivery Point or PostBox Level. -
In the Minimum Verification Score drop-down list, select 80.
-
If you're configuring real-time processing, select Search or Verify for Processing Mode. This option isn't available for batch processing.
-
Select the Correct Partially Verified Addresses.
-
Select the Correct Ambiguous Addresses.
-
Select Return Verified Address in Native Script to display verified addresses in the language native to the country selected in sub step a.
For more information, let's see the topic How You Define Address Cleansing Configuration Parameters.
-
-
Click Save.
-
Review Configuration Results.
For more information, let's see the topic Reviewing Matching Configuration Results.
-
Click Save and Close.
How You Map Address Cleansing Attributes
An Address Cleansing configuration comes with the following two sets of attributes:
-
Address Attribute: The application attribute used to describe the address submitted for address cleansing.
-
DaaS Attribute: The Oracle Address, Email, and Phone Verification attribute that's mapped with the application address attribute for cleansing.
You can determine which Oracle Address, Email, and Phone Verification Attribute you want to map to an Address Attribute depending on your address cleansing requirements. A Oracle Address, Email, and Phone Verification attribute is used to describe a distinct item of information that relates to a record. For example a City attribute might describe the city details of a customer record. Once the mapping is established, the input address is verified, and cleansed.
How You Define Cleansing Configuration Parameters
Cleansing configuration parameters are system-level parameters that control aspects of the data quality cleansing services. An address cleansing configuration includes both real-time and batch cleansing configuration parameters.
These parameters control real-time and batch address cleansing, standardization, and validation operations for a subset or all of the address records in the database, or as part of a data import process. The following table describes theses parameters and provides the supported parameter values where applicable.
|
Parameter |
Description |
Parameter Value |
|---|---|---|
|
Default Country |
Used to specify the country to cleanse the address, if no identifiable country can be found in an input address. |
|
|
Output Casing |
Used to specify the letter case for an output address. |
|
|
Minimum Verification Level |
Used to specify the level of verification to which the input data matches the available reference data during the verification process. Ranges from Verified to Administrative Area Level to Verified to Delivery Point, or Postbox level. |
Note:
The higher the value, the more precise is the address. For a description of what each level means, see the topic: Notes on Minimum Verification Levels. |
|
Minimum Verification Score |
Used to specify the similarity between the input address and closest reference data match as a percentage between 0 (no match) and 100 (perfect match). |
|
|
Correct Partially Verified Addresses |
Determines if you want to correct the addresses that you entered. |
|
|
Correct Ambiguous Addresses |
Determines if you want to correct the address that you entered if it's unclear and resolve it to the correct address. |
|
|
Processing Mode |
Use Verify mode to see the verified addresses. The Address Verification usage counter increases when you use the Verify mode. Use Search mode to get a list of verified addresses from which you can select the correct address. |
|
Notes on Minimum Verification Levels
The verification level sets the level at which the input data is verified against the available reference data during the verification process. The 'post processed verification level achieved after standardization and parsing of the input address, is used as the second character of the Accuracy Code returned by the Address Verification processor.
Here's a table that lists the possible verification levels. The maximum verification level that it's possible to reach varies by country. For information on the maximum level in each country, see the Oracle Portal website at: http://www.loqate.com/oracle
|
Verification Level |
Description |
|---|---|
|
1 |
Verified to Administrative Area (State, Region or County) level |
|
2 |
Verified to Locality (City or Town) level |
|
3 |
Verified to Thoroughfare (Street) level |
|
4 |
Verified to Premise (Building Number) level |
|
5 |
Verified to Delivery Point (Sub-Building Number) level |
Review Configuration Results
The Review Configuration Results option lets you check if the address attributes entered for cleansing in the Edit EDQ Cleansing Configuration page return the expected cleansed address. Here's a list of the cleaning configuration parameters that you can use to test the results:
-
Minimum Verification Level: Returns records based on the selected minimum verification level.
-
Minimum Verification Score: Returns records based on the selected minimum verification score.
-
Processing Mode: Use Search mode to search for valid addresses from Oracle Address, Email, and Phone Verification. If you use Verify mode, the Address Verification usage counter increases. In this mode, for every verified address the customer is charged.
You can review configuration results by completing the following steps:
-
Sign in as a setup user having the role Master Data Management Applications Administrator.
-
Open the Manage Address Cleansing Configurations task from the implementation project. Alternatively, in the Setup and Maintenance work area, go to the following.
-
Offering: Customer Data Management
-
Functional Area: Data Quality Foundation
-
Task: Manage Address Cleansing Configurations
-
-
Click the Review Configuration Results button on the Edit EDQ Cleansing Configuration page.
Clicking the Review Configurations Result button verifies your connection with the Oracle Address, Email, and Phone Verification server. Select the process mode as Search to see multiple valid address results and Verify to see the verified address.
-
Enter values for the Cleansing Configuration parameters as required.
-
Enter some sample address data into Review Configuration Results page:
-
Address 1: 100 Oracle Parkway
-
State: CA
-
Country: Redwood City
-
-
Click Find to verify whether the cleansed address record meets your expectations.
The following figure shows the Review Configurations Results page. 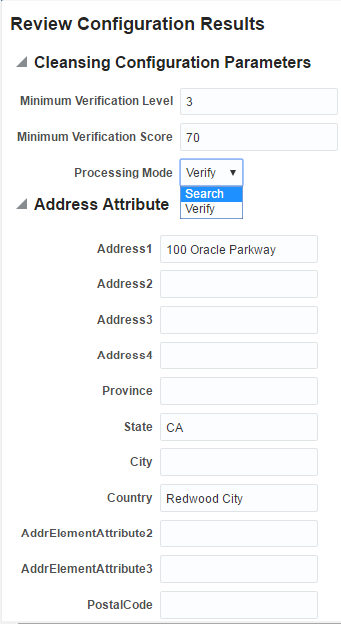
For more information about address cleansing configuration template, see Implementing Customer Data Management, Address Cleansing Setup, Address Cleansing Configurations.