Customize search pages
Agents spend a great deal of time searching for customer information. By customizing your search environment, you can make these searches more efficient.
One of the most common ways that an agent obtains customer information is through searches. Therefore, you may want to customize the search pages so that you can determine what an agent needs when obtaining pertinent information.
Before making any customizations, you should be familiar with how widgets are downloaded, created and added to the server. For detailed information on widgets, see Developing Widgets.
Note that the example code in this section is for illustrative purposes only; it is not intended to be production-ready, and may not adequately handle all possible use cases or implement the exact behavior you want.
Remove fields from a search page
The agent console can be modified so that it displays only certain search fields. The following information explains how to remove fields from a search page.
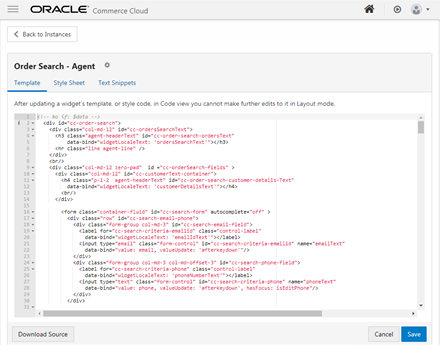
Remove a field using the code view screen on the Templates tab.

You can any add any number of fields using the code view, but only the fields that are supported by the Search API will display results. For example, to prevent the order ID field from displaying on the screen, you could remove the <div> with the ID “cc-search-criteria-id-field”, then save the code and publish it.
Add fields to a search page
Use the Oracle CX Commerce REST web services APIs to add customer properties to your search pages. See Extending Oracle Commerce Cloud for information you need to know before using the services.
To add a property, for example, myNewProperty, to the screen you must make changes to the widget’s JavaScript as well as the HTML template. For example, you can use the searchOrders endpoint to view a new property, paymentType, which you may want to add to the page to allow an agent to search for an order based on the type of payment used. The endpoints that you use for this example are:
/ccagent/v1/orders/serachOrders
/ccagent/v1/profiles/searchProfiles
/ccagent/v1/returnRequests/searchReturns
To make modifications to a widget, you must first download the widget. Then you make changes to the JavaScript and HTML template file. Once you have completed your changes, upload the widget. This upload process is described in detail in the Developing Widgets guide.
To modify the widget’s JavaScript:
- Identify the fields in the search API for the new field. For example,
paymentType. - In the widget’s JavaScript add a new observable in the
initOrderSearchCriteriaViewModelmethod.initOrderSearchCriteriaViewModel: function () { var self = this; self.accountNameSelected = ko.observableArray([]); self. paymentType = ko.observable(''); self.orderId = ko.observable(''); self.email = ko.observable(''); self.firstName = ko.observable(''); self.lastName = ko.observable(''); self.account = ko.observable(''); self.approver = ko.observable(''); self.selectedSite = ko.observable(''); self.selectedOrderState = ko.observable(''); self.skuId = ko.observable(''); self.productId = ko.observable(''); self.timeValueForLastOrders = ko.observable(''); self.timeUnitForLastOrders = ko.observable(''); self.phone = ko.observable(''); self.isEditPhone = ko.observable(false); self.isAdvancedSearch = ko.observable(false); self.timeUnits = []; - Clear the observable that was just added in the
resetBasicSearchfunction./** * Resets the basic search fields. */ resetBasicSearch: function() { this.orderId(''); this.email(''); this. paymentType (''); this.firstName(''); this.lastName(''); this.accountNameSelected([]); this.approver(''); this.selectedSite(''); this.selectedOrderState(''); this.timeValueForLastOrders(''); this.timeUnitForLastOrders(this.resources().days); this.skuId(''); this.productId(''); this.phone(''); - Modify the
getTextSearchCriteriafunction to include the newly added property for text search queries./** * Gets the Text search criteria. */ getTextSearchCriteria: function() { var self = this; var searchCriteria = self.getBasicSearchCriteria(); searchCriteria[CCConstants.LIMIT] = this.orderSearchViewModel. itemsPerPage; searchCriteria[CCConstants.REQUIRE_COUNT] = false; return searchCriteria; }, - Modify the
getSCIMSearchCriteriafunction to include the newly added property for SCIM search.getSCIMSearchCriteria: function() { var self = this; var data = {}; ... data.fields = "id,priceGroupId,siteId, paymentType, submittedDate,state,profile, priceInfo, payShippingInSecondaryCurrency,payTaxInSecondaryCurrency secondaryCurrencyCode,organization"; return data; }, - Modify the widget’s HTML template. To do this, add the required
<div>in the template, this can be done in any form whose ID iscc-search-form.
Note that the search API also supports search by dynamic properties. To add a dynamic property to the search screen, such as isVipMember, ensure that you follow the naming convention for the search criteria given in the order search API documentation.