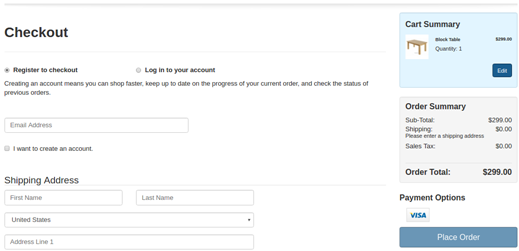
Example for restricting guest checkout
Preventing guest checkout is a two-step process involving disabling the guest checkout administration option and modifying the checkout UI on the storefront.
First, you must disable Guest Checkout on the Settings page in the Commerce administration interface. This sets the flag used for testing whether guest checkout is allowed. For details on how to set this flag, see Restrict guest checkout. Second, you must modify your storefront’s checkout UI to prevent anonymous shoppers from accessing check out features until they have logged in. For example, you might disable the Place Order button on the Checkout page until the shopper logs in. The specifics of modifying your checkout UI to restrict guest checkout vary with each storefront’s requirements. As such, a simple example has been provided to give you an understanding of how you can restrict access to the Place Order button until a shopper has logged in or agreed to create an account.
In the illustration below, the out-of-the-box Login-Checkout widget has been modified to replace the Checkout as Guest button with a Register to Checkout button. The Register to Checkout button has been selected but the I Want to Create an Account checkbox has not. This combination of settings indicates that the shopper is an anonymous shopper who does not yet have an account. For a storefront that restricts guest checkout, this combination of settings should result in a disabled Place Order button.

When the shopper enables the “I want to create an account” option, he is agreeing to become a registered shopper using the information he provides on the Checkout page. At this point, the Place Order button becomes enabled.

To create this UI, you first modify the Login – Checkout widget to introduce
ko if and ko ifnot bindings that check for whether the
guestCheckoutEnabled flag is true or false and then render the appropriate
radio button text (either “Checkout as guest” or “Register to checkout”) depending on the
state of the flag.
<!-- ko with: user -->
<div id="checkout-registration">
  <h2 data-bind="widgetLocaleText:'checkoutRegistrationText'"></h2>
  <hr>
  <fieldset id="checkoutOptions" data-bind="visible: !loggedIn()">
  <legend id="checkoutOptions-legend"
    data-bind="widgetLocaleText:'checkoutOption'"></legend>
  <div class="row">
    <div class="form-group">
      <div class="col-sm-6 col-lg-4 cc-checkoutRegistration-radio">
        <label class="radio"
           data-bind="attr:{ for: 'CC-checkoutRegistration-userOption-'+
           $parent.order().checkoutGuest() }">
          <input type="radio" class="form control" name="account"
              data-bind="value: $parent.order().checkoutGuest,
              attr:{ id: 'CC-checkoutRegistration-userOption-
              '+$parent.order().checkoutGuest() },
              checked: $parent.order().checkoutOption"/>
          <!-- ko if: $data.contextData.global.guestCheckoutEnabled -->
            <span data-bind="widgetLocaleText: 'checkoutAsGuestText'"></span>
          <!-- /ko -->
          <!-- ko ifnot: $data.contextData.global.guestCheckoutEnabled -->
            Register to checkout
          <!-- /ko -->
        </label>
      </div>
      <div class="col-sm-6 col-lg-8 cc-checkoutRegistration-radio">
        <label class="radio"
          data-bind="attr:{ for: 'CC-checkoutRegistration-userOption-
          '+$parent.order().checkoutLogin() }">
          <input type="radio" class="form control" name="account"
            data-bind="value: $parent.order().checkoutLogin,
            attr:{ id: 'CC-checkoutRegistration-userOption-
            '+$parent.order().checkoutLogin() },
            checked: $parent.order().checkoutOption"/>
           <span data-bind="widgetLocaleText: 'loginToAccountText'"></span>
        </label>
      </div>
    </div>
  </div>
  ...
  ...
Note: In the interest of simplicity, this example does not add a resource string for the “Register to checkout” label. To do that, you must download the widget, update the source files, and import the updated widget into Commerce.
Next, you modify the Order Summary – Checkout widget to update the
handleCreateOrder enable data-binding with logic that controls whether the
Place Order button is enabled or disabled, based on whether guest checkout is enabled and
whether the shopper is logged in:
...
<div id="CC-checkoutOrderSummary-placeOrder" class="checkout row">
    <button class="cc-button-primary col-xs-12"
        data-bind="click: handleCreateOrder,
        enable: (!user().contextData.global.guestCheckoutEnabled &&
        user().loggedIn() && order().enableOrderButton) ||
        (!user().contextData.global.guestCheckoutEnabled && !user().loggedIn()
        && order().enableOrderButton && order().createAccount) ||
        (user().contextData.global.guestCheckoutEnabled &&
        order().enableOrderButton)">
          <span data-bind="widgetLocaleText:'placeOrderText'"></span>
    </button>
</div>
...