Integrate with Customer Data Management
Integrate your Oracle Commerce environment with Oracle Customer Data Management.
Oracle Commerce can be configured to integrate with Oracle Customer Data Management (CDM), a cloud-based application for managing organizations and contacts. (CDM is also referred to as Oracle Engagement Manager or OEM.) CDM can store organization and contact records that are consolidated from several different applications deployed throughout your environment. You can use CDM to identify potential duplicate records and take the necessary actions to edit, remove or validate your data. For information on obtaining, installing and configuring CDM, refer to https://docs.oracle.com/en/cloud/saas/customer-data-management/20d/books.html.
Accounts, contacts and their relationships and addresses can be synchronized from CDM to Oracle Commerce. Similarly, accounts and contacts that are created either through self-registration or a delegated administrator can be synchronized with CDM in real time. The integration between Oracle Commerce and CDM occurs by both applications communicating through Oracle Integration Cloud (OIC), a cloud-based communication platform.
For information on obtaining, installing and configuring OIC, refer to https://docs.oracle.com/en/cloud/paas/integration-cloud/index.html.
- Synchronize in bulk or individually accounts that have been created or updated in Commerce to CDM in real time.
- Synchronize in bulk or individually contacts and profiles that have been created or updated in Commerce to CDM in real time. Additionally, you can associated contacts to an account during the synchronization process.
- Maintain organization hierarchy between synchronizations.
Steps and requirements for the integration
- An Oracle Commerce account and access to Oracle CX Commerce 21A or later.
- An Oracle Customer Data Management account and access to CDM 21A or later.
- An Oracle Integration Cloud (OIC) account and access to the Oracle Integration Cloud Service.
If you require one or more of these applications, please contact your Oracle sales representative: http://www.oracle.com/us/coporate/contact/index.html.
The integration is delivered as a .par file. To download and import the integration, perform the following:
- Open the integration package
OCC-OEC_Integration. - Import the package by logging into OIC as an admin user.
- Click the Packages button.
- Click the Import button.
- Click Browse to open the navigation pane.
- Select the
OCC-OEC_Integrationspackage. - Click Import.
The package is added to the packages list.
Understand integrations
The OCC-OEC_Integrations package contains three connections and six integrations.
- Oracle Customer Data Management (CDM), also known as Oracle Engagement Cloud (OEC) - You must provide a CDM Services Catalog URL and an Interface Catalog URL. You must also provide the
UsernameandPasswordfor access to the OEC. - Oracle Export Download - This connection is a REST API Base URL that requires a connection URL that points to the Bulk Export Activities resource. You must also provide the CDM
UsernameandPasswordfor access to CDM. - Oracle Commerce Cloud - This requires a connection to a Base URL as well as a security token.
The six integrations configured within the package are:
Bulk Profile Sync from OEC to Commerce
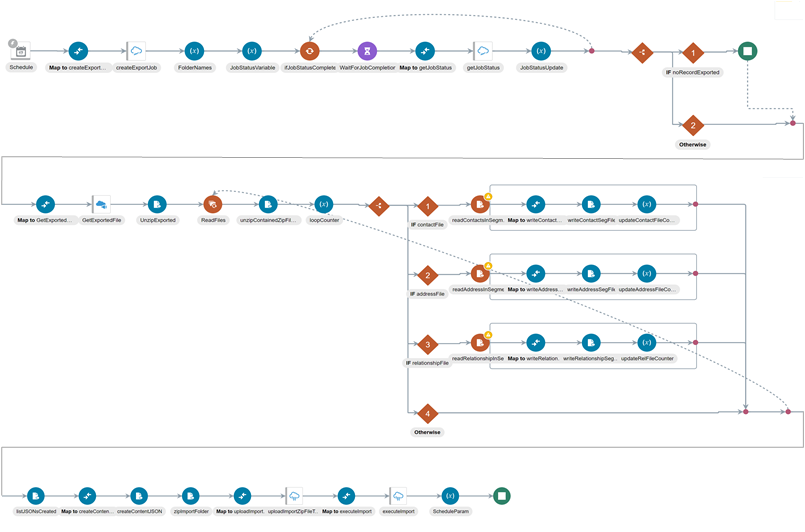
This scheduled flow synchronizes profiles in bulk from CDM to Commerce. The identifier is BULK_PROFILE_SYNC_OEC_TO_OCC.
When OEC encounters a file that contains more than 50 thousand records, it splits the records into multiple CSV files. However, the OIC integration does not support the conversion of multiple CSV files into JSON files. Should your export file contain more than 50 thousand records, it will be divided into multiple files, however these files will not be converted. To prevent this from occurring, ensure that you do not export more than 50 thousand records at a time.
You should also ensure that CDM is configured to store states using the abbreviated state format, such as CA or VT. This is required because Commerce stores the state values in the abbreviated format.
The following diagram shows the flow of the integration:

Bulk Account Sync from OEC to Commerce
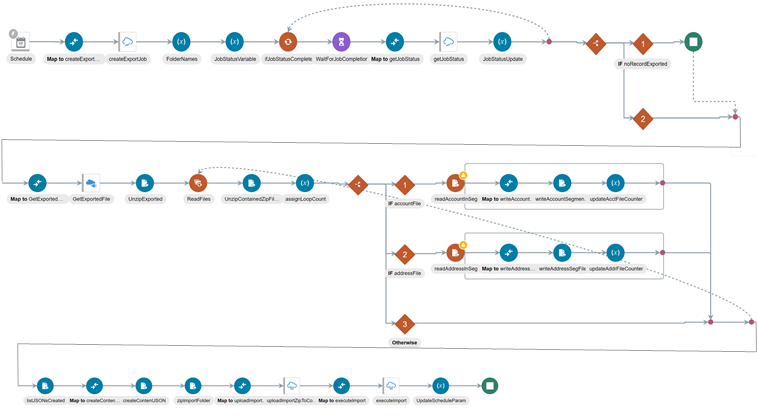
This scheduled flow synchronizes account data in bulk from CDM to Commerce. Its identifier is BULK_ACCOUNT_SYNC_OEC_TO_OCC. When you are synchronizing addresses, the primary address in CDM is marked as the default shipping address in Commerce.
Note that OEC supports multiple accounts with the same name. If a CSV file has to account records with the same name or email address, only the first instance will create a record, the second instance will then update the record. Therefore it is important that you define the appropriate restrictions in CDM to ensure that account names and profile email addresses are unique.
The following diagram shows the flow of the integration:

Create Account From Commerce to OEC
The following integrations perform individual synchronizations of things such as profiles, accounts and addresses. This event flow is triggered whenever an account is created in Commerce. It synchronizes the new account data with CDM. Its identifier is CREATE_ACCOUNT_OCCS_TO_OEC.
Note that when synchronizing account and contact data from Commerce to CDM, the default shipping address in Commerce is marked as the primary shipping address in CDM. Additionally, accounts that are synchronized from Commerce to OEC are marked as type = CUSTOMER in OEC.
Inherited attribute values are not synchronized to OEC. If an account is a sub-account and it inherits the Tax and DUNs values from its parent, these values are not synchronized, and the Tax and DUNs values will be set to NULL. This occurs because inheritance is not recognized in CDM. The integration uses the following architecture:

Create Profile sync from Commerce to OEC
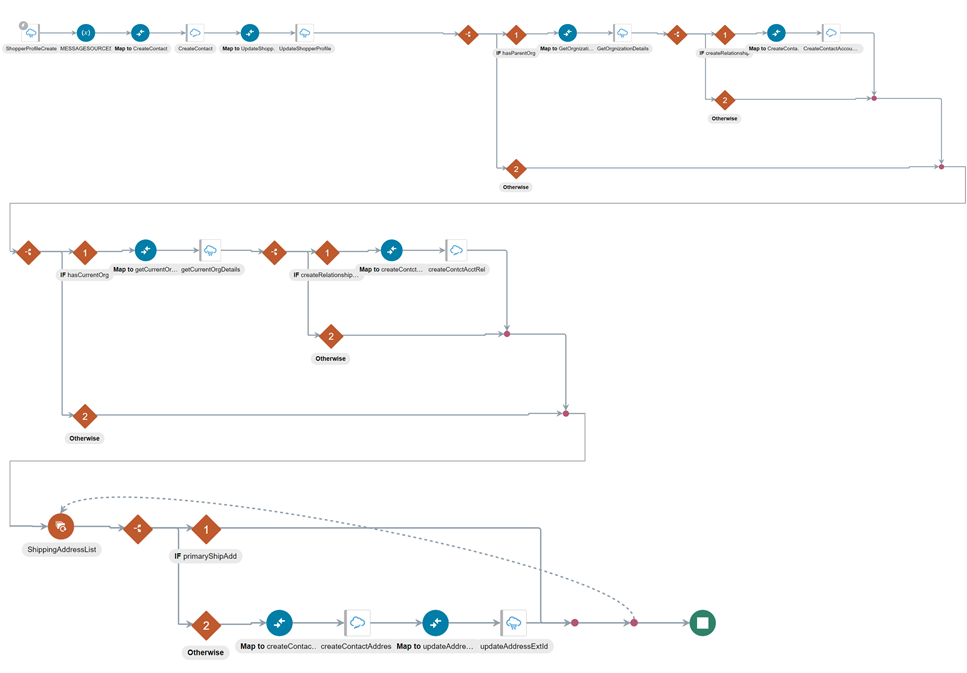
This even flow is triggered whenever a profile is created in Commerce. It synchronizes the new profile data with CDM. Its identifier is CREA_PROF_SYNC_FOM_OCC_TO_OEC.
This integration uses the following architecture:

Update Account From Commerce to OEC
This event flow is triggered whenever an account is updated in Commerce. It synchronizes the new account data with CDM. Its identifier is UPDATE_ACCOUNTS_OCC_TO_OEC.
Note that when synchronizing account and contact data from Commerce to CDM, the default shipping address in Commerce is marked as the primary shipping address in CDM. Additionally, accounts that are synchronized from Commerce to OEC are marked as type = CUSTOMER in OEC.
Update Profile sync from Commerce to OEC
This event flow is triggered whenever a profile is updated in CDM. It synchronizes the new profile data with Commerce. Its identifier is UPDA_PROF_SYNC_FROM_OCC_TO_OEC.
Understand account-based contact address synchronization
Commerce supports roles at the account-contact relationship level. However, CDM does not provide such a dynamic use of roles. Whenever an account or contact is synchronized from CDM to Commerce, the default role of Buyer is assigned to all relationships. Because of this, Commerce is unable to assign the Address Manager role and cannot assign addresses to account-based contacts who only have the role of Buyer.
Register the integration with Commerce and generate a security token
This integration uses the Commerce REST APIs to access Commerce data. You must register the integration within Commerce and generate a security token in order for the integration to be granted access to the data.
To generate a security token:
- Log into the Commerce administration interface.
- Click the Settings menu and select Web APIs.
- Click Registered Applications from the Web APIs panel.
- Click the Register Application button.
- Enter a name for the integration application. Create a meaningful name that reflects the purpose of the application.
- Click Save. The Application ID and Application Key are automatically generated and the application is added to the Registered Applications page.
- Click on the name of the application you created.
- Click on Reveal link to display application key. You can copy the application key to use as the security token for the Oracle Commerce Cloud connection.
For more information on managing an application within Commerce, refer to Register applications.
Configure the source system reference
Whenever contacts are synchronized from Commerce to CDM, a source system reference is required in CDM. Source system references allow you to identify the source of the data. When you create a source system code, ensure that it has a unique identifier.
Configure the source system code in OIC to pass the value to CDM as part of the integration flow. For information on setting up OIC mappings, refer to the OIC documentation.
To configure a Commerce system, log into your CDM application and perform the following steps:
- Navigate to the Setup and Maintenance tab.
- Select Customer Data Management from the Setup options.
- Select Trading Community Foundation. From there, select the Manage Trading Community Source Systems.
- Create a Commerce Cloud system with the code
COMMERCE_CLOUD. TheTypeof the code isSpoke. Provide a full name in the Name field, such as Oracle Commerce Cloud. Enable the code for Trading Community Members. - When you have finished, save your changes by publishing the sandbox by using the drop down menu to select Manage Sandboxes. Select the currently active sandbox and click Publish.
Configure the Commerce webhook
When an account or profile is created in Commerce, it is synced to OEC. These synchronizations are triggered by the account, shopper and CreateAnUpdate webhooks. The webhooks then trigger the integration workflows. You must configure the profile and account webhook to point to the correct URLs. Follow these steps to configure the webhooks in the Commerce administration interface:
- Log into the Commerce administration interface.
- Click the Settings icon.
- Click Web APIs and then click the Webhook tab.
- Click the
production-updateProfilewebhook. Provide the endpoint URL for the integration:
.../ic/api/integration/v1/flows/rest_oraclecommercecloud/ UPDA_PROF_SYNC_FROM_OCC_TO_OEC/1.0/
- Update the OIC
usernameandpasswordunder Basic Authorization. - Click the
production-registerProfilewebhook. Enter the integration endpoint URL in the URL box:
.../ic/api/integration/v1/flows/rest_oraclecommercecloud/CREA_PROF_SYNC_FROM_OCC_TO_OEC/1.0/
- Update the OIC
usernameandpasswordunder Basic Authorization. - Click the
production-createAccountwebhook. Enter the integration endpoint URL in the URL box:
.../ic/api/integration/v1/flows/rest_oraclecommercecloud/CREATE_ACCOUNT_OCCS_TO OEC/1.0/
- Update the OIC
usernameandpasswordunder Basic Authorization. - Click the
production-updateAccountwebhook. Enter the integration endpoint URL in the URL box:
.../ic/api/integration/v1/flows/rest_oraclecommercecloud/UPDATE_ACCOUNT_OCCS_TO_OEC/1.0/
- Update the OIC
usernameandpasswordunder Basic Authorization. - Click Save.
Configure the connections
Once you have installed the package, you must configure the connections used in the integration.
- Log in to OIC as an admin user.
- Select Integration and then Connections.
- Select Oracle Engagement Cloud. The Connection Properties dialog appears.
Enter the OEC Services Catalog URL and an Interface Catalog URL. The OEC Services Catalog URL is: https://hostname/fscmService/ServiceCatalogService?wsdl
The Interface Catalog URL is: https://hostname/helpProfalApi/otherResources/latest/interfaceCatalogs
- Enter the
UsernameandPasswordfor access to the OEC. - Enter the security token value, which you can find in the Commerce administration settings and click OK.
- Select OEC Export Download. The Connection Properties dialog appears.
- The
connection typefor this property isrestUrl.
Enter the connection URL that points to the Bulk Export Activities resource. For example, the URL would be: https://CDMServer/crmRestApi/resources/CDMServer/bulkExportActivities
or
https://CDMServer/crmRestApi/resources/latest/bulkExportActivities.
- Select Oracle Commerce Cloud.
- Enter the Connection base URL, which would be
https://CommerceHost/ccadmin/v1 - The security token is the application key created in Register the application and Create a security key.
- Enter the Connection base URL, which would be
Activate the integration flows
After you configure the Oracle CDM and Commerce connections, you must activate the integrations that were created when the integration package was imported to Oracle Integration Cloud. To do this, follow these steps:
- Log in to Oracle Integration Cloud (OIC) as an admin user.
- Click the Integrations icon to display the Integrations list.
- Click the Activate button for each of the following integrations:
Bulk Profile Sync from OEC to OCCBulk Account Sync from OEC to OCC– Note that activating both of these bulk integrations also requires creating a schedule that then runs the integration.Update Account From OEC to OCCUpdate Profile sync from OEC to OCCCreate Account From OCC to OECCreate Profile sync from OCC to OEC
OIC displays a message to indicate that the integration flow was successfully activated.
Mapping for CDM and Commerce
The following table shows the relationships between the CDM properties and the Commerce properties. For details on the properties, refer to each product's documentation:
| Property in CDM | Property in Commerce |
|---|---|
Account |
Account |
Address |
Address |
Address ID |
Id |
Address Line 1 |
address1 |
Address Line 2 |
address2 |
City |
city |
Country |
country |
DateOfBirth |
dateOfBirth |
DoNotEmailFlag |
not(receiveEmail) |
emailAddress |
email |
FirstName |
firstName |
LastName |
lastName |
MiddleName |
middleName |
Party Number |
Whenever an account, contact or address entity is synchronized between CDM and Commerce, the Party Number information is stored in externalOrganizationId property. The Party Number property also maps to the customerContactId and the externalAddressId properties.
|
PartyId (Generated automatically by CDM)
|
None |
Person |
Profile |
Postal Code |
postalCode |
Primary address
|
Default shipping address |
Primary contact |
Commerce accounts can have multiple contacts, and do not recognize a primary contact. |
Province |
None |
Relationship (account-account) |
Parent Organization |
Relationship (account-person of type contact) |
Contact, or Secondary Contact (There is no distinction between contact or secondary contact in CDM.)
|
SourceSystemReferenceValue |
profileId |
State |
state |