Taxonomy Manager
The Taxonomy Manager gives you complete control to maintain and update your taxonomy. You can add categories to any part of your 1st-party taxonomy (private or self-classification tree), and then seamlessly create rules that map your online, offline, and mobile data into your categories. You can make taxonomy updates one-by-one with the UI or batch your updates by uploading files.
In this topic
Taxonomy and classification overview
A taxonomy is a hierarchical tree structure that contains categories. Categories are groups of user profiles with similar behaviors and attributes. For example, there might be categories for coffee drinkers, video gamers, smartphone purchasers, frequent travelers, and so on. Rules map the user profile data extracted from your websites, mobile apps, and CRM files to your categories via key-value pairs called "phints".
Phints are passed into tags (and offline files) when customers, for example, visit product pages, browse items, add items to their carts, and complete purchases. The rules state which phints must be in the tag and where the tag must have been fired (denoted by a unique site ID) in order to classify the user into the category.
Consider a user that has purchased a smartphone from an online store (for example, "Supertronx", which has a site ID of 46506). The tag could have a "purchase=smartphone" phint for this user. When this phint is passed into a tag, it can be mapped to a Supertronx - Private > Purchased > Smartphone category via a rule that states "if item purchased is a smartphone AND the tag is fired from site 46506, then the add the user to the Smartphone category (in other words, add category ID 1086121 [Smartphone] to the user's profile). The following diagram illustrates how categories and rules are used to onboard your user data into your taxonomy.

Opening the Taxonomy Manager
To access the Taxonomy Manager, follow these steps:
- Log in to partner.bluekai.com.
-
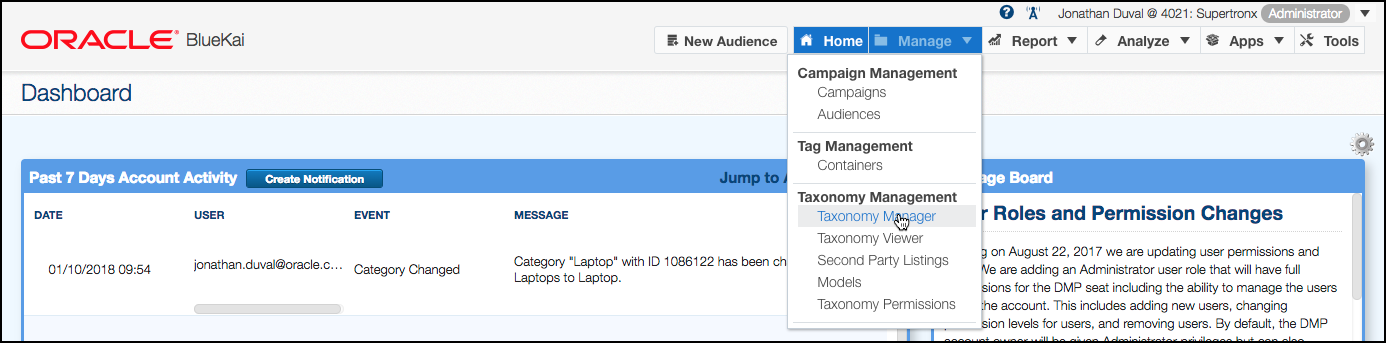
Select Manage > Taxonomy Manager (under Taxonomy Management).
-
The Taxonomy Manager opens.
-
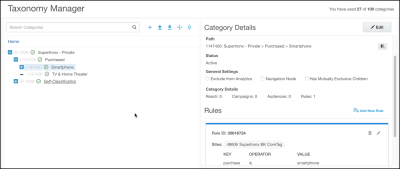
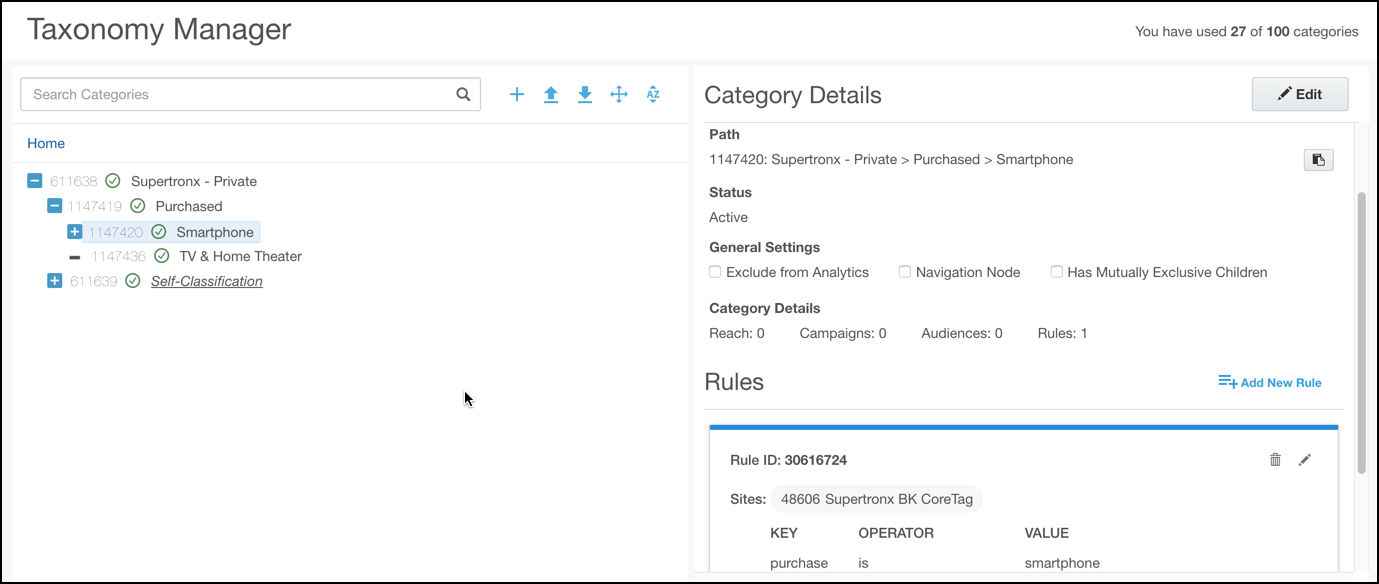
The Taxonomy Manager is divided into three sections: Taxonomy, Category Details, and Rules.
- Taxonomy. Contains your 1st-party category tree, and options for adding, downloading, uploading, moving, and sorting categories (also herein referred to as "nodes").
By default, your taxonomy includes a {PartnerName} - Private root node at the top, and it may include a Self-Classification node directly under this category. You cannot edit, rename, or move the Self-Classification category because it is a legacy node that is still used in many data ingest integrations. You can move any of the child categories from under the Self-Classification node to directly under the Private node.Navigating your Taxonomy. You can navigate the taxonomy tree by expanding and collapsing nodes, searching category names or IDs, and clicking on the breadcrumb path.
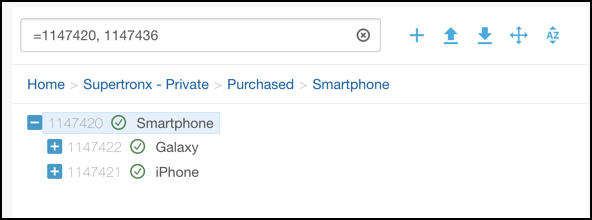
Search. To search for a category, enter its name or category ID (for example, "smartphone" or "1086121"). To search for multiple categories, enter the equals symbol (=) and then a comma-separated list of category IDs (for example, "=108621, 108629). Click the reset icon ( ) to clear the search and reset the tree.
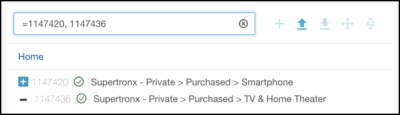
Breadcrumb Trail. When you click on a category from your search results, the breadcrumb above the tree denotes the full path of the selected category. You can click on any node in the path to navigate to it. For example, if you clicked on Laptop in the following example, you would get the path for the Laptop category. You could then click the Purchased category to temporarily make it the root node displayed in the tree, and the expand it to see its child categories.
- Category Details. Lists the all properties for the category currently selected in the tree, including the name, description, path, reach, and usage statistics.
- Rules. Lists all the classification rules associated with the category currently selected in the tree.
Category Limit. You can create up to the maximum number of categories that is specified in your contract. The upper-right hand corner of the Taxonomy Manager displays the current number of categories you have created. You cannot delete categories, but you can rename them and modify any associated rules if the categories are not actively being used in any audiences .
- Taxonomy. Contains your 1st-party category tree, and options for adding, downloading, uploading, moving, and sorting categories (also herein referred to as "nodes").
- You can use the Taxonomy Manager to do the following:

Adding categories
To add a single category to your taxonomy, follow these steps (to add multiple categories in bulk, see Adding and Editing Categories in Bulk (via Upload)):
- From the tree on the left, click the parent node to which the new category is to be added, and then click the Add icon (
 ).
).Private (Managed) Tree is now Accessible: You can now select any category in your tree, including those directly underneath the Private node. With the previous classification tool, you could only add categories to your Self-Classification tree.
- In the Category Details section, enter the following properties:
- Exclude from Analytics. Disables the inclusion of this category in Audience Analytics reports.
- Navigation Node. Limits the functionality of this category to a parent node that cannot store user profile data, accumulate inventory, or be added to audiences. A navigation node essentially functions as a folder for one or more child categories.
- Has Mutually Exclusive Children. Makes the child categories under this category mutually exclusive (only the most recently tagged child category is in the user's profile). You may only create a flat list of mutually exclusive child categories. Mutually exclusive categories may not have any child categories below them unless you mark the mutually exclusive categories as navigation-only nodes.
- Active. The category is published to your taxonomy. This means that it is visible in the Audience Builder and Taxonomy Viewer, may be added to audiences, and may be shared with other clients.
- Draft. The category is only visible in the Taxonomy Manager. It cannot be used in the Audience Builder or Taxonomy Viewer, and it cannot be shared.
- Click Save. To edit the category, click Edit, make changes to the properties, and then click Save.
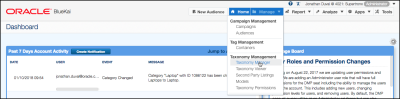
- The new category is added underneath the selected parent node. The category ID and status icon are listed to the left of the category. The green check mark (
 ) indicates that the category is active; the pencil-book icon(
 ) means the category is in the draft state. The Path property under Category Details list the ID and full taxonomy path of the category (for example, 1086122: Supertronx - Private > Purchased > Laptop). You can click the clipboard to copy the path.
 - Create one or more rules for your category following the steps in the next section. If you created a navigation node, you cannot create a rule for it (by definition, it cannot have user profile data mapped into it).
| Setting | Description |
|---|---|
| Name | Enter a unique, concise name for the category. The category will be listed by this name in your private taxonomy. The name may be a maximum of 255 characters. |
| Description |
A verbose summary of the type of users included in with this category. The description may be a maximum of 255 characters. |
| General Settings (optional) |
Optionally, configure the following general settings. By default, these settings are disabled. |
| Status | Select whether the category is to be placed in the Active or
Draft state. The default value of this setting is based on the parent category. Changing the status of parent category also updates the status of all the child categories underneath it. If a parent node is in the Draft state, you cannot make any of its child nodes Active. |
Adding rules
To create rules for a single category, follow these steps (to create rules for multiple categories in bulk, see Uploading Rules):
- From the tree on the left, click the category for which new rules are to be created (if it is not already selected), and then click Add New Rule in the Rules section.
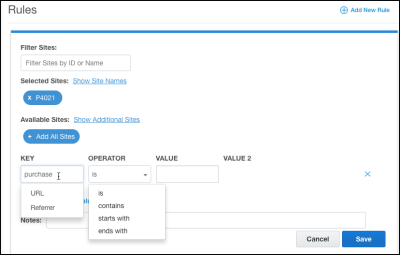
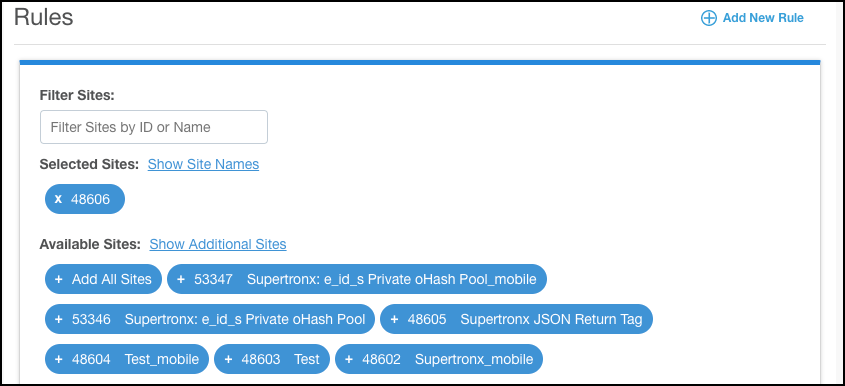
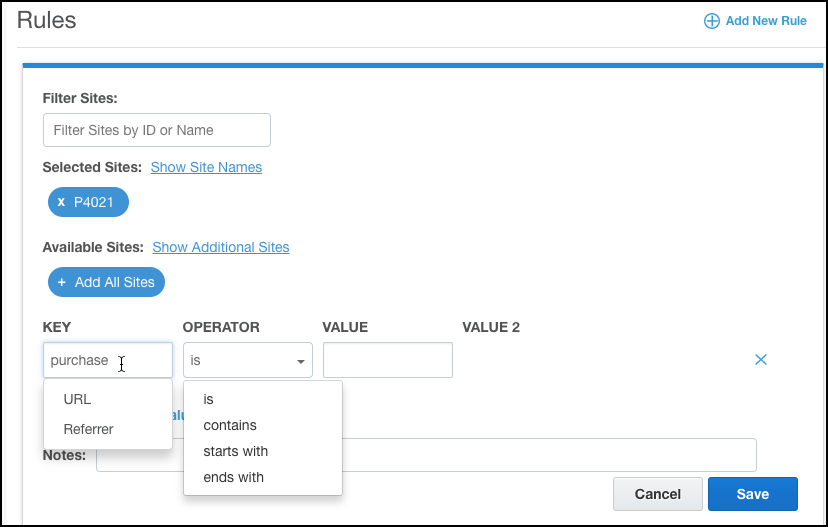
- Under Available Sites, click one or more site IDs/container tags for which the rule is applicable. To make the rule applicable for all your sites/containers, click Add All Sites (in this case, the Selected Sites field will show your partner ID [for example, P4021]). You can filter the list of sites displayed by entering the digits or characters in the site ID or container name in the Filter Sites box.

- Under Key, do one of the following:
Enter the name of the attribute to be evaluated. Phint keys are case-insensitive, and they support alphanumeric and underscore characters (a-z, 0-9, and _). Spaces in the phint key are not supported. Do not use the period character (.) in your phint key if you plan on creating rules that use the contains operator (rules involving regex expressions will fail to evaluate the key properly).
- Select URL (__bk_l) to evaluate the path or query string of a web page URL. The Oracle Data Cloud core tag automatically extracts the URLs from your web pages. This enables you to link categories to your web pages.
- Select Referrer URL (__bk_pr) to evaluate the path or query string of a URL, where a customer clicked and was consequently directed to your web page. The Oracle Data Cloud core tag automatically extracts the referrer URLs from your web pages. This enables you to link categories to referrers.
- In the Operator box, select whether the phint value in their tag must exactly match the one in the rule (is), include the value (contains), begin with the value (starts-with), or end with it (ends-with). The default operator is is.
- In the Value box, enter the name of the value for the user attribute to be classified. Phint values support all Latin-1 and UTF-8 characters (alphanumeric characters and special symbols).
Creating URL Rules with Multi-Byte Characters: To create rules for URLs that include multi-byte characters, you must encode the percentage symbols (%) in the UTF-8 encoded character. For example, to create a URL rule for http://www.??????/site.html, you would do the following:
- Convert ?????? to UTF-8, which results in the following encoding: %e3%83%9e%e3%83%8d%e3%82%b8%e3%83%a1%e3%83%b3%e3%83%88.
- Encode the percentage symbols in the UTF-8 encoding (convert each % symbol to %25), which results in the following: %25e3%2583%259e%25e3%2583%258d%25e3%2582%25b8%25e3%2583%25a1%25e3%2583%25b3%25e3%2583%2588.
- Enter the following in the Value box: http://www.com%2F%25e3%2583%259e%25e3%2583%258d%25e3%2582%25b8%25e3%2583%25a1%25e3%2583%25b3%25e3%2583%2588%2Fsite.html/.
- To add another phint to the rule, click Add New Key-Value Pair and repeat steps 3–5. This creates an AND condition, where both phints must be in the tag call of offline file to add the category to the user profile. To remove a phint, click the delete (
 ) icon to the right of it.
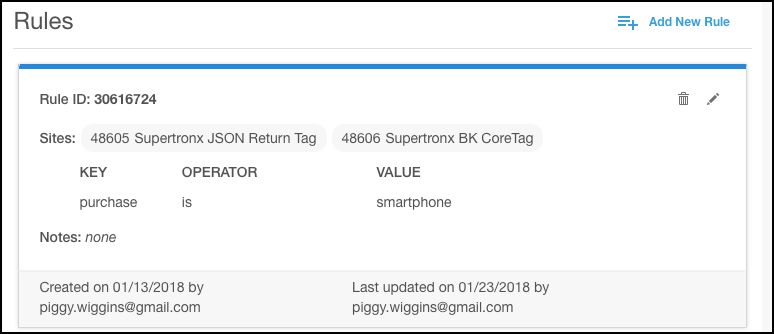
 - Click Save to save the rule. Click Cancel to discard all changes. The unique ID generated for the rule (the Rule ID), the Created and Last Updated timestamps, and the user name of the rule creator is displayed.

- To add another rule to the category, repeat steps 2–7. This creates an OR condition, where only one of the rules must be true to add the category to the user profile. To delete the rule, click the garbage can icon (
 ), and then confirm the deletion. To edit the rule, click the pencil icon (
 ), make changes, and then click Save.
Maintaining your taxonomy
Taxonomy maintenance tasks includes viewing category reach and usage, moving categories to different parent node, and sorting the order of categories under parent nodes.
Viewing category reach and usage
To view the reach and usage of a category, follow these steps:
- From the taxonomy tree on the left, click the category for which you want to view the details.
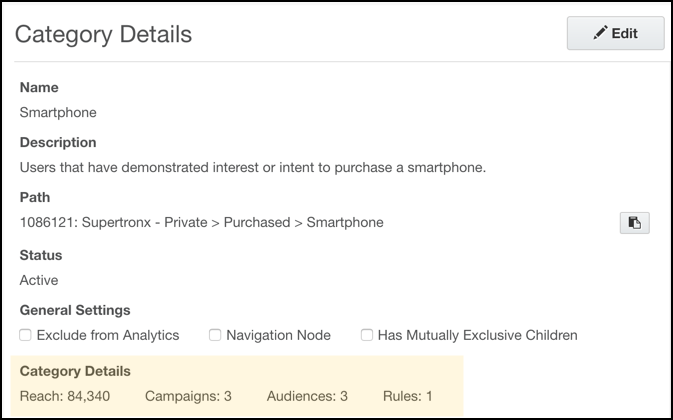
- Under Category Details, you can view the following statistics for the selected category:
| Setting | Description |
|---|---|
| Reach | The number of user profiles in the category. This figure is updated daily (around 12PM GMT) with the previous day's inventory data, and it is based on a sampling rate of 1/8. |
| Audiences | The number of audiences that include the category. |
| Campaigns | The number of audience deliveries that include the category. (The platform creates a campaign automatically when you deliver an audience.) |
| Rules | The number of rules associated with the category. |
Moving categories
To move a category to a different parent node.
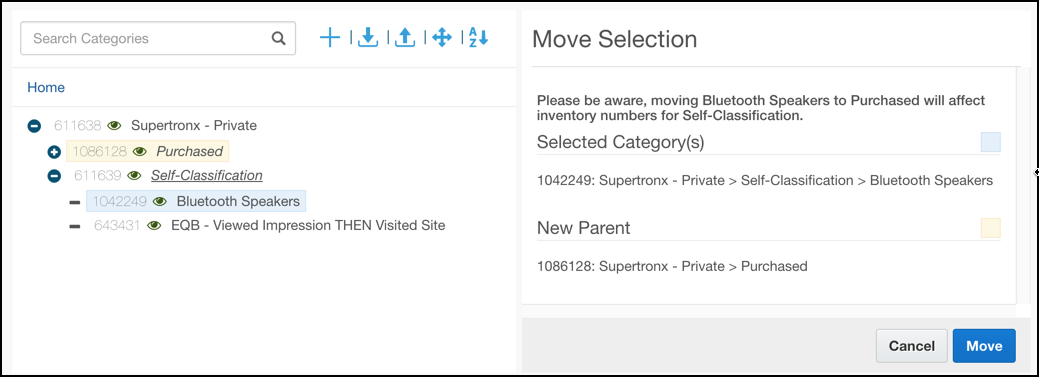
- From the taxonomy tree on the left, click the category to be moved.
- Click the Move icon (
 ).
). -
From the taxonomy tree, click the new parent node to which the current category is to be moved. The category being moved is highlighted blue in the tree; the selected parent node is highlighted yellow.
Note that the reach values for the old and new parent category do not update immediately to reflect the relocation of the child category.
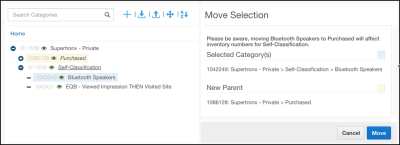
- Click Move to move the category. Click Cancel to discard all changes.
- The category is moved under the new parent category. Its placement is based on the current sort order of the new parent node (alphabetical by default).
Sorting categories
To change the order of the child categories under a parent node ("sibling categories"), follow these steps:
- From the taxonomy tree on the left, click one of the child categories under the parent node to be re-ordered.
- Click the Sort icon (
 ).
). - You can order the sibling categories by doing one of the following:
- Drag a category to the desired position within the list of sibling categories. Repeat for any other categories you want to reorder.
- Click Sort by ID to arrange the categories by category IDs in ascending order (oldest to newest).
- Click Sort Alphabetically to arrange the categories in alphabetical order.
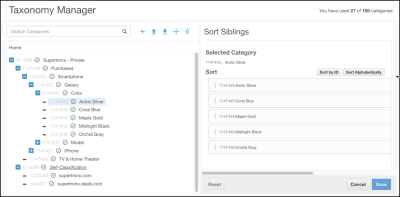
- Click Save to save the reordering. Click Cancel to discard all changes.

Downloading categories
You can download one or more categories, and the child categories underneath them, to a text file. This is particularly useful for (1) viewing the reach of your categories (optionally, separated by country and ID source) and (2) generating a template to be used for making bulk updates to your taxonomy (via upload). To download categories, follow these steps:
- Select one or more categories from the tree on the left. A category is highlighted blue when it has been selected.
- To select multiple categories, click one category, hold down COMMAND, and then select additional categories.
- To select a range of categories, click one category, hold down SHIFT, and then select another category.
- To de-select a category, just click it.
- Click the Download icon (
 ).
). - The Download Categories pane opens on the right.
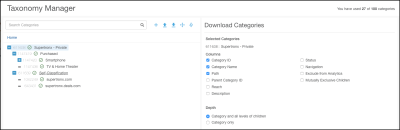
- Under Columns , select which fields to include in the export file (the Category ID, Category Name, and Path fields are selected by default). Under Depth, select the depth of child categories to be included (the Category and All Levels of Children option is selected by default). The following table summarizes the fields you can include in the export file.
Field Description Columns Category ID* The unique ID assigned to the category. This column is required for editing categories via bulk upload because Taxonomy Manager identifies categories based on the unique category IDs.
Category Name The name of the category. Path* The full taxonomy path of the category. This column is required for adding categories via bulk upload because Taxonomy Manager determines where to create new categories based on the taxonomy path.
Parent Category ID* The unique ID assigned to the category directly above the selected category in your taxonomy. This column is required for moving categories via bulk upload. Price The CPM (cost per 1,000 impressions) of the category. This field is only available if the CPM Rate feature is enabled for your seat.
- 1st-party categories. CPM is 0.
- 3rd-party categories. CPM is based on rate cards set by the data provider.Reach The total number of users in the category. By default, the reach includes inventory across all countries and ID sources (cookies and Mobile Advertising IDs [MAIDs]) are included.
- Countries. You can select which countries included in the total reach by clicking in the Countries box and entering the name of the country or its ISO 3166-1 alpha-2 country code (for example, you can enter "United Kingdom" or "GB" to specify the United Kingdom.
- ID Sources. You can select which ID sources to include in the total reach by selecting their check boxes. You can include inventory by 3rd Party Desktop Cookie ID, Mobile Cookie ID, Google Advertising ID (AdID), and Apple IDFA.
Description The summary associated with the category. Status The current state of the category: Active or Draft. Navigation Whether this category is a navigation-only node, which only functions as folder to one or more child categories.
Exclude from Analytics Whether this category is excluded from Audience Analytics reports. Mutually Exclusive Children Whether this category has mutually exclusive child categories (only the most recently tagged child category is in the user's profile). Depth Category and All Levels of Children The selected category and all of the categories underneath it are exported. For example, if you exported Category A in the example below with this option selected, you would export categories A, A>1, A>1>x, A>1>y, A>1>z, A>2, A>2>x, A>2>y, and A>2>z.
+ Category A
++ Category 1
+++ Category x
+++ Category y
+++ Category z
++ Category 2
+++ Category x
+++ Category y
+++ Category z
+ Category BCategory and First Level of Children The selected category and only the categories in the child directly underneath it are exported. For example, if you exported Category A in the example below with this option selected, you would only export categories A, A>1, and A>2.
+ Category A
++ Category 1
+++ Category x
+++ Category y
+++ Category z
++ Category 2
+++ Category x
+++ Category y
+++ Category z
+ Category BCategory Only Only the selected category is exported. - Click Download. A text file named Category-YYYY-MM-DD-HH-MM-SS+0000.txt is downloaded (the time stamp is based on GMT). You can open it with a text editor or spreadsheet. The following example demonstrates an export that includes the total reach based on user profiles in the United States and United Kingdom that are linked to the Oracle Data Cloud desktop cookie. Categories are sorted by ID in ascending order (oldest to newest).


Adding and editing categories in bulk
After you do an export, you can update your taxonomy in a spreadsheet, tab separated value (TSV) file, or text file and then upload the file to the taxonomy manager. The updates you can make include adding new categories, editing the names and properties of exciting categories, and moving and sorting categories. This is especially useful for quickly creating and configuring multiple categories in bulk. To add and edit categories via download, follow these steps:
- Download all or a portion of your taxonomy to a text file.
- Bulk Creation. If you are adding categories to your taxonomy, you can download all the target parent nodes or the nodes in a specific section. In this case, only the Path column is required in the export file. This is because the Taxonomy Manager determines where to create new categories based on the full taxonomy path.
- Bulk Editing. If you are editing category properties (name, description, general settings, status), you can download your entire taxonomy with the default settings selected and additionally whichever columns you want to edit (at a minimum, the Category ID column is required).
- Bulk Moving. If you are moving categories to different parent nodes, you can download your entire taxonomy with the default settings and the Parent Category ID column selected.
- To add new categories, copy and paste paths or enter the full path of the parent node under which the new category is to be created, and then append " > {ChildCategoryName}" to the path (there is a space before the path/greater than symbol).
- You download the Supertronx - Private > Purchased > Smartphone category with only the Path column selected.
- You want to add iPhone and Galaxy categories under the Smartphone category. You therefore add two rows to your export file for the new categories:
- You want to further add new categories for iPhone models and colors. In this case, you could actually skip explicitly creating the actual Model and Color categories. This is because Taxonomy Manger automatically creates any existing categories in the path. For example, if you created a Supertronx - Private > Purchased > Smartphone > iPhone > Color > Rose Gold category, the Color and Rose Gold categories would both get created (note that you would probably want to later edit the Model and Color categories so that they were navigation-only nodes because they function as folders for their child categories).
- To edit categories, change the values in the columns (the Category ID column is required). To move categories, change their parent category IDs (ParentCategory).
- Save your updated file in .txt or .tsv format.
- In the Taxonomy Manager, move your mouse pointer over the Upload icon (), select Upload Categories, select your updated taxonomy file, and then click Upload.
- The Import Preview section displays all the categories in your taxonomy to be added or updated. To make additional edits before applying your changes, update your file and then repeat steps 3–5.

- The Import Categories section displays all the categories, with their IDs, that have been added to your taxonomy or updated.

- Click Close. Refresh your browser to see the new or updated categories in your taxonomy.

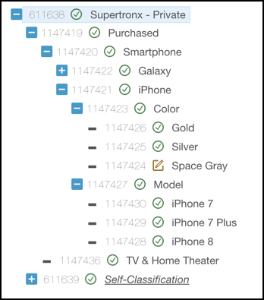
Category Import Example: Consider the following import scenario:
| Path |
|---|
| Supertronx - Private > Purchased > Smartphone |
| Path |
|---|
| Supertronx - Private > Purchased > Smartphone |
| Supertronx - Private > Purchased > Smartphone > iPhone |
| Supertronx - Private > Purchased > Smartphone > Galaxy |
| Path |
|---|
| Supertronx - Private > Purchased > Smartphone |
| Supertronx - Private > Purchased > Smartphone > iPhone |
| Supertronx - Private > Purchased > Smartphone > Galaxy |
| Supertronx - Private > Purchased > Smartphone > iPhone > Color > Space Gray |
| Supertronx - Private > Purchased > Smartphone > iPhone > Color > Silver |
| Supertronx - Private > Purchased > Smartphone > iPhone > Color > Gold |
| Supertronx - Private > Purchased > Smartphone > iPhone > Model > iPhone 8 |
| Supertronx - Private > Purchased > Smartphone > iPhone > Model > iPhone 7 Plus |
| Supertronx - Private > Purchased > Smartphone > iPhone > Model > iPhone 7 |

Downloading rules
You can download one or more classification rules to a TSV file. You can then use the text file to make bulk updates to your rules (via upload). To download rules, follow these steps:
- Select one or more categories from the tree on the left. A category is highlighted blue when it has been selected.
- To select multiple categories, click one category, hold down COMMAND, and then select additional categories.
- To select a range of categories, click one category, hold down SHIFT, and then select another category.
- To de-select a category, just click it.
- Click the Download icon (), and then click Download Rules from the Download Categories pane on the right (the Columns and Depth fields are not applicable for rules).
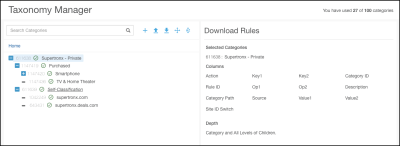
- A TSV file named Rules-YYYY-MM-DD-HH-MM-SS+0000.tsv is downloaded. You can open it with a text editor or spreadsheet. The following example demonstrates a rules export file. Rules are sorted by Rule ID in ascending order (oldest to newest).
- The Rules export file contains the following columns (the columns required for upload and ones that require values are denoted):


The Rules export file will only contain categories that have one or more rules associated with it. Categories that do not have any rules are not included.

| Column | Description | Required for Upload | Value Required for Creating Rules via Upload | |||||||||||||||||||||||||||||||||||||||||||||
|---|---|---|---|---|---|---|---|---|---|---|---|---|---|---|---|---|---|---|---|---|---|---|---|---|---|---|---|---|---|---|---|---|---|---|---|---|---|---|---|---|---|---|---|---|---|---|---|---|
| Action | The value entered into this field depends on the action: Create rule. Leave blank. Edit rule. Enter "modify". Delete rule. Enter "delete". |
YES | NO | |||||||||||||||||||||||||||||||||||||||||||||
| Rule ID | The unique ID generated for the rule. This is required for editing or deleting rules. | YES (if editing) | NO | |||||||||||||||||||||||||||||||||||||||||||||
| Site ID | A pipe-separated list of the site IDs for which the rule is applicable. If the rules is applicable to all site IDs, your partner ID is listed with the following syntax: P{partnerId} (for example, P4021). | YES | YES | |||||||||||||||||||||||||||||||||||||||||||||
| Site ID Switch | Internal-use only. Site ID switches are used to attribute the data collected from a site ID to another one. This is typically used for 3rd-party offline match partners. | YES | NO | |||||||||||||||||||||||||||||||||||||||||||||
| Key1 |
The name of the phint key. Phint keys are case-insensitive, and they support
alphanumeric and underscore characters (a-z, 0-9, and _). Rules with Multiple Phints: If a rule contains multiple phints, the export will include an additional
key, op, and value column for each phint. For example, if a rule
has three phints, the export will additionally include key2, Op2,
Value2, key3, Op3, and Value3 columns. |
YES | YES | |||||||||||||||||||||||||||||||||||||||||||||
| Op1 |
The operator used to evaluate the phint value linked to the key. This may be one the following values:
For rules created by Oracle service teams, the operator may be one of the following read-only values. These operators may be made available for rule creation in a future versions of the Taxonomy Manager:
|
YES | YES | |||||||||||||||||||||||||||||||||||||||||||||
| Value1 | The phint value. Phint values support all Latin-1 and UTF-8 characters (alphanumeric characters and special symbols). | YES | YES | |||||||||||||||||||||||||||||||||||||||||||||
| Category ID |
The unique ID assigned to the category. This column is required for editing categories via bulk upload because Taxonomy Manager identifies categories based on the unique category IDs. |
YES | YES | |||||||||||||||||||||||||||||||||||||||||||||
| Category Path | The full taxonomy path of the category. This column is required for adding categories with rules via bulk upload because Taxonomy Manager determines where to create new categories based on the taxonomy path. | NO | NO |
Adding and editing rules in bulk
You can export one or more classification rules to a TSV file, create new rules or edit the properties of existing ones in the file, and then upload the file to create and update rules. This is especially useful for quickly creating and configuring multiple rules in bulk. To add and edit rules via upload, follow these steps:
- Export all or a portion of your taxonomy to a TSV file. Alternatively, you can create a TSV file with the following required columns:
Action Rule ID Site ID Site ID Switch Key1 Op1 Value1 Category ID - To add new rules, enter the values in the required columns:
- You do a rule export for your entire taxonomy.
- You want to add rules for all the iPhone color categories. You therefore add three new rows to your export file, and then enter the site ID (Site ID), phint (Key, Op, and Value), and Category ID for the rules (the CategoryPaths field has been entered in the example below for this demonstration, but are not required):
Action Rule ID Site ID Site ID Switch Key1 Op1 Value1 Category ID Category Path 30616724 48605 purchase == smartphone 1147420 Supertronx - Private > Purchased > Smartphone 30616726 48606 phone == galaxy 1147422 Supertronx - Private > Purchased > Smartphone > Galaxy 30616727 48606 phone == iphone 1147421 Supertronx - Private > Purchased > Smartphone > iPhone 30616732 P4021 color == gold 1147426 Supertronx - Private > Purchased > Smartphone > iPhone > Color > Gold 48606|48605 color == silver 1147425 Supertronx - Private > Purchased > Smartphone > iPhone > Color > Silver 48606 color == spacegrey 1147424 Supertronx - Private > Purchased > Smartphone > iPhone > Color > Space Gray - To include multiple site IDs in the Site ID column, use a pipe-separated list (do not use spaces between the pipe and site ID or the upload will fail).
To include multiple phints in a rule, insert additional key, op, and value column for each phint. For example, to create a rule with three phints, add key2, Op2, Value2, key3, Op3, and Value3 columns to the file.
-
In the Taxonomy Manager, move your mouse pointer over the Upload icon (
 ), select Upload Rules, select your updated rules file, and then click Upload.
 -
Rules are added or edited based on your file. Click a category, and then view the Rules section to see the updates.
Rule Import Example: Consider the following import scenario:
| Action | Rule ID | Site ID | Site ID Switch | Key1 | Op1 | Value1 | Category ID | Category Path | |
|---|---|---|---|---|---|---|---|---|---|
| 30616724 | 48605 | purchase | == | smartphone | 1147420 | Supertronx - Private > Purchased > Smartphone | |||
| 30616726 | 48606 | phone | == | galaxy | 1147422 | Supertronx - Private > Purchased > Smartphone > Galaxy | |||
| 30616727 | 48606 | phone | == | iphone | 1147421 | Supertronx - Private > Purchased > Smartphone > iPhone | |||
Import Notes: