Becoming a Data Ingest App Partner
Data ingest is the process of classifying data from your system and onboarding it into categories in the Oracle Data Cloud platform. This document provides an overview of ingesting data by using platform web services. For a detailed introduction, including information about using a user interface, see Data Ingest.
EU Data. To onboard data for user profiles located in the European Union (EU), you must have signed Oracle's General Data Protection Regulation (GDPR) Consent agreement. Contact your Oracle Account Representative to obtain and sign this agreement.
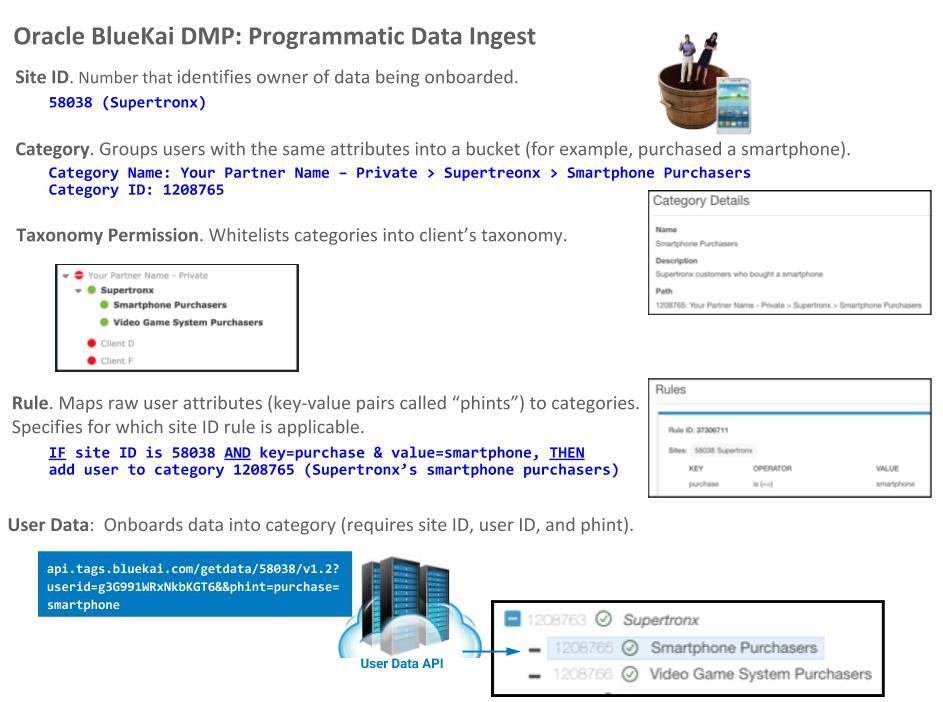
You ingest data programmatically by making a sequence of calls to the platform APIs. Specifically, you make API calls to create sites, categories, and rules to classify data. Additional API calls whitelist the categories into the client's taxonomy and then onboard the data.
For example, consider a client named Supertronx that wants to import all their smartphone purchaser data from your system into their DMP. You first generate a site ID (48419) that uniquely identifies the Supertronx data. You pass this site ID in all subsequent User Data API calls for onboarding their data. Next, you create a category for smartphone purchasers (category ID 341150). You whitelist the category to the client's taxonomy. Finally, you create a rule that specifies that if an item purchased is a smartphone AND the site ID is 48419, then the user should be added to the Smartphone Purchasers category. The "item purchased is a smartphone" condition in the rule is specified as a key-value pair called a phint. When this phint is passed into the User Data AP) with the site ID and the user ID, the user is classified into the Smartphone Purchasers category in the Supertronx taxonomy.
The following image illustrates how sites, categories, rules, whitelistings, and the User Data API are used to onboard your user data into your taxonomy.
Important: IDs that you pass into the User Data API may be linked to an Oracle Data Cloud cookie ID, partner ID (email hash, account ID hash, cookie ID, or another identifier), or Mobile Advertising ID (MAID). If you are passing a partner ID, it must be synced with the user's Oracle Data Cloud cookie through an ID swap.
If you are onboarding data linked to a MAID, no ID swap is required because the data will be stored in separate Google AdID and Apple IDFA primary ID spaces, where linkages to Oracle Data Cloud cookies are not required.
The following table lists and summarizes the APIs used to import data from your system into the Oracle Data Cloud platform. The APIs are listed in the order in which you call them.
| Step | API | Description | One Time/ Recurring | When to Call |
|---|---|---|---|---|
| 1 | Containers | Generates a unique identifier (called a site ID) for client data. The site ID is required for the Rule and User Data API calls. | Once per client | Client signals they wants to use BlueKai integration. |
| 2 | Categories | Creates a bucket that contains users who share a distinct attribute or behavior. | Recurring | Client identifies a segment of users they want to classify in their DMP. |
| 3 | Taxonomy Permissioning | Adds the category to the client's taxonomy. | Recurring | Every time you create a new category. |
| 4 | Rules | Creates a rule that maps the raw data from your system into categories. | Recurring | Every time you create a new category. |
| 5 | User Data | Onboards data against a cookie ID, email hash, or mobile device ID. Supports one call per user with a maximum of 1,000 calls per second. | Recurring | Client confirms they want to onboard selected segment into their DMP. |
| 5a | Bulk | Batch up individual User Data API calls. This step is optional but recommended. | Recurring | After batching up individual User Data API calls. |
To make Oracle Data Cloud API calls, you need your partner ID and your Web service keys. For information about getting your ID and keys, see Getting your API keys.
Important: All Oracle Data Cloud API calls need to be authenticated via a request signature (bksig) by generating the encryption data into a string byte array containing the following elements and then signing the resulting string with a Web service private key:
HTTP_METHOD + URI_PATH + QUERY_ARG_VALUES + POST_DATA
For more information, see Authenticating API calls.
Containers API
You use the BlueKai Containers web service (services.bluekai.com/Services/WS/sites) to create site IDs. A site ID defines a unique namespace for classifying, onboarding, and managing a client's data. The site ID ensures that different clients' data are classified into different categories.
The Containers POST request takes the client's name and your app partner ID, and returns the site ID to be used for managing the client's data. You include this site ID in subsequent Rules and User Data API calls.
API Reference: Containers API
To create a site ID with the Containers API:
- Make a POST request that specifies the client name and your partner ID. The request syntax and an example are shown below.
{
"name": {"ClientName"},
"data_transfer_limit": 0,
"partner_id": {yourPartnerId},
"analytics_only": "false",
"transaction_scope": "self",
"blocked_countries":["NL"]
}{
"name": "Supertronx - Data Ingest",
"data_transfer_limit": 0,
"partner_id": 1690,
"analytics_only": "false",
"transaction_scope": "self",
"blocked_countries":["NL"]
}The API returns the site ID as shown in the following example.
{
   "desktop_site": {
       "labels": null,
       "notes": "",
       "name": "Supertronx - Data Ingest",
       "id": 58038,
       "type": 0,
       "allowed_buyers": [],
       "private_data": "true",
       "partner": {
           "name": "Your App Partner Name",
           "id": 1690
        },
        "created_at": "2017-06-17 12:18:14-0500",
        "updated_at": "2017-06-17 12:18:14-0500",
        "blocked_countries": [
            "NL"
        ],
        "redirect_domains": [],
        "data_transfer_boost_enabled": "false",
        "data_transfer_boost_interval": null,
        "transaction_scope": "self",
        "analytics_only": "false",
        "data_transfer_limit": 0,
        "group_id": 48419
    }
}
Categories API
You use the Categories API (taxonomy.bluekai.com/taxonomy/categories) to create a group that contains all the users that share a distinct behavior or have the same attribute. For example, you can create categories for users who have opened an email, clicked on an offer, browsed for a product, added a product to their cart, or purchased an item. In other words, a category represents a specific data item in your system. You use the Rules API along with the Categories API to map user attributes from your system into categories.
API Reference:Categories API
Best practices for organizing categories
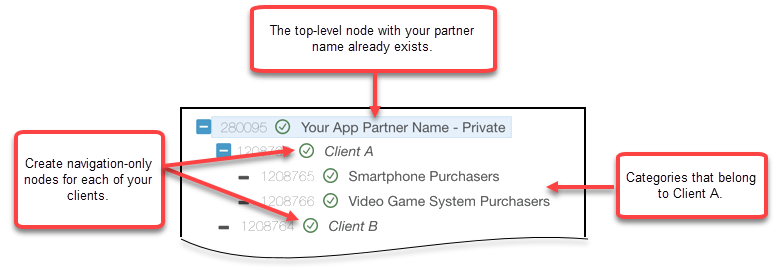
When creating categories for a client, you should structure them in a logical hierarchy that makes it easy for clients to find the data exported from your system and that groups the data together in the same location. For example, you can create a hierarchy like the one shown below:
Creating categories with the Category API
To create a client category hierarchy, you retrieve the ID of your seat's root node, create a navigation-only node for the client, then create specific categories for users.
Important: The Categories and Rules APIs both support the uploading of .txt and .tsv files with the categories and rules to be created or updated. This enables you to take customer data from a catalog, port it to a file, and then upload the ported file to the Oracle Data Cloud platform programmatically. For more information on bulk upload, see Adding and Editing Categories in Bulk (via Upload) and Rules Bulk Upload .
To create a client category hierarchy with the Category API:
- Make a GET call to retrieve the category ID of the private root node in your seat. All the categories you create are stored under this node. Set the following parameters:
partner.id. Set to your partner ID.viewSet to OWNER.qInclude a URL-encoded "name contains Private" in the parameter (q=name%20co%20%22Private%22).
An example GET request is shown below.
taxonomy.bluekai.com/taxonomy/categories?partner.id=1690&view=OWNER&q=name%20co%20%22Private%22&bkuid=a33a152dba41b82d16fccd7e87d7d0df243d8625&bksig=WXpqovlKLUL%2BbuYo37Pq9EU%2BPml0IBS6Eqg%2BhJJShp4%3D
The POST response includes the category ID of the private root node (280095 in the example shown below). You use this category ID for the
parentCategoryparameter in subsequent POST requests.{ "items": [ { "id": 280095, "name": "Your Partner Name - Private", "parentCategory": { "id": 344 }, "partner": { "id": 1690 }, ... } ] } - Make a POST call to create a navigation-only category for the client. This category functions as a folder that contains all of the clients' data items exported from your system.
partner.id. Set to your partner ID.nameSet to the client name or another unique identifier on your system.parentCategorySet to the category ID for private root node returned by the previous GET call (280095 in this example).isForNavigationOnlyFlagSet to true.isMutuallyExclusiveChildrenFlag(Optional) If you want to create the categories you create under this node to be mutually exclusive, set to true. Mutually exclusive means that If a user is classified into only one child category at a time. Only the most recently tagged category is stored in the user's profile. If they are classified into one child category, they are removed from any other child category. . For example, to classify users' gender, you could create a parent Gender category that is set to mutually exclusive, and then create child Male and Female categories under it.
An example POST request is shown below:
{
"partner": {"id": 1690},
"name": "Supertronx",
"parentCategory": {"id": 280095},
"isIncludeForAnalyticsFlag": true,
"isForNavigationOnlyFlag": true,
"isMutuallyExclusiveChildrenFlag": false
}
The API returns creates the navigation note and returns its category ID (1208763 in the example shown below).
{
    "id": 1208764,
    "name": "Supertronx",
    "parentCategory": {"id": 280095},
    "partner": {"id": 1690},
    ....

    "isForNavigationOnlyFlag": true,
    "isIncludeForAnalyticsFlag": false,
    "isMutuallyExclusiveChildrenFlag": false,
    ...
    "pathFromRoot": {
        "ids": [
            344,
            280095,
            1208763
        ],
        "names": [
            "ROOT",
            "Your Partner Name - Private",
            "Supertronx"
        ]
    },
    "status": "active",
    "links": []
} - Create categories representing specific segments of users in your system. Set the following parameters for each category: Provide a clear, concise name for the category, and pass the navigation-only node's category ID, which you obtained from the POST call in step 2, in the
parentCategoryfield (1208764 in this example).partner.id. Set to your partner ID.nameSet to a clear, concise name that identifies the category.parentCategorySet to the category ID for the navigation node returned in step 2 (1208764 in this example).
The following examples create two categories under the navigation-only node: Smartphone Purchasers and Video Game System Purchaser.
[
    {
        "partner": {"id": 1690},
        "name": "Smartphone Purchasers",
        "parentCategory": {"id": 1208763},
        "isIncludeForAnalyticsFlag": true,
        "isForNavigationOnlyFlag": false,
        "isMutuallyExclusiveChildrenFlag": false
    },
    {
        "partner": {"id": 1690},
        "name": "Video Game Purchasers",
        "parentCategory": {"id": 1208763},
        "isIncludeForAnalyticsFlag": true,
        "isForNavigationOnlyFlag": false,
        "isMutuallyExclusiveChildrenFlag": false
    }
]
The POST response includes the category IDs of the categories created (1211430 and 1211431 in the example shown below), along with other information.
{
    "items": [
        {
            "httpStatusCode": 201,
            "item": {
                "id": 1211430,
                "name": "Smartphone Purchasers",
                "parentCategory": {"id": 1208763},
                "partner": {"id": 1690},
                "vertical": {"name": "Your Partner Name"
                },
                ...
                "isIncludeForAnalyticsFlag": true,
                "isMutuallyExclusiveChildrenFlag": false,
                "isExplicitPriceFloorFlag": false,
                "namespaceId": 1,
                ...
                "pathFromRoot": {
                    "ids": [
                        344,
                        280095,
                        1208763,
                        1211430
                    ],
                    "names": [
                        "ROOT",
                        "Private",
                        "Supertronx",
                        "Smartphone Purchasers"
                    ]
                },
                "status": "active",
                "links": []
            }
        },
        {
            "httpStatusCode": 201,
            "item": {
                "id": 1211431,
                "name": "Video Game Purchasers",
                "parentCategory": {"id": 1208763},
                "partner": {"id": 1690},
                "vertical": {"name": "Your Partner Name"
                },
                ...
                "isForNavigationOnlyFlag": false,
                "isIncludeForAnalyticsFlag": true,
                "isMutuallyExclusiveChildrenFlag": false,
               ...
                "pathFromRoot": {
                    "ids": [
                        344,
                        280095,
                        1208763,
                        1211431
                    ],
                    "names": [
                        "ROOT",
                        "Private",
                        "Supertronx",
                        "Video Game Purchasers"
                    ]
                },
                "status": "active",
                "links": []
            }
        }
    ],
    "size": 2
}
Taxonomy Permissioning API
You use the Taxonomy Permissioning API (taxonomy.bluekai.com/taxonomy/partnerPermissions) to whitelist categories from your app partner seat to the client's taxonomy. The client can then view and select the whitelisted categories from their taxonomy tree just like any other categories.
Important: Before making Taxonomy Permissioning API calls, your Oracle Data Cloud integration support specialist must add the client as a category/audience recipient to your seat. After this is done, you receive the client's partner ID. You can also get the client's partner ID by having the client enter it in your system UI as part of the integration setup.
API Reference:Taxonomy Partner Permissions API
To whitelist categories into a client's taxonomy
- Make a POST request to whitelist the categories. Set the following parameters:
-
partner.idSet to your partner ID. -
buyer.idSet to the client's partner ID. whitelist_categoriesInclude a comma-separated list of category IDs to be whitelisted. This should include the navigation node category and its child categories.-
permissionTypeset to modelingTargetingAndAnalytics. - If you have multiple Oracle Data Cloud partner seats, you must also pass your partner ID in a
pidquery string parameter.
The POST request syntax is shown below.
{
"partner": {"id":yourPartnerId},
"buyer": [{"id":clientParnerId}],
"whitelistCategories": [categoryId 1, categoryId 2, categoryId n],
"permissionType": "modelingTargetingAndAnalytics"
}
An example POST request is shown below.
{
"partner": {"id":1690},
"buyer": [{"id":4021}],
"whitelistCategories": [1208764, 1208765],
"permissionType": "modelingTargetingAndAnalytics"
}
The POST response includes the whitelisting ID (27789 as shown in the following example). You can use this ID to whitelist additional categories to the client or remove categories from their taxonomy via a PUT request. See Changing a client taxonomy after whitelisting for more information.
[ { "id": 27789, "partner": { "id": 1690, "name": "Your Partner Seat" }, "buyer": [ { "id": 4021, "name": "Supertronx" } ], "whitelistCategories": [ 1208764, 1208765 ], "permissionType": "modelingTargetingAndAnalytics", "createdAt": "2018-03-07T10:08:50-06:00", "updatedAt": "2018-03-07T10:08:50-06:00" } ] -
Changing a client taxonomy after whitelisting
If you need to whitelist additional categories to a client or remove categories from their taxonomy, you can make a PUT request with the categories to be added or removed. In the query string, pass the whitelisting ID received from the POST response you received during the original whitelisting. In the body, you pass the same set of parameters as in the original POST request, except that the new list of categories to be whitelisted should exclude categories you want to remove and include categories you want to keep or add. Excluding a previously whitelisted category removes it from the client's taxonomy.
Rules API
You use the Rule API (services.bluekai.com/rest/taxonomyRuleChains) to create the set of criteria that determine which users are added to a category. You specify criteria the following criteria:
- The rule operator, which can be is, contains, starts-with, or ends-with .
- Phints, which are key-value pairs representing user attributes in your system.Phint keys support only alphanumeric characters and underscores (a-z, 0-9, and _) and are case insensitive. Do not include spaces in the key. Phint values support all Latin-1 and UTF-8 characters (alphanumeric characters and special characters). Values are case insensitive.
- The client's site ID, which identifies them as the data owner.
- The category ID into which users are classified when the criteria are met.
Important: It takes approximately 30 minutes for rules to be propagated across Oracle Data Cloud pixel servers. You should wait at least 30 minutes after creating a new rule before calling the User Data API with phints that are included in the rule.
API Reference: Rules API
To add rules:
- Make a POST request to the Rules API in which you specify your partner ID in the
partner.idquery string parameterThe following example shows a Rules API call, with the partner ID in the query string.
services.bluekai.com/rest/taxonomyRuleChains?partner.id=1690&bkuid=a33a152dba41b82d16fccd7e87d7d0df243d8625&bksig=v85cOJxPFQCWQp%2BeFWsj1rwmHTPe9OOFw%2BUj3KmjTJE%3D
- In the body of the request, set the following parameters:
taxonomyRuleOperator: Enter the ID for the rule operator to be used. The rule operator can be one of the following values:- 1 (==) is: The phint value passed in the User Data API call must exactly match the one in the rule.
- 3 (_*) starts-with: The phint value must start with the one in the rule.
- 4 (*_ ) ends-with: The phint value passed must end with the one in the rule.
- 5 -(*_*) contains: The phint value must be contained within the one in the rule.
taxonomyRuleOperatorParams: Enter the names of the phint key and value in the value parameters (yourKeyandyourValue). Do not modify thekeyorvalue1parameter names.categories: Enter the category ID for which this rule applies.sites: Enter the client's site ID that you generated with the Containers API.
{
  "rules": [ {
     "taxonomyRuleOperator": { "id": 1 },
     "taxonomyRuleOperatorParams": [
           { "name": "key", "value": "purchase" },
           { "name": "value1", "value": "smartphone" }
        ]
   } ],
  "categories": [ { "id": 1211430 } ],
  "sites": [ { "id": 58038 }],
  "partners": []
}
The API response includes an ID for the rule and other information, as shown in the example below.
{
    "id": 37514815,
    "rules": [
        {
            "id": 39898800,
            "operatorExpression": "purchase=smartphone",
            "taxonomyRuleOperator": {
                "id": 1,
                "name": "==",
                "formula": "{{key}}={{value1}}",
                "description": "is ",
                "createdAt": "2016-04-05T21:22:11-05:00",
                "updatedAt": "2016-04-05T21:22:11-05:00",
                "status": "active"
            },
            "taxonomyRuleOperatorParams": [
                {
                    "name": "key",
                    "value": "purchase"
                },
                {
                    "name": "value1",
                    "value": "smartphone"
                }
            ]
        }
    ],
    "categories": [
        {
            "id": 1211430,
            "name": "Smartphone Purchasers"
        }
    ],
    "ruleChainMetaData": [],
    "classificationGroups": [],
    "sites": [
        {
            "id": 58038,
            "name": "Supertronx"
        }
    ],
    "partners": [],
    "createdAt": "2018-03-07T13:51:08-06:00",
    "updatedAt": "2018-03-07T13:51:08-06:00",
    "status": "active"
}
Creating URL-based Rules
You can create rules that evaluate the path or query string of a web page URL, enabling you to link categories to your web pages and referrers. To use this capability, call the Rules API to add a rule, with yourKey in the taxonomyRuleOperatorParams parameter set to one of the following:
- __bk_l to evaluate the path or query string of a web page URL. This setting enables you to link categories to your web pages.
- __bk_pr to evaluate the path or query string of a URL where a customer clicked and was directed to your web page. The BlueKai CoreTag automatically extracts referrer URLs from your web pages. This setting enables you to link categories to referrers.
User Data API
You use the User Data API (api.tags.bluekai.com) to onboard user data into categories. The User Data API takes 1 call per user, and it supports 1,000 calls per second. Because of the volume of user data to onboard, we recommend that you batch User Data API calls by using the Bulk API. See Bulk API for more information.
When you call the User Data API, you specify the user's ID. The following table lists and describes the user IDs you can include in API calls.
| ID Type | API Parameter | Description |
|---|---|---|
| BlueKai Cookie ID (BKUUID) | bkuid
|
An obfuscated Oracle Data Cloud cookie ID received via Server Data Transfer (SDT) or JSON Return Tag. |
| Partner ID (PUUID) | puserid
|
An email hash, account ID hash, cookie ID, or other identifier that has been ID synced to an Oracle Data Cloud cookie ID. See ID swapping for more information on syncing your ID with the Oracle Data Cloud cookie ID. |
| MAID (ADID or IDFA) |
|
A Google or Apple device ID. Onboarded data linked to MAIDs resides in a primary ID space. No linkage to an Oracle Data Cloud cookie is required, but the data can only be delivered to platforms that accept data linked to MAIDs.
To pass an IDFA or ADID, you must also set the ccode field to the two-letter ISO 3166-1 alpha-2 country code where the user's data was acquired and set the create_profile flag to 1. This enables a new user profile in your ID space to be added to the Profile Store. If the profile already exists, the user attributes you are passing in the phints field are just appended to the user's profile. |
API Reference: User Data API
API Tool:
To onboard user data:
- Make a GET request to the User Data API . Include the client's site ID in the URI path and set the following parameters:
- The user ID as an Oracle Data Cloud cookie ID (
BKUID), partner ID (PUUID), or MAID (IDFA, orADID.). - If you specified a MAID for the user ID: set
ccodeto the two-letter code for the country where the user's data was acquired. - If you specified a MAID for the user ID. set
create_profileflag to 1. - For
phint, include a key-value pair, such as purchase=smartphone.
The following example shows a GET request for data linked to a PUUID:
api.tags.bluekai.com/getdata/58038/v1.2?puserid=g3G991WRxNkbKGT6&phint=purchase=smartphone&bkuid=a33a152dba41b82d16fccd7e87d7d0df243d8625&bksig=wN9TzTedbuPXtw0YSaAus2t4LAteWJMakxuAihgfk48%3D
The following example shows a GET request for data linked to a MAID, in this case an ADID:
api.tags.bluekai.com/getdata/58038/v1.2?adid=38400000-8cf0-11bd&phint=purchase=smartphone&ccode=US&create_profile=1&bkuid=a33a152dba41b82d16fccd7e87d7d0df243d8625&bksig=wN9TzTedbuPXtw0YSaAus2t4LAteWJMakxuAihgfk48%3D
The User Data API returns a 200 code if the user profile has been found or created. It returns a 404 User Not Found error if the user does has not been ID synced to an Oracle Data Cloud cookie.
- The user ID as an Oracle Data Cloud cookie ID (
Bulk API
You use the Bulk API to onboard large volumes of user data programmatically. Using this API enables you to batch many calls to the User Data API in the body of a single HTTPS POST request. The Bulk API reduces latency and maximizes throughput compared to making a large number of individual calls to the user data API.
To use the Bulk API, contact your Oracle Data Cloud partner manager to request it. In the request, include the maximum number of subrequests per day and any custom requirements. The partner manager will enable your web service keys for making Bulk API calls.
API Reference: Bulk API
To onboard batches of user data:
- To make POST requests to the Bulk API call in the header of your POST request, set the following parameters:
ApiKey: Set to your BlueKai web service key.Accept: Set to application/json.Content-Type: Set to application/json.
- In the URI path, include the method signature, which is calculated based on the entire request. You do not have to calculate signatures for the individual User Data API calls.
The following shows an example URI path:
https://bulkapi.bluekai.com/2/api?bksig=signatureThe following shows a: signature calculation example:
#!/usr/bin/python import os import sys import getopt import hashlib import hmac import base64 def usage(): print "\nUsage: " + sys.argv[0] + "-k <secret-key> [-f <post-file> | -p <post-data>] \n" def main(argv=sys.argv): try: opts,args = getopt.getopt(argv, 'k:f:p:') except getopt.GetoptError: usage() sys.exit(2) key = "" data = "" for opt,arg in opts: if opt in ('-k'): key = arg elif opt in ('-f'): try: data = open(arg, 'r').read() except: print "Failed to read file: " + arg sys.exit(2) elif opt in ('-p'): data = arg else: usage() sys.exit(2) if key == "" or data == "": usage() sys.exit(2) h = hmac.new(key, data, hashlib.sha256) s = base64.standard_b64encode(h.digest()) print " key: " + key print " data: " + data print "digest: " + h.hexdigest() print "result: " + s if __name__ == "__main__": main(sys.argv[1:]) - In the body, pass the individual User Data API calls (subrequests) in the
Scatterobject.The following shows an example request body.
{
    "ResponseType": "Detail",
    "Method": "POST",
    "ResponseCallbackUrl": "http://example.com/uri",
    "Scatter": [{
        "Method": "POST",
        "URIPath": "/getdata/58038/v1.2?puserid=j4r951sRxl25KqT6&phint=purchase=smartphone",
        "RequestID": "001"
    }, {
        "Method": "POST",
        "URIPath": "/getdata/58038/v1.2?puserid=g3G991WRxNkbKGT6&phint=purchase=smartphone",
        "RequestID": "002"
    },
    . . .
  ]
}
Monitoring data onboarding
To monitor whether your user data is being successfully onboarded into categories, you can generate an inventory trend report in the DMP. The Inventory Trend report lists and visualizes historical daily inventory, for both new and all unique users, over daily intervals. The report is updated daily (around 12PM GMT) with the previous day's inventory data, and it is unsampled. See Inventory Trend Report for more information.
Validating integration
After your integration has been completed, you must provide your Oracle Data Cloud integration support specialist with a demo seat in your system. The support specialist can test the integration end-to-end to verify that is works correctly and also provide troubleshooting support.
Documentation
After your integration has been validated, you must provide your Oracle Data Cloud integration support specialist with instructions, including screen shots, on how clients can onboard data from their platform into the platform. Your integration may not be enabled until this requirement is completed.