Quick Mode for File-based Load Process Description
To create an integration for a Quick Mode file-based load:
-
From the Data Integration home page, click
 (Create), and then select Integration.
The General page is displayed in Create Integration view.
-
In Name and Description, enter a name and description for the new integration.
-
In Location, enter a new location name, or pick an existing location to specify where to load data.
A location is used to link a source and target along with the associated member mappings. You can define multiple integrations within a same location with different set of Options and Filter criteria. A location is primarily used to control access to integration. You can use Location Security to control access to end users.
If you enter a new location, you must provide the source and target. When you save the integration, the system creates the location automatically.
If you select an existing location, the system populates the source and target automatically and you cannot change it.
For more information about the location attributes, see Selecting Location Attributes.
-
Tap the Quick Mode slider on.
When you associate an integration job with the Quick Mode method and then save the job, you cannot reverse the Quick Mode association. However, the integration job can be deleted.
-
Click
 (Select a Source).
-
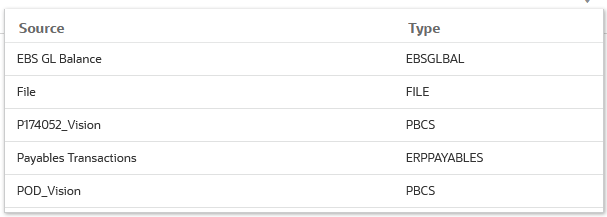
From the Select a Source page, select File.

-
From the File Browser, select the file and click OK.
Quick Mode for file-based loads support numeric and non-numeric data types.
You can double-click the inbox or outbox folders, or any other folders to see a list of files in folders.

You can also click Upload and navigate to a file to upload it.
-
From Cube, select the plan type of the target system.
You can register a custom cube as a separate application with no limit to the number of custom cube applications that can be registered.
-
From Category, select the category for the integration.
The categories listed are those that you created in the setup, such as "Actual." See Managing Category Mappings.
-
Optional: To map the file or change the header columns associated with the file, from the Create Integration page, click File Options.
-
From the File Import - File Type Encoding page, complete the Type, Encoding ,Delimiter, and Drill URL fields. Then from Use Header for Column Names, use the arrow keys to select a header row or no header row, and then click Next.

For more information on the File Import - File Type Encoding page, see Specifying File Options.
-
From the File Import - File Column Mapping page, modify any column headers as needed and click Finish.
For more information, see Editing a File Column Header.
-
-
For a new location only, click
 (Select a Target).
-
From the Select a Target page, select a target application.
-
Click Save.

-
From the Data Integration home page, click
 to the right of the integration, and then select Map
Dimensions.
-
From Import Format, select the name of the import format to use for the integration.
-
From Type, select the format of the file.
Available options:
-
Delimited—Load numeric data from a delimited file format.
-
Multi-column–Numeric—Load numeric data for multiple dimension members of a selected dimension in a single row of data. The definition of the members to load can be included in a header record in the load file, or in the import format definition.
-
Delimited–All Data Type—Load all data types from a delimited file format.
-
Multi Column–All Data Type—Load all data types for multiple dimension members of a selected dimension in a single row of data. The definition of the members to load can be included in a header record in the load file, or in the import format definition.
-
-
From Delimiter, select the character to use for delimiting columns in the output file.
A delimited file contains one or more records set off from each other by a specified delimiter.
-
Comma (,)
-
Pipe (|)
-
Exclamation (!)
-
Semicolon (;)
-
Colon (:)
-
Tab
-
Tilde (~)
-
-
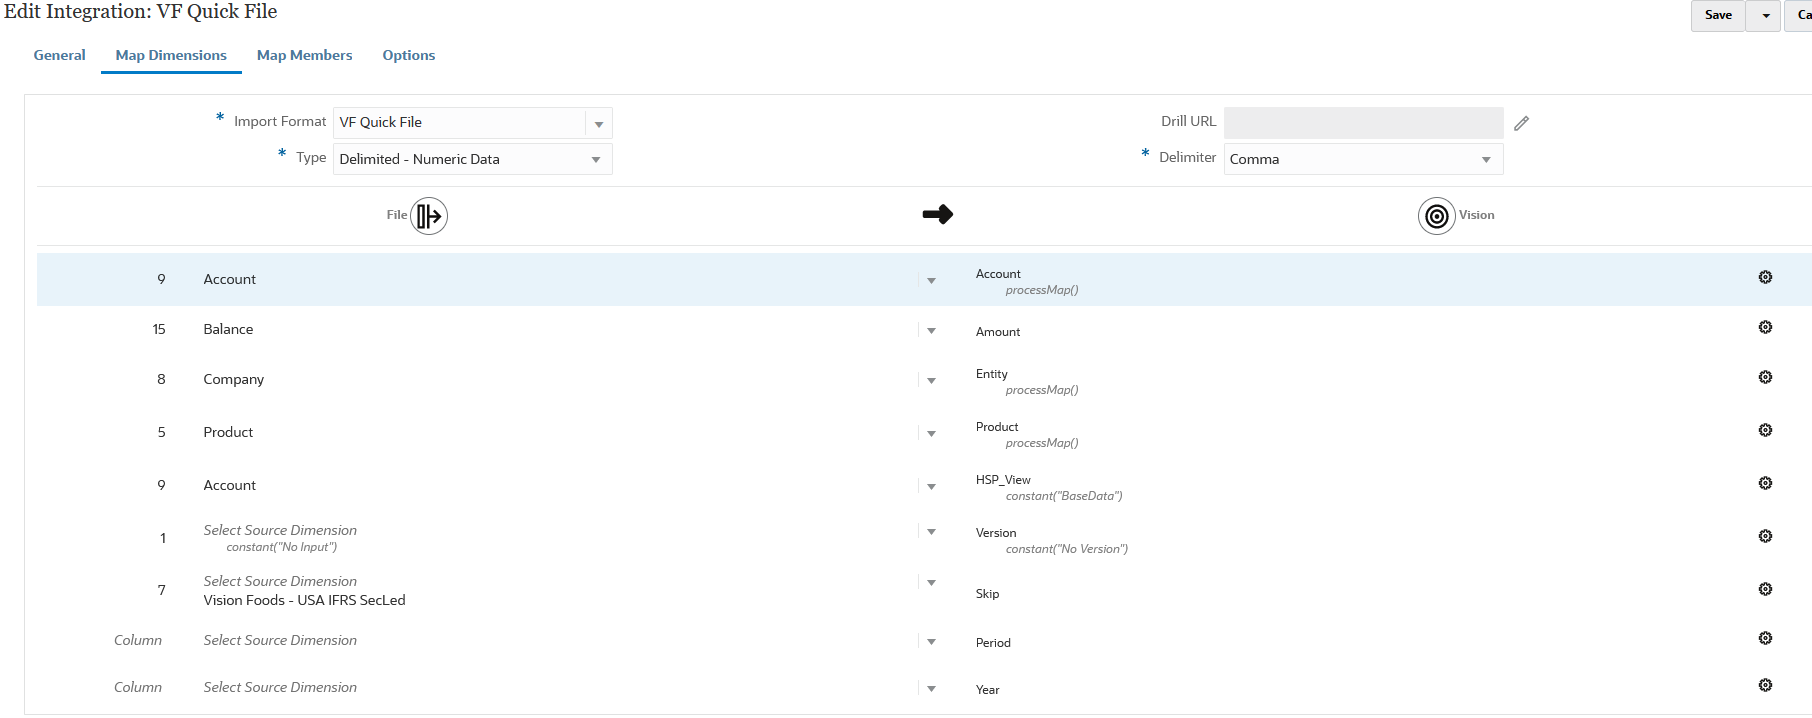
In the mappings grid, map the source columns in the source data-load file to the dimensions in the target application.
The dimensions from the target application are populated automatically.
If you select an existing import format, then the source and target are automatically mapped.
If you are adding a new import format or editing an existing import format, complete the following:
-
In Column, specify the field number from the file to import.
-
In Select Source Dimension, specify the name of the source dimension to assign to the target application.
Multiple source columns of the same dimension can be mapped to target dimensions. For example, you can map four "Account" source columns.
-
-
(Optional): Add a source or target expression by assigning expressions that operates on values directly from the source or target.
For more information for target expression types: see Using Target Expressions.
Note:
The
ProcessMaptarget expression is exclusively used for Quick Mode for file-based loads. This target expression enables you to perform transformation using mappings specified in Map Members.For more information for source expression types, see Using Source Expressions
Note:
The SQL target expression type is not available for dimensions used in Quick Mode - file-based loads. -
To use a member mapping for a dimension, you need to specify explicitly the target expression processMap for the dimension.
For example, if you plan to map a member for the Entity dimension, you need to define the processMap expression for the Entity dimension.
-
In the mappings grid, select the target value to which to add a target expression by clicking
 to the right of the dimension, and then selecting
Edit Target Expression.
-
From the Edit Target Expression page, click Expression Type, then select Process Map and then click OK.

-
- Click Save.
-
From the Data Integration home page, click
 to the right of the integration, and then select Map
Members.
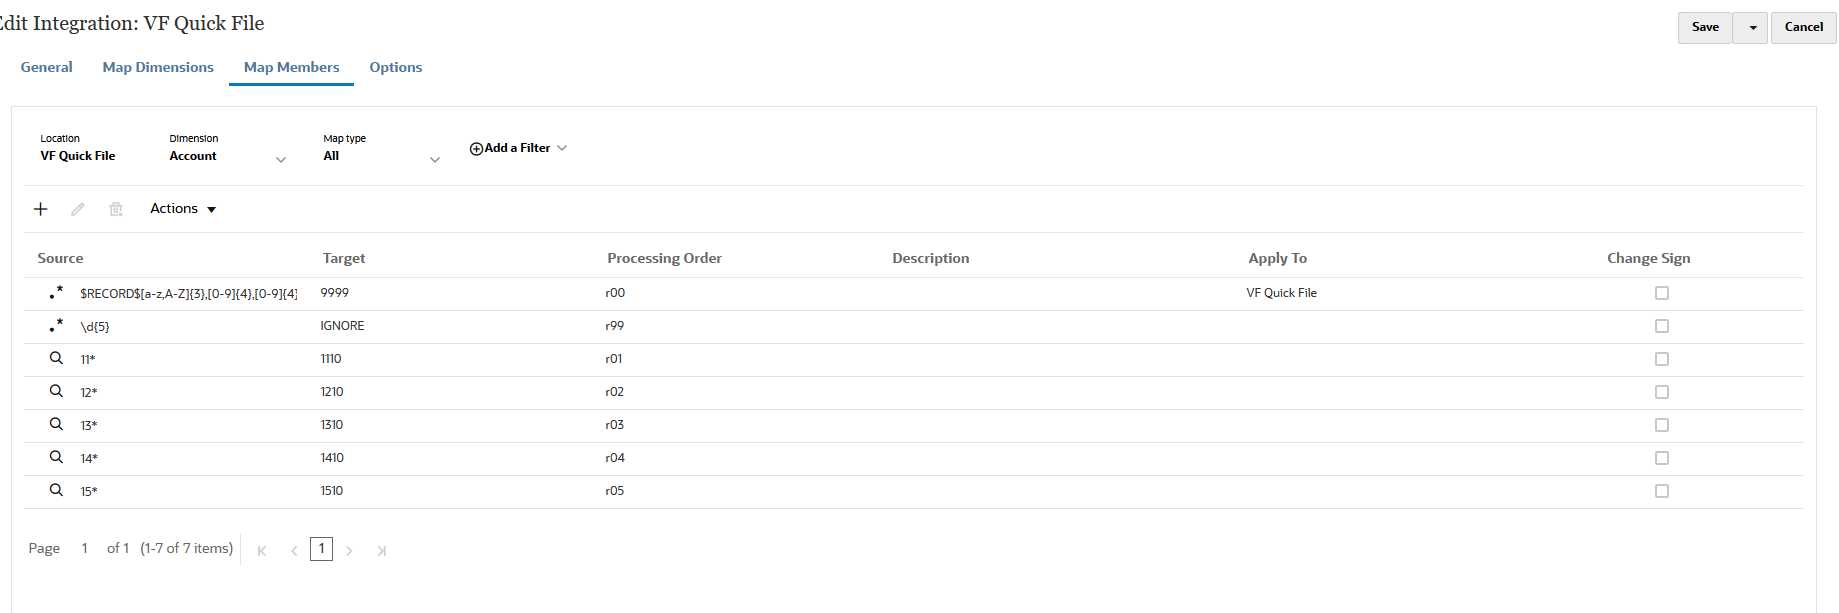
Map members to translate source values to valid members in each target dimension. If you have defined target expressions to derive the target members for a given dimension, then you don’t have to define member mapping.
Note:
If your data transformations can be achieved using target expressions, then its highly recommended to use it instead of mapping members. Transformation using target expression perform significantly better than member mapping for large data sets. -
From the Dimension drop-down, select the dimension to which to edit or add member mappings.
Note:
To use a member mapping for a dimension, you must have alread specified explicitly the target expression processMap to the dimension when mapping dimensions.
-
Click
 to add a new member mapping.
You can also just edit existing mappings as needed without adding a new mapping by selecting a mapping and clicking the Edit icon
 .
.
-
From Add Member Mapping page, then Source, select the member mapping type from the Mapping Type drop down, and then specify the source value.
Types of member mappings:
Type of Mapping Description See Also 
Match and replace the source value exactly with the target value.
Explicit mappings are one to one mappings, for example, source value "ABC" is replaced with target value "123."
Using Explicit Mappings 
Use special characters to match a string in the source value and map it to a target value.
Like mappings can use wildcard characters in the source record only: a single asterisk (*) and question marks (?). Asterisks are placeholders for any number of characters.
For example, 1190* maps the accounts 1190, 1190100, and 1190-200 to the Cash target account.
Question marks are placeholders for one character. For example, the source account of 119? maps only to source accounts that contain four characters and that begin with 119.
Using Like Mappings 
Regular expression that uses a sequence of characters that specifies a match pattern in text.
This mapping type is available for source records only.
Only Java supported regular expressions can be used.
For example, if you want to apply a regular expression that ignores a row that has five digits in the source record, you can specify .* \d{5} and in the target, you specify IGNORE.
Other examples:
110[1-9]{3}999 - Starts with 110 any 3 numbers ends with 999
^[A-Z][1-5]{5} - Starts with uppercase alphabet followed by 5 numbers between 1 & 5
^1[1-5]{5}9{3} - Starts with 1 any 5 number between 1 & 5 and ends with 999
See:
Note:
When processing the source values for transformations, multiple mappings may apply to a specific source value. The order of precedence is: Explicit, Like, and then Regular Expression. -
In Target, enter the target value for the dimension member name.
You can enter an individual member as target or select a value using member selector by clicking by clicking
 .
.
Note:
You cannot use wildcards on the target value. -
In Processing Order, specify the order of the mapping.
The processing order determines the level of precedence within a mapping type. Mappings are processed in alphabetical order by the name within a mapping type. Numbers may also be used to help with ordering. For example, if numbering by tens or hundreds, you can insert a new value between existing ones. When mappings are numbered 10, 20, and 30, you can add a mapping that starts with 25 and need not rename other mappings.
-
In Description, enter a description of the mapping.
-
Click OK.

-
Optionally, you can edit a member mapping by selecting the mapping and clicking
 .
.
You can delete a member mapping by selecting the mapping and clicking
 .
.
-
Run the integration:
-
From the Data Integration home page, select the integration job associated with the Quick Mode - File-based load and then click
 .
.
-
From the Run Integration page, the default value for the Mode is Replace.
-
If no period was defined on the Options page, then from the Period drop-down, select the single period from the source file from which to load data.
If you map a period dimension and specify a target expression for period on the Map Dimension page for the integration, then the Period drop-down is not available for selection because the period is derived from the mapping.
-