Applying Application Filters to an Oracle ERP Cloud Data Source
All the application filters are predefined when you select any of the prepackaged queries to the Oracle ERP cloud sources. However, you can provide input values in the rule or integration options.
You can select dynamic filters to define as report parameters from the Oracle ERP cloud data source when the actual parameter value needs to be defined at the data load rule or application level.
An example of a dynamic filter is "Currency Type" where you can select either: Entered, Statistical, or Total.
You can specify a single filter condition or multiple filters conditions, and additionally specify the exact values that you want returned.
In some cases, you can change a static parameter value in the Report parameter list by replacing it with a parameter value enclosed within $$ notations. This type of filter applies to the Ledger ID and Period parameters.
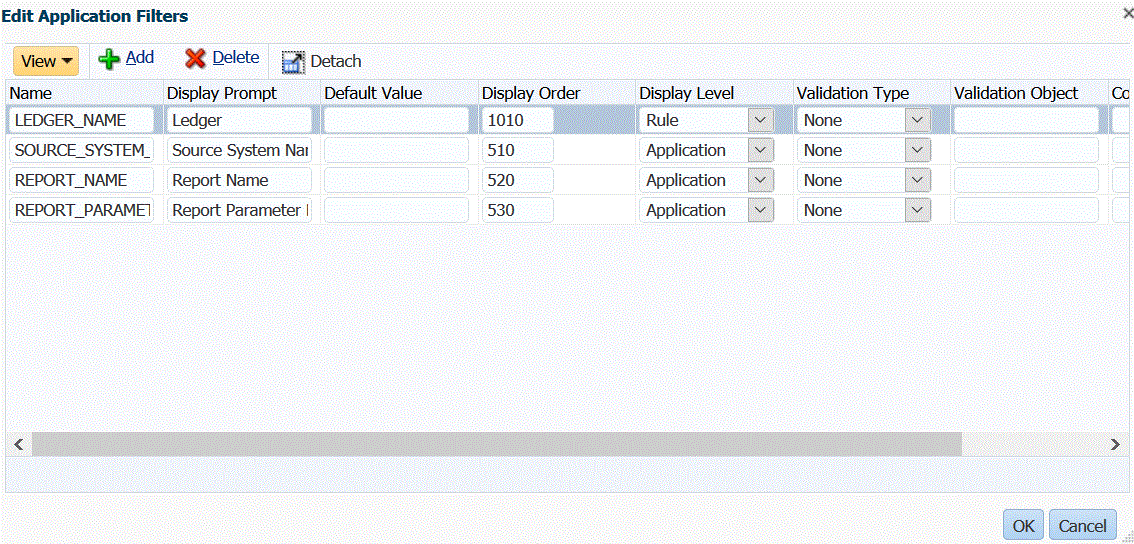
For example, in the image below, the static parameter value argument1 = $LEDGER_NAME$ has been added to the Report Parameter List as a parameter:

On the Edit Application Filter screen, a display name has been entered for the parameter. This is the name as it is shown in the rule or integration options.

In data load rules, this is how the parameter shows on the Source Options screen:

Two predefined parameters, $START_PERIODKEY$ and $END_PERIODKEY$, can be used to select specific periods using a data format from the POV. For information on using these two parameters, see Selecting Period Report Parameters from the Oracle ERP Cloud.
To add a filter for the Oracle ERP cloud data source.
-
In Data Management, select the Setup tab, and then under Register, select Target Application.
-
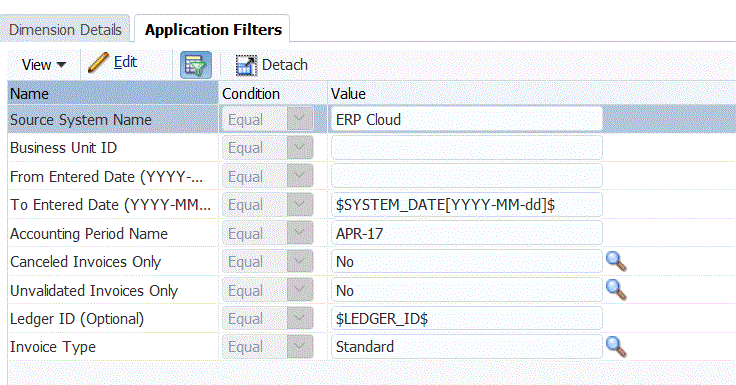
Select the Oracle ERP Cloud data source and click the Application Filters tab.
-
In the Source System Name, specify the name of the Oracle ERP Cloud source system.
For example, type ERP Cloud.
-
Select any parameters from the list of available report parameter to pass to the Source Option tab when the data load rule is run.
For example, to set the Canceled Invoices Only option to "No," select No in the parameter field for Canceled Invoice Only.
-
Optional: Select any Ledger ID or any Periods report parameters to pass.
You can replace a static parameter value in the parameter list for the Ledger ID or Period by replacing the value enclosed within the $$ notation with your own selected parameter.
In the following example, you can change the "ACCOUNTING PERIOD NAME" by selecting the actual period using the $START_PERIODKEY[MMM-YY]$ format. In this example, the accounting period has been changed to APR-17.

For more information, see Selecting Period Report Parameters from the Oracle ERP Cloud.
-
To edit any display options for any dynamic report parameter, on the Application Filters tab, click Edit.
-
On the Edit Application Filters screen, click Add.
-
From the Name field, select the name of the parameter.
-
In Display Prompt, enter the name of the display prompt for the filter on the Source Options tab in Data Management or Edit Integration page in Data Integration.
-
In Display Order, specify the display order of the filter on the Source Options or Edit Integration page.
If this field is blank, the custom filter cannot be displayed, and the default value is used as the filter value.
For example, enter 99 to show the filter in the 99th position sequence or position in a list of filters. Display orders are listed from lowest to highest.
-
In Display Level, select display level of the parameter (application and/or rule) to indicate the level at which the filter is displayed.
-
In Validation Type, select None.
-
Click OK.
-
Click Save.