Introduction
This tutorial shows you multiple ways to generate focused calculation scripts in Oracle EPM Cloud Planning to calculate only data that has been edited, instead of the entire data entry form.
Background
The Groovy EPM object model enables you to determine what cells in a data entry grid have been edited, and then generate a focused Essbase calculation to calculate only those members impacted by your data entry.
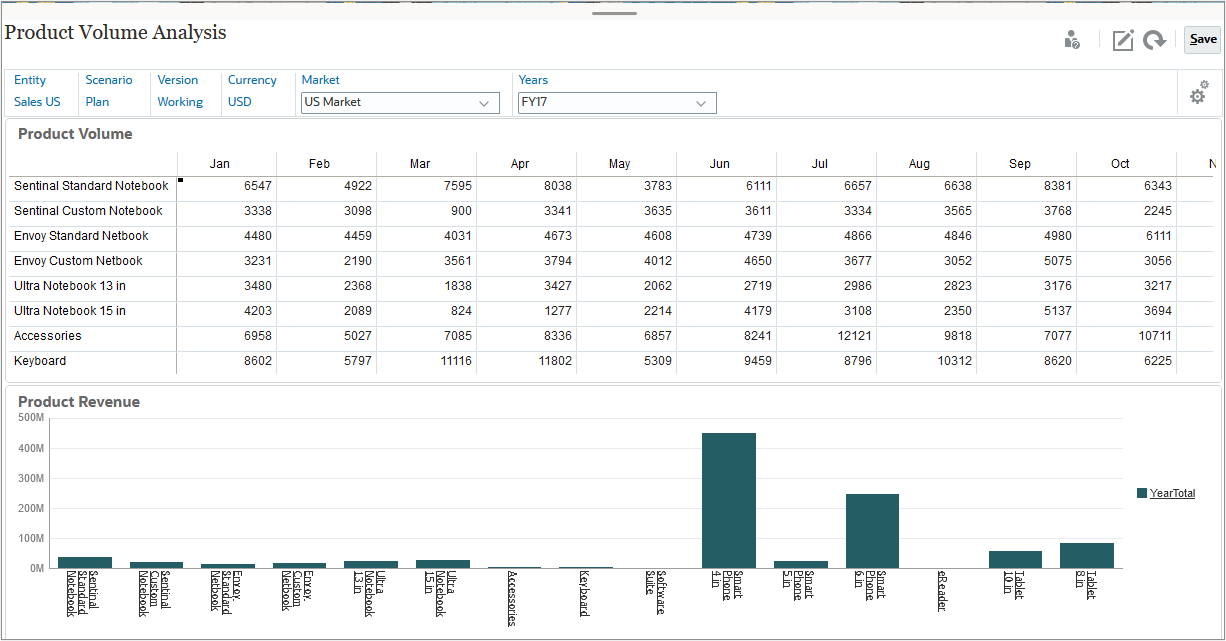
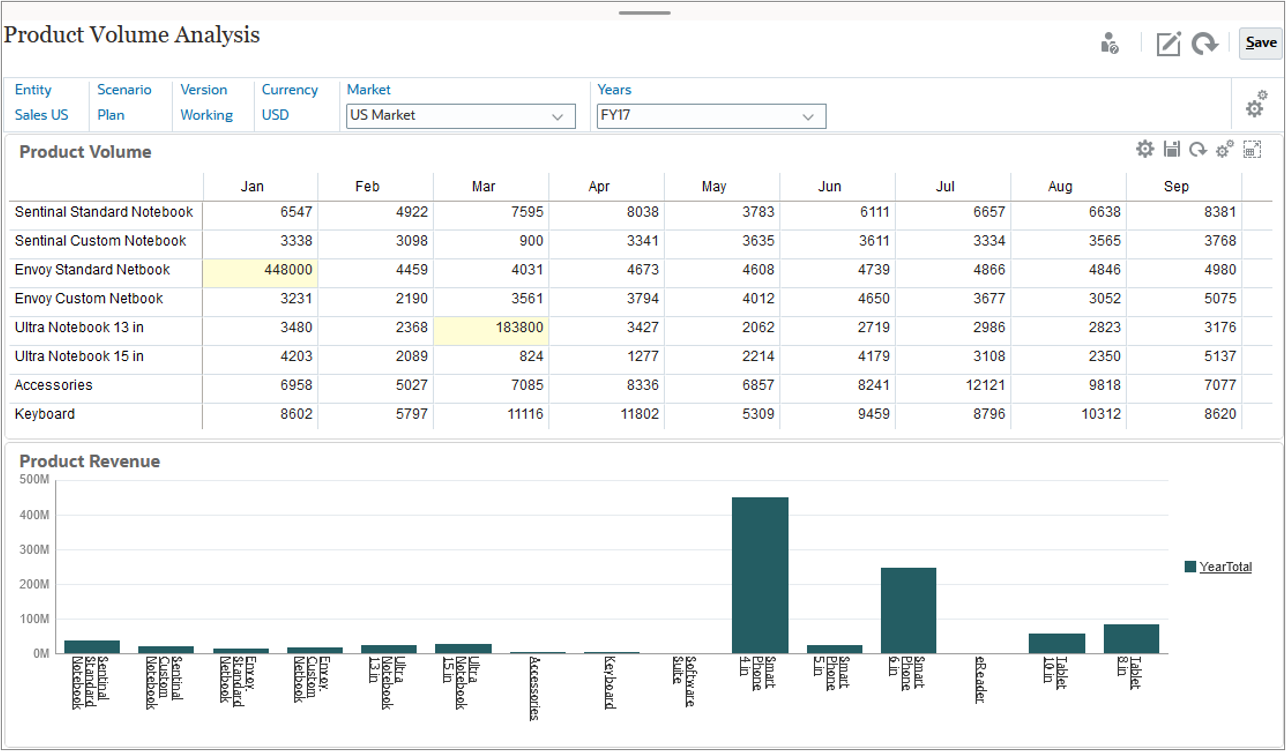
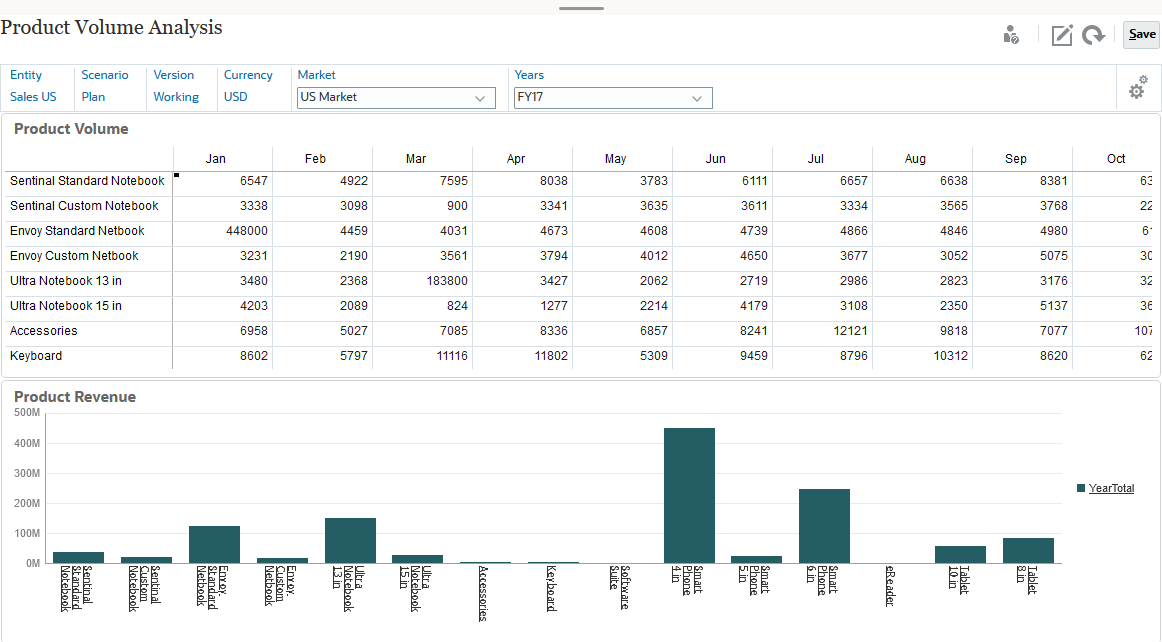
In this tutorial, you work with a Product Volume Analysis dashboard. The top form, Product Volume, captures the volume for various products in monthly periods. The bottom form, Product Revenue, displays revenue for the various products. When you edit the top form, you want revenue to be calculated in the bottom form for the edited products only.
This tutorial is in three parts and covers three different ways to calculate the edited products:
- Generating and executing a focused calculation script
- Creating a Groovy script that executes an existing calculation job
- Generating and executing a focused calculation script, then returning to the Groovy script for further evaluation
Prerequisites
Cloud EPM Hands-on Tutorials may require you to import a snapshot into your Cloud EPM Enterprise Service instance. Before you can import a tutorial snapshot, you must request another Cloud EPM Enterprise Service instance or remove your current application and business process. The tutorial snapshot will not import over your existing application or business process, nor will it automatically replace or restore the application or business process you are currently working with.
Before starting this tutorial, you must:
- Have Service Administrator access to a Cloud EPM Enterprise Service instance.
- Upload and import this snapshot into your Planning instance. If you've previously uploaded the snapshot for another Groovy tutorial, you can continue using the same snapshot.
Note:
If you run into migration errors importing the snapshot, re-run the migration excluding the HSS-Shared Services component, as well as the Security and User Preferences artifacts in the Core component. For more information on uploading and importing snapshots, refer to the Administering Migration for Oracle Enterprise Performance Management Cloud documentation.Tip:
The scripts you need for this tutorial are linked as text files within each section.Setting up the Planning environment
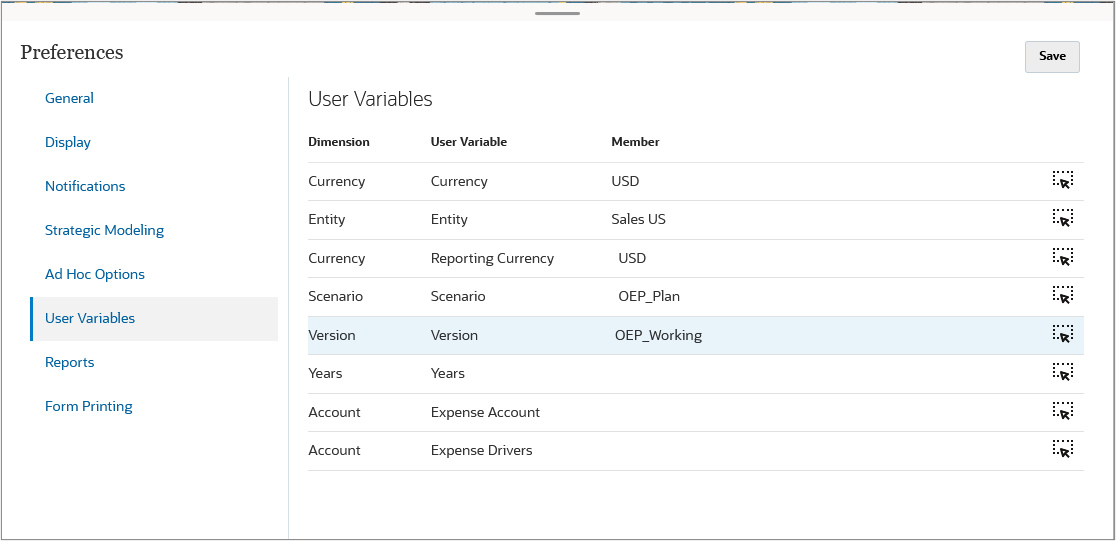
Setting user variables in Planning
First, you set the required user variables to work with the Product Volume Analysis dashboard.
- From the Home page, click Tools, and then select User Preferences.
- Select the User Variables tab.
- Enter the following variable definitions:
- Click Save. At the confirmation message, click OK, then return to the Home page.

| User Variable | Member |
|---|---|
| Reporting Currency | USD |
| Currency | USD |
| Entity | Sales US |
| Scenario | OEP_Plan |
| Version | OEP_Working |
Importing variables for run-time prompts in Planning
Next, you import calculation variables to the OEP_FS cube to support the run-time prompts (RTPs) used later in this tutorial.
- Right-click the link for HP4_OEP_FS_Variables.xml, and save the file to your local drive.
- From the top left, click
 Navigator and navigate to Rules (under Create and Manage) to open Calculation Manager. In the System View, expand EPM Cloud > HP4. Right-click OEP_FS and select Import.
 - Under File Import Details, browse to select HP4_OEP_FS_Variables.xml from your local drive.
- Under Location Details, make the following selections:
- Application Type: EPM Cloud
- Application: HP4
- Cube: OEP_FS
- Under Import Options, select Override Existing Objects.
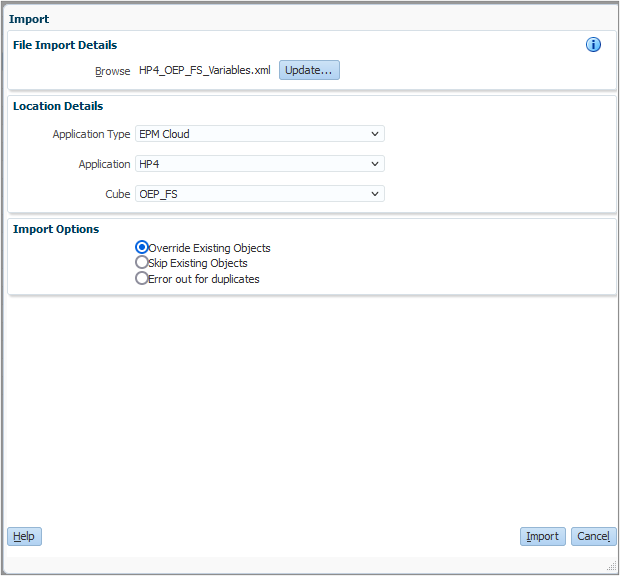
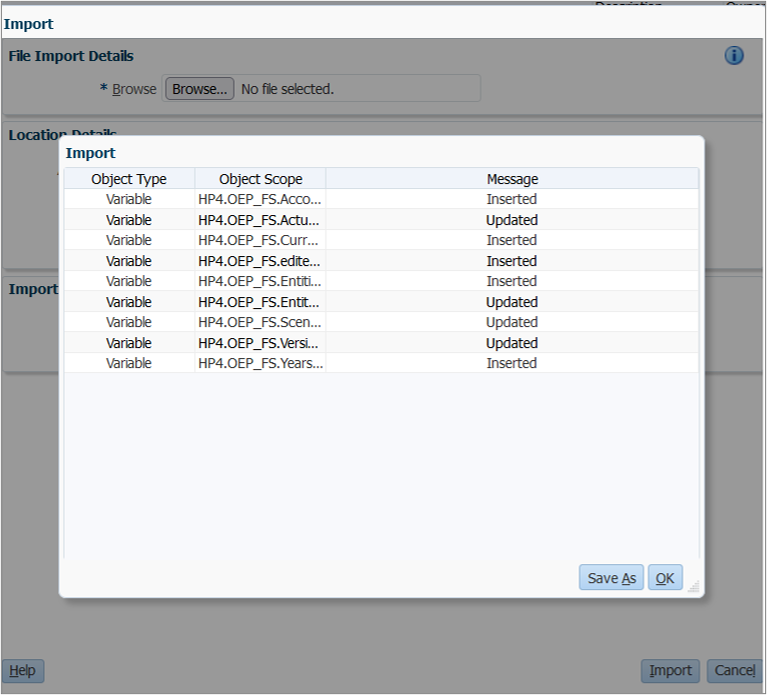
- Click Import. Review the import results (they may say either Updated or Inserted), and then click OK.
- Click Cancel to close the Import dialog box.
Generating a focused calculation script for edited products
In this section, you implement a Groovy script in Planning to calculate product revenue for edited products.
Creating the Groovy script
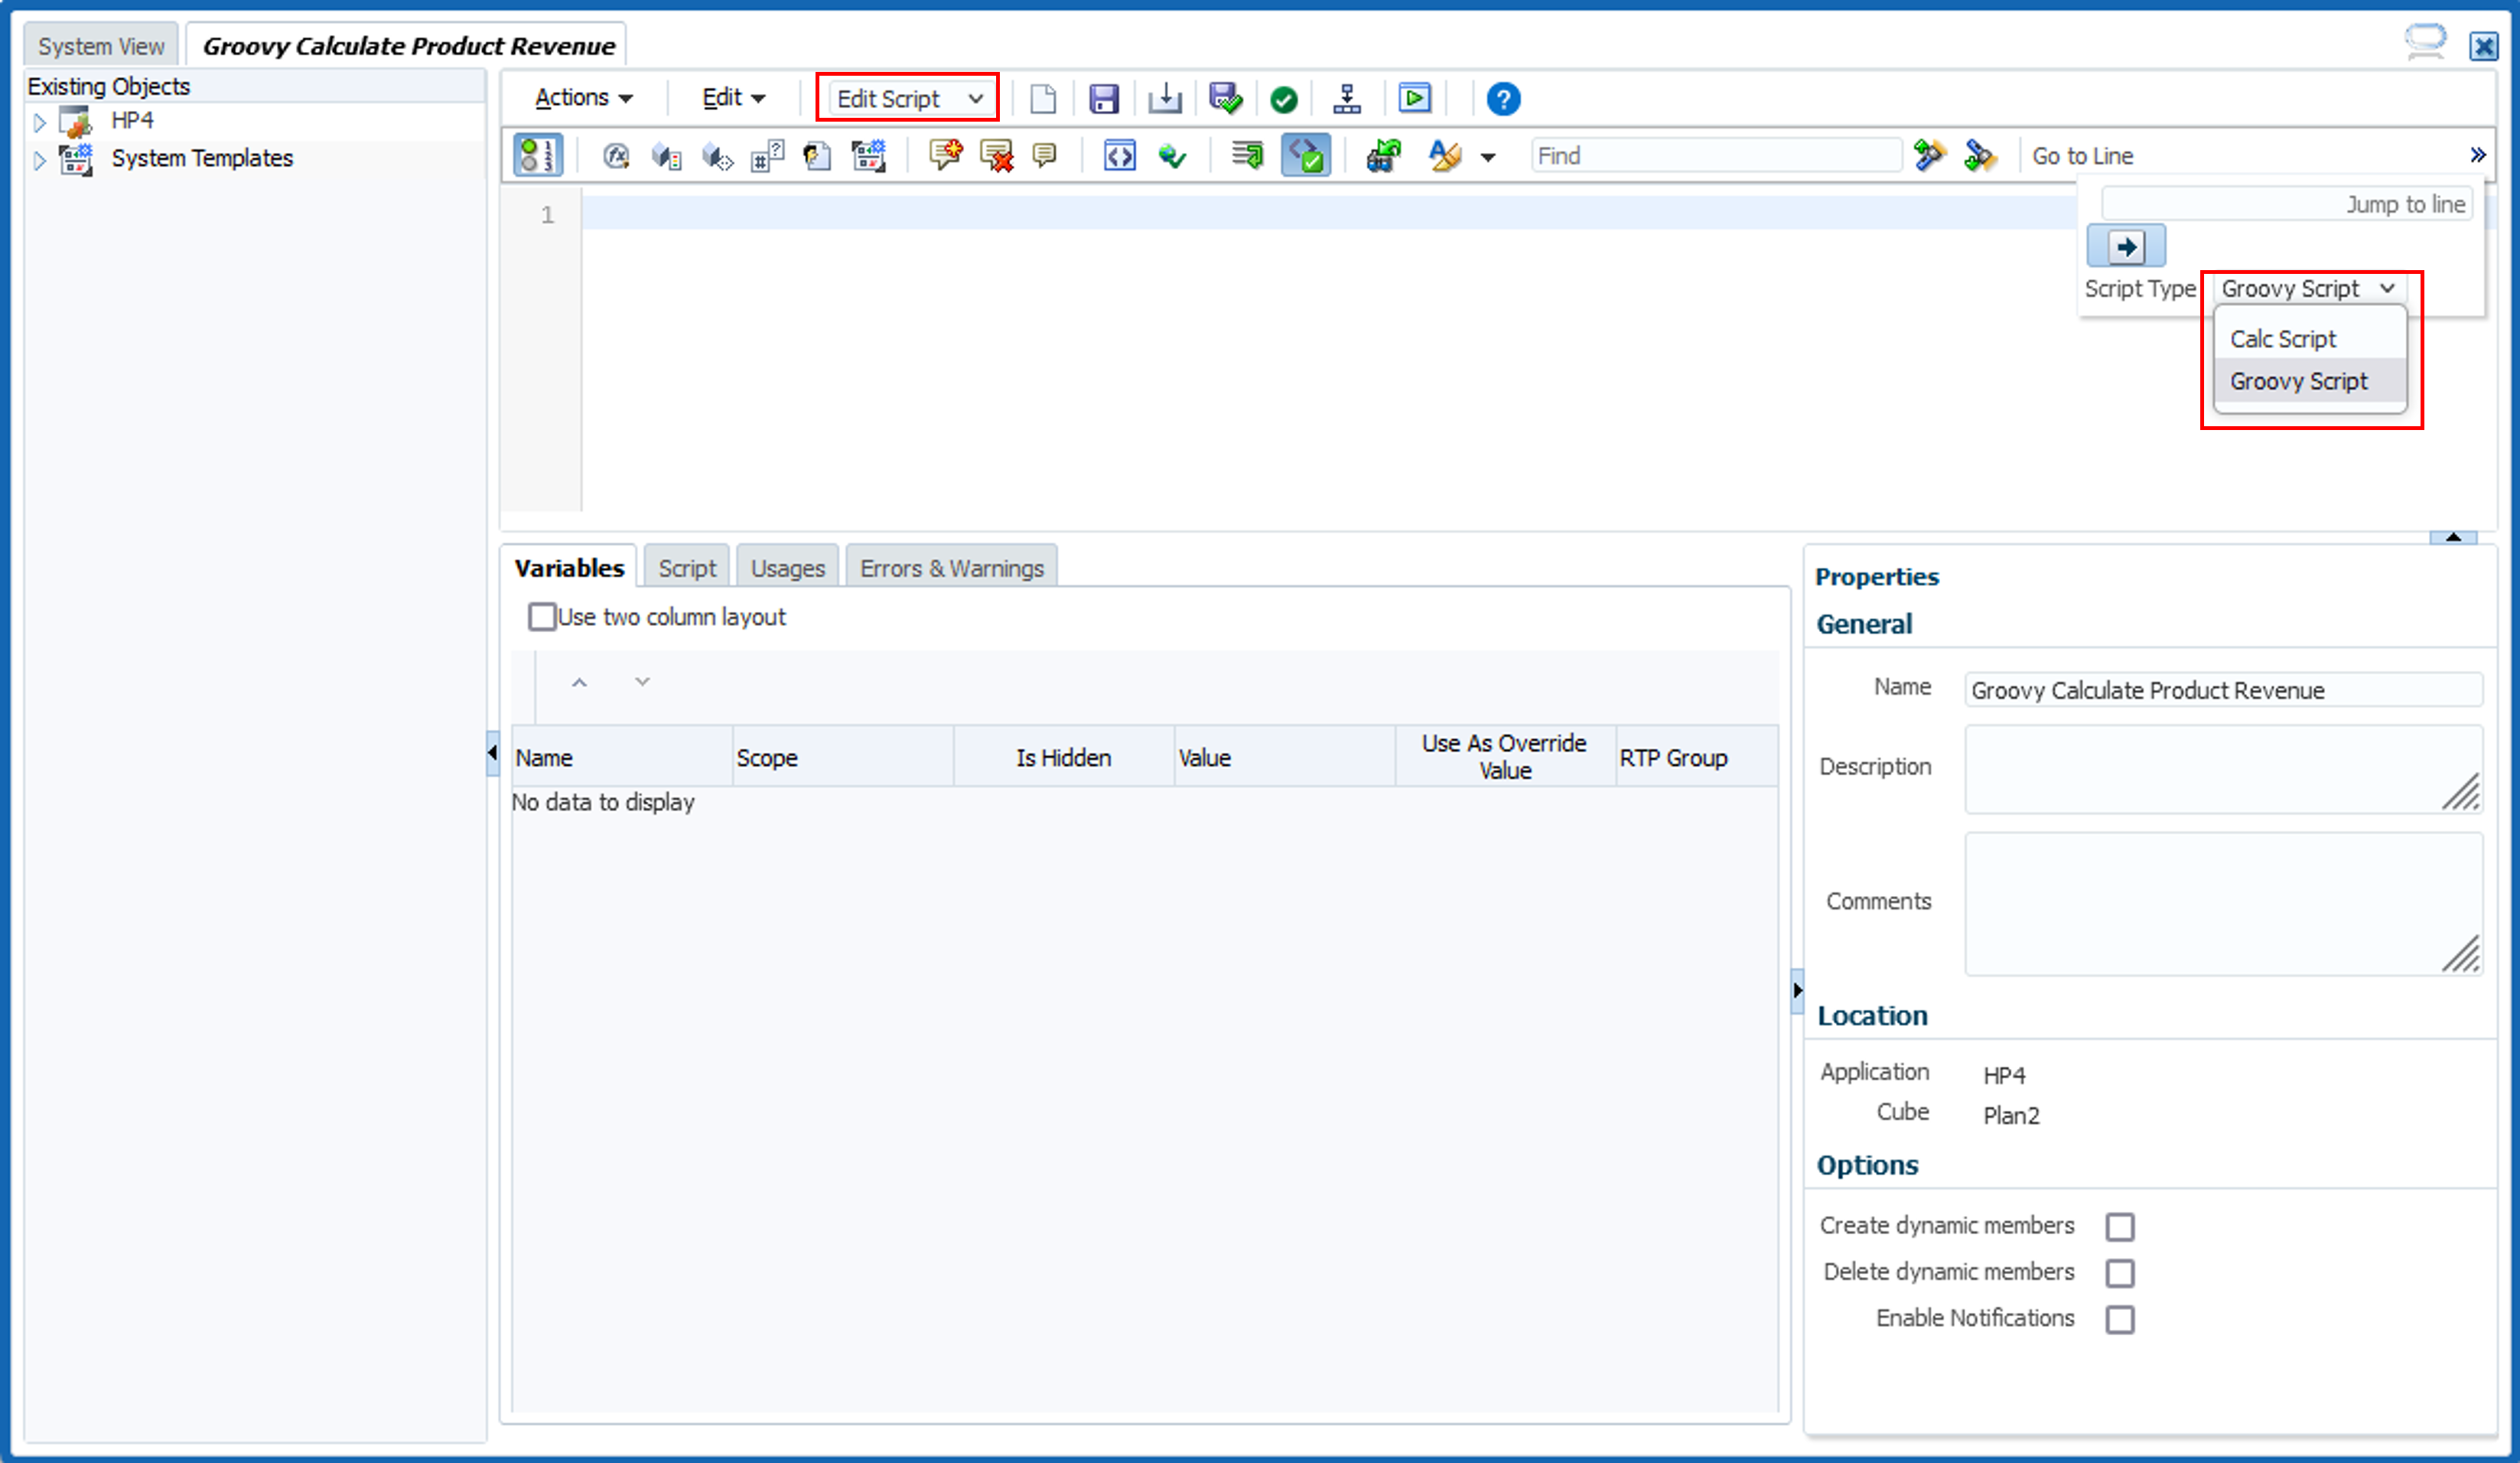
- In Calculation Manager, create a rule named Groovy Calculate Product Revenue in the OEP_FS plan type.
- In the Rule Editor, change the Designer option to Edit Script and set the Script Type to Groovy Script.
- Copy this script and paste it into the editor:
- On the toolbar, click
 (Save) to save the script, then click
  (Validate and Deploy) to validate and deploy the script. Click OK when prompted. Leave the Calculation Manager window open.

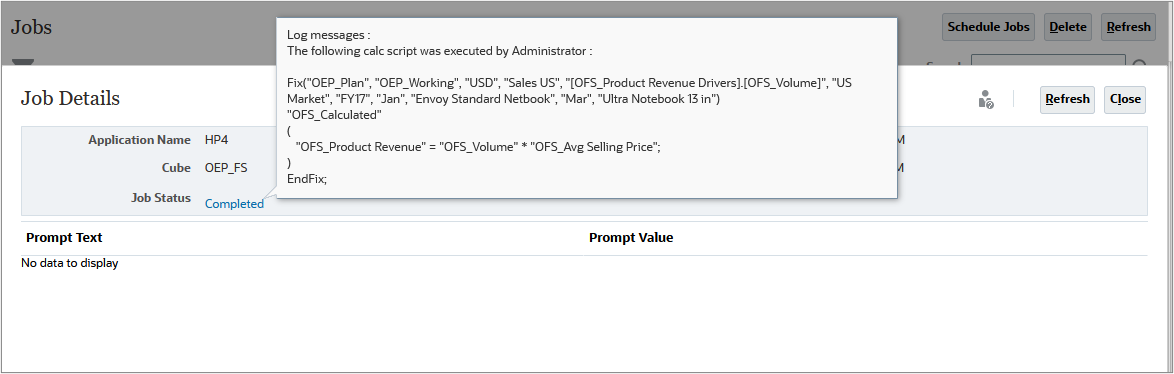
// Capture the edited periods and products Set<String> editedMembers = []operation.grid.dataCellIterator({DataCell cell -> cell.edited}, MemberNameType.ESSBASE_NAME).each { DataCell cell -> editedMembers << cell.periodName << cell.getMemberName("Product")
} if(editedMembers.size() == 0){
println("No edited cells found!") return; } // Generate the calc script to calculate revenue for the products whose volume was edited String calcScript = """ Fix(${cscParams(operation.grid.pov, editedMembers)}) "OFS_Calculated" ( "OFS_Product Revenue" = "OFS_Volume" * "OFS_Avg Selling Price"; ) EndFix;"""
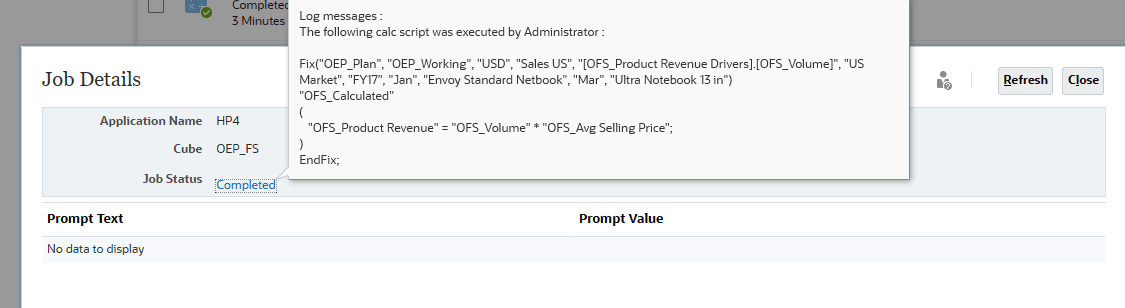
println("The following calc script was executed by $operation.user.fullName: \n $calcScript")
return calcScript.toString()

Define a Set to capture unique edited members.
Capture edited members.
Check if any members were edited. If none were edited, no further processing is required so return from the script.
Generate a calculation script to calculate the product revenue for edited cells by fixing on the POV members and edited members.
Note:
ThecscParams() API is a utility that returns a string value with each of the specified items flattened, quoted and separated by a comma. The string returned by this method can be plugged into an Essbase calculation script command as parameters. Print a message indicating the user who executed the rule and the generated calculation script.
Return the calculation script, which will then be executed.
Adding the rule to a Planning form
In this section, you add your Groovy script rule to the Product Volume form, to be run after saving.
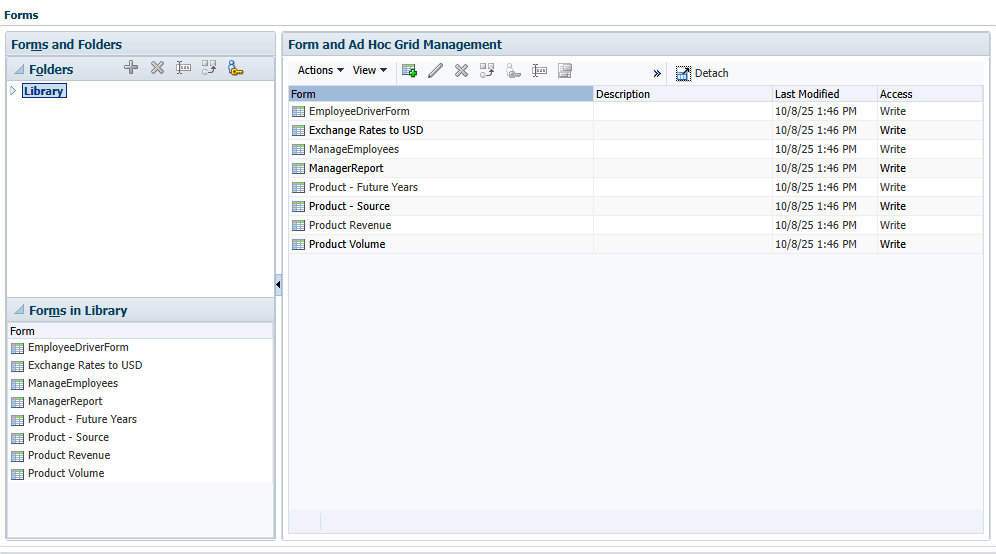
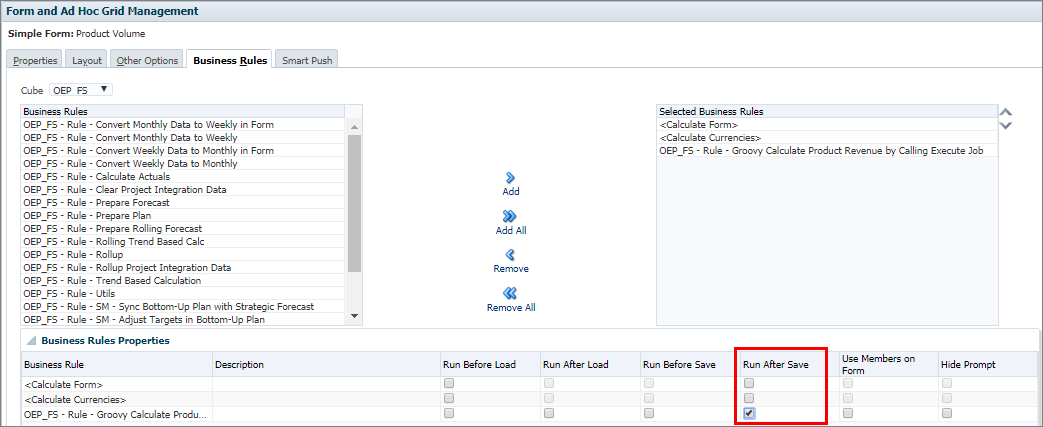
- Select the Planning window, and from the top left, click Navigator and navigate to Forms (under Create and Manage). Select the Product Volume form.
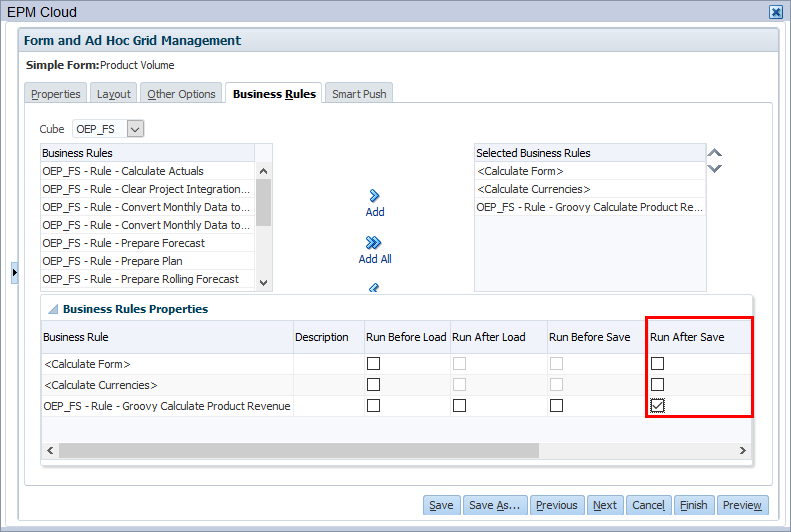
- Edit the form. Add the Groovy Calculate Product Revenue rule and set it to Run After Save. Save the form and close the Form Manager window.
Testing the focused calculation rule
In this section, you test your Groovy rule by editing data in the Product Volume Analysis dashboard.
- From the Home page, click Dashboards. Open the Product Volume Analysis dashboard.
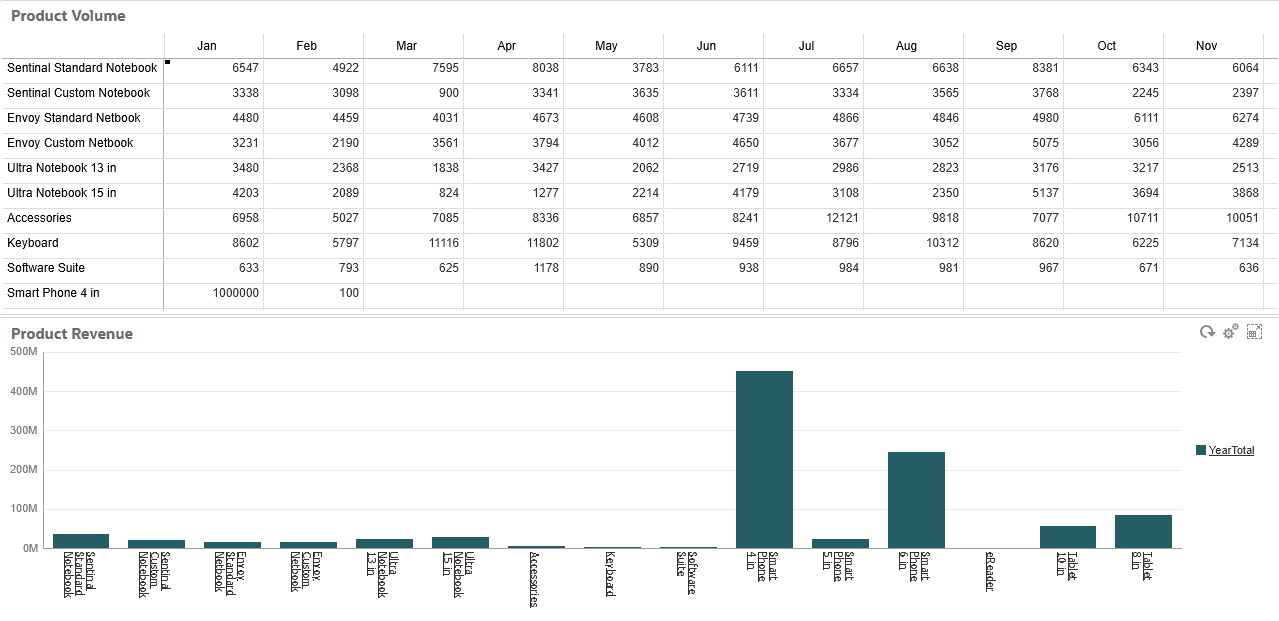
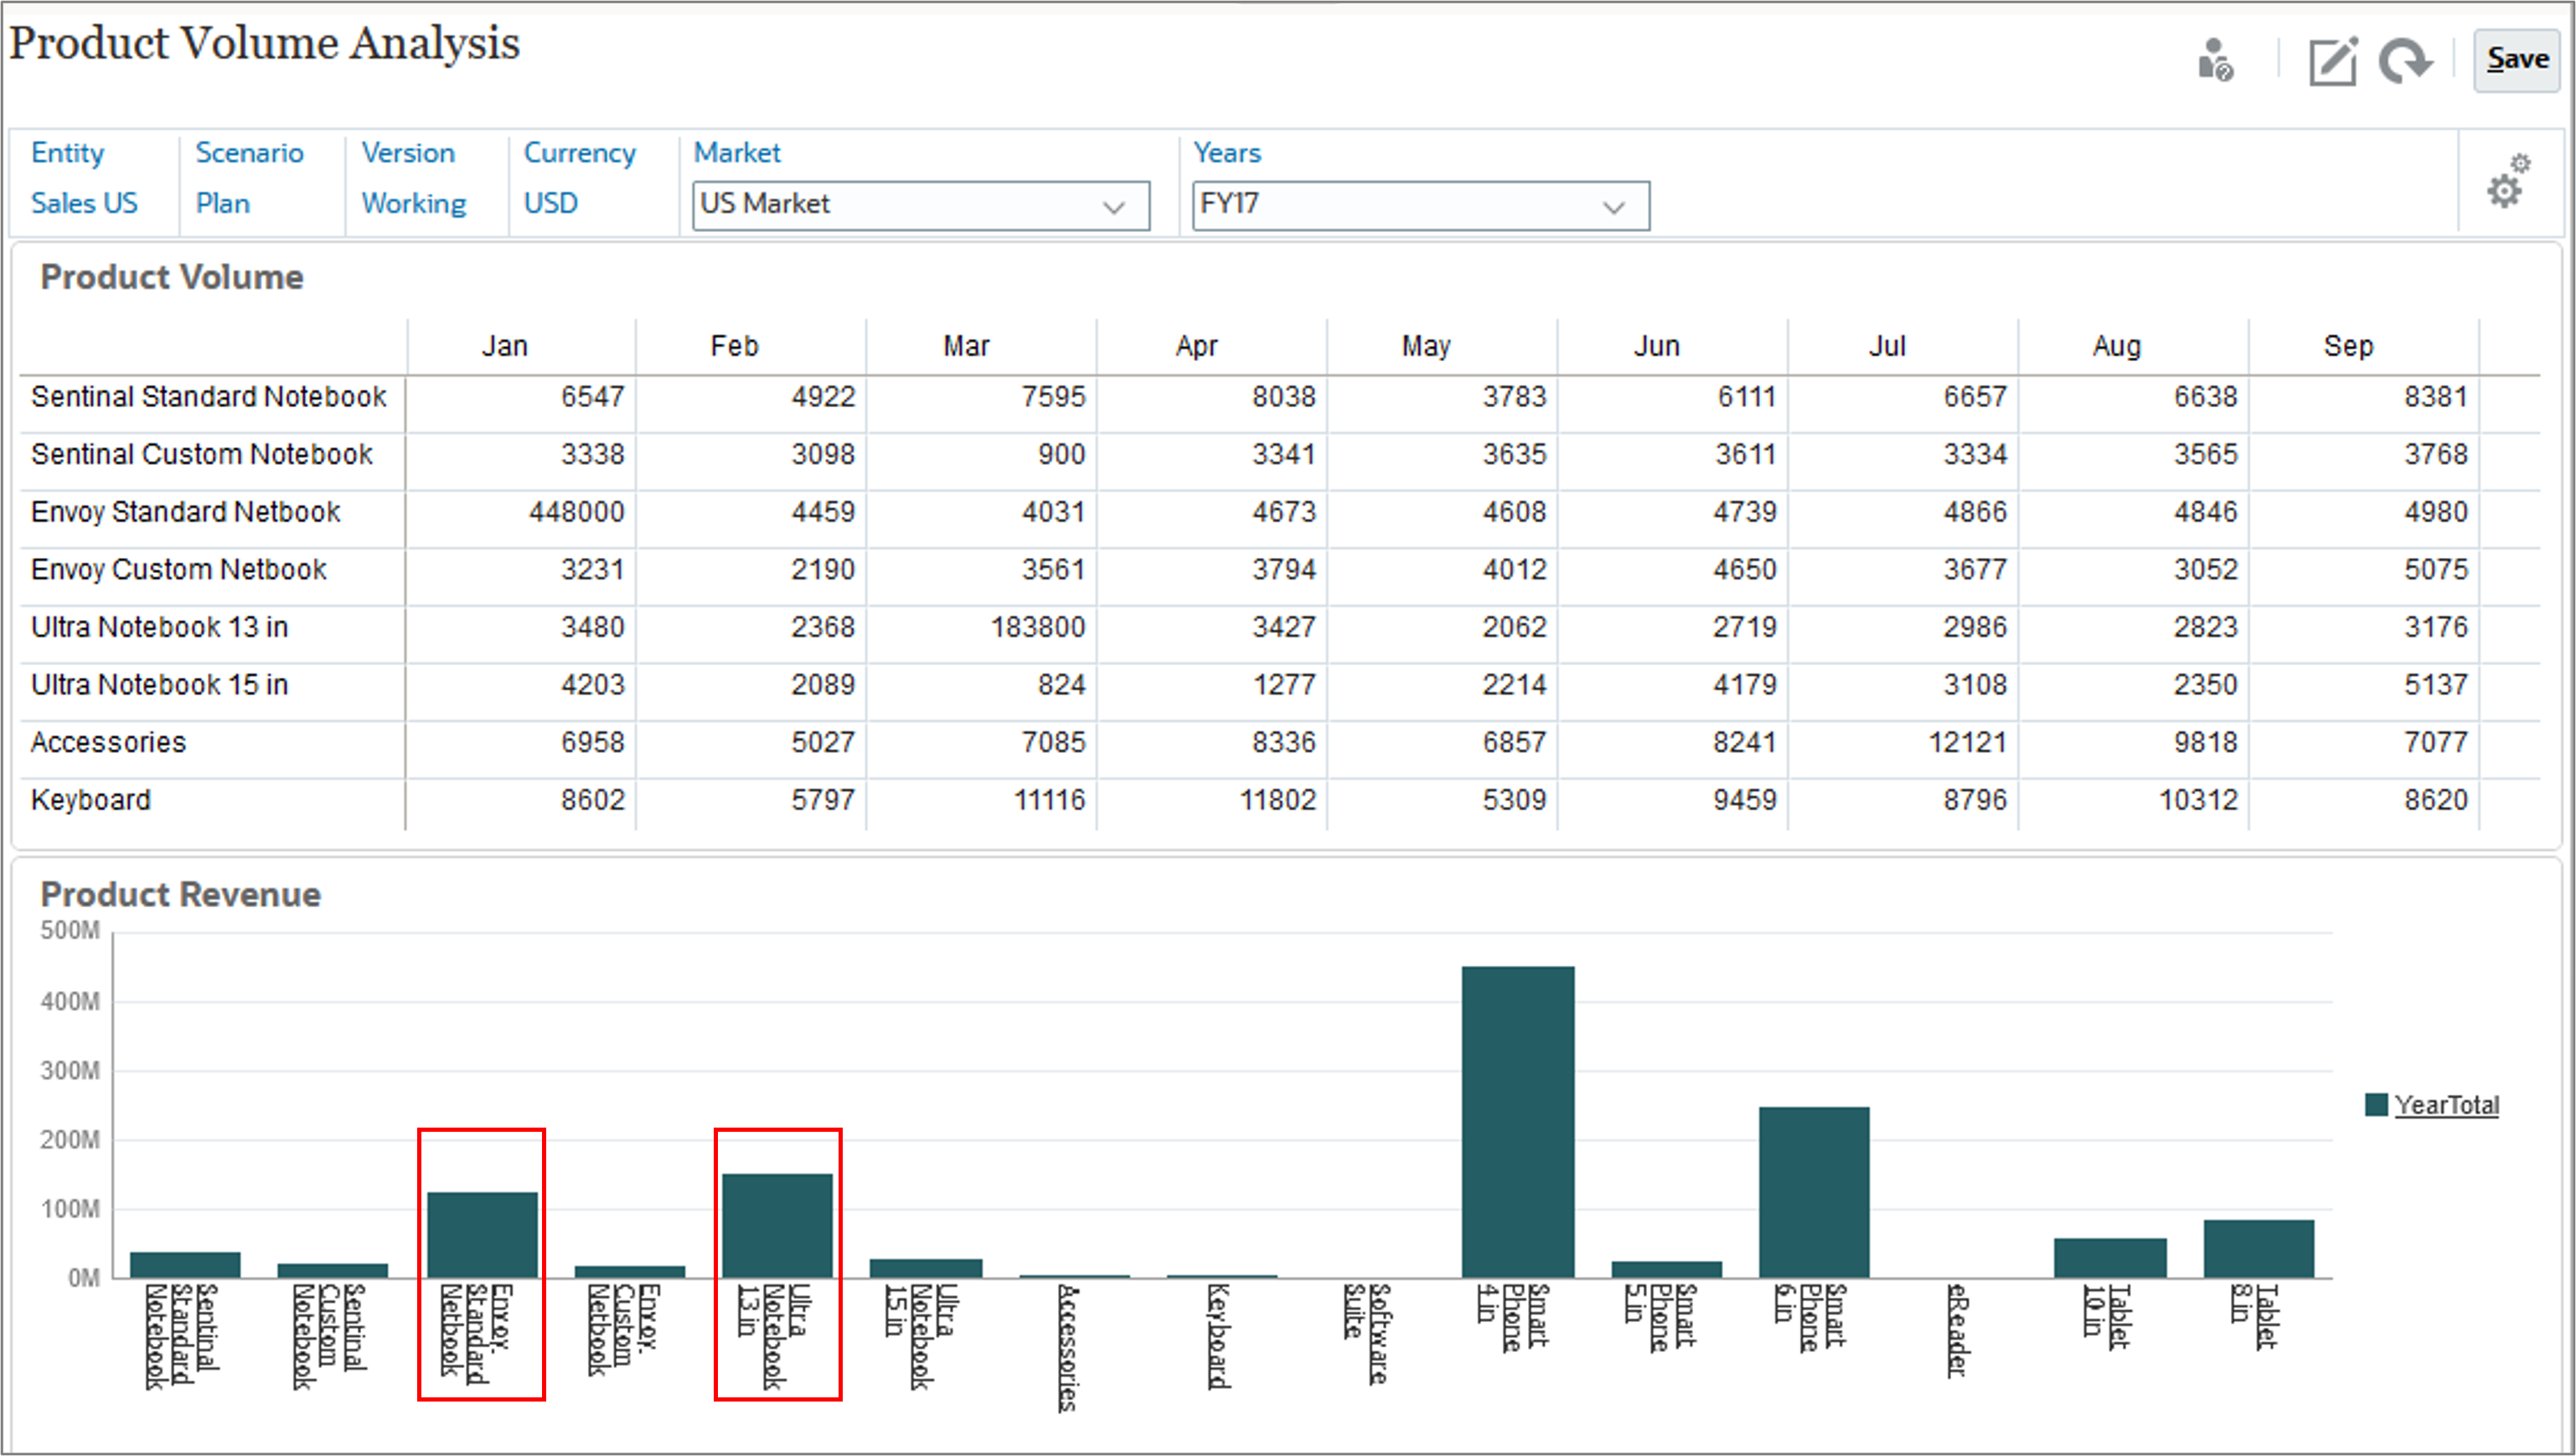
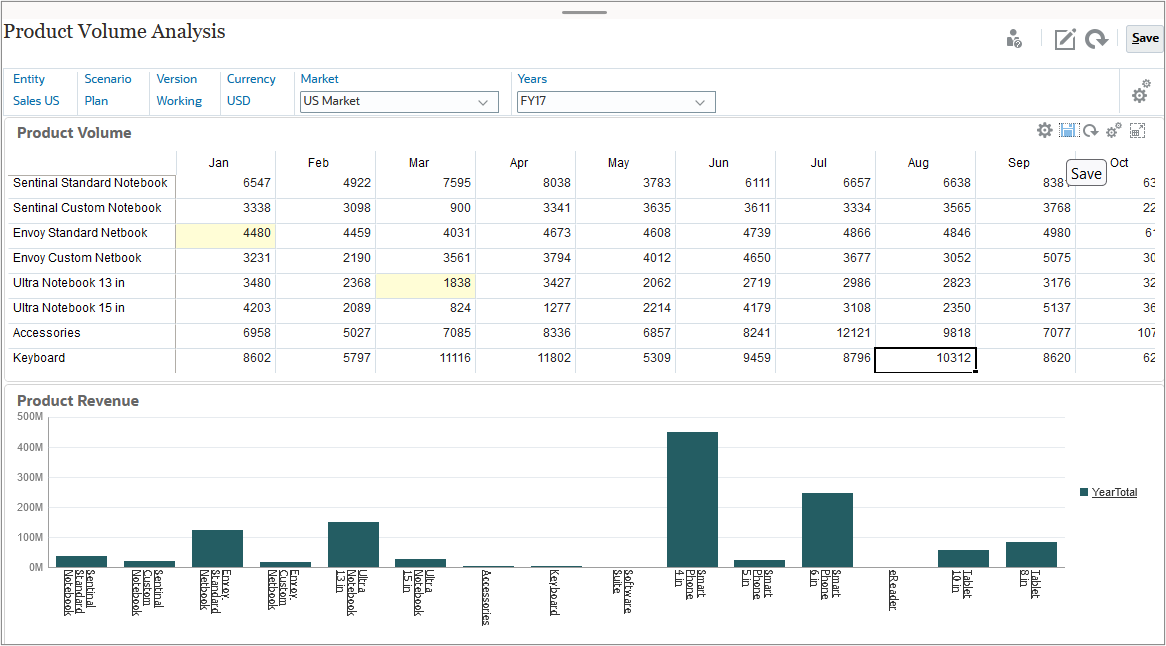
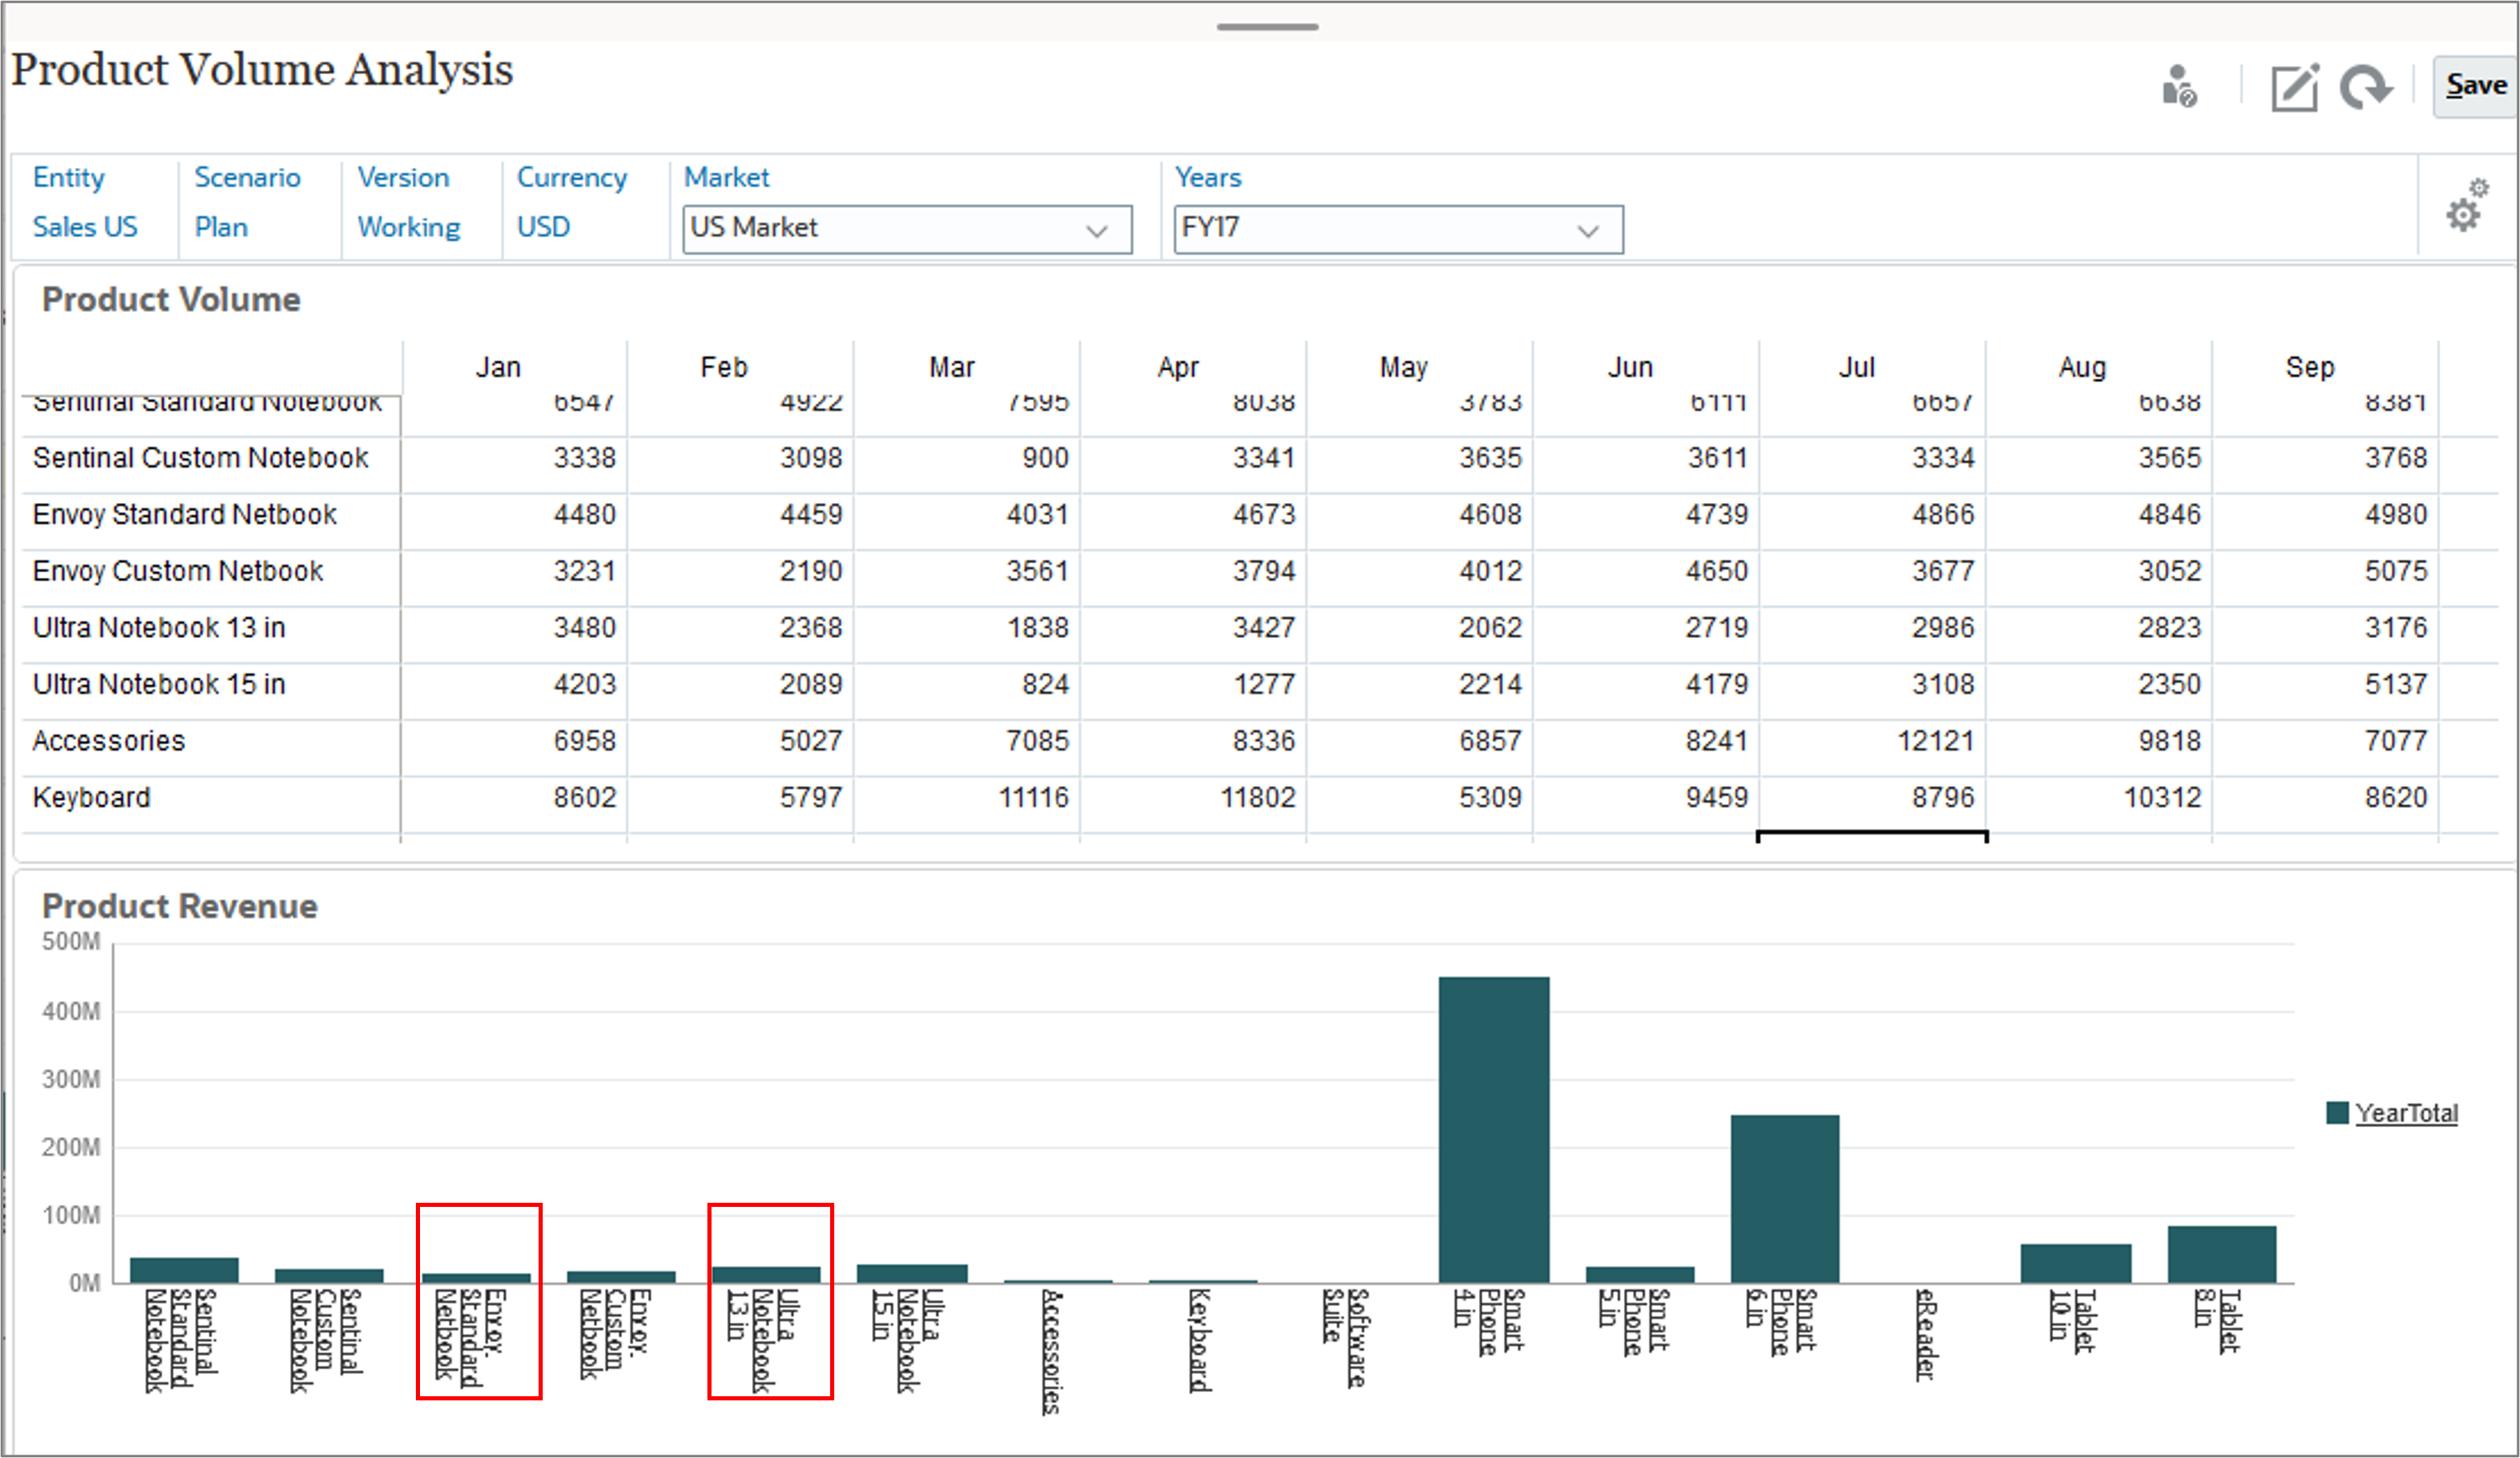
- For Envoy Standard Notebook, edit product volume for January. For Ultra Notebook 13 in, edit product volume for March. Save the form (not the dashboard).
- Click OK to close the information message. The changes are reflected in the Product Revenue form.
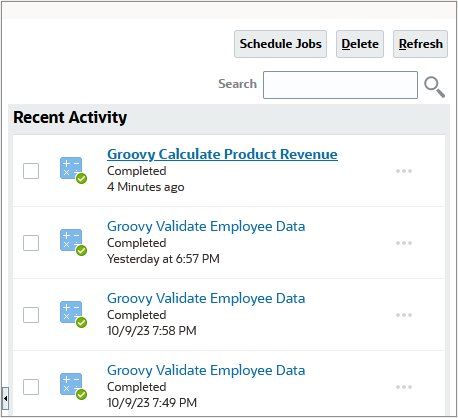
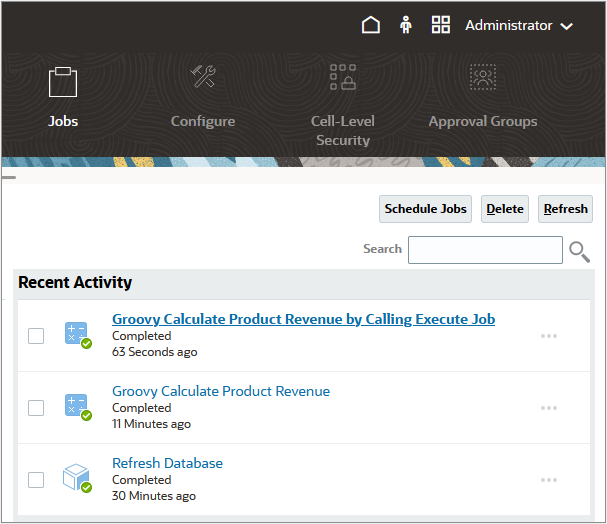
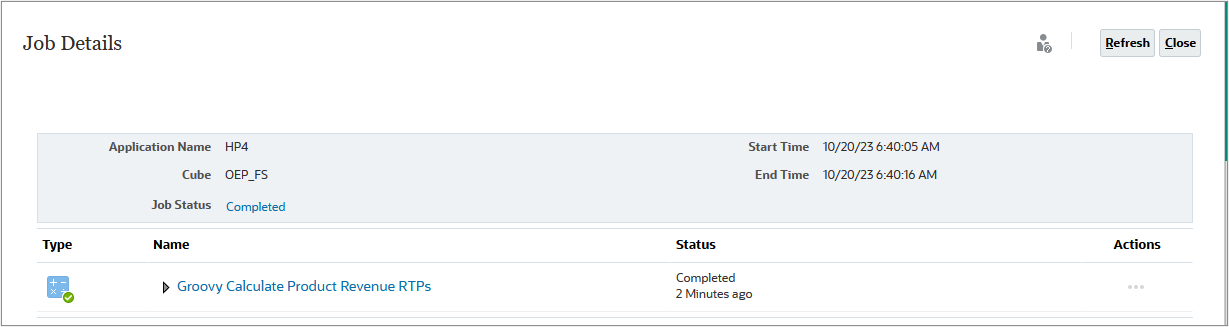
- Close the dashboard. Navigate to Jobs (under Application) and select the Groovy Calculate Product Revenue job.
- The log message for the completed job identifies the user who executed the rule and the generated calculation script. After viewing the job details, close the window and return to the Home page.
Executing a calculation job with a Groovy script
In this section, you create two Groovy scripts: one to calculate product revenue for edited members in a form, and a second to execute a calculation job that runs the first calculation. The second script is attached to the form and executed on saving data, and the first script uses RTPs to capture edited members passed to it from the second script. Offloading the calculation into a standalone rule that is called by another rule allows for code to be maintained, tested, and re-used in an efficient manner.
Creating a Groovy script for focused calculations using run-time prompts
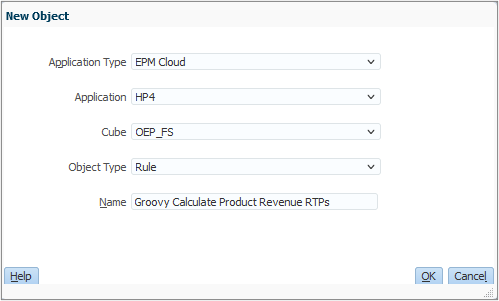
- Select the Calculation Manager window and create a rule named Groovy Calculate Product Revenue RTPs in the OEP_FS plan type.
- In the Rule Editor, change the Designer option to Edit Script and set the Script Type to Groovy Script.
- Copy this script and paste it into the editor:
- On the toolbar, click (Save) to save the script.
- Click (Validate and Deploy). For the Edited Members RTP, enter a value of
Accessoriesfor validation purposes, then click OK. - Click OK when prompted.

/*RTPS: {editedMembers}*/
String calcScript = """Fix($rtps.editedMembers)
"OFS_Calculated"
(
   "OFS_Product Revenue" = "OFS_Volume" * "OFS_Avg Selling Price";
)
ENDFIX"""
println("The following calc script was executed by $operation.user.fullName: \n $calcScript")
return calcScript
Define a run time prompt to accept the edited members on the first line.
Generate a calculation script to calculate the product revenue for edited cells by fixing on the edited members.
Print a message indicating the user who executed the rule and the generated calculation script.
Return the calculation script, which will then be executed.
Note:
During this step, the rule is not executed; however, you must enter valid members for the validation process to succeed.Creating a Groovy rule to execute a calculation job
Now you create the second Groovy rule, which executes a calculation job that passes variables to and runs the Groovy Calculate Product Revenue RTPs rule.
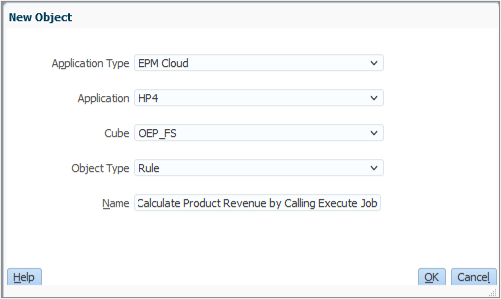
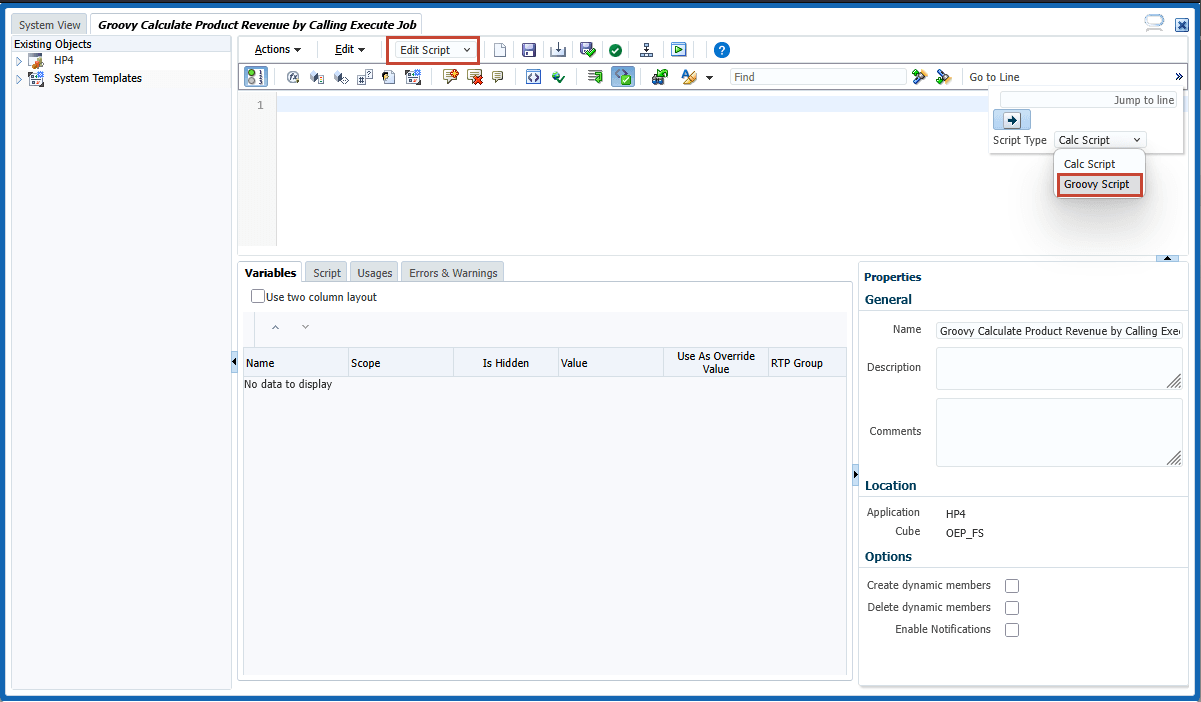
- In Calculation Manager, create a rule named Groovy Calculate Product Revenue by Calling Execute Job in the OEP_FS plan type.
- In the Rule Editor, change the Designer option to Edit Script and set the Script Type to Groovy Script.
- Copy this script and paste it into the editor:
- On the toolbar, click (Save) to save the script, then click (Validate and Deploy) to validate and deploy the script. Click OK when prompted. Leave the Calculation Manager window open.
// Capture the edited periods and products Set<String> editedMembers = []
Define a Set to capture unique edited members.
Capture edited members.
Check if there were any members edited. If none were edited, no further processing is required so return from the script.
Get the job factory.
Get a list of POV member header cells for dimensions other than Plan Element because the script has a member block on a Plan Element dimension member.
Execute the Groovy Calculate Product Revenue RTPs rule by passing the POV and the edited members as values for the editedMembers run time prompt.
Adding the rule to a Planning form
In this section, you add your Groovy script rule to the Product Volume form, to be run after saving.
- Select the Planning window and from the top left, click Navigator and navigate to Forms (under Create and Manage). Select the Product Volume form.
- Edit the form. Remove the Groovy Calculate Product Revenue rule from selected rules. Add the Groovy Calculate Product Revenue by Calling Execute Job rule and set it to Run After Save. Save the form and close the Form Manager window.
Testing the Groovy rule to call a calculation job
In this section, you test your Groovy rule by editing data in the Product Volume Analysis dashboard.
- From the Home page, click Dashboards. Open the Product Volume Analysis dashboard.
- For Envoy Standard Notebook, edit product volume for January. For Ultra Notebook 13 in, edit product volume for March. Save the form (not the dashboard).
- Click OK to close the information message. The changes are reflected in the Product Revenue form.
- Close the dashboard. Navigate to Jobs (under Application) and select the Groovy Calculate Product Revenue by Calling Execute Job job.
- In the job details, the Groovy Calculate Product Revenue RTPs rule is listed as a child job. Click the child job.
- In the child job details, you can see the list of members passed to the script for the Edited Members prompt. The log message for the completed job identifies the user who executed the rule and the generated calculation script. After viewing the job details, close the window and return to the home page.
Generating an inline calculation script for edited data with further Groovy processing
The EPM object model provides a way to execute a calculation script inline and then return to the Groovy script for further evaluation. In this section, you explore this calculation script and Groovy integration by implementing a Groovy script to calculate product revenue for edited products and count how many cells were calculated.
Creating the Groovy script
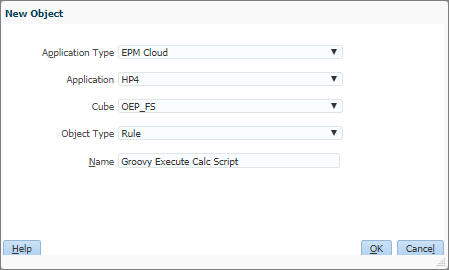
- Select the Calculation Manager window and create a rule named Groovy Execute Calc Script in the OEP_FS plan type.
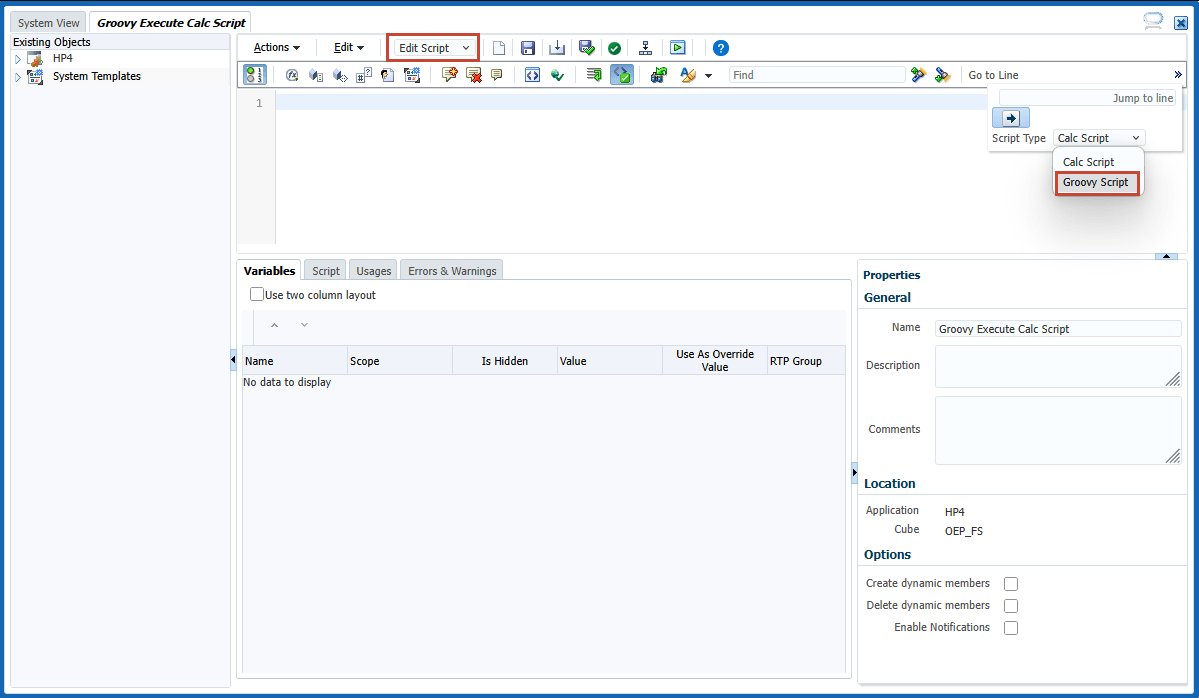
- In the Rule Editor, change the Designer option to Edit Script and set the Script Type to Groovy Script.
- Copy this script and paste it into the editor:
- On the toolbar, click (Save) to save the script, then click (Validate and Deploy) to validate and deploy the script. Click OK when prompted. Close Calculation Manager.
// Capture the edited periods and products Set<String> editedMembers = []println("Total number of cells calculated: $e.atReturnMessage")
}
Define a Set to capture unique edited members.
Capture edited members.
Check if any members were edited. If none were edited, no further processing is required so return from the script.
Generate a calculation script to calculate the product revenue for edited cells by fixing on the POV members and edited members. The calculation script also returns a count of number of cells calculated via the @RETURN command.
Get the OEP_FS cube.
Execute the calculation script against the cube.
Print a message indicating the user who executed the rule and the generated calculation script.
Print the total number of cells calculated returned by the calculation script.
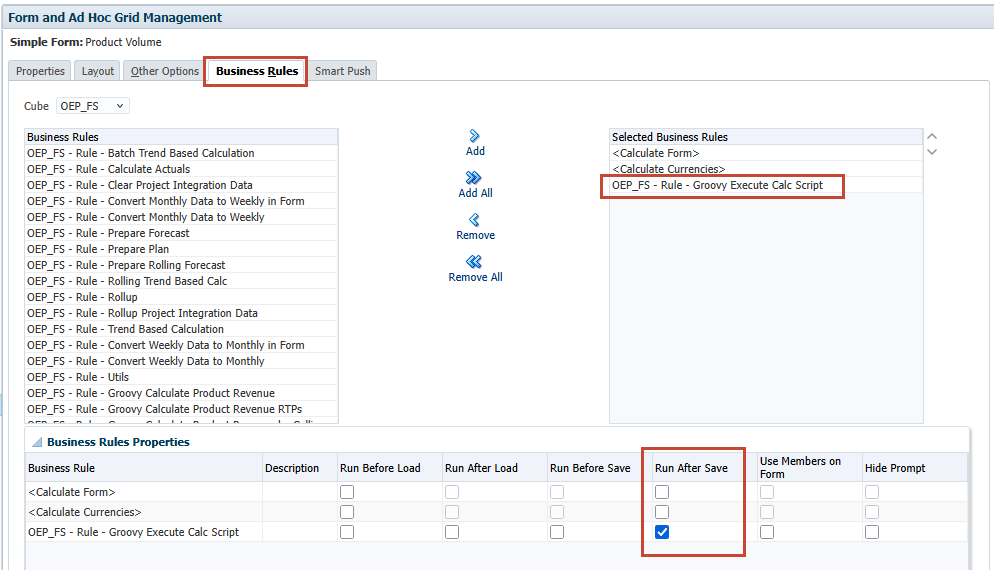
Adding the rule to a Planning form
In this section, you add your Groovy script rule to the Product Volume form, to be run after saving.
- From the top left, click Navigator and navigate to Forms (under Create and Manage). Select the Product Volume form.
- Edit the form. Remove the Groovy Calculate Product Revenue by Calling Execute Job rule from Selected Business Rules. Add the Groovy Execute Calc Script rule and set it to Run After Save. Save the form and close the Form Manager window.
Testing the Groovy Rule to execute a calculation script
In this section, you test your Groovy rule by editing data in the Product Volume Analysis dashboard.
- From the Home page, click Dashboards. Open the Product Volume Analysis dashboard.
- For Envoy Standard Notebook, edit product volume for January. For Ultra Notebook 13 in, edit product volume for March. Save the form (not the dashboard).
- Click OK to close the information message. The changes are reflected in the Product Revenue form.
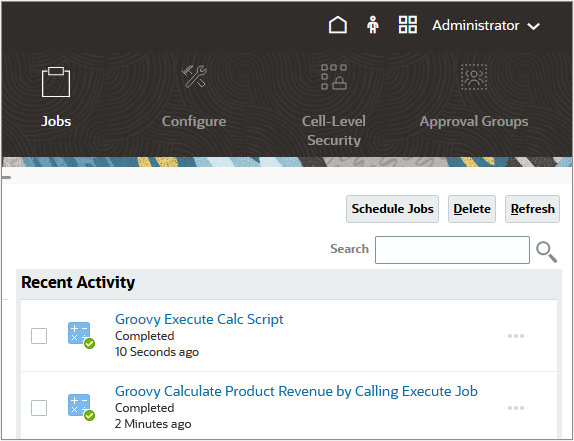
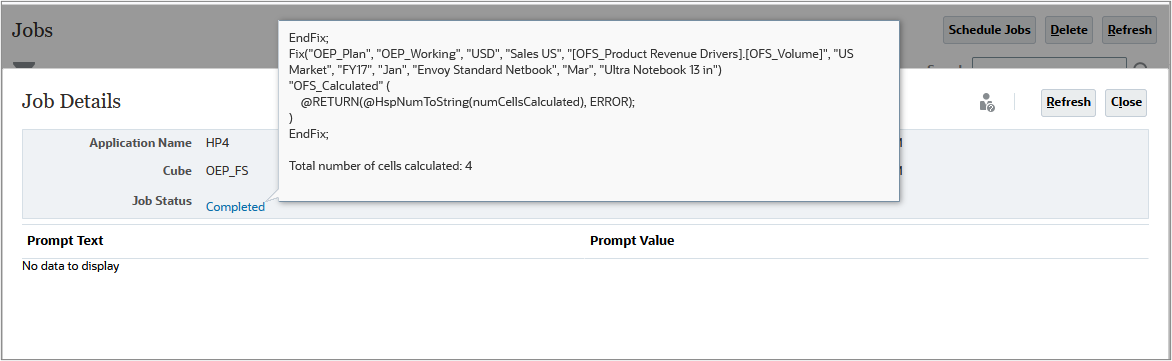
- Close the dashboard. Navigate to Jobs and select the Groovy Execute Calc Script job.
- The log message for the completed job identifies the user who executed the rule and the generated calculation script, as well as the count of calculated cells.
Related Links
More Learning Resources
Explore other labs on docs.oracle.com/learn or access more free learning content on the Oracle Learning YouTube channel. Additionally, visit Oracle University to view training resources available.
For product documentation, visit Oracle Help Center.
Calculating modified data using Groovy
F87591-02
October 2025