Introduction
This 60-minute tutorial introduces you to Strategic Modeling concepts and shows you how to integrate data between strategic models and Planning applications using Groovy scripts.
Background
Strategic Modeling, available as a module in Planning, is a feature-rich financial forecasting and modeling solution. With Strategic Modeling, you can model long-range Planning, treasury and funding options, and mergers and acquisitions, among other things.
Prerequisites
Cloud EPM Hands-on Tutorials may require you to import a snapshot into your Cloud EPM Enterprise Service instance. Before you can import a tutorial snapshot, you must request another Cloud EPM Enterprise Service instance or remove your current application and business process. The tutorial snapshot will not import over your existing application or business process, nor will it automatically replace or restore the application or business process you are currently working with.
Before starting this tutorial, you must:
- Have Service Administrator access to a Cloud EPM Enterprise Service instance.
- Upload and import this snapshot into your Planning instance. If you've previously uploaded the snapshot for another Groovy tutorial, you can continue using the same snapshot.
Note:
If you run into migration errors importing the snapshot, re-run the migration excluding the HSS-Shared Services component, as well as the Security and User Preferences artifacts in the Core component. For more information on uploading and importing snapshots, refer to the Administering Migration for Oracle Enterprise Performance Management Cloud documentation.Tip:
The scripts you need for this tutorial are linked as text files within each section.Understanding Strategic Modeling
The primary artifact in Strategic Modeling is a Model. Models have the following dimensions:
- Model (Entity)
- Version
- Measure
- Business Case / Scenario
- Currency
- Time
- Account
- Custom Dimensions
Because the dimensions between your Strategic Model and your Planning application are not the same, to map data between the two you must first understand how and where the dimensions on each side of the transaction align.
Model (Entity)
The Model dimension in Strategic Modeling is hierarchical. Each Model represents a single entity— for example, a company, business unit, project, and so on—that is being modeled in the product. A Model stores a full set of data and metadata for each saved version of the model.
Version
The Version dimension is flat. This dimension enables you to specify a particula snapshot of model data that you'd like to work with. The most current version of a model's data is referred to as the Tip.
Measure
The Measure dimension is flat. It contains two members: Output and Input. The Output measure enables you to refer to calculated results in Strategic Modeling, and is what you most commonly map to and from between your Planning application. The Input measure enables you to refer to input values, but is not usually useful for mapping to Planning because the relationships that transform input values to output values (forecast methods) in Strategic Modeling can be changed by the user.
Business Case / Scenario
The Business Case / Scenario dimension is flat. Business Cases and Scenarios are closely related in Strategic Modeling. Any given mapping will work with one or the other, depending on what the user is intending to do with the data. Strategic Modeling data is stored in scenarios.
Currency
The Currency dimension is flat. Each model in Strategic Modeling works with a particular currency.
Time
The Time dimension is hierarchical. Unlike Planning, Strategic Modeling contains a single continuous Time dimension, with years stored immediately beneath the root of the Time dimension. Each year can contain a varying level of detail in Halves, Quarters, Months, and Weeks.
Account
The Account dimension is hierarchical. Each account represents an accounting concept such as Sales or Cost of Goods sold. Usually, these are line items— for example, an Output value exists for Sales in all time periods and all scenarios in the model.
You can extend the Account dimension by creating subaccounts beneath the Account structure, almost always for accounts that accept input.
Custom Dimensions
You can create an arbitrary number of hierarchical custom dimensions. Custom dimensions can represent concepts such as Products or Regions.
Understanding the Strategic Models and Planning application for this tutorial
To integrate data between Strategic Modeling and Planning, you must understand how their respective dimensions map to each other. In this tutorial, you'll be syncing data between the Operations US entities in the OEP_FS Planning cube and the strategic models in the Operations US model hierarchy.
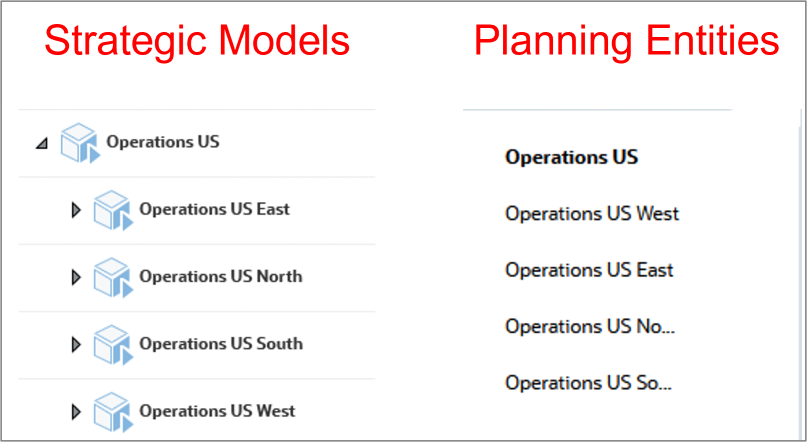
The strategic models Operations US, Operations US East, Operations US North, Operations US South, and Operations US West, map directly to the similarly named entities in the Planning entity structure.
Note:
We'll explain the rest of the specific dimensional mappings for each exercise in this tutorial, as they differ depending on what type of integration you're trying to accomplish.Setting up for testing
Entering test Planning data
In this section, you use a form to enter test data in the OEP_Working version in Planning. Later in this tutorial, you create Groovy scripts to push this data to Strategic Modeling.
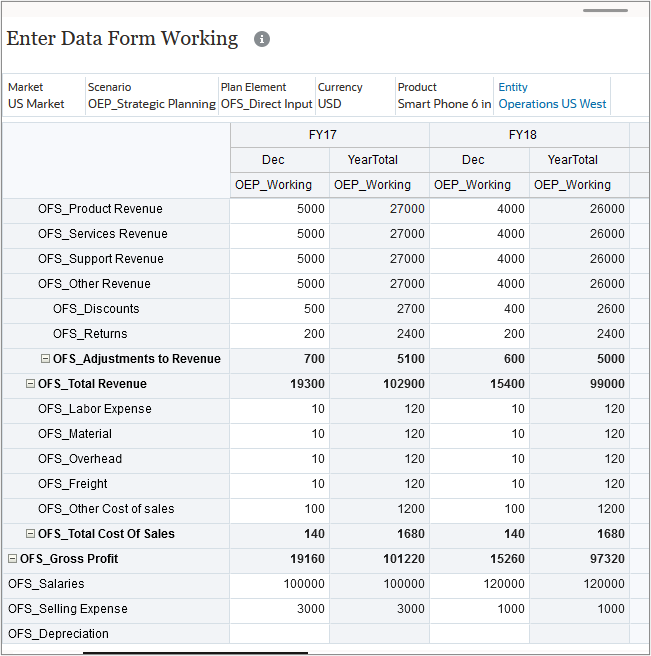
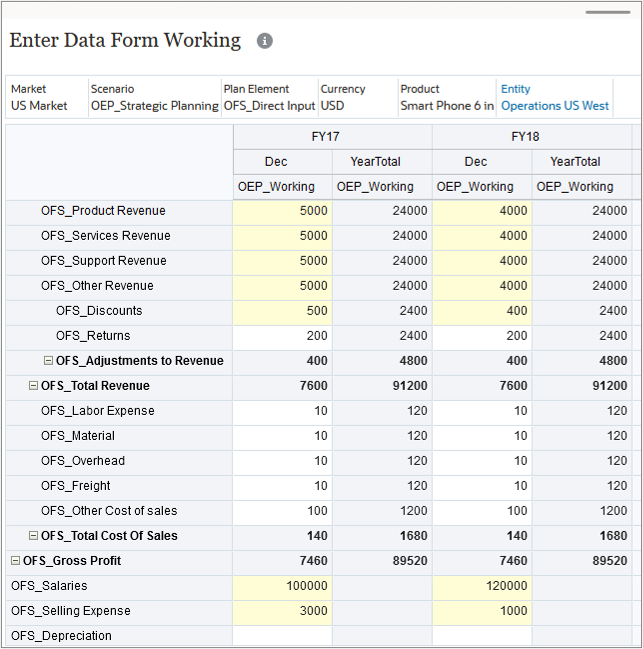
- From the home page, click Data, then expand the Strategic Modeling folder to display data entry forms. Click Enter Data Form Working to open the form. Notice that the data will be written to the OEP_Working version in Planning.
- Verify that the entity selected in the POV is Operations US West. Enter the following data in the form for Dec, FY17:
- Click Save. Notice that the Year Total column is updated automatically when you save.
- In the toolbar, click
 (Edit Members) and select Operations US East. Click Apply to change the POV.
 - Repeat steps 2 and 3 to enter test data into Operations US East.
- Repeat this process for the entities Operations US North and Operations US South.
- Click Close to return to the list of data entry forms.
| Account | Value |
|---|---|
| OFS_Product Revenue | 5000 |
| OFS_Services Revenue | 5000 |
| OFS_Support Revenue | 5000 |
| OFS_Other Revenue | 5000 |
| OFS_Discounts | 500 |
| OFS_Salaries | 100000 |
| OFS_Selling Expense | 3000 |
Enter the following data in the form for Dec, FY18:
| Account | Value |
|---|---|
| OFS_Product Revenue | 4000 |
| OFS_Services Revenue | 4000 |
| OFS_Support Revenue | 4000 |
| OFS_Other Revenue | 4000 |
| OFS_Discounts | 400 |
| OFS_Salaries | 120000 |
| OFS_Selling Expense | 1000 |
Clearing Planning data
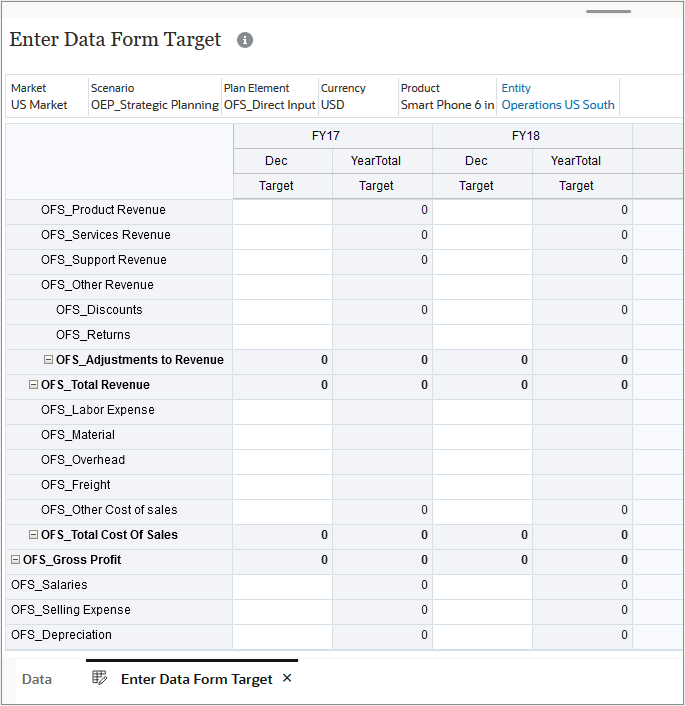
In this section, you use a form to clear data from the Target version in Planning. Later in this tutorial, you create Groovy scripts to push data from Strategic Modeling to Planning.
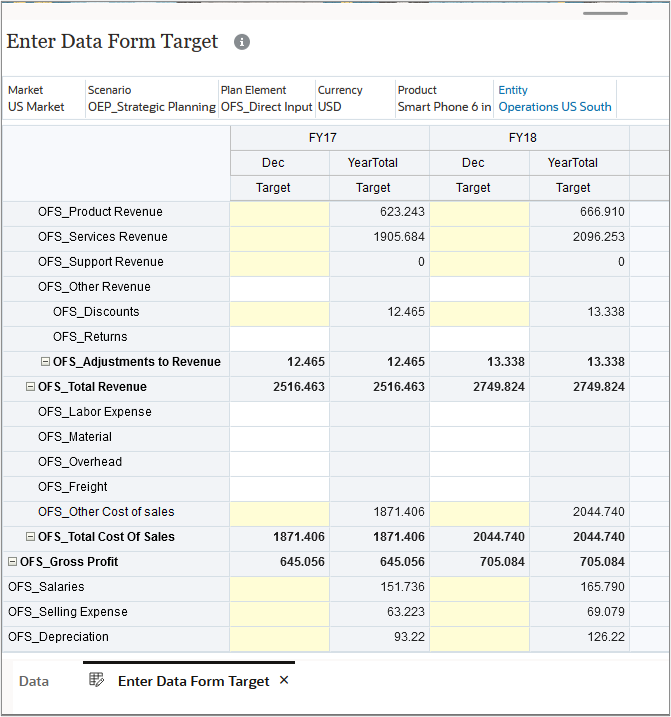
- Click Enter Data Form Target to open the form.
- Verify that the entity selected in the POV is Operations US South.
- Select the first cell in the form (OFS_Product Revenue for FY17, Dec, Target) and press [Delete] to clear the cell.
- Click and drag the selection handle to cover the entire grid in the form, or repeat the previous step for every cell in both Dec columns to clear all input cells.
- Click Save. Notice that the calculated cells update automatically when you save.
- In the toolbar, click
 (Edit Members) and select Operations US West. Click Apply to change the POV.
 - Repeat steps 3—5 for Operations US West, Operations US East, and Operations US North.
- Click Close to return to the list of data entry forms, then return to the Home page.
Selecting a navigation flow in Planning
In this section, you change your navigation flow to work with specific cards in the Strategic Modeling cluster.
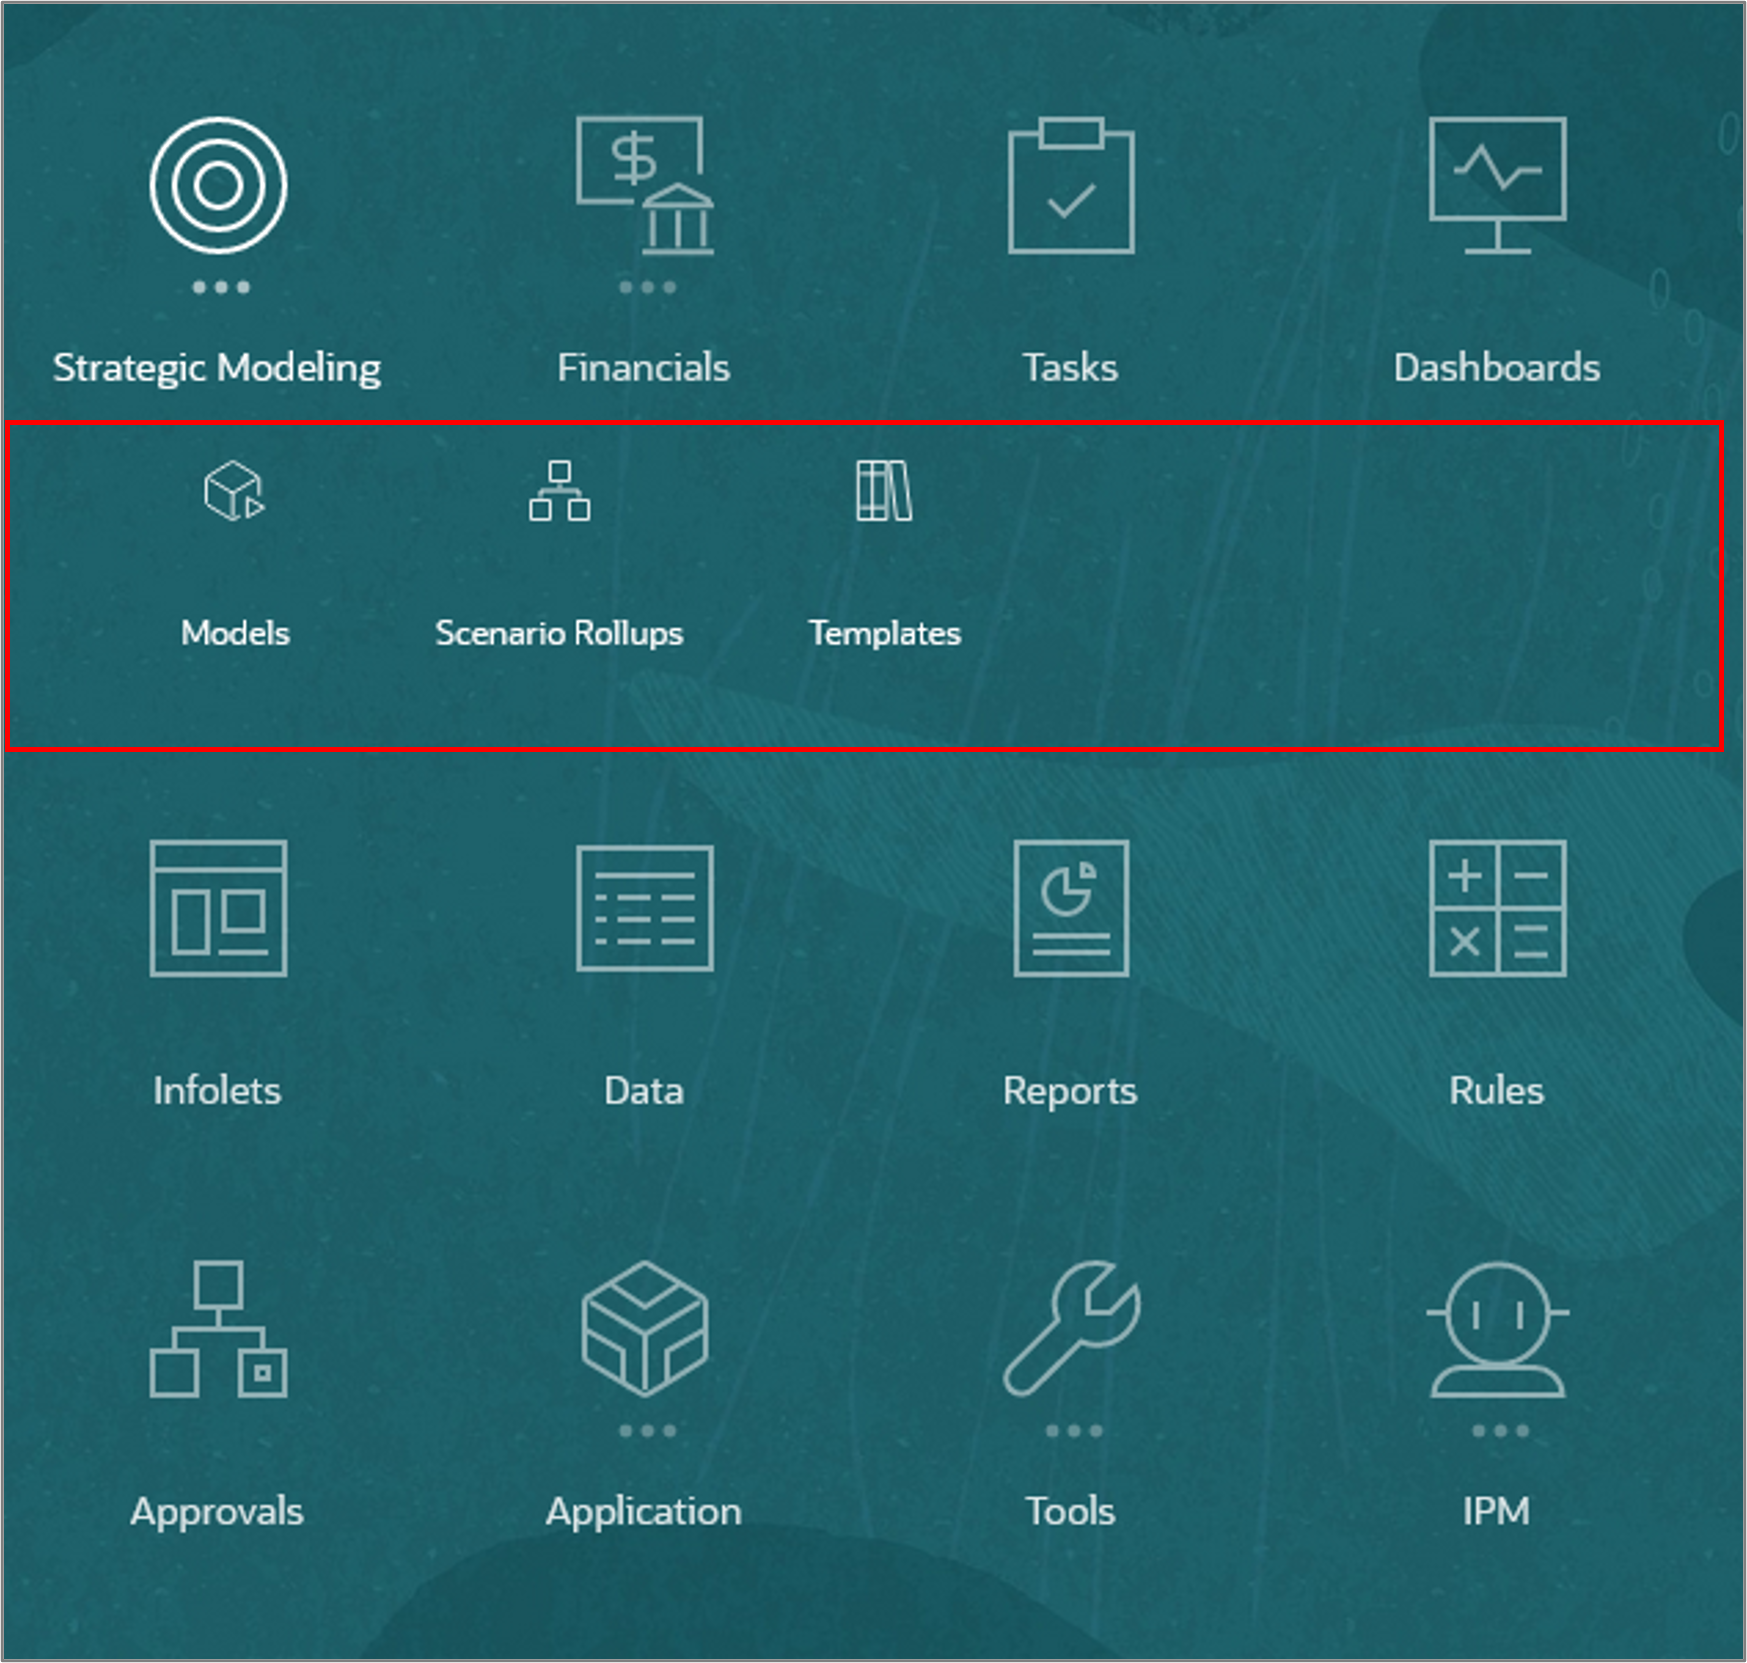
- From the Home page, click Strategic Modeling to view the cards in the cluster by default. The default navigation flow does not display the custom set of cards you need to view or test your integration scripts. Close the cluster.
- From the home page, click Tools, then click Navigation Flows.
- In the Active column, click the link for the SM navigation flow to make it the active navigation flow.
- Return to the home page.
- From the User menu drop down, select Reload Navigation Flow.
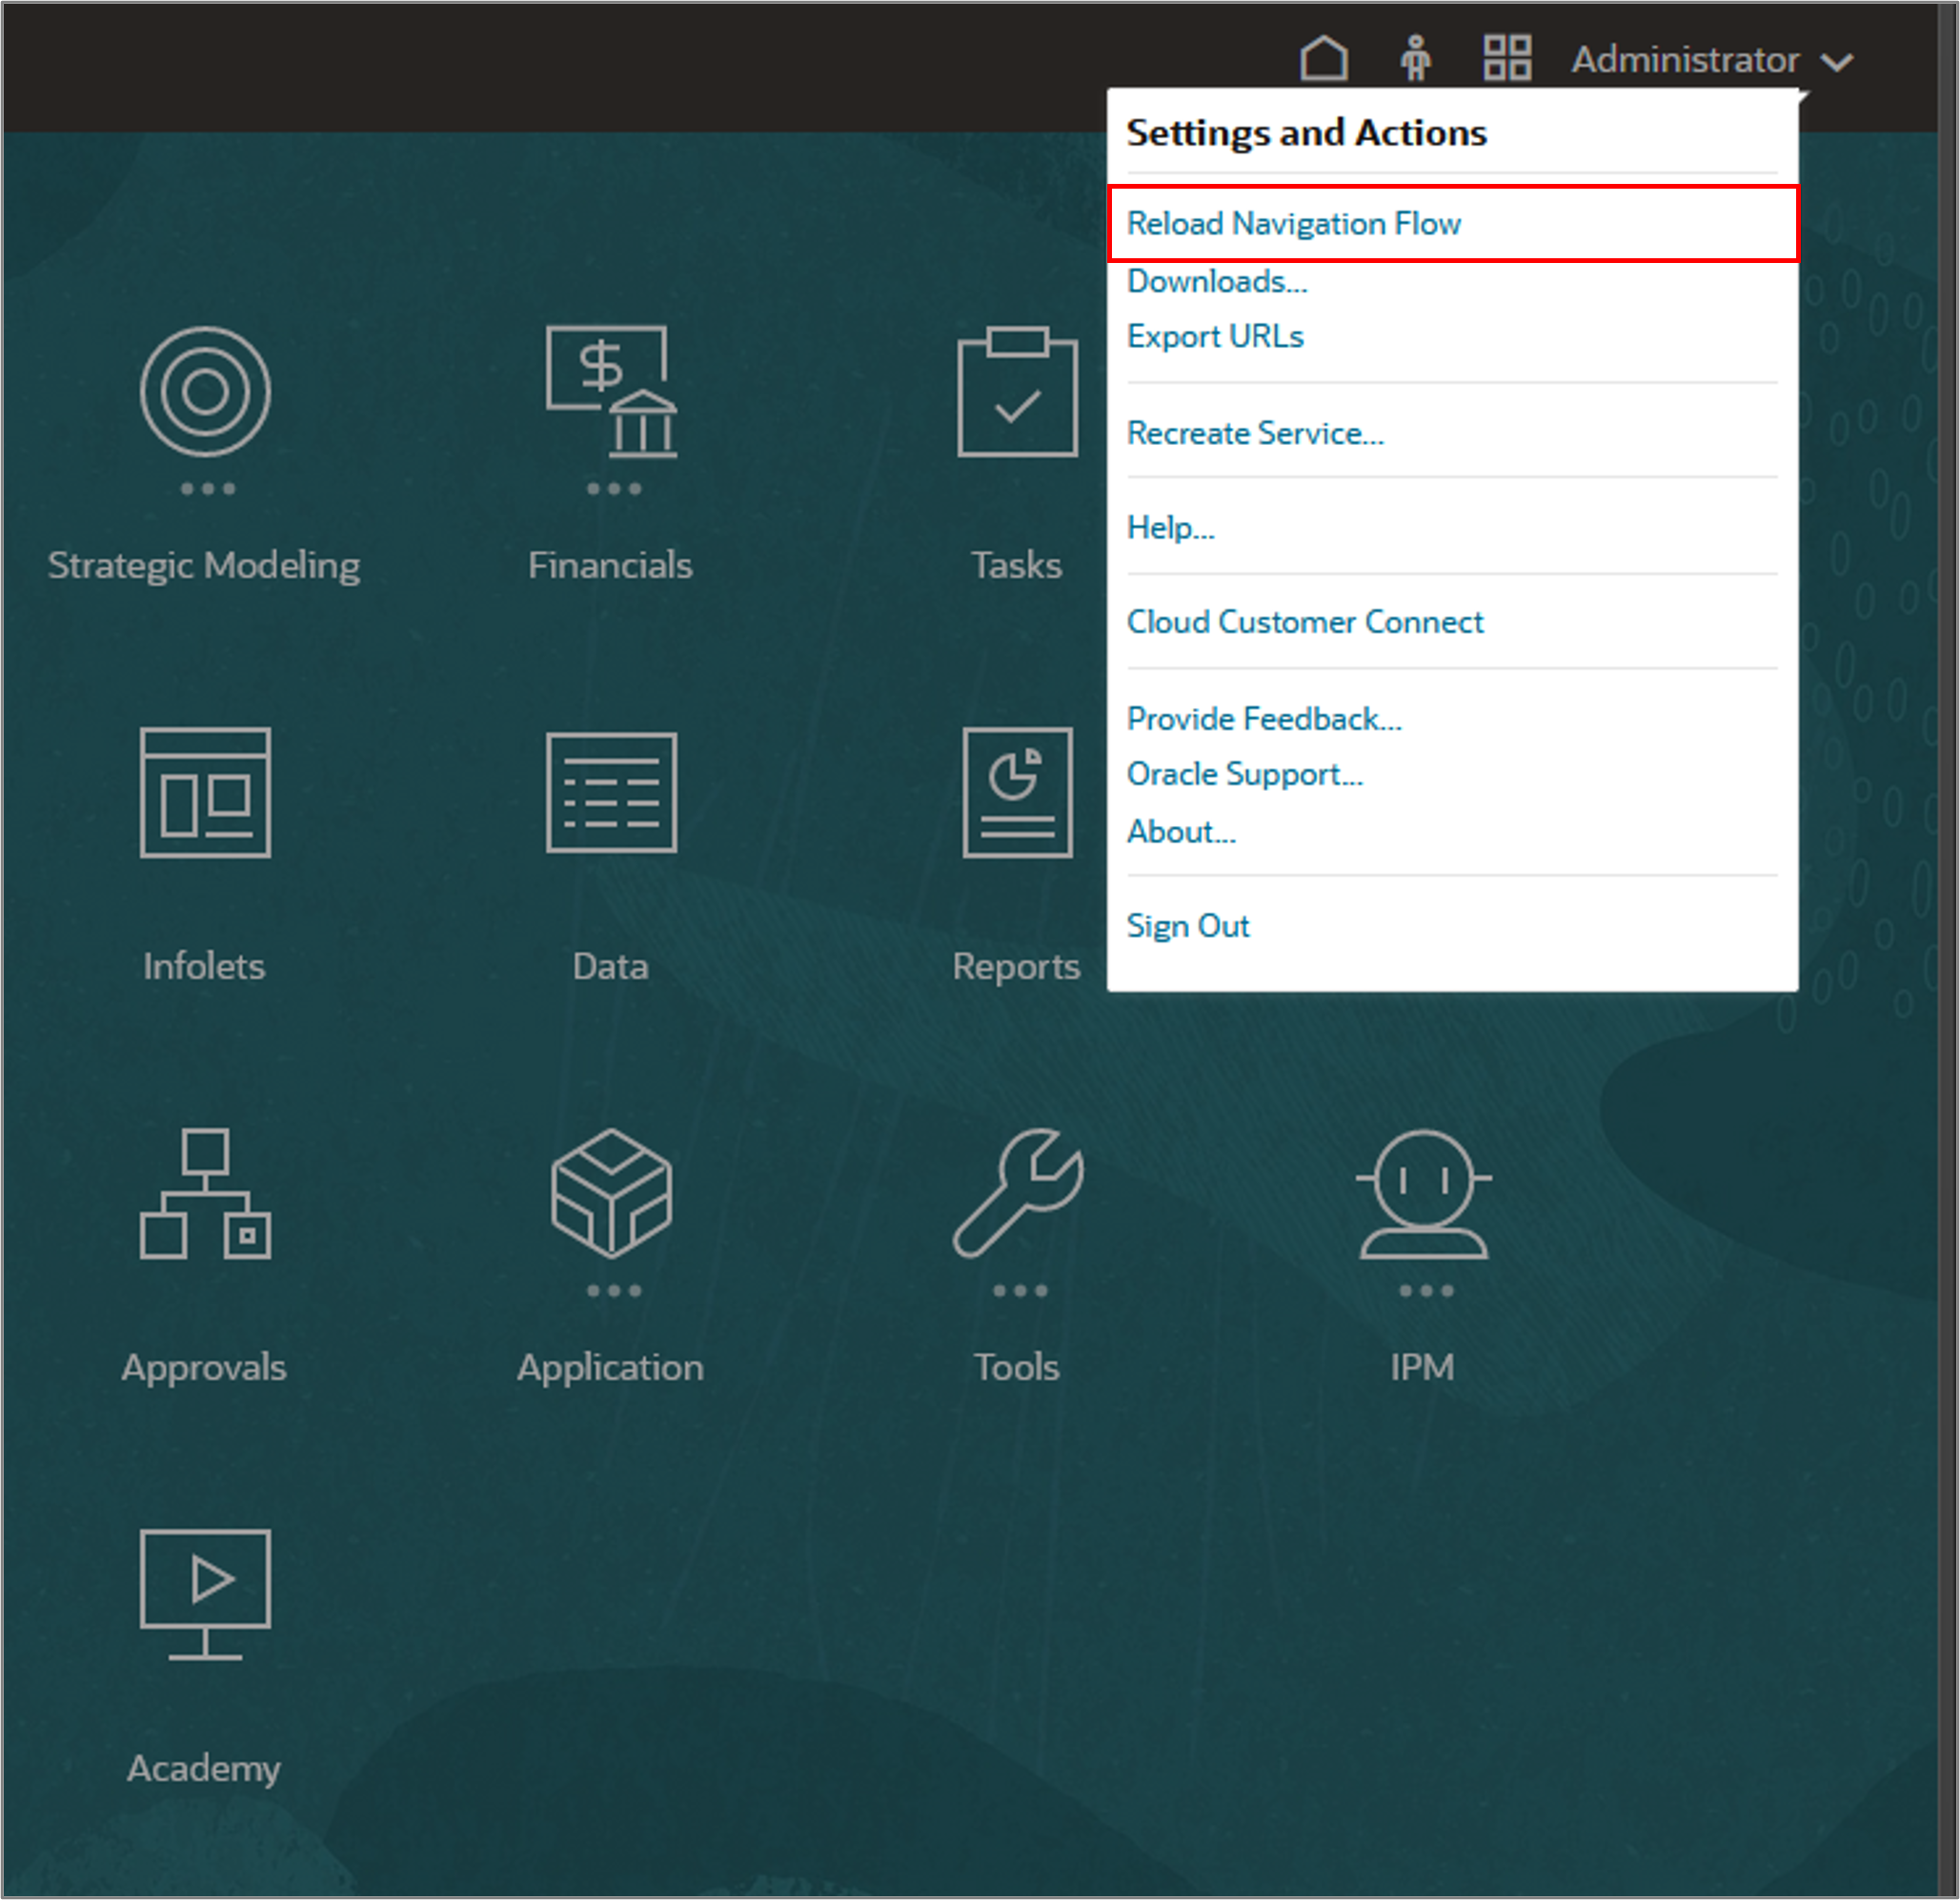
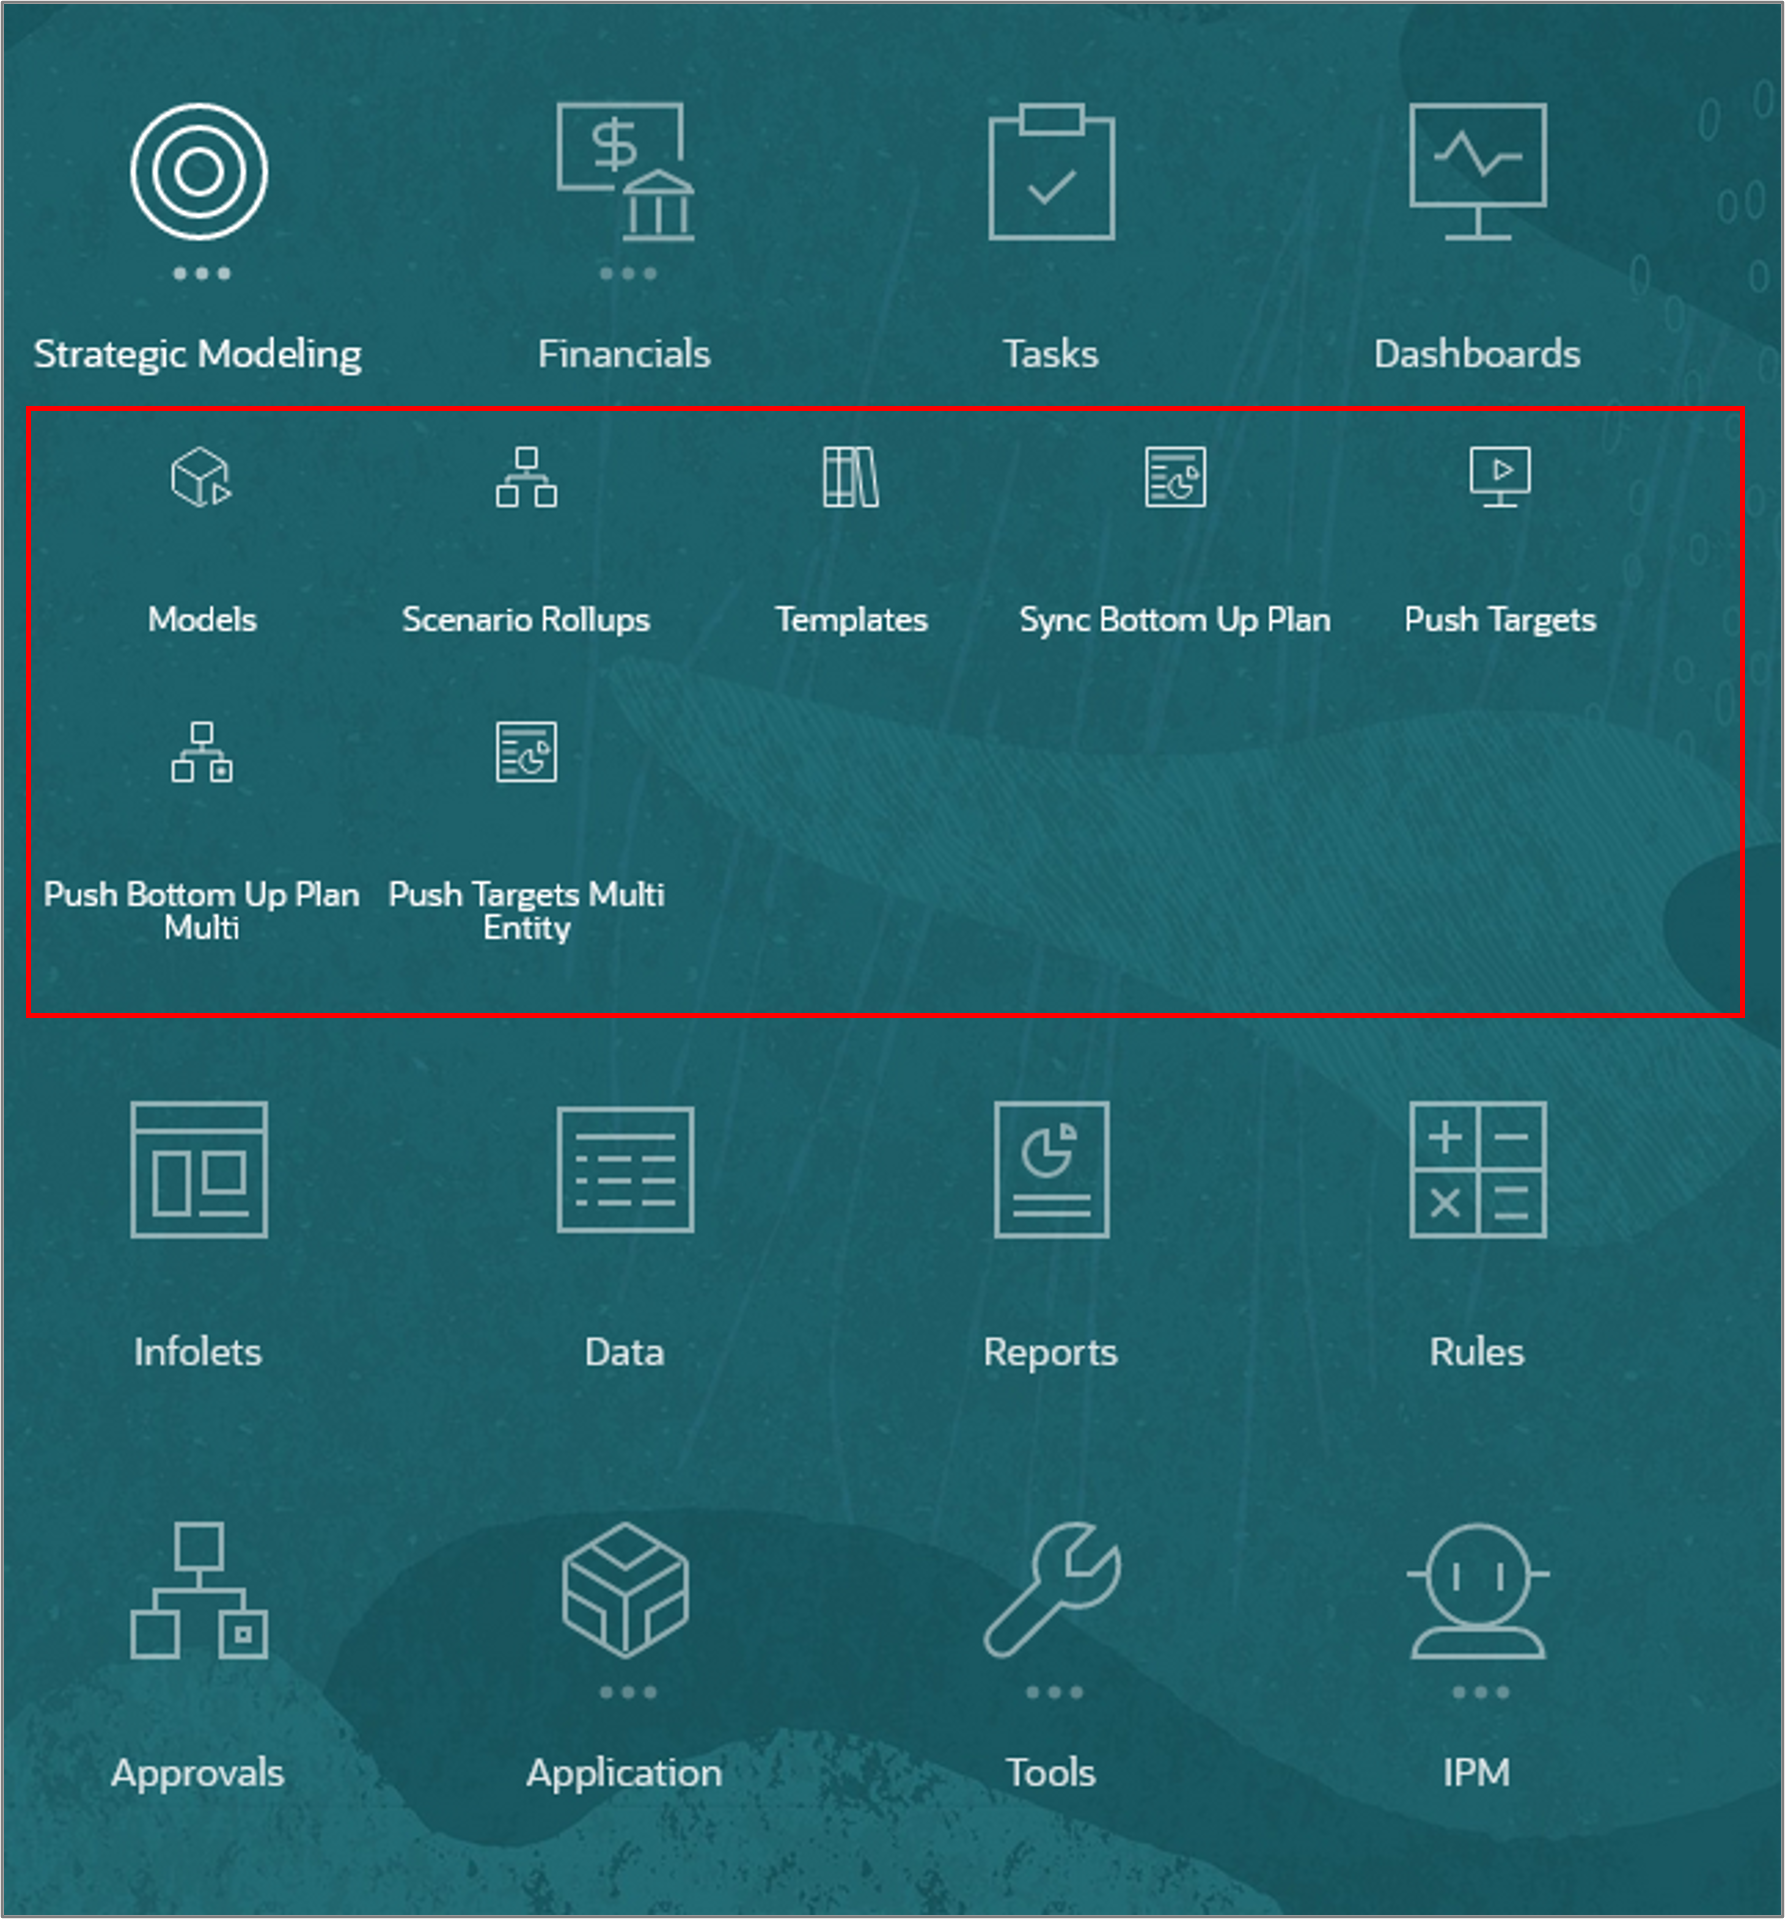
The Strategic Modeling cluster now includes the cards you'll use to test your Groovy scripts in this tutorial: Sync Bottom Up Plan, Push Targets, Push Bottom Up Plan Multi, and Push Targets Multi Entity.

Note:
You cannot associate rules with Strategic Models to be executed on check-in. In this tutorial, all data movement from and to Strategic Models will be executed from Planning forms.Syncing bottom-up Planning data with Strategic Forecast
In this section, you create a Groovy rule to move data from Planning to a Strategic Model. After deploying the rule, you add it to the Strategic Modeling form, then you test it in the form.
Understanding the source and target intersections
-
The following table shows the source intersections for Planning and the target intersections for the Strategic Model:
| Planning (Source) | Strategic Modeling (Target) |
|---|---|
| Entity: Operations US | Model: Operations US |
| POV: Scenario: OEP_Strategic Planning Market: US Market Plan Element: OFS_Direct Input Currency: USD Product: Smart Phone 6 in |
POV: Scenario: Forecast |
| Column: Years: FY17 Period: YearTotal Version: OEP_Working |
Column: Period: 2017 |
| Rows: Accounts | Rows: Accounts |
| OFS_Product Revenue | v1000:010 (Product Sales) |
| OFS_Services Revenue | v1000:020 (Service Revenue) |
| OFS_Support Revenue OFS_Other Revenue |
v1000:030 (Other Revenues) |
| OFS_Adjustments to Revenue | v1020 (Discounts & Returns) |
| OFS_Total Cost of Sales | v1040 (Cost of Goods Sold) |
Creating the Groovy rule
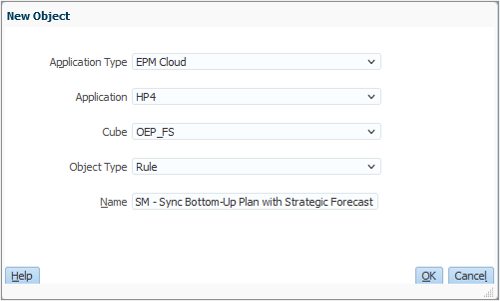
- Open Calculation Manager and create a rule named SM - Sync Bottom-Up Plan with Strategic Forecast in the OEP_FS cube.
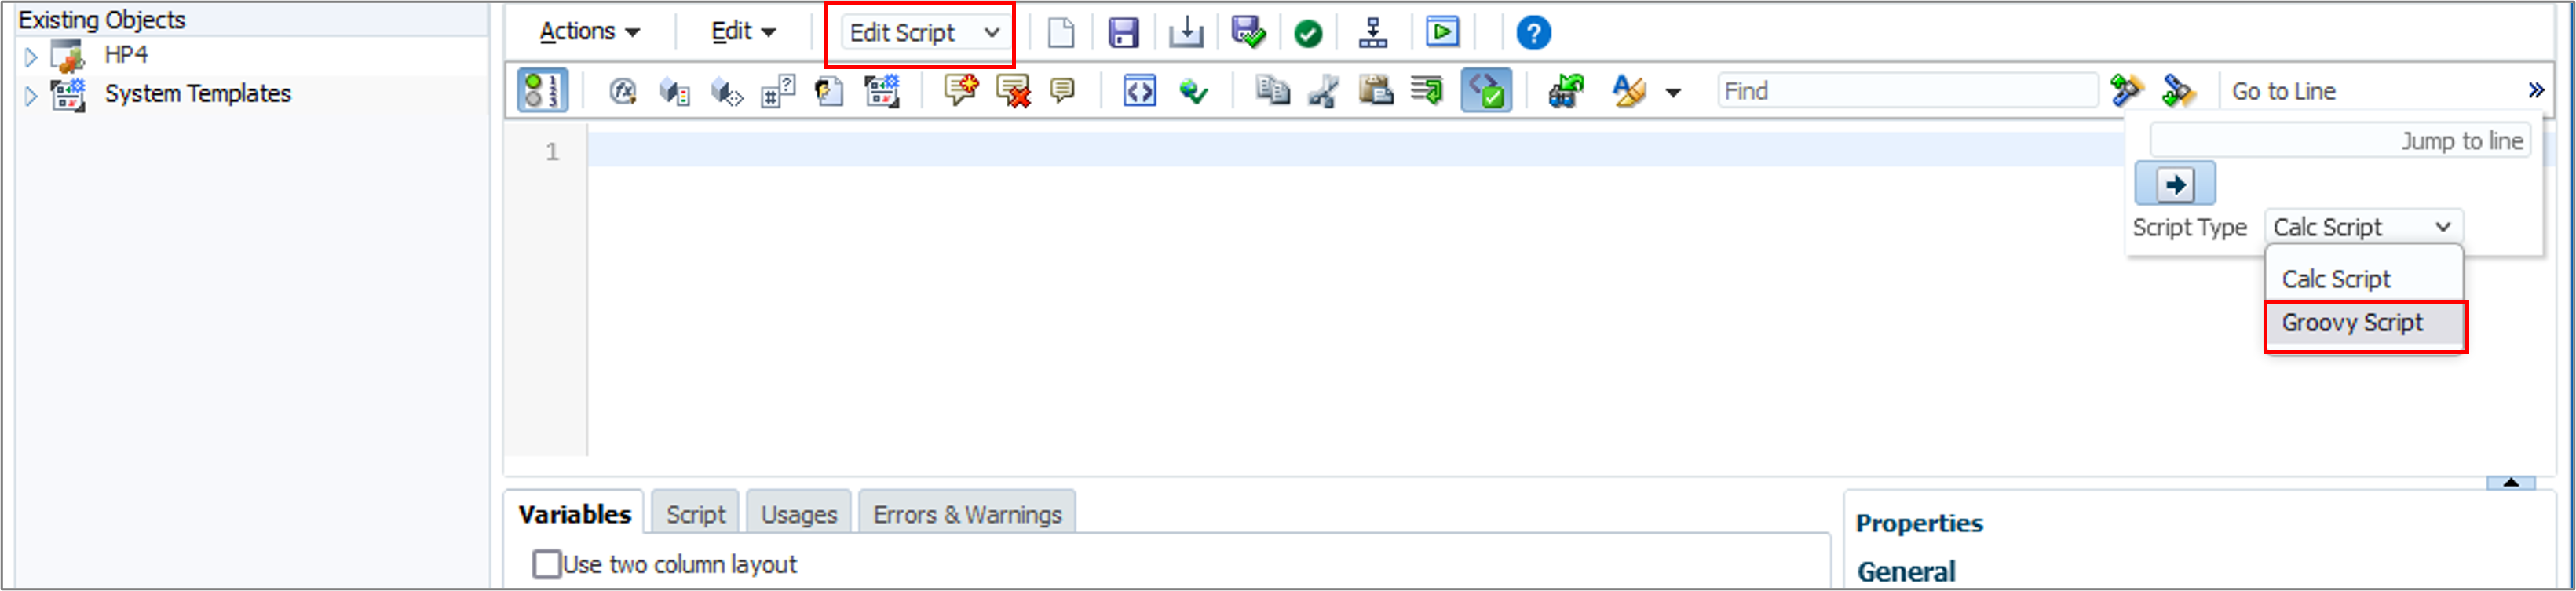
- In the Rule Editor, change the Designer option to Edit Script and set the Script Type to Groovy Script.
- Copy this script and paste it into the editor:
- On the toolbar, click
 (Save) to save the script.
 - Click
 (Validate and Deploy). Click OK at the confirmation message.
//Push data from Planning to Strategic Model Operations US
//Create Planning grid
Cube cube = operation.application.getCube("OEP_FS")

DataGridDefinitionBuilder defBuilder = cube.dataGridDefinitionBuilder()

defBuilder.addPov(['Years', 'Scenario', 'Currency', 'Version', 'Entity', 'Market', 'Plan Element', 'Product'], [ ['FY17'], ['OEP_Strategic Planning'], ['USD'], ['OEP_Working'], ['Operations US'], ['US Market'], ['OFS_Direct Input'], ['Smart Phone 6 in'] ])

defBuilder.addColumn(['Period'], [ ['YearTotal'] ])

defBuilder.addRow(['Account'], [ ['OFS_Product Revenue', 'OFS_Services Revenue','OFS_Support Revenue','OFS_Adjustments to Revenue','OFS_Total Cost Of Sales','OFS_Other Revenue'] ])

DataGridDefinition gridDefinition = defBuilder.build()
DataGrid grid = cube.loadGrid(gridDefinition, true)

double millionsScalingFactor = 0.000001

// Push to Strategic Model
def data = []
grid.dataCellIterator().each{
    data << it.data / millionsScalingFactor
    println("$it.memberNames, cell data: $it.data")
}

// Create the SM model grid
operation.application.getStrategicModel('Operations US').withCloseable { smModel->
    DataGridBuilder gridBuilder = smModel.dataGridBuilder()
    gridBuilder.addPov('Forecast')
    gridBuilder.addColumn('2017')
    println("Pushing " + data[0] + "to Product Sales")
    gridBuilder.addRow(['v1000:010'], [data[0]])
    println("Pushing " + data[1] + "to Service Revenue")
    gridBuilder.addRow(['v1000:020'], [data[1]])
    println("Pushing " + data[3] + "to Discounts & Returns")
    gridBuilder.addRow(['v1020'], [data[3]])
    println("Pushing " + data[4] + "to Cost of Goods Sold")
    gridBuilder.addRow(['v1040'], [data[4]])
    double supportRevenue = data[2]
    double otherRevenue = data[5]
    double totalSupportOtherRevenue = supportRevenue + otherRevenue
    println("Pushing " + totalSupportOtherRevenue + "to Other Revenues")
    gridBuilder.addRow(['v1000:030'], [totalSupportOtherRevenue])

    DataGridBuilder.Status status = new DataGridBuilder.Status()
    grid = gridBuilder.build(status)
    println("Total number of cells accepted: $status.numAcceptedCells")
    println("Total number of cells rejected: $status.numRejectedCells")
    println("First 100 rejected cells: $status.cellsRejected")

    smModel.saveGrid(grid)
}
Explaining the script logic
In this section, we'll describe the script logic one section at a time.
- Create the Planning grid.
- Push data to Strategic Modeling.
Cube cube = operation.application.getCube("OEP_FS")  DataGridDefinitionBuilder defBuilder = cube.dataGridDefinitionBuilder()
  defBuilder.addPov(['Years', 'Scenario', 'Currency', 'Version', 'Entity', 'Market',
'Plan Element', 'Product'], [ ['FY17'], ['OEP_Strategic Planning'], ['USD'], ['OEP_Working'],
['Operations US'], ['US Market'], ['OFS_Direct Input'], ['Smart Phone 6 in'] ])
defBuilder.addColumn(['Period'], [ ['YearTotal'] ])
defBuilder.addRow(['Account'], [ ['OFS_Product Revenue', 'OFS_Services Revenue',
'OFS_Support Revenue','OFS_Adjustments to Revenue','OFS_Total Cost Of Sales',
'OFS_Other Revenue'] ])
DataGridDefinition gridDefinition = defBuilder.build()
defBuilder.addPov(['Years', 'Scenario', 'Currency', 'Version', 'Entity', 'Market',
'Plan Element', 'Product'], [ ['FY17'], ['OEP_Strategic Planning'], ['USD'], ['OEP_Working'],
['Operations US'], ['US Market'], ['OFS_Direct Input'], ['Smart Phone 6 in'] ])
defBuilder.addColumn(['Period'], [ ['YearTotal'] ])
defBuilder.addRow(['Account'], [ ['OFS_Product Revenue', 'OFS_Services Revenue',
'OFS_Support Revenue','OFS_Adjustments to Revenue','OFS_Total Cost Of Sales',
'OFS_Other Revenue'] ])
DataGridDefinition gridDefinition = defBuilder.build()  DataGrid grid = cube.loadGrid(gridDefinition, true)
double millionsScalingFactor = 0.000001
DataGrid grid = cube.loadGrid(gridDefinition, true)
double millionsScalingFactor = 0.000001 
Get the OEP_FS cube.
Get a DataGridDefinitionBuilder for the cube. Use the builder to construct a region from which to load the data by adding the POV members, column members and rows.
Build the DataGridDefinition object.
Define the scaling factor. We need this because in our example we are working with a Strategic Model whose units are in millions.
def data = []grid.dataCellIterator().each{ data << it.data / millionsScalingFactor println("$it.memberNames, cell data: $it.data") } // Create the SM model grid
operation.application.getStrategicModel('Operations US').withCloseable { smModel-> DataGridBuilder gridBuilder = smModel.dataGridBuilder() gridBuilder.addPov('Forecast') gridBuilder.addColumn('2017') println("Pushing " + data[0] + "to Product Sales") gridBuilder.addRow(['v1000:010'], [data[0]]) println("Pushing " + data[1] + "to Service Revenue") gridBuilder.addRow(['v1000:020'], [data[1]]) println("Pushing " + data[3] + "to Discounts & Returns") gridBuilder.addRow(['v1020'], [data[3]]) println("Pushing " + data[4] + "to Cost of Goods Sold") gridBuilder.addRow(['v1040'], [data[4]]) double supportRevenue = data[2] double otherRevenue = data[5] double totalSupportOtherRevenue = supportRevenue + otherRevenue println("Pushing " + totalSupportOtherRevenue + "to Other Revenues") gridBuilder.addRow(['v1000:030'], [totalSupportOtherRevenue]) DataGridBuilder.Status status = new DataGridBuilder.Status() grid = gridBuilder.build(status) println("Total number of cells accepted: $status.numAcceptedCells") println("Total number of cells rejected: $status.numRejectedCells") println("First 100 rejected cells: $status.cellsRejected") smModel.saveGrid(grid)
}
Iterate over the grid object and retrieve the cell values one cell at a time. Store the values in the data array.
Construct the Strategic Model grid similar to how it was done in Planning. Push the cell values to the Strategic Model grid object.
Save the Strategic Model grid. This checks in the model with the new values.
Adding the rule to the testing form
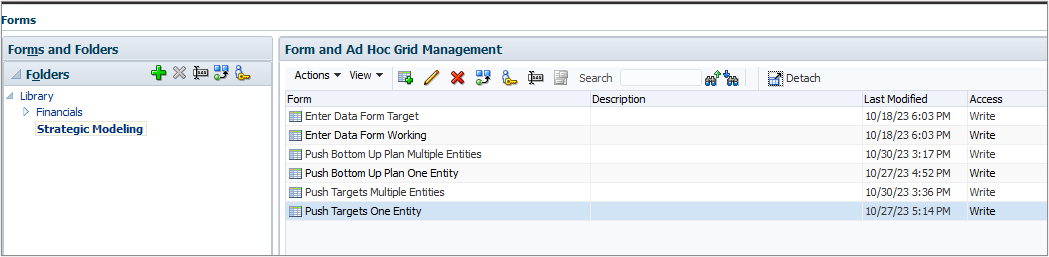
- From the home page, open the Navigator and click Forms (under Create and Manage).
- Expand the Library folder, and select Strategic Modeling.
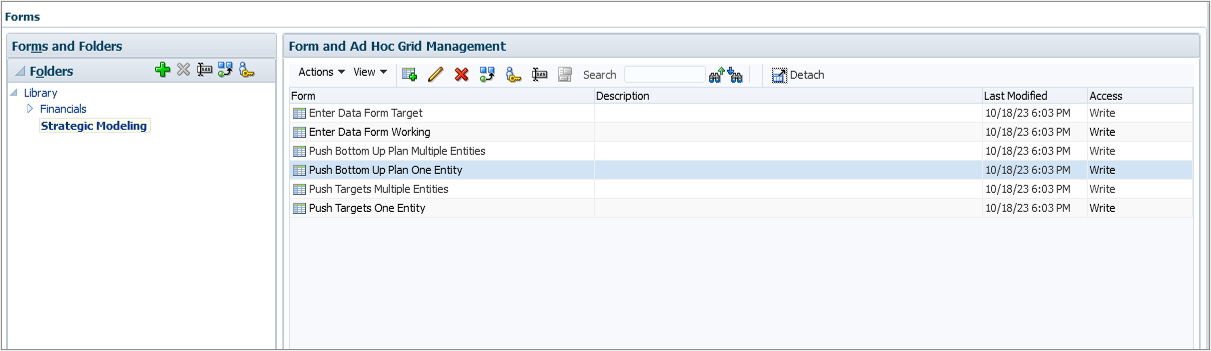
- Select the Push Bottom Up Plan One Entity form, and click (Edit).
- Select the Business Rules tab. Add the SM - Sync Bottom-Up Plan with Strategic Forecast rule to the Selected Business Rules list.
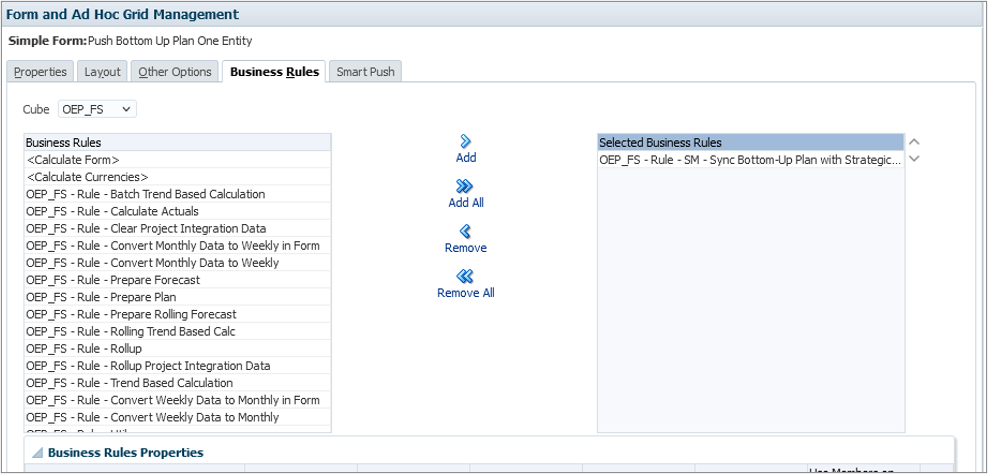
- Click Finish to save the changes to the form.
Testing the Groovy rule
- From the home page, click Strategic Modeling, then select the Sync Bottom Up Plan card. Select the Sync Bottom Up Plan horizontal tab.
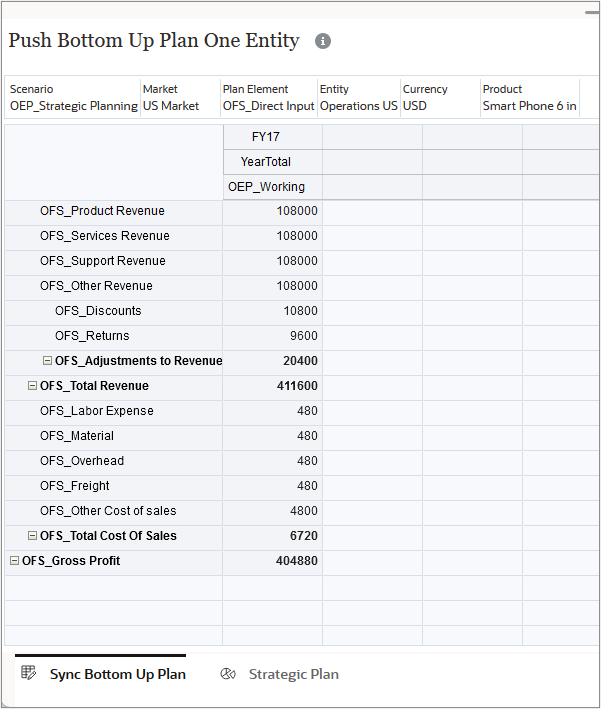
- Click Actions, then select Business Rules. Click the SM - Sync Bottom-Up Plan with Strategic Forecast rule to launch it. Click OK at the confirmation message.
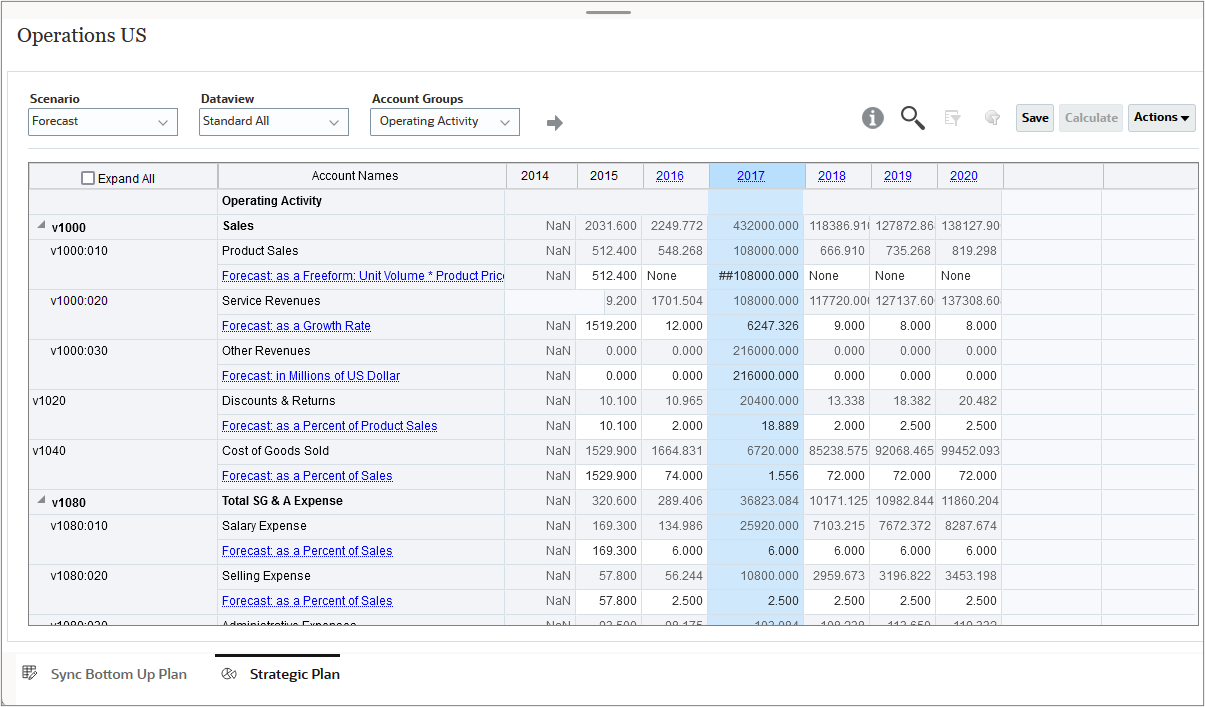
- Select the Strategic Plan horizontal tab. In the 2017 column, verify that the data was pushed from the expected accounts (for example, OFS_Product Revenue was pushed to v1000:010 Product Sales).
Adjusting targets in a bottom-up plan
In this section, you create a Groovy rule to move data from the Model Operations US East to the Planning entity Operations US East. After deploying the rule, you add it to the Planning form, then you test it in the form.
Understanding the source and target intersections
-
The following table shows the source intersections for the Strategic Model and the target intersections for Planning:
| Strategic Modeling (Source) | Planning (Target) |
|---|---|
| Entity: Operations US East | Model: Operations US East |
| POV: Scenario: Forecast |
POV: Scenario: OEP_Strategic Planning Period: Dec Market: US Market Plan Element: OFS_Direct Input Currency: USD Version: Target Product: Smart Phone 6 in |
| Column: Period: 2017, 2018 |
Column: Years: FY17, FY18 |
| Rows: Accounts | Rows: Accounts |
| v1000:010 (Product Sales) | OFS_Product Revenue |
| v1000:020 (Service Revenue) | OFS_Services Revenue |
| v1000:030 (Other Revenues) | OFS_Support Revenue |
| v1020 (Discounts & Returns) | OFS_Adjustments to Revenue |
| v1040 (Cost of Goods Sold) | OFS_Other Cost of Sales |
| v1080:010 (Salary Expense) | OFS_Salaries |
| v1080:020 (Selling Expense) | OFS_Selling Expense |
| v1110 (Depreciation Expenses) | OFS_Depreciation |
Creating the Groovy rule
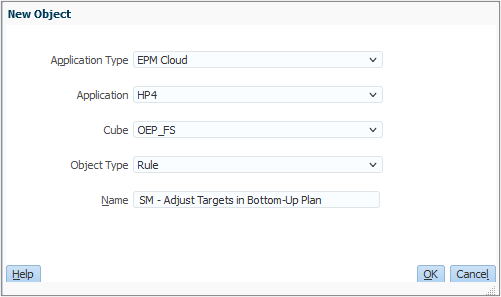
- Open Calculation Manager and create a rule named SM - Adjust Targets in Bottom-Up Plan in the OEP_FS cube.
- In the Rule Editor, change the Designer option to Edit Script and set the Script Type to Groovy Script.
- Copy this script and paste it into the editor:
- On the toolbar, click (Save) to save the script.
- Click (Validate and Deploy). Click OK at the confirmation message.
 // Pull each year from Strategic Model 'Operations US East' and Push data into planning.
def smPbcsYearMap = ['2017':'FY17', '2018':'FY18']

def pbcsAccountNames = ['OFS_Product Revenue', 'OFS_Services Revenue', 'OFS_Support Revenue', 'OFS_Discounts', 'OFS_Other Cost of Sales', 'OFS_Salaries', 'OFS_Selling Expense', 'OFS_Depreciation']

List smYears = smPbcsYearMap.collect {it.key}
List pbcsYears = smPbcsYearMap.collect {it.value}

operation.application.getStrategicModel("Operations US East").withCloseable { smModel->
    DataGridDefinitionBuilder builder = smModel.dataGridDefinitionBuilder()
    builder.addPov(['Scenario'], [ ['Forecast'] ])
    builder.addColumn(['Time'], [ ['2017', '2018'] ])
    builder.addRow(['Account'], [ ['v1000:010', 'v1000:020', 'v1000:030', 'v1020', 'v1040', 'v1080:010', 'v1080:020', 'v1110'] ])
    DataGridDefinition gridDefinition = builder.build()
    DataGrid smGrid = smModel.loadGrid(gridDefinition)

//Create the Planning grid
    Cube cube = operation.application.getCube("OEP_FS")
    DataGridBuilder gridBuilder = cube.dataGridBuilder("MM/DD/YYYY")
    gridBuilder.addPov('Dec','OEP_Strategic Planning', 'USD', 'Target', 'Operations US East',  'OFS_Direct Input', 'Smart Phone 6 in', 'US Market')
    gridBuilder.addColumn(pbcsYears as String[])
    int k = 0;
    int numColumns = 2;
    def rowdata = []
    smGrid.dataCellIterator().each {
       rowdata << it.data * 0.000001
       println("$it.memberNames, cell data:" +  it.data * 0.000001)
       println("Period Name = " + it.periodName + "Account ," + pbcsAccountNames[k] + " cell data:" +  it.data * 0.000001)
       if (rowdata.size() == numColumns) {
       	 println("Row Data = " + rowdata)
         gridBuilder.addRow([pbcsAccountNames[k]], rowdata)
         k++
         rowdata = []
       }
    }
    DataGridBuilder.Status status = new DataGridBuilder.Status()
    DataGrid planningGrid = gridBuilder.build(status)
    println("Size of the grid: " + planningGrid.size())
    println("Total number of cells accepted: $status.numAcceptedCells")
    println("Total number of cells rejected: $status.numRejectedCells")
    println("First $status.numRejectedCells rejected cells: $status.cellsRejected")
    cube.saveGrid(planningGrid)
} //close SM model.
Explaining the script logic
In this section, we'll describe the script logic one section at a time.
- Pull 2017 and 2018 from the Strategic Model Operations US East and push data into Planning.
- Create the Planning grid and close the Strategic Model.
def smPbcsYearMap = ['2017':'FY17', '2018':'FY18']
Define the year dimension mappings between Strategic Modeling and Planning.
Define the Planning account names where you're pushing the data.
Get the list of Strategic Modeling year names from the year map defined in
Get the list of Planning years from the year map.
Construct the Strategic Model object and use the withCloseable construct. This will close the model when that block of code completes execution. This ensures that the rule does not leave the model open in memory after operations on the model are completed.
Get a DataGridDefinitionBuilder for the Strategic Model. Use the builder to construct a region from which to load the data by adding the POV members, column members, and rows. Construct the grid.
Cube cube = operation.application.getCube("OEP_FS")
DataGridBuilder gridBuilder = cube.dataGridBuilder("MM/DD/YYYY")
gridBuilder.addPov('Dec','OEP_Strategic Planning', 'USD', 'Target', 'Operations US East', 'OFS_Direct Input', 'Smart Phone 6 in', 'US Market')
gridBuilder.addColumn(pbcsYears as String[])
int k = 0;
int numColumns = 2;
def rowdata = []
smGrid.dataCellIterator().each {  rowdata << it.data * 0.000001
println("$it.memberNames, cell data:" + it.data * 0.000001)
println("Period Name = " + it.periodName + "Account ," + pbcsAccountNames[k] + " cell data:" + it.data * 0.000001)
if (rowdata.size() == numColumns) {
println("Row Data = " + rowdata)
gridBuilder.addRow([pbcsAccountNames[k]], rowdata)
k++
rowdata = []
}
}
rowdata << it.data * 0.000001
println("$it.memberNames, cell data:" + it.data * 0.000001)
println("Period Name = " + it.periodName + "Account ," + pbcsAccountNames[k] + " cell data:" + it.data * 0.000001)
if (rowdata.size() == numColumns) {
println("Row Data = " + rowdata)
gridBuilder.addRow([pbcsAccountNames[k]], rowdata)
k++
rowdata = []
}
}  DataGridBuilder.Status status = new DataGridBuilder.Status()
DataGrid planningGrid = gridBuilder.build(status)
println("Size of the grid: " + planningGrid.size())
println("Total number of cells accepted: $status.numAcceptedCells")
println("Total number of cells rejected: $status.numRejectedCells")
println("First $status.numRejectedCells rejected cells: $status.cellsRejected")
cube.saveGrid(planningGrid)
} //close SM model.
DataGridBuilder.Status status = new DataGridBuilder.Status()
DataGrid planningGrid = gridBuilder.build(status)
println("Size of the grid: " + planningGrid.size())
println("Total number of cells accepted: $status.numAcceptedCells")
println("Total number of cells rejected: $status.numRejectedCells")
println("First $status.numRejectedCells rejected cells: $status.cellsRejected")
cube.saveGrid(planningGrid)
} //close SM model. 
Get the OEP_FS Planning cube.
Construct an iterator that iterates over the grid one row at a time and saves the value in a data array.
Close the Strategic Modeling grid iterator.
Close the Strategic Model opened in .
Adding the rule to the testing form
- From the home page, open the Navigator and click Forms (under Create and Manage).
- Expand the Library folder, and select Strategic Modeling.
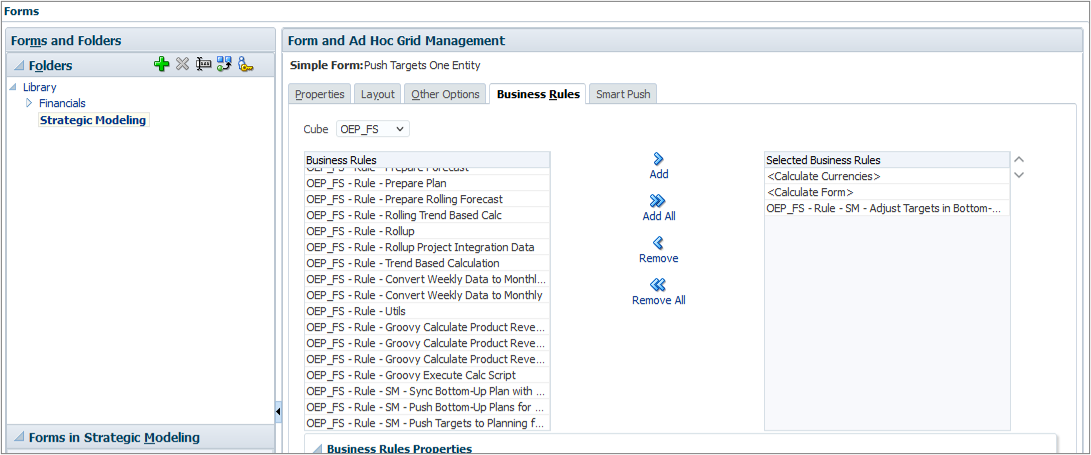
- Select the Push Targets One Entity form, and click (Edit).
- Select the Business Rules tab. Add the SM - Adjust Targets in Bottom-Up Plan rule to the Selected Business Rules list.
- Click Finish to save the changes to the form.
Testing the Groovy rule
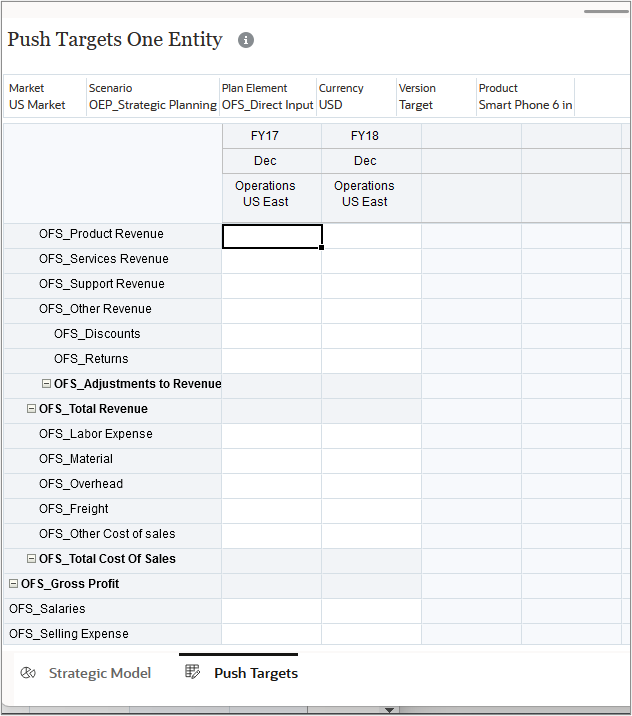
- From the home page, click Strategic Modeling, then select the Push Targets card. Select the Push Targets horizontal tab.
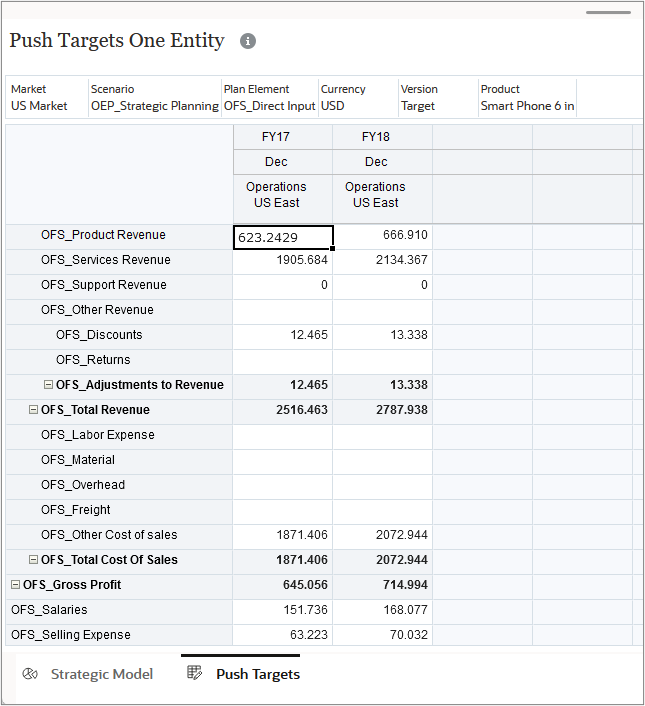
- Click Actions, then select Business Rules. Click the SM - Adjust Targets in Bottom-Up Plan rule to launch it. Click OK at the confirmation message.
- Compare the resulting data to the Strategic Model horizontal tab to verify that the data was pushed from the expected accounts (for example, v1000:010 Product Sales was pushed to OFS_Product Revenue).
Pushing bottom-up Planning data to Strategic Forecast for multiple entities
In this section, you create a Groovy rule to move data from multiple Planning entities to multiple Strategic Models with the same name. After deploying the rule, you add it to the Strategic Modeling form, then you test it in the form.
Understanding the source and target intersections
-
The following table shows the source intersections for Planning and the target intersections for the Strategic Model:
| Planning (Source) | Strategic Modeling (Target) |
|---|---|
| Entity: Operations US East Operations US West Operations US North Operations US South |
Model: Operations US East Operations US West Operations US North Operations US South |
| POV: Scenario: OEP_Strategic Planning Market: US Market Plan Element: OFS_Direct Input Currency: USD Product: Smart Phone 6 in |
POV: Scenario: Forecast |
| Column: Years: FY17, FY18 Period: YearTotal Version: OEP_Working |
Column: Period: 2017, 2018 |
| Rows: Accounts | Rows: Accounts |
| OFS_Product Revenue | v1000:010 (Product Sales) |
| OFS_Services Revenue | v1000:020 (Service Revenue) |
| OFS_Support Revenue OFS_Other Revenue |
v1000:030 (Other Revenues) |
| OFS_Adjustments to Revenue | v1020 (Discounts & Returns) |
| OFS_Total Cost of Sales | v1040 (Cost of Goods Sold) |
Creating the Groovy rule
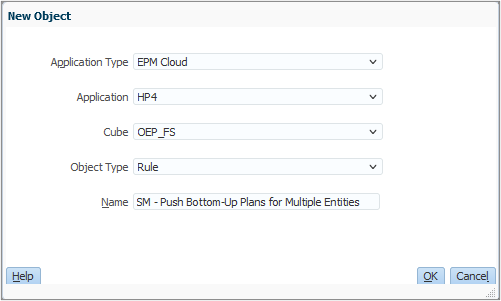
- Open Calculation Manager and create a rule named SM - Push Bottom-Up Plans for Multiple Entities in the OEP_FS cube.
- In the Rule Editor, change the Designer option to Edit Script and set the Script Type to Groovy Script.
- Copy this script and paste it into the editor:
- On the toolbar, click (Save) to save the script.
- Click (Validate and Deploy). Click OK at the confirmation message.
	// Define mappings for Account dimension members between PBCS and Strategic Models
def smToPbcsAccountNameMap = ['v1000:010' : 'OFS_Product Revenue', 'v1000:020' : 'OFS_Services Revenue', 'v1000:030' : 'OFS_Support Revenue', 'v1020' : 'OFS_Discounts', 'v1040' : 'OFS_Total Cost Of Sales']

def smPbcsYearMap = ['2017':'FY17', '2018':'FY18']

List smYears = smPbcsYearMap.collect {it.key}
List pbcsYears = smPbcsYearMap.collect {it.value}

//Reversing the key value pair from the existing maps.
def pbcsToSMAccountNameMap = smToPbcsAccountNameMap.collectEntries { k, v -> [v, k] } as Map
def pbcstoSMScenarioMap = ['OEP_Strategic Planning' : 'Forecast']

String pbcsScenarioName = 'OEP_Strategic Planning'
String smScenarioName = pbcstoSMScenarioMap.get(pbcsScenarioName) ?: pbcsScenarioName;

["Operations US East", "Operations US West", "Operations US North", "Operations US South"].each { String modelName ->
    Cube cube = operation.application.getCube("OEP_FS")
    DataGridDefinitionBuilder defBuilder = cube.dataGridDefinitionBuilder()
    defBuilder.addPov(['Period', 'Scenario', 'Currency', 'Version', 'Entity', 'Market', 'Plan Element', 'Product'], [ ['YearTotal'], [pbcsScenarioName], ['USD'], ['OEP_Working'], [modelName], ['US Market'], ['OFS_Direct Input'], ['Smart Phone 6 in'] ])
    defBuilder.addColumn(['Years'], [ ['FY17', 'FY18'] ])
    defBuilder.addRow(['Account'], [ ['OFS_Product Revenue', 'OFS_Services Revenue','OFS_Support Revenue','OFS_Discounts','OFS_Total Cost Of Sales','OFS_Other Revenue'] ])

    DataGridDefinition gridDefinition = defBuilder.build()
    DataGrid grid = cube.loadGrid(gridDefinition, true)

    operation.application.getStrategicModel(modelName).withCloseable { smModel ->
        DataGridBuilder gridBuilder = smModel.dataGridBuilder()
        gridBuilder.addPov(smScenarioName)
        gridBuilder.addColumn(smYears as String[])

        double millionsScalingFactor = 0.000001

        // Push to Strategic Model
        grid.dataCellIterator('OFS_Product Revenue', 'FY17').each {
			DataCell productRevenue18 = it.crossDimCell('OFS_Product Revenue', 'FY18')
            gridBuilder.addRow([pbcsToSMAccountNameMap[it.accountName]], [it.data / millionsScalingFactor, productRevenue18.data / millionsScalingFactor])
            println(it.yearName + ", " + pbcsToSMAccountNameMap[it.accountName] + ", " + it.data / millionsScalingFactor + ", " + productRevenue18.data / millionsScalingFactor)

            DataCell servicesRevenue = it.crossDimCell('OFS_Services Revenue', 'FY17')
            DataCell servicesRevenue18 = it.crossDimCell('OFS_Services Revenue', 'FY18')
            gridBuilder.addRow([pbcsToSMAccountNameMap[servicesRevenue.accountName]], [servicesRevenue.data / millionsScalingFactor, servicesRevenue18.data / millionsScalingFactor])
            println(it.yearName + ", " + pbcsToSMAccountNameMap[servicesRevenue.accountName] + ", " + servicesRevenue.data / millionsScalingFactor + ", " + servicesRevenue18.data / millionsScalingFactor)

            DataCell adjRevenue = it.crossDimCell('OFS_Discounts', 'FY17')
            DataCell adjRevenue18 = it.crossDimCell('OFS_Discounts', 'FY18')
            gridBuilder.addRow([pbcsToSMAccountNameMap[adjRevenue.accountName]], [adjRevenue.data / millionsScalingFactor, adjRevenue18.data / millionsScalingFactor])
            println(it.yearName + ", " + pbcsToSMAccountNameMap[adjRevenue.accountName] + ", " + adjRevenue.data / millionsScalingFactor + ", " + adjRevenue18.data / millionsScalingFactor)

            DataCell cosRevenue = it.crossDimCell('OFS_Total Cost Of Sales', 'FY17')
            DataCell cosRevenue18 = it.crossDimCell('OFS_Total Cost Of Sales', 'FY18')
            gridBuilder.addRow([pbcsToSMAccountNameMap[cosRevenue.accountName]], [cosRevenue.data / millionsScalingFactor, cosRevenue18.data / millionsScalingFactor])
            println(it.yearName + ", " + cosRevenue.accountName + ": " + pbcsToSMAccountNameMap[cosRevenue.accountName] + ", " + cosRevenue.data / millionsScalingFactor  + ", " + cosRevenue18.data / millionsScalingFactor)

            DataCell supportRevenue = it.crossDimCell('OFS_Support Revenue', 'FY17')
            DataCell otherRevenue = it.crossDimCell('OFS_Other Revenue', 'FY17')
            DataCell supportRevenue18 = it.crossDimCell('OFS_Support Revenue', 'FY18')
            DataCell otherRevenue18 = it.crossDimCell('OFS_Other Revenue', 'FY18')
            def totalRev17 = (supportRevenue.data / millionsScalingFactor) + (otherRevenue.data / millionsScalingFactor)
            def totalRev18 = (supportRevenue18.data / millionsScalingFactor) + (otherRevenue18.data / millionsScalingFactor)
            gridBuilder.addRow([pbcsToSMAccountNameMap[supportRevenue.accountName]], [totalRev17, totalRev18])
            println(it.yearName + ", " +  pbcsToSMAccountNameMap[supportRevenue.accountName] + ", " + totalRev17 + "," + totalRev18)
        }

        DataGridBuilder.Status status = new DataGridBuilder.Status()
        gridBuilder.build(status).withCloseable { smGrid ->
            println("Total number of cells accepted: $status.numAcceptedCells")
            println("Total number of cells rejected: $status.numRejectedCells")
            println("First 10 rejected cells: $status.cellsRejected")
            smModel.saveGrid(smGrid)
        }
    } //smModel close
    grid.close()
} //for each entity.
Explaining the script logic
In this section, we'll describe the script logic one section at a time.
- Define mappings between Planning and Strategic Modeling.
- Push data from Planning to Strategic Modeling.
// Define mappings for Account dimension members between PBCS and Strategic Models def smToPbcsAccountNameMap = ['v1000:010' : 'OFS_Product Revenue', 'v1000:020' : 'OFS_Services Revenue', 'v1000:030' : 'OFS_Support Revenue', 'v1020' : 'OFS_Discounts', 'v1040' : 'OFS_Total Cost Of Sales']
Define the Account mappings between Planning and Strategic Modeling.
Define the Year dimension mappings between Planning and Strategic Modeling.
Get the list of Strategic Modeling year names from the year map we defined in .
Get the list of Planning years from the year map.
Define the Planning to Strategic Modeling account mappings by reversing the array defined in . This is will be used later in the script.
This line demonstrates how to get scenario names from the Scenario map. This can be extended to use multiple scenarios.
["Operations US East", "Operations US West", "Operations US North", "Operations US South"].each
{ String modelName ->
Cube cube = operation.application.getCube("OEP_FS")
DataGridDefinitionBuilder defBuilder = cube.dataGridDefinitionBuilder()
defBuilder.addPov(['Period', 'Scenario', 'Currency', 'Version', 'Entity', 'Market', 'Plan Element', 'Product'], [ ['YearTotal'], [pbcsScenarioName], ['USD'], ['OEP_Working'], [modelName], ['US Market'], ['OFS_Direct Input'], ['Smart Phone 6 in'] ])
defBuilder.addColumn(['Years'], [ ['FY17', 'FY18'] ])
defBuilder.addRow(['Account'], [ ['OFS_Product Revenue', 'OFS_Services Revenue','OFS_Support Revenue','OFS_Discounts','OFS_Total Cost Of Sales','OFS_Other Revenue'] ])
DataGridDefinition gridDefinition = defBuilder.build()
DataGrid grid = cube.loadGrid(gridDefinition, true)
operation.application.getStrategicModel(modelName).withCloseable { smModel ->
DataGridBuilder gridBuilder = smModel.dataGridBuilder()
gridBuilder.addPov(smScenarioName)
gridBuilder.addColumn(smYears as String[])
double millionsScalingFactor = 0.000001
// Push to Strategic Model
grid.dataCellIterator('OFS_Product Revenue', 'FY17').each {
DataCell productRevenue18 = it.crossDimCell('OFS_Product Revenue', 'FY18')
gridBuilder.addRow([pbcsToSMAccountNameMap[it.accountName]], [it.data /
millionsScalingFactor, productRevenue18.data / millionsScalingFactor])
println(it.yearName + ", " + pbcsToSMAccountNameMap[it.accountName] + ", " +
it.data / millionsScalingFactor + ", " + productRevenue18.data / millionsScalingFactor)
DataCell servicesRevenue = it.crossDimCell('OFS_Services Revenue', 'FY17')  DataCell servicesRevenue18 = it.crossDimCell('OFS_Services Revenue', 'FY18')
gridBuilder.addRow([pbcsToSMAccountNameMap[servicesRevenue.accountName]], [servicesRevenue.data / millionsScalingFactor, servicesRevenue18.data / millionsScalingFactor])
println(it.yearName + ", " + pbcsToSMAccountNameMap[servicesRevenue.accountName] + ", " + servicesRevenue.data / millionsScalingFactor + ", " + servicesRevenue18.data / millionsScalingFactor)
DataCell adjRevenue = it.crossDimCell('OFS_Discounts', 'FY17')
DataCell adjRevenue18 = it.crossDimCell('OFS_Discounts', 'FY18')
gridBuilder.addRow([pbcsToSMAccountNameMap[adjRevenue.accountName]], [adjRevenue.data / millionsScalingFactor, adjRevenue18.data / millionsScalingFactor])
println(it.yearName + ", " + pbcsToSMAccountNameMap[adjRevenue.accountName] + ", " + adjRevenue.data / millionsScalingFactor + ", " + adjRevenue18.data / millionsScalingFactor)
DataCell cosRevenue = it.crossDimCell('OFS_Total Cost Of Sales', 'FY17')
DataCell cosRevenue18 = it.crossDimCell('OFS_Total Cost Of Sales', 'FY18')
gridBuilder.addRow([pbcsToSMAccountNameMap[cosRevenue.accountName]], [cosRevenue.data / millionsScalingFactor, cosRevenue18.data / millionsScalingFactor])
println(it.yearName + ", " + cosRevenue.accountName + ": " + pbcsToSMAccountNameMap[cosRevenue.accountName] + ", " + cosRevenue.data / millionsScalingFactor + ", " + cosRevenue18.data / millionsScalingFactor)
DataCell supportRevenue = it.crossDimCell('OFS_Support Revenue', 'FY17')
DataCell otherRevenue = it.crossDimCell('OFS_Other Revenue', 'FY17')
DataCell supportRevenue18 = it.crossDimCell('OFS_Support Revenue', 'FY18')
DataCell otherRevenue18 = it.crossDimCell('OFS_Other Revenue', 'FY18')
def totalRev17 = (supportRevenue.data / millionsScalingFactor) + (otherRevenue.data / millionsScalingFactor)
def totalRev18 = (supportRevenue18.data / millionsScalingFactor) + (otherRevenue18.data / millionsScalingFactor)
gridBuilder.addRow([pbcsToSMAccountNameMap[supportRevenue.accountName]], [totalRev17, totalRev18])
println(it.yearName + ", " + pbcsToSMAccountNameMap[supportRevenue.accountName] + ", " + totalRev17 + "," + totalRev18)
}
DataGridBuilder.Status status = new DataGridBuilder.Status()
DataCell servicesRevenue18 = it.crossDimCell('OFS_Services Revenue', 'FY18')
gridBuilder.addRow([pbcsToSMAccountNameMap[servicesRevenue.accountName]], [servicesRevenue.data / millionsScalingFactor, servicesRevenue18.data / millionsScalingFactor])
println(it.yearName + ", " + pbcsToSMAccountNameMap[servicesRevenue.accountName] + ", " + servicesRevenue.data / millionsScalingFactor + ", " + servicesRevenue18.data / millionsScalingFactor)
DataCell adjRevenue = it.crossDimCell('OFS_Discounts', 'FY17')
DataCell adjRevenue18 = it.crossDimCell('OFS_Discounts', 'FY18')
gridBuilder.addRow([pbcsToSMAccountNameMap[adjRevenue.accountName]], [adjRevenue.data / millionsScalingFactor, adjRevenue18.data / millionsScalingFactor])
println(it.yearName + ", " + pbcsToSMAccountNameMap[adjRevenue.accountName] + ", " + adjRevenue.data / millionsScalingFactor + ", " + adjRevenue18.data / millionsScalingFactor)
DataCell cosRevenue = it.crossDimCell('OFS_Total Cost Of Sales', 'FY17')
DataCell cosRevenue18 = it.crossDimCell('OFS_Total Cost Of Sales', 'FY18')
gridBuilder.addRow([pbcsToSMAccountNameMap[cosRevenue.accountName]], [cosRevenue.data / millionsScalingFactor, cosRevenue18.data / millionsScalingFactor])
println(it.yearName + ", " + cosRevenue.accountName + ": " + pbcsToSMAccountNameMap[cosRevenue.accountName] + ", " + cosRevenue.data / millionsScalingFactor + ", " + cosRevenue18.data / millionsScalingFactor)
DataCell supportRevenue = it.crossDimCell('OFS_Support Revenue', 'FY17')
DataCell otherRevenue = it.crossDimCell('OFS_Other Revenue', 'FY17')
DataCell supportRevenue18 = it.crossDimCell('OFS_Support Revenue', 'FY18')
DataCell otherRevenue18 = it.crossDimCell('OFS_Other Revenue', 'FY18')
def totalRev17 = (supportRevenue.data / millionsScalingFactor) + (otherRevenue.data / millionsScalingFactor)
def totalRev18 = (supportRevenue18.data / millionsScalingFactor) + (otherRevenue18.data / millionsScalingFactor)
gridBuilder.addRow([pbcsToSMAccountNameMap[supportRevenue.accountName]], [totalRev17, totalRev18])
println(it.yearName + ", " + pbcsToSMAccountNameMap[supportRevenue.accountName] + ", " + totalRev17 + "," + totalRev18)
}
DataGridBuilder.Status status = new DataGridBuilder.Status()  gridBuilder.build(status).withCloseable { smGrid ->
println("Total number of cells accepted: $status.numAcceptedCells")
println("Total number of cells rejected: $status.numRejectedCells")
println("First 10 rejected cells: $status.cellsRejected")
smModel.saveGrid(smGrid)
}
gridBuilder.build(status).withCloseable { smGrid ->
println("Total number of cells accepted: $status.numAcceptedCells")
println("Total number of cells rejected: $status.numRejectedCells")
println("First 10 rejected cells: $status.cellsRejected")
smModel.saveGrid(smGrid)
}
Iterate over multiple models using the withCloseable construct when getting the model name. The block of code within braces will be executed for each model in the array.
Construct the Planning grid to retrieve values which will be pushed to the Model.
For each Strategic Model, create the DataGridBuilder which will be used to construct the Strategic Modeling grid.
Construct an iterator that iterates over all data cells containing the “OFS_Product Revenue” member in the current input grid.
Cross dim into each of the Accounts in the grid and retrieve the value. Call the addRow method on the Strategic Modeling DataGridBuilder for each Account to add a row to the Strategic Modeling grid.
Create the Strategic Modeling grid and save the grid to check in the Model with the new data values pushed from Planning.
Adding the rule to the testing form
- From the home page, open the Navigator and click Forms (under Create and Manage).
- Expand the Library folder, and select Strategic Modeling.
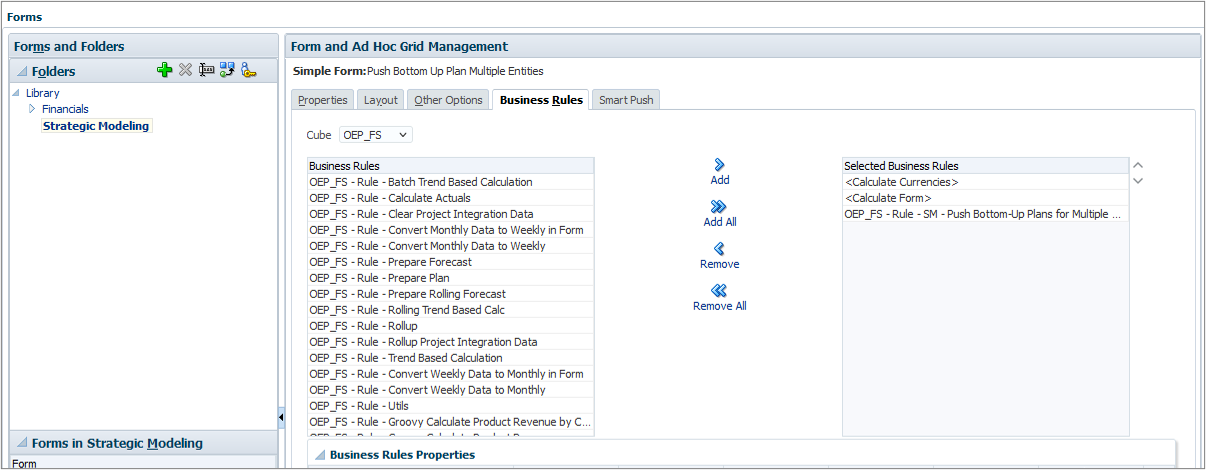
- Select the Push Bottom Up Plan Multiple Entities form, and click (Edit).
- Select the Business Rules tab. Add the SM - Push Bottom-Up Plans for Multiple Entities rule to the Selected Business Rules list.
- Click Finish to save the changes to the form.

Testing the Groovy rule
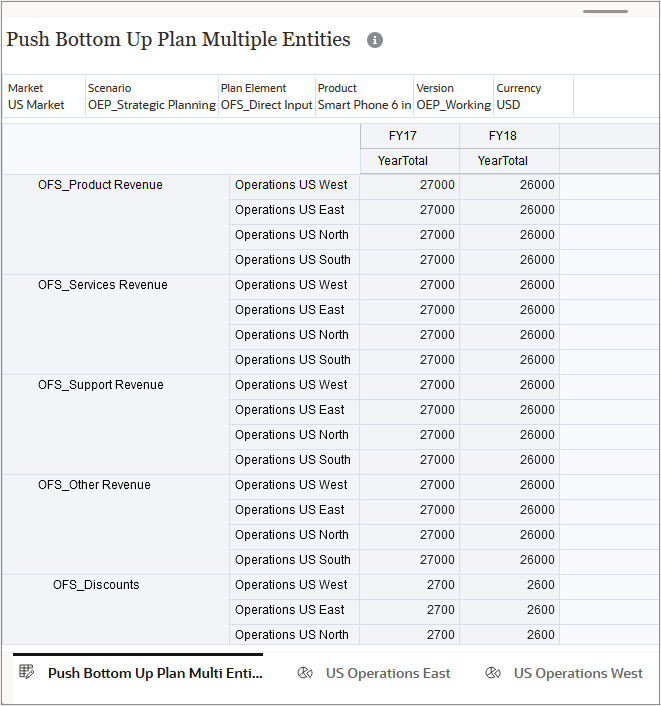
- From the home page, click Strategic Modeling, then select the Push Bottom Up Plan Multi card. Select the Push Bottom Up Plan Multi Entity horizontal tab.
- Click Actions, then select Business Rules. Click the SM - Push Bottom-Up Plans for Multiple Entities rule to launch it. Click OK at the confirmation message.
- Select the US Operations East horizontal tab. In the 2017 and 2018 columns, verify that the data was pushed from the expected accounts (for example, OFS_Product Revenue was pushed to v1000:010 Product Sales).
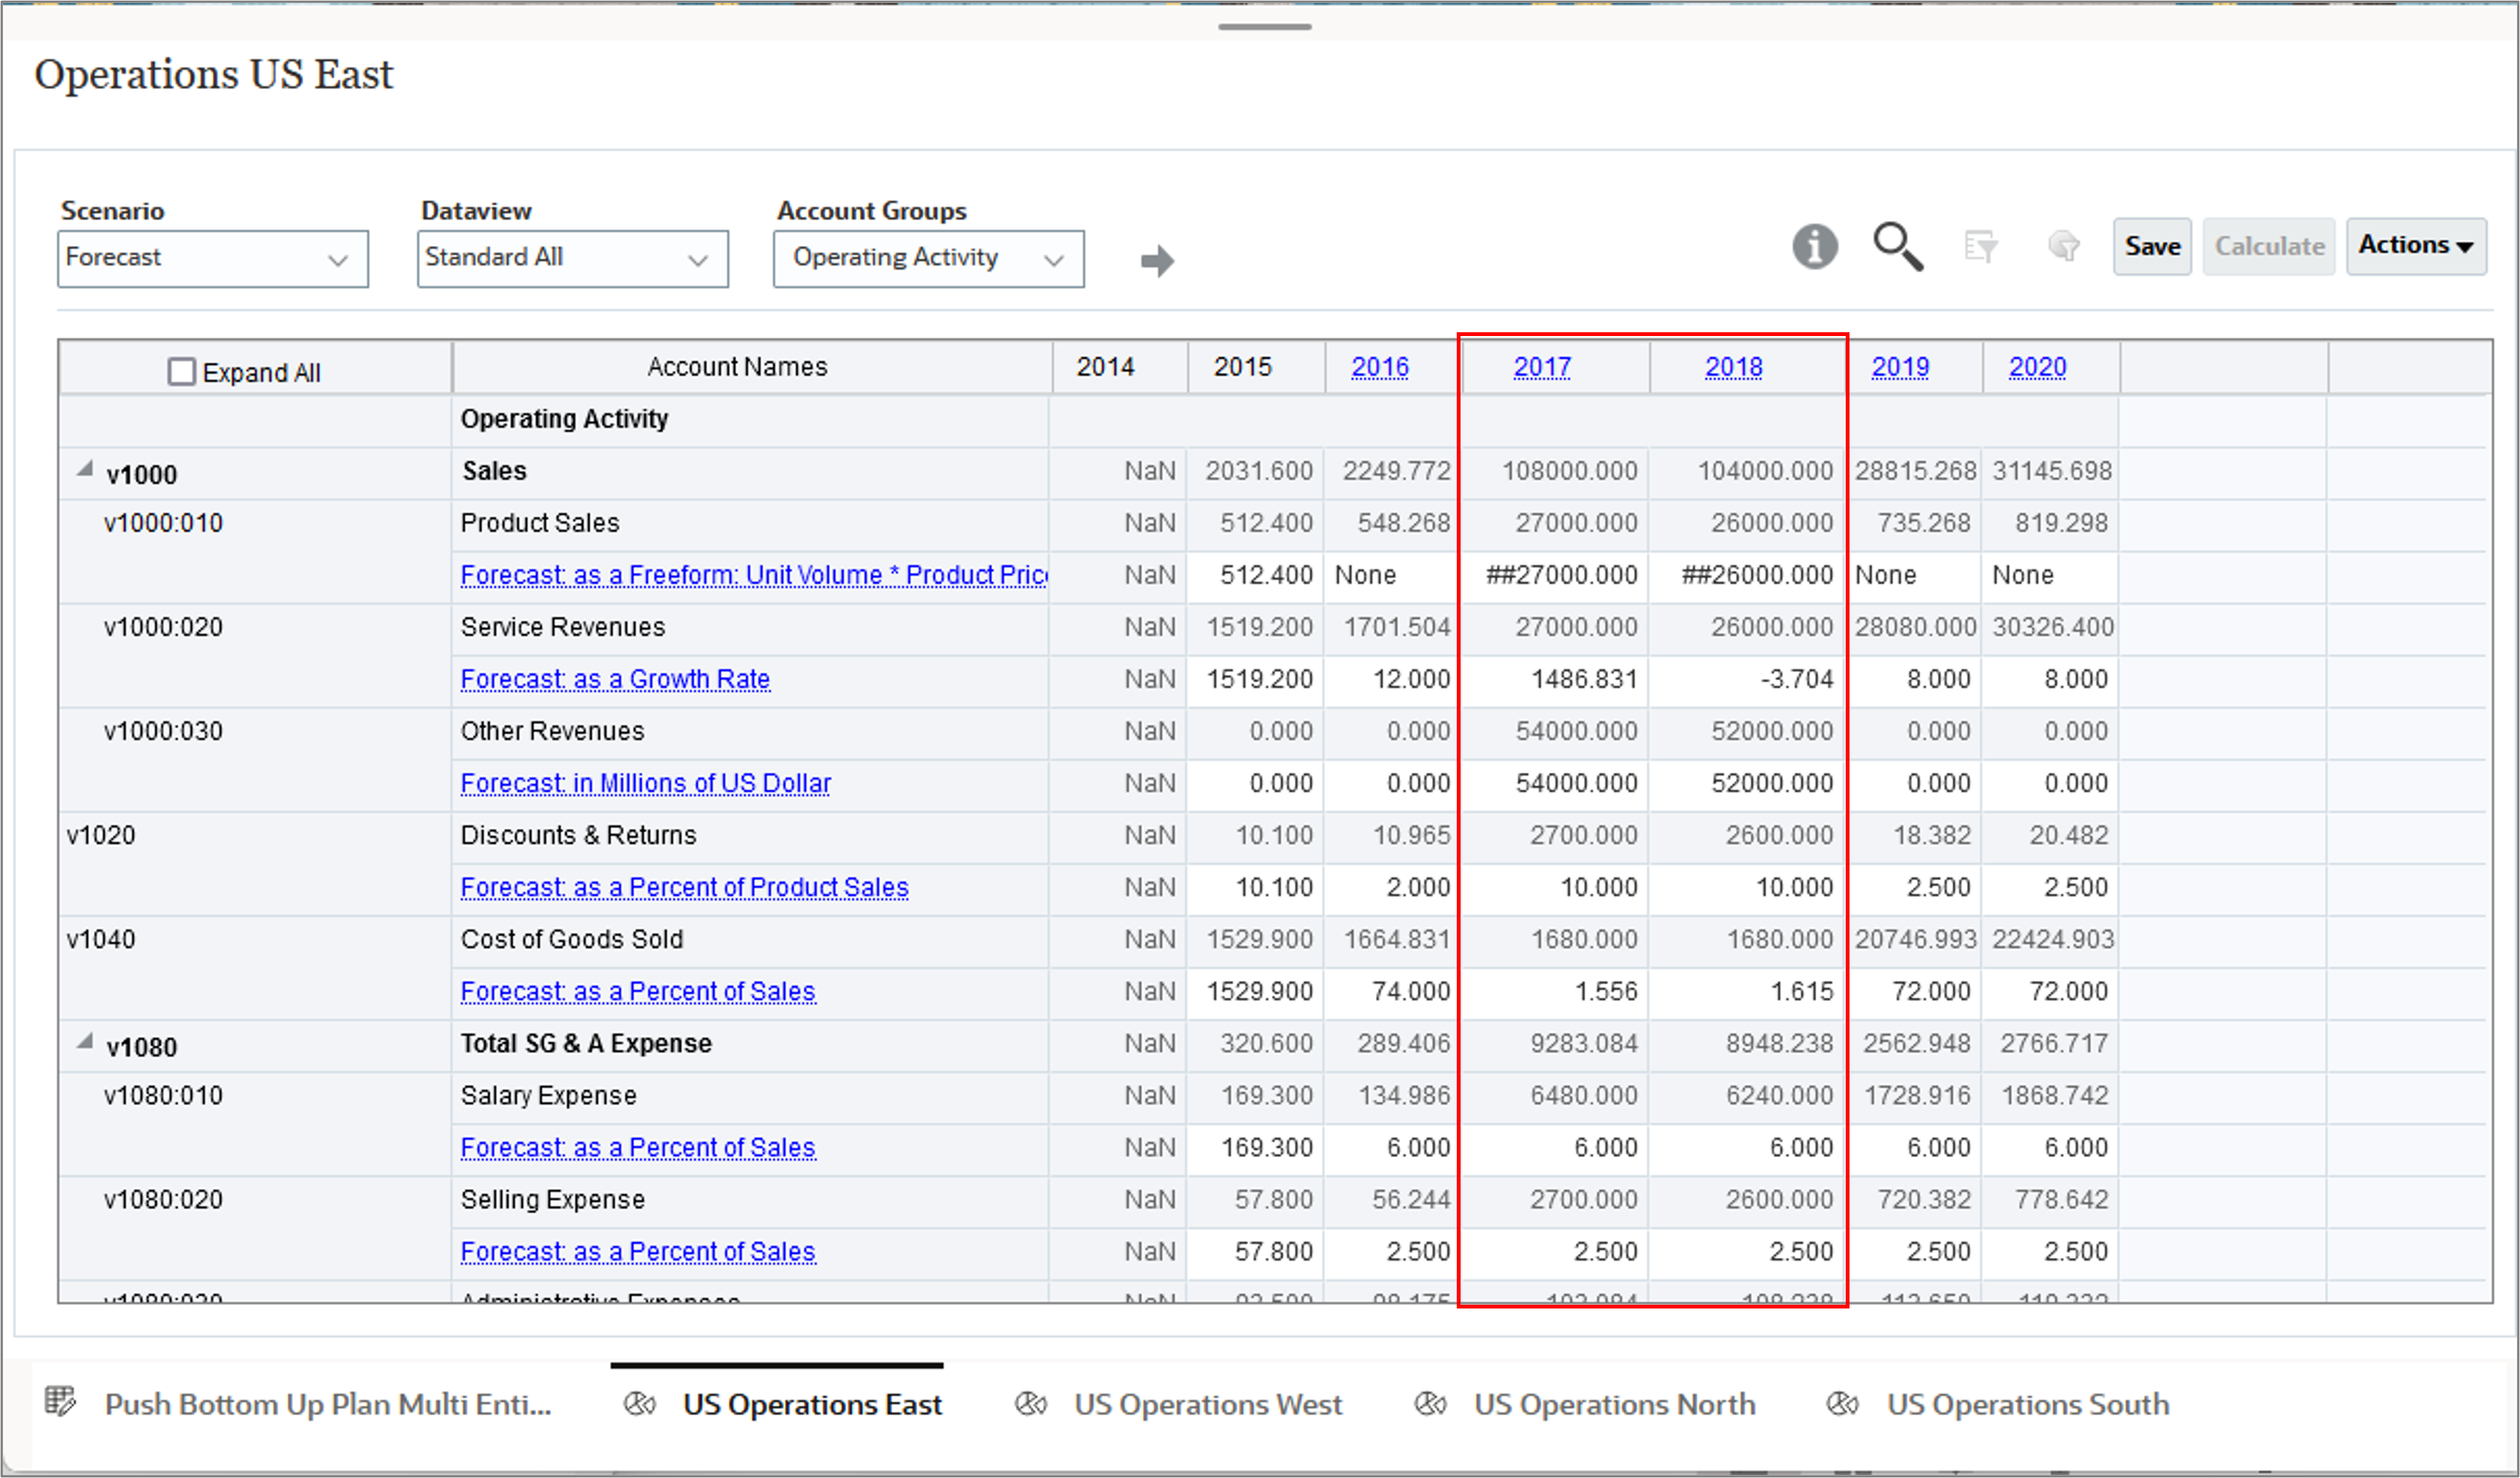
- Repeat the verification for each of the remaining Strategic Model tabs: US Operations West, US Operations North, and US Operations South.
Pushing multiple Strategic Models to multiple Planning entities
In this section, you create a Groovy rule to move data from multiple Strategic Models to Planning entities with the same name. After deploying the rule, you add it to the Planning form, then you test it in the form.
Understanding the source and target intersections
-
The following table shows the source intersections for the Strategic Model and the target intersections for Planning:
Strategic Modeling (Source) Planning (Target) Model:
Operations US East
Operations US West
Operations US North
Operations US SouthEntity:
Operations US East
Operations US West
Operations US North
Operations US SouthPOV:
Scenario: Forecast
POV:
Scenario: OEP_Strategic Planning
Market: US Market
Plan Element: OFS_Direct Input
Currency: USD
Version: Target
Product: Smart Phone 6 inColumn:
Period: 2017, 2018Column:
Years: FY17, FY18
Period: DecRows: Accounts Rows: Accounts v1000:010 (Product Sales) OFS_Product Revenue v1000:020 (Service Revenue) OFS_Services Revenue v1000:030 (Other Revenues) OFS_Support Revenue v1020 (Discounts & Returns) OFS_Adjustments to Revenue v1040 (Cost of Goods Sold) OFS_Other Cost of Sales v1080:010 (Salary Expense) OFS_Salaries v1080:020 (Selling Expense) OFS_Selling Expense v1110 (Depreciation Expenses) OFS_Depreciation
Creating the Groovy rule
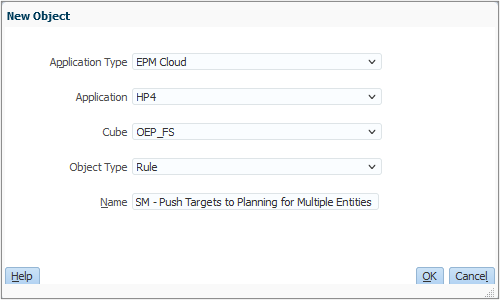
- Open Calculation Manager and create a rule named SM - Push Targets to Planning for Multiple Entities in the OEP_FS cube.
- In the Rule Editor, change the Designer option to Edit Script and set the Script Type to Groovy Script.
- Copy this script and paste it into the editor:
- On the toolbar, click (Save) to save the script.
- Click (Validate and Deploy). Click OK at the confirmation message.
// Define mappings for Account dimension members between PBCS and Strategic Models
def smToPbcsAccountNameMap = ['v1000:010' : 'OFS_Product Revenue', 'v1000:020' : 'OFS_Services Revenue', 'v1000:030' : 'OFS_Support Revenue', 'v1020' : 'OFS_Discounts', 'v1040' : 'OFS_Other Cost of sales', 'v1080:010' : 'OFS_Salaries', 'v1080:020' : 'OFS_Selling Expense', 'v1110' : 'OFS_Depreciation']

def smToPbcsScenarioNameMap = ['Forecast' : 'Target']
def smPbcsYearMap = ['2017':'FY17', '2018':'FY18']

List smYears = smPbcsYearMap.collect {it.key}
List pbcsYears = smPbcsYearMap.collect {it.value}

// Load data from Strategic Models to Planning entities
["Operations US East", "Operations US West", "Operations US North", "Operations US South"].each { String modelName ->
    def pbcsEntityName = modelName
    operation.application.getStrategicModel(modelName).withCloseable { smModel ->
        String smScenarioName = 'Forecast'
        def pbcsScenarioName = smToPbcsScenarioNameMap.get(smScenarioName) ?: smScenarioName

        DataGridDefinitionBuilder builder = smModel.dataGridDefinitionBuilder()
        builder.addPov(['Scenario'], [ [smScenarioName] ])
        builder.addColumn(['Time'], [ smYears ])
        println("SM Scenario Name: " + smScenarioName)
        println("Time: " + smYears)
        println("Accounts: " + smToPbcsAccountNameMap.collect {"""\"$it.key\""""})
        builder.addRow(['Account'], [ ['v1000:010', 'v1000:020', 'v1000:030', 'v1020', 'v1040', 'v1080:010', 'v1080:020', 'v1110'] ])

        DataGridDefinition gridDefinition = builder.build()
        DataGrid smGrid = smModel.loadGrid(gridDefinition);

        // Construct Planning grid
        Cube cube = operation.application.getCube("OEP_FS")
        DataGridBuilder gridBuilder = cube.dataGridBuilder("MM/DD/YYYY")
        gridBuilder.addPov('Dec','OEP_Strategic Planning', 'USD', pbcsScenarioName, pbcsEntityName,  'OFS_Direct Input', 'Smart Phone 6 in', 'US Market')
        gridBuilder.addColumn(pbcsYears as String[])

        def numDataCols = 2;
        def rowData = []
        smGrid.dataCellIterator().each {
            rowData << it.data * 0.000001
            if (rowData.size() == numDataCols) {
                def pbcsAccountName = smToPbcsAccountNameMap[it.accountName] ?: it.accountName
                println "${it.memberNames}: $rowData"
                gridBuilder.addRow([ pbcsAccountName], rowData)
                rowData = []
            }
        }

		smGrid.close()

        DataGridBuilder.Status status = new DataGridBuilder.Status()
        gridBuilder.build(status).withCloseable { DataGrid pbcsGrid ->
            println("Total number of cells accepted: $status.numAcceptedCells")
            println("Total number of cells rejected: $status.numRejectedCells")
            println("First 100 rejected cells: $status.cellsRejected")
            cube.saveGrid(pbcsGrid)
        }
    }// withCloseable
}// for each model
Explaining the script logic
In this section, we'll describe the script logic one section at a time.
- Define the mappings between Strategic Modeling and Planning.
- Load data from Strategic Models to Planning entities.
// Define mappings for Account dimension members between PBCS and Strategic Models def smToPbcsAccountNameMap = ['v1000:010' : 'OFS_Product Revenue', 'v1000:020' : 'OFS_Services Revenue', 'v1000:030' : 'OFS_Support Revenue', 'v1020' : 'OFS_Discounts', 'v1040' : 'OFS_Other Cost of sales', 'v1080:010' : 'OFS_Salaries', 'v1080:020' : 'OFS_Selling Expense', 'v1110' : 'OFS_Depreciation']
Define the Account mappings between Strategic Modeling and Planning.
Define the Scenario dimension mappings between Strategic Modeling and Planning.
Define the Year dimension mappings between Strategic Modeling and Planning.
["Operations US East", "Operations US West", "Operations US North",
"Operations US South"].each { String modelName ->
    def pbcsEntityName = modelName
    operation.application.getStrategicModel(modelName).withCloseable { smModel ->
        String smScenarioName = 'Forecast'
        def pbcsScenarioName = smToPbcsScenarioNameMap.get(smScenarioName) ?: smScenarioName

        DataGridDefinitionBuilder builder = smModel.dataGridDefinitionBuilder()
        builder.addPov(['Scenario'], [ [smScenarioName] ])
        builder.addColumn(['Time'], [ smYears ])
        println("SM Scenario Name: " + smScenarioName)
        println("Time: " + smYears)
        println("Accounts: " + smToPbcsAccountNameMap.collect {"""\"$it.key\""""})
        builder.addRow(['Account'], [ ['v1000:010', 'v1000:020', 'v1000:030', 'v1020',
        'v1040', 'v1080:010', 'v1080:020', 'v1110'] ])

        DataGridDefinition gridDefinition = builder.build()
        DataGrid smGrid = smModel.loadGrid(gridDefinition);

        // Construct Planning grid
        Cube cube = operation.application.getCube("OEP_FS")
        DataGridBuilder gridBuilder = cube.dataGridBuilder("MM/DD/YYYY")
        gridBuilder.addPov('Dec','OEP_Strategic Planning', 'USD', pbcsScenarioName, pbcsEntityName,  'OFS_Direct Input', 'Smart Phone 6 in', 'US Market')
        gridBuilder.addColumn(pbcsYears as String[])

        def numDataCols = 2;
        def rowData = []
        smGrid.dataCellIterator().each {
            rowData << it.data * 0.000001
            if (rowData.size() == numDataCols) {
                def pbcsAccountName = smToPbcsAccountNameMap[it.accountName] ?: it.accountName
                println "${it.memberNames}: $rowData"
                gridBuilder.addRow([ pbcsAccountName], rowData)
                rowData = []
            }
        }

		smGrid.close()

        DataGridBuilder.Status status = new DataGridBuilder.Status()
        gridBuilder.build(status).withCloseable { DataGrid pbcsGrid ->
            println("Total number of cells accepted: $status.numAcceptedCells")
            println("Total number of cells rejected: $status.numRejectedCells")
            println("First 100 rejected cells: $status.cellsRejected")
            cube.saveGrid(pbcsGrid)
        }
    }// withCloseable
}// for each model
Iterate over multiple models using the withCloseable construct when getting the model name. The block of code within braces will be executed for each model in the array.
Define the Scenario name.
Create the Strategic Modeling grid for each of the models.
Construct the Planning grid.
Iterate over the Strategic Modeling grid to retrieve data values and addRow on the Planning grid.
Create the Planning grid and save the grid with values pushed from Strategic Modeling.
Adding the rule to the testing form
- From the home page, open the Navigator and click Forms (under Create and Manage).
- Expand the Library folder, and select Strategic Modeling.
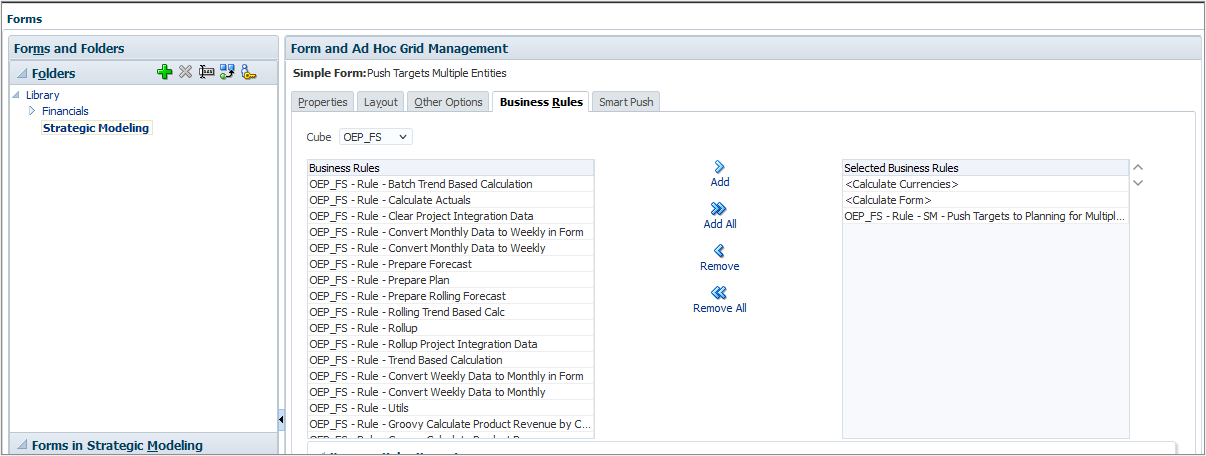
- Select the Push Targets Multiple Entities form, and click (Edit).
- Select the Business Rules tab. Add the SM - Push Targets to Planning for Multiple Entities rule to the Selected Business Rules list.
- Click Finish to save the changes to the form.
Testing the Groovy rule
- From the home page, click Strategic Modeling, then select the Push Targets Multi Entity card. Select the Push Targets Multi Entity horizontal tab.
- Click Actions, then select Business Rules. Click the SM - Push Targets to Planning for Multiple Entities rule to launch it. Click OK at the confirmation message.
- Compare the resulting data in the form to the data in the Strategic Modeling horizontal tabs (Operations West, Operations East, Operations North, and Operations South) to verify that the data was pushed from the expected accounts (for example, v1000:010 Product Sales was pushed to OFS_Product Revenue).
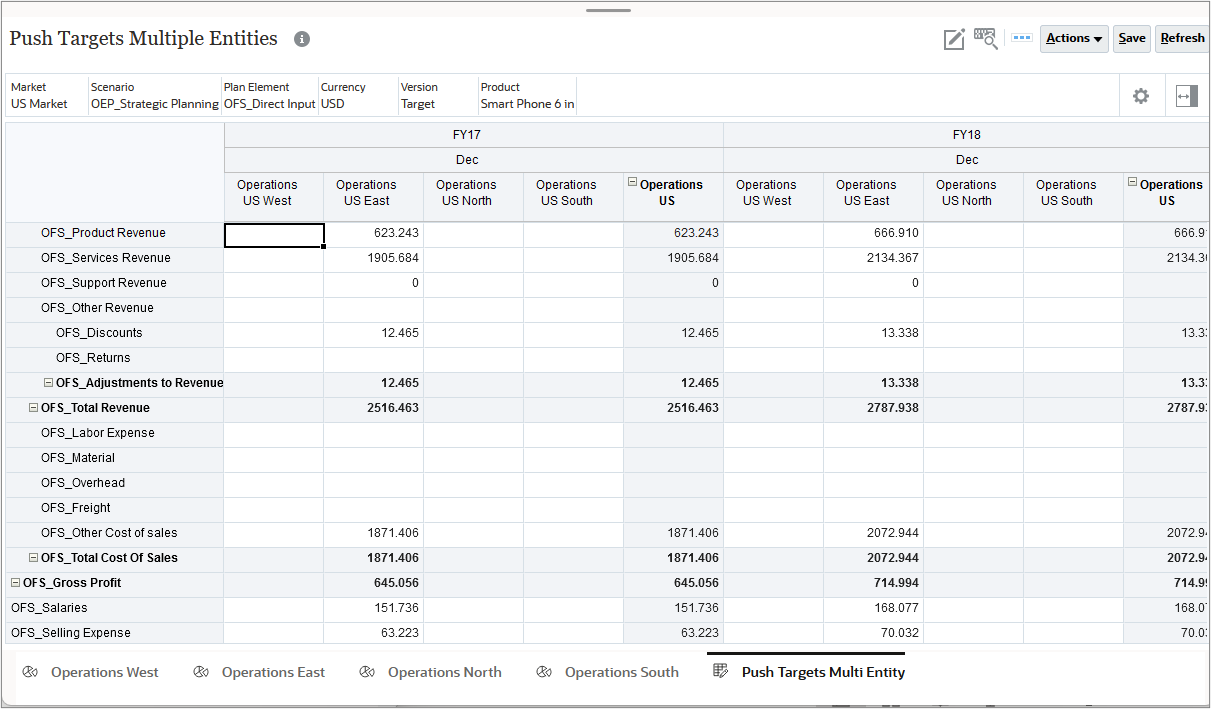
Note:
Notice that there is already data in Operations US East, which was pushed from Strategic Modeling when you ran the SM - Adjust Targets in Bottom-Up Plan rule earlier.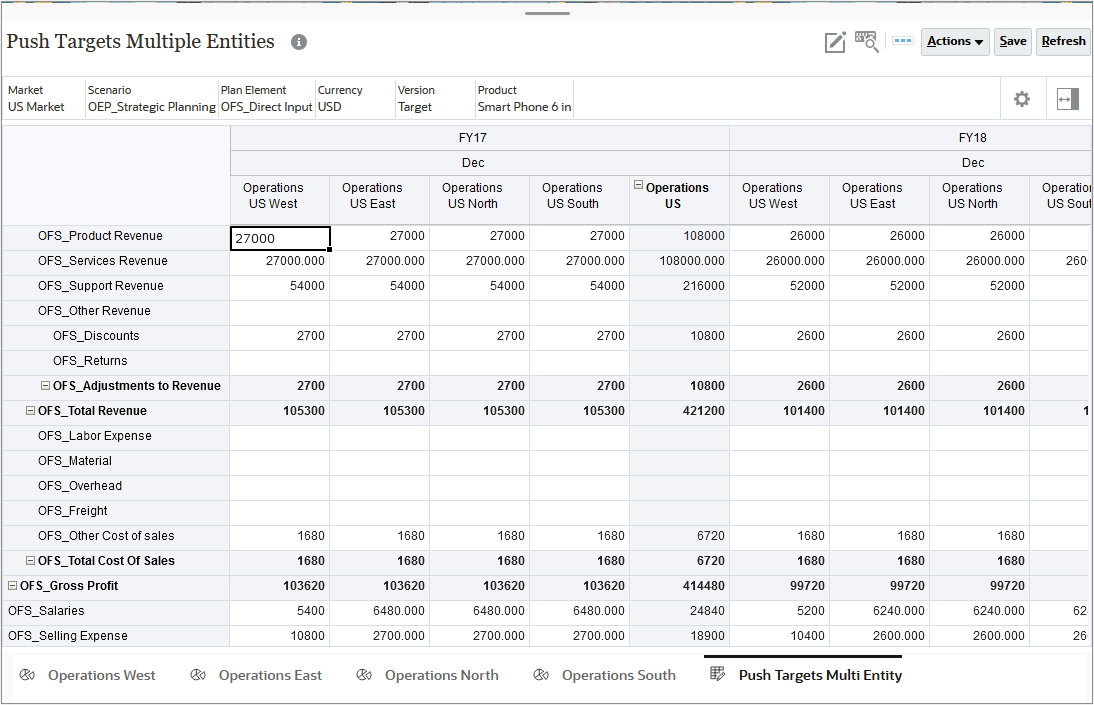
Related Links
- Integrating Strategic Models Using Groovy Rules (video)
- Groovy videos on Oracle EPM Tutorials YouTube channel
- EPM Cloud Planning - Groovy Tutorials
- Oracle Enterprise Performance Management Cloud, Groovy Rules Java API Reference
- REST API for Oracle Enterprise Performance Management Cloud
- Groovy Scripting Reference
Integrating data between Planning and Strategic Models using Groovy
F87767-01
November, 2023
Copyright © 2023, Oracle and/or its affiliates.